Tài liệu Thiết kế flash với flash cs5 part 54 pptx
Bạn đang xem bản rút gọn của tài liệu. Xem và tải ngay bản đầy đủ của tài liệu tại đây (640.15 KB, 5 trang )
ptg
342 Chapter 13
One of the cool features in Flash is its ability to work alpha channel
masks. Alpha masks are typically created within video-editing applica-
tions, such as Apple's Final Cut Pro or Adobe's Premiere. The process
involves opening the image within the video-editing application and
creating the transparency using a specific color (referred to as blue or
green screening), using luminosity levels, or actually creating a mask in
an image-editing application such as Adobe Photoshop, and then
importing the mask. For example, you could film yourself against a
green screen, and then mask those areas out. When you open the
movie in Flash, any other background you place behind the movie will
replace the original green screen. They do this in the movies all the
time.
Working with Alpha
Channel Masks
Work with Alpha Channel
Masks
Open your video-editing
application, and create a specific
alpha channel mask.
The mask represents the areas of
the movie for which you want to
maintain transparency.
Use your video-editing Export
command and then select the
Flash FLV format.
Click Options or select options for
exporting a Flash FLV file.
◆ If Options is not available, open
the Adobe Media Encoder
(from the desktop), add the FLV
file to the queue select a FLV
preset format, and then open
the Export Settings dialog box.
Click the Edit menu, and then
click Export Settings.
The Export Settings dialog box
appears, displaying tabs for
Source and Output.
3
2
1
3
2
11
From the Library of Wow! eBook
ptg
Chapter 13 Working with Video 343
Click the Source tab.
Select the Export Video check box.
Click the Video tab.
Select the Encode Alpha Channel
check box.
Click OK.
Click Save to save the file.
Open Flash Professional.
Click the File menu, point to
Import, and then click Import
Video.
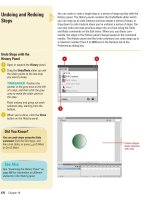
Use the steps outlined in “Using
the Video Import Wizard” on page
326.
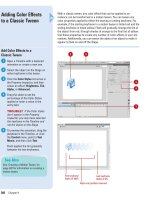
Move to the Timeline and create a
new layer directly underneath the
video layer, and name it backdrop.
Place an image in the backdrop
layer.
Click the Control menu, point to
Test Movie, and then click Test.
When you view the movie, the
areas designated as transparent
by the alpha channel mask will
display the contents of the
backdrop layer, directly through
the running video.
15
14
13
12
11
10
9
8
7
6
5
4
FLV masked movie
Backdrop image
13 14
See Also
See “Using the Video Import Wizard”
on page 326 for more information on
using the Video wizard.
See “Working with the Video Encoder”
on page 340 for information on Flash
video encoding settings.
15
8
4
7
5
6
From the Library of Wow! eBook
ptg
344 Chapter 13
Flash makes it easy to export a Flash document to a QuickTime video
using the QuickTime Export Settings dialog box. By default, Flash cre-
ates a QuickTime video of the complete source document with the
same dimensions. However, you can change the export options. In the
QuickTime Export Settings dialog box, you can set movie dimensions,
ignore stage color, specify when to stop exporting and where to store
temporary data, and set advanced QuickTime settings. The advanced
QuickTime settings are set for optimal playback. If you have experience
using QuickTime, you can set the advanced settings to customize the
results you want.
Exporting as a
QuickTime Video
Export Flash as a QuickTime
Video
Click the File menu, point to
Export, and then click Export
Movie.
Click the Format popup (Mac) or
Save As Type list arrow (Win), and
then click QuickTime (*.mov).
Type the new file name.
Navigate to the drive or folder
location where you want to save
the document.
Click Save.
The QuickTime Export Settings
dialog box opens.
If available, specify the width and
height in pixels you want for the
QuickTime video.
◆ To maintain t he same ratio of
width and height, select the
Maintain Aspect Ratio check
box.
To create an alpha channel us in g
the Stage color, select the Ignore
Stage Color (Generate Alpha
Channel) check box.
The alpha channel is encoded as a
transparent track, letting you
overlay the exported QuickTime
movie on top of other content to
alter the background color or
scene.
7
6
5
4
3
2
1
2
4
5
3
Extension Description
.swf Shockwave movie
.avi Audio Video Interleaved
.mov QuickTime
.gif Animated GIF
.wav Audio WAV
.jpg, .jpeg, .gif, .png Sequence of images for JPEG, GIF, or PNG
Supported Export Video Formats
From the Library of Wow! eBook
ptg
Chapter 13 Working with Video 345
Click the When Last Frame Is
Reached or After Time Elapsed
option and then specify the time
you want in the format
(hh:mm:ss.msec), where hh is
hours, mm is minutes, ss is
seconds, and msec is milli-
seconds.
Click the In Memory or On Disk
option to specify where you want
to store temporary data.
Click QuickTime Settings.
Select the Video check box, and
then click the buttons where you
want to make video option
changes.
◆ Settings. Select video
compression type, quality,
frame rate, and data rate.
◆ Filter. Select a video filter, such
as blur, emboss, sharpen, and
special effects.
◆ Size. Select a standardized
size, such as NTSC, PAL, etc.
Select the Sound check box, and
then click the buttons where you
want to make audio option
changes.
◆ Settings. Select sound
compression, sample rate,
sample bit size, and usage
(mono or stereo).
To optimize f or Internet streaming,
select the Prepare For Internet
Streaming check box, and then
select the option you want.
Click OK.
Click Export.
Upon completion, click OK.
16
15
14
13
12
11
10
9
8 67
8
9
14
13
11
12
10
15
From the Library of Wow! eBook
ptg
346 Chapter 13
The FLV (Flash Video) file format allows you to import or export a static
video stream including encoded audio. For example, you could use the
FLV format to save video for use with communications applications,
such as video conferencing. When an FLV clip is exported with stream-
ing audio, the audio is compressed using the Streaming Audio settings
in the Publish Settings dialog box, and the file is compressed. FLV files
can be used with Flash's new media components to create streaming
video files directly in a Flash movie. In order to use the FLV format, you
must first set up the video files for exporting. Any Flash document that
contains video clips will work. When FLV video files are played back,
they're handled as a progressive download—Progressive downloads
begin playing as soon as a certain percent of the complete file has
been transferred. The playback is not as quick as that provided by
streaming video, but it's not as slow as complete file download formats
such as the MPEG video.
Exporting as a FLV
File
Export Video Clips into the FLV
File Format
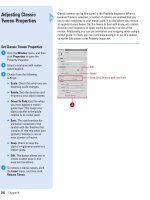
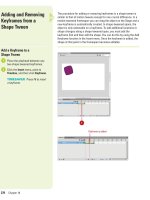
Select a video clip in the Library
panel.
Click the Libraries Options button,
and then click Properties.
Click Export.
Enter a name for the exported file.
Select a location where it will be
saved.
Click Save.
Click OK.
7
6
5
4
3
2
1
7
3
Did You Know?
You can use the Property Inspector to
modify a Flash FLV video clip.
Drag the
FLV video file onto the Stage, select the
video clip, and then open the Property
Inspector. The Property Inspector lets
you give the clip an instance name;
change the width, height, and registra-
tion point of the clip; and even swap a
video clip with another video clip.
5
6
4
From the Library of Wow! eBook