Sách hướng dẫn thắt và đan Macrame: Step by step macrame | Macrame Việt Nam 0865.427.6637
Bạn đang xem bản rút gọn của tài liệu. Xem và tải ngay bản đầy đủ của tài liệu tại đây (30.46 MB, 82 trang )
STEP-8¥-STEP
A COMPLETE INTRODUCTION TO THE CRAFT OF CREATIVE KNOTTING. ILLUSTRATED IN FULL COLOR
STEP-BY-STEP
I
macrame
A Complete Introduction to the Craft of Creative Knotting
By Mary Walker Phillips
Conceived and edited by
William and Shirley Sayles
@
GOLDEN PRESS· NEW YORK
WESTERN PUBLISHING COMPANY, INC.
Racine, Wisconsin
Foreword
It can be said that we live in a world occupied with the exploration of construction techniques-a world not particularly romantic or introspective.
Within the present decade weavers have been increasingly exploring the
possibilities of constructing fabrics without the aid of a loom. Exhibitions
of contemporary textiles include non-woven fabrics and forms in a variety
of techniques. In addition, many of the fabrics used for clothing and furnishing are non-woven, and designers predict that their use will increase
in the future. The fact that Mary Walker Phillips began her professional
career as a weaver and fabric designer, and is now recognized as our foremost creative knitter, establishes her as a leading force in the current
movement to explore non-woven constructions. Her interest in Macrame
has been in part the result of her understanding and response to fibers and
yarns and her adventure into research and delight in discovery.
Interest in knots has ranged from the intricacies of Leonardo da Vinci's
interlacings, outlining complex Renaissance theories, to the fanciful fringes
and embellishments of the Victorian era. Many cultures, ancient and contemporary, have used knotting as a means of fabric construction or decoration. This includes ritual masks of tribal Africa and fringes on Mexican
shawls. Perhaps the most vital heritage, however, has been that of the
sailor. Sailors, who have spent their lives with rope, twine, and cord and
their interlacings and fastenings, have named countless numbers of knots.
They have spent endless hours tying knots as part of their livelihood and
as a means of pleasure. Few are aware of the fanciful and creative forms
knotted by sailors in their spare time.
Mary Walker Phillips is fascinated by the relationship of the uncomplicated process of tying a knot to the clear and direct form of the knot itself.
In the process of knotting she ties, re-ties, and constructs to produce an
infinite variety of textures and shapes. Not always content with pure form,
however, she adds the dimension of function and insists on a high standard
of craftsmanship. This book was conceived and written to present clearly
outlined projects in Macrame-projects which demonstrate the possibilities
of the technique and the variety of functional and non-functional forms
which can be created. The emphasis is on the response of the eye and the
hand, and, ultimately, the individuality of the craftsman and the unique
qualities of his work.
MILTON SONDAY
Assistant Curator of Textiles
Cooper-Hewitt Museum of Design,
Smithsonian Institution
Fourteenth Printing, 1979
Library of Congress Catalog Card Number: 75-100337
© Copyright 1970 by Western Publishing Company, Inc. All rights reserved,
including rights of reproduction and use in any form or by any means,
including the making ofcopies by any photo process, or by any electronic or
mechanical device, printed or written or oral, or recording for sound or
visual reproduction or for use in any knowledge retrieval system or device,
unless permission in writing is obtained from the copyright proprietor.
Printed in the V.S.A. - Published by Golden Press, New York, N.Y.
GowEN® and GoLDEN PREss® are trademarks of Western Publishing
Company, Inc.
Contents
INTRODUCTION
4
EQUIPMENT
10
YARNS
11
PROJECT PREVIEWS
12
PREPARING THE YARN
14
PROJECTS
Sash 1 (Jute Sash)
Sasn 2 (Multicolor Sash)
Belts 1 and 2
Rugs
Blue and Gold Rug
Red Rug
Cavandoli Stitch
Wall Hanging or Purse
46
48
50
52
54
56
58
KNOTS
Square Knot, Half Knot
Half Hitch, Overhand Knot,
Double Chain Knot
Double Half Hitch-Horizontal
Double Half Hitch- Vertical, Diagonal
Double Half Hitch-Angling Technique
Headings and Picots
16
18
18
20
21
22
24
FINISHING-FRINGE; SPLICING
25
TEXTURE
26
WALL HANGINGS PORTFOLIO
Spirit of '76
Amigo
Bill's Folly, Animal Fair
Peking
Empress
Summer Sun
Stately Mansion
Christmas Bells, project
Cascade
Nightbird
Gazebo
COLOR AND DESIGN
28
INDEX
78
PROJECTS
Hanging Planters
Tote Bag
BIBLIOGRAPHY AND BOOK SERVICES
79
30
32
SUPPLIERS
79
PATIO HANGINGS
34
SCHOOLS AND WORKSHOPS
80
PROJECTS
Placemat
Bracelets and Beads
Room Divider
Pillow Cover
36
38
40
42
TWO EXAMPLES FROM MITLA
44
ACKNOWLEDGMENTS
Among those who have assisted in the preparation of this book, special thanks are due to:
Design and Production
Louis Mervar, Photography
Paul Goodfriend A ssociates, Diagrams
Remo Cosentino,
60
61
62
64
66
67
68
70
72
74
76
4
INTRODUCTION
MACRAMf
5
Introduction
Sylvia's Book of Macrame Lace, published in England in the 1880's,
states that "Goethe, somewhere or other, in exalting music above
every other art, does so on the ground that it produces its marvellous
·effects with so little display of means and tools; and if this test be
applied to our present work, it will rank very high . . . not even a
thimble and needle, are wanted to produce the charming effects of
our Macrame work."
Macrame can be practiced wherever you are, needing no more space
than your lap. The knots themselves are also simple and can be
easily followed from the diagrams given in this book.
KNOTS
Only two basic knots are involved- the Half Knot and the Half
Hitch-but it is the endless variations on these two knots that generate all the excitement in Macrame. The wonder of this craft is that
anything as simple as these two knots can produce such a variety of
beautiful things, and such fun in maki ng them. It is no surprise that
both those who have become devoted to Macrame and those who
are newly initiated find it difficult to leave their knotting boards.
A Macrame wall hanging adds a decorative
and exciting touch to what otherwise would be
a dull corner.
Macrame has been defined as the interknotting of yarns. It is, however, much more than that in terms of the satisfaction that you will
discover in the actual process of creating. The work is easier than
it seems; a knowledge of knots is all that is necessary to make the
most difficult-appeari ng knotting pattern.
This craft is now in the midst of a n enthusiastic revival, and I would
like to mention Virginia I. Harvey as one who has made a large
contribution to this resurgence of interest. I had already explored
this craft before seeing her book, Macrame: The Art of Creative
Knotting, but, like lots of others, I have benefited greatly from it.
M any of us who had been busy in other crafts are now using this
particular medium for several levels of expression- to create works
of art, such as the wall hanging shown at left, and to make practical
items for the home, such as the projects included in this book.
Macrame is for all, for young and old, male and female- for anyone
who is attracted by the beauty that exists in simple knots.
A SHORT BACKGROUND
M acrame, like many another craft, suffered a loss of popularity for
a time and became almost a lost art. When it was reintroduced
(Facing page) Wall hanging, "Variations #5", 7W' x 17lf2'', worked in
three colors-in black and white rug wool and brown P /2 lea linen .
1
6
INTRODUCTION
towards the end of the Victorian period, people enthusiastically
adopted it as a new craft, to such an extent that Sylvia was prompted
to write in her book: "This kind of fancy-work is not exactly a
novelty, except in the sense that when anything becomes so old as
to be forgotten, its revival has all the effects of a first appearance."
It was put to great use during this period, and elaborate fringes and
tassels were produced in enormous quantities to trim curtains, mantelpieces, shelves, and four-poster beds. Sylvia even prompted her
"fair reader . . . to work rich trimmings for black and coloured
costumes, both for home wear, garden parties, seaside ramblings,
and balls-fairylike adornments for household and underlinen...."
The earliest form of Square Knot work is said to have originated
in Arabia during the 13th century-Macrame comes from the Arabic
Migramah, which means ornamental fringe and braid. The Spaniards,
after learning the art from the Moors, spread it to southern Europe,
possibly as early as the 14th century-certainly by the 16th, since its
use is documented in a painting in Valladolid Cathedral, Spain.
A charming example of Cavandoli work can be
seen at the top of this Italian bag with Macrame fringe. Author's collection, gift from Don nie Mac Nab Brown.
Macrame was also popular in Italy around that time. In more recent
days, however, in Turin, at an open-air school called Casa del Sole,
young children-some five and six years old-became adept at doing
a form of Macrame called the Cavandoli Stitch. This stitch, created
by Mrs. Valentina Cavandoli to amuse and occupy the children in
her care, is worked in two colors and is really another name for work
produced by the Double Half Hitch. Some Cavandoli work is offered
on pages 56-57.
France has produced a great deal of Macrame, and there is sufficient historical data to suggest that it was an established art in that
country by the late 14th century. It is not known exactly when Le
Macrame, by Therese de Dill mont, was written, or even when her
Encyclopedia on Needlework, which contains a chapter on Macrame,
was published, but I would venture to say that it was in the early
1800's. The examples in these books are extremely interesting and
clearly exhibit the tremendous range of knotting possibilities.
Not to be overlooked is the contribution that seafaring men have
made to Macrame. It cannot be said when they first began knotting
to while away their long hours at sea, but as early as the 15th century they were using knotted articles for barter in India and China.
Outstanding examples of sailors' work are to be found in the many
maritime museums; two can be seen at the Seamen's Church Institute
of New York City. These are large picture frames made with heavy
seine twine, the traditional material used by maritime men.
Macrame is thought to have been introduced into England in the
late 1600's by Queen Mary, wife of William of Orange, who learned
the craft in Holland. During the time of George Ill, the knotting of
MACRAMt
(Above) American turn-of-the-century Macrame fringe for four-poster bed,
approximately 18" high. Collection of Cooper-Hewitt Museum of Design,
Smithsonian Institute.
(Right) American turn-of-the-century Macrame bag made of cotton cord,
approximately 14" high with fringe. Collection of Elizabeth T. Page.
7
8
INTRODUCTION
fringes was a great pastime; his wife, Queen Charlotte, in the 1780's
was making Macrame fringe at court.
PROJECTS
Since there are so many items that can be knotted, and such a variety
of knots to work them in, it might be difficult for the beginner to
know where to start. I have therefore presented a cross section of
items from the practical to the decorative. Seventeen projects are
included, with complete directions and diagrams wherever necessary.
In all instances, a handsome piece can be developed that will give
pleasure in the making and in the using as well.
The intention of this book in giving directions is to build confidence
so that each idea will be a springboard to your own creativity. Perhaps, after doing a few projects, you will want to try your own ideas,
or perhaps you will want to vary a project by adding a knotting
variation. By all means do so, and to aid you in this there is information on yam, color, design, and texture. This information,
together with the knowledge you will have gained from the explanatory text and the diagrams of the knots, should enable you to start
on the road to designing your own pieces.
SAMPLERS
Method of working in Macrame on a knotting
board, with the article placed and pinned against
guidelines. Here a new cord is being added on with
a row of Horizontal Double Half Hitches.
Making samplers of each knot, and in all its variations, will pay
dividends in the understanding that you will soon have of the knotting process. Eventually, you will be able to tell how a piece of
Macrame was knotted by just looking at it.
Until a complete knowledge of the knots is achieved, it is recommended that the beginner make samplers in one color-natural or
white-since the knots will then be easier to see. Use as many variations on the knots as you wish. By using three different yams, even
greater interest is added. Experiment to your heart's content and
then put what you have learned into a finished piece.
REFERENCES
At the conclusion of this book there is an index for quick reference,
a list of suppliers of materials, a bibliography, and a list of bookdealers. Also listed are schools and workshops where courses in Macrame are offered periodically.
(Facing page) Detail of wall hanging, " Variations # 11", 12" x 64", using
natural 11!2 lea linen and tan and dark green rug wool. Collection of W.
Easton Pribble.
MACRAM~
9
10
E QU I P M E N T
Scissors
"T" Pins
Yarns
Embroidery Needles
Crochet Hook
Woodstrips
Ruler
Beads and Rings
Knotting Board
Equipment
The basic tools for Macrame work are simple and consist of scissors, "T' pins, and a knotting board. All other items are accessories
or adornments. The em broidery needle and crochet hook are used
occasionally for finishing off; chopsticks, hardwood, beads, rings,
and loops for headings and decorations. Two metal loops make a
belt buckle, as shown on pages 50-51.
THE KNOTTING BOARD
The knotting board is the working surface; the one shown is a piece
of Celotex, an insulating material, covered with brown wrapping
paper. Celotex can be cut into various sizes; a good selection to have
would be sizes 12" x 24", 20" x 36", and 24" x 48", or whatever
other size suits the piece you plan to make. In place of Celotex,
padded cardboard may be used or cork covered with paper. The
important thing is that the board be lightweight, rigid, yet pliable
enough so that pins can be easily inserted.
MACRAMt
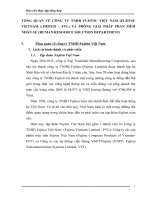
YARNS
Yarns used for Macrame should be strong enough to withstand the
abrasion that knotting produces and should not have a lot of give
or elasticity. Smooth-surfaced yams are best since they are the most
satisfactory to work with and do not detract from the textural interest of the knots.
Knitting yarns are not desirable since they have too much elasticity,
but some can be used once their limitations are understood and
samplers have been made with them. Yams used for Irish sweaters
usually have less elasticity than do knitting worsteds and can be
tested and considered for use in stoles and pillow covers.
1. # 1 Rattail rayon
2. Silk cord
3. 1'/z Lea linen
4. 10/ 5 Linen
5. 40 / 12 Linen cable
6. 12/ 16 Linen cable
7. Linen cable
8. Marline twine
2
Jute is an effective material, not too costly, and the thickness of the
yam gives quick results. One word of caution, however: jute is not
colorfast, so it is best not worked in colors if the piece is to be subjected to direct natural or electric light for any length of time. Seine
twine, an old favorite of knotters, is excellent. It is stiffer than most
twine but can be made pliable by rinsing in a fabric softener. Heavy
rope, twine, and cord purchased in hardware stores can also be tried.
Wool, linen, and silk are also excellent.
4
In many cases I have used fine linen and silk doubled, tripled and
so on until I obtained the thickness necessary for the weight needed
(as in Gazebo, pages 76-77). I have also combined two thicknesses
of linen and one of rug wool for scale and texture, as in the black
and white rug sample, page 57. This technique adds a new dimension
to a piece and makes possible the use of yams that could not be
used to advantage singly.
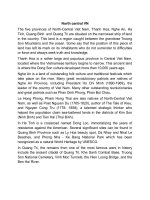
Handspun yams of quality lend themselves well to the more knowledgeable knotter. The Indians of Mitla, Mexico, who work beautifully in Macrame, do a great deal of their knotting in these yarns.
Two examples of their work are shown on pages 44- 45. Very heavy
unspun roving provides scale and is interesting when combined with
other yams, as in Cascade, pages 72-73.
Mexican ixtle
Jute-Tone
African sisal
Leather lacing
Avanti rug wool
Pat rug wool
Wool roving
1
The two hanging planters on page 31 were knotted with marline
twine, obtained at marine supply stores. It is a fairly stiff material
and so does not lend itself well to the Double Half Hitch Knot, but,
since it does withstand the weather, I have used it to make outdoor
hangings, such as shown on pages 34-35.
Linen has a wide latitude of colors and weights and is one of the
most desirable of knotting yams. It is one of my favorites because
it has the strength and diversity of character that few other yarns
offer. It combines well with wool and silk, as can be seen in the wall
hangings shown in this book. Because of its fraying qualities, however, Ilh lea linen requires skill to use. Silk is not the easiest of
yams to obtain but is well worth the effort involved in finding it.
9.
10.
11.
12.
13.
14.
15.
11
:>
- ==""
"
-
~
--
3
5
6
7
8
9
10
.
0
,
-~
:
J
.
•
.
0
11
12
13
14
15
.
...
,.,
~
'-
--.
•
•
-,.p
.
12
P R 0 J EC T P R EV I EW S
Project Previews
A few projects that appear in this book are shown on these two
pages to introduce you to Macrame pieces that you can make. I
have tried to present a varied arrangement throughout to suit different interests, tastes, and developments of skill.
In addition to the many pieces that I made for the projects-which
include hanging planters, tote bag, placemat, wall hangings, purse,
bracelets, room divider, pillow cover, and sashes and belts, plus ideas
for others-! have also presented some of my wall hangings (an example is on the facing page), and have described them as to technique, knots, and materials used . This analysis was done not so that
you could copy the individual pieces, but so that you would be better able to understand the progression of knots in their variations
and how their combination can produce a work of art. Rugs and
mats, also included as projects, are a relatively new departure for
Macrame and one that I hope you will find exciting.
This combination of projects and analysis of technique offers the best
way to begin your adventure into Macrame. While the pieces presented are all different, they have one thing in common- they are
all made up of the two basic knots (the Half Hitch and the Half
Knot) and their variations.
As you build up your skills and become more and more intrigued
with the interplay of knotting patterns and yam textures, new ideas
and endless possibilities for further exploration will open up before
you.
(Left) Hanging vase-see page 31.
(Below) Belt #2-see pages 50-51.
MACRAME
13
Pillow cover- see pages 42- 43.
Blue and gold rug-see pages 52- 53.
Wall hanging, Spirit of '76-see pages 60-61.
14
PREPA RI N G TH E YA RN
Preparing the Yarn
The yarn is prepared for knotting by calculating the length of the
ends and measuring off. An end is an individual ~ength of yarn.
F
G
H
HOW TO CALCULATE
The ends should be 31h. to 4 times longer than the piece you plan
to make, but since they are doubled in half for knotting, they are
measured 7 to 8 times longer. For example, if the piece will have a
finished length of 1 yd., measure each end to 7 or 8 yds. When each
end is doubled for knotting, it will then be two ends, each 3'12 to 4
yds. long. Measure ends generously and then add to them. This is
no time to apply "Waste not, want not." It is better to have extra
yarn than to run short and have to add at an inconvenient place in
the design. If, however, you should be in this situation, see Splicing,
page 25.
c
(Above) Ends being measured off on
a warping board. Note the cross between G ahd H. (Below) Ends can also
be measured off on an expanding hat
rack.
G
H
Making a Sampler. Heavy yarns take up more length in knotting than
lightweight ones, so allow for this in the calculations. Make a sampler,
at least 3" x 6", to gauge the length and to see how many ends will
be needed for the width. To determine the number, tie four ends
into a Square Knot (see pages 16- 17) and measure the knot's width.
If it is 'h.", for example, you know you will need eight ends to the
inch.
When you know what you want to make, or if you are searching
for ideas, knot the yarn in several ways to know how it will tie and
to gauge its texture and desirability. Keep notes of the amount
used, its source, the number of ends and their length. Such records
are valuable when planning future Macrame pieces.
MEASURING OFF ENDS
Warping Board. Once you know how long the ends should be, measure them off. This can be done with a 'h. yd. x l yd. weaver's warping board. Begin by cutting one end, in a contrasting color, to the
calculated length. Tie this measuring cord around peg A and wind
it out to its full length as shown in the diagram. Making a cross between pegs G and H keeps the ends in order. With the measuring
cord as guide, measure off the ends and cut them at peg A. In this
way, ends may be removed in sections, and measurements will not
be lost. To keep easier count of the ends, tie every group of ten with
a loose loop of contrasting yarn.
Other Methods. If you don't have a warping board, C-clamps, or
Close·up of cross, showing loose loop
of contrasting yarn separating the
ends.
holding pegs, can be used. Attach clamps to opposite ends of a table
and wind the yarn from peg to peg. Remember to make the cross.
There is still another method. It takes longer, but it works. Mea-
MAC RAM~ 15
sure the yarn against a yardstick, then cut it. Keeping this end as the
measuring cord, measure off the needed number of ends.
MOUNTING ENDS
Knotting Board. The board is covered with brown wrapping paper,
which affords good contrast to the yarns. To ready the board, pull
the paper tightly, tape it on the reverse side, and mark it off into
1" squares. These guidelines will help you knot to the proper length
and width. Work at the board in the way most comfortable for you
-1 usually sit with the board leaning against a table edge and resting in my lap. A convenient point to begin the work is usually the
middle of the board, or about I 0" from the bottom. As knotting
progresses, move the work upward.
Holding Cord. The ends are knotted onto a holding cord (a horizontal
length) with the Reversed Double Half Hitch Knot (see diagram;
also page 17) or onto a chopstick, ring, bracelet or whatever you feel
suits the piece. They can also be looped around "T" pins.
Tie an Overhand Knot onto each side of the holding cord and pin
securely to the knotting board. The cord must be kept taut. At times
it is also used as a knot-bearing cord (over which knots are tied);
in that case, make an Overhand Knot on one side only, preferably
the left.
Hand bobbin
Making a
butterfly
Hand Bobbin: Wind the ends in circles around
the fingers and fasten with a Square Knot when
ends reach about 18" from holding cord.
Butterfly: Clasp loose end of yarn and wind
length in figure 8's as shown.
As each end is knotted onto the holding cord, pin it to the board.
Move pins down constantly as the work progresses. They should
never be more than an inch from the working area and can even be
just in the row above. Slant pins away from you, and anchor them
firmly. If the design should become irregular, either the pinning is
not sufficient or some knots are being tied too tightly.
WINDING ENDS
When ends are too long to handle convemently, their lengths can be
reduced by making hand bobbins or butterflies (see diagrams), or by
using rubber bands. Each end is wound separately.
KNOTS
Only two elementary knots are essential to Macrame- the Half Knot,
also called the Macrame Knot; and the Half Hitch. There are various
combinations of these knots, some distinctive enough to have their
own names. Different texts refer to them under different names but,
once seen, they can be recognized as old friends.
Knots can be easily learned from the diagrams in this book. In addition to those in the section on Knots which follows, others are included in the book where they apply. Practice them by making
samplers, using different yams and doubling the number of ends.
Make the knots in light-colored yarns so that they will be easier to
see.
Two Reversed Double Half Hitches shown
mounted on a holding cord. The two Overhand
Knots on either side are pinned securely to the
knotting board.
THINGS TO REMEMBER
Keep the holding cord in a steady position
when mounting ends.
Keep the knot·bearing cord motionless
and taut when in use.
Tie every knot close to the previous knot
unless the design directs otherwise. ·
Keep ends straight, in order, and not
twisted, particularly when knots are being
made over them.
Ends are always doubled in half before
knotting begins. When the number of cut
ends is given in the projects, this always
refers· to measured·off ends and not to
doubled ends.
16
K N0 TS
#1
#2
#3
# 4 This sinnet is a combination of
left-right. right-left Half Knots.
MACRAM~
17
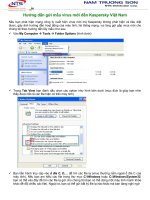
The Square Knot and The Half Knot
The Square Knot is made up of two Half Knots, one going to the
left, the other to the right. Four ends are used; the center two, known
as fillers or core ends, are held taut until the knot is completed. As
you practice you will be making sinnets (braided cordage), as seen
on the facing page. The knotting patterns below correspond by
number with those used in the sinnets illustrated. In Sinnet # 1 the
knotting pattern consists of a series of Square Knots. In Sinnets #2
and #3, using a Square Knot and a Reversed Square Knot respectively, a twist effect is obtained in the lower sections by repeating the Half Knot. Sinnet #4 is a combination of the lower sections
of Sinnets # 2 and # 3. In Sinnets # 1 and # 4 the last knot is
shown in construction.
D
How to mount ends on holding cord
with Reversed Double Half Hitches.
TO MAKE SINNETS ON FACING PAGE:
# 1 Square Knot
# 2 Square Knot with Half Knot
twist
# 3 Reversed Square Knot with
Half Knot twist
Half Knot, left·right
Square Knot, left·t'ight,
right·left, completed. Con·
tinue with series of Square
Knots.
Square Knot
Reversed Square Knot
Continue Half Knot, left·
right, to make twist.
Continue Half Knot, right·
left, to make twist.
Squa-re Knot sinnet of leather made into handles adds new interest to old
'
bureau drawers.
18
KN0TS
#5
#6
#7
#8
#9
MAC RAM
t
19
The Half Hitch~ The Overhand Knot
The Half Hitch is the most practical knot in Macrame since a number of variations may be obtained from it. The Overhand Knot is
tied in a way somewhat similar to the Half Hitch but is applied differently. A series of Overhand Knots using either a single end or
multiends creates texture. It also can be used to end a sinnet. In
diagram #7, it is used between Square Knots for added interest.
The Double Chain Knot can be made with two ends or multiends.
Using it in two colors with a heavy yam makes an interesting sash.
The construction of all these knots can be easily followed from the
diagrams. In each case the knotting patterns correspond by number
with those used in the sinnets on the facing page.
# 5 Half Hitch Knot
Continue for sinnet.
# 6 Overhand Knot, two ends
Continue for sinnet.
TO MAKE SIN NETS ON FACING PAGE:
upper
portion
lower
portion
# 7 Square Knot with Overhand
Knot on core ends
#8 Alternating Half Hitches and
Reversed Double Half Hitches
# 9 Double Chain Knot with four
ends
20
KN0 TS
The Double Half Hitch
It would be difficult to say which of the Double Half Hitch variations gives the most exciting results. They are certainly all distinctive. This book contains several projects that well illustrate the endless possibilities of this important and versatile knot. Three versions
are diagrammed here-the Horizontal, Vertical, and Diagonal. Each
end goes over the knot-bearing cord twice while completing the row
(making two Half Hitches). Keep the knot-bearer secure across each
row and held sharply in the determined direction. Draw up knots
closely and pin each row after completion. The knot-bearer must be
measured off longer than other ends.
TO MAKE HORIZONTAL ROWS:
A End # 1 is knot-bearer.
8 With end # 2, make Double Half
Hitch.
Sampler showing Horizontal, Vertical,
and Diagonal Double Half Hitches.
56
3 4
2
3 4
C Repeat for end # 3.
0 Complete row and return.
1
2
4
56
56
MAC RAM~
21
TO MAKE VERTICAL ROWS:
C Return
B Continue
A Start
TO MAKE DIAGONAL ROWS:
C Start 2nd row with end # 2
as knot·bearer.
B With each end, make Double Half Hitch.
A End # 1 is knot·bearer.
1
2
2
3
D Method of crossing ends when diagonal rows meet.
8
Continue by making a row of knots with end # 7,
then tie it over end # 1.
4
5 3
4
E To create open spaces, diagonal rows are not crossed.
3
4
1
2
7
8
5
6
22
KN0 T S
To start
2
3
4
5
6
7
8
To start, loop ends around " T" pins and begin
1st row of Horizontal Double Half Hitches
FACING PAGE:
A, B, C Start angling technique, working from
left to right .
D To continue, end # 5 is brought to hori·
zontal position and Horizontal Double Half
Hitches start with end # 6.
AA To reverse angling pattern direction .
BB To vary color pattern.
Sampler # 1
Sampler #2
Double Half Hitch (Angling Technique)
The Horizontal and Vertical Double Half Hitches can be varied in
an angling technique which makes color changes possible, as well
as the creating of pointed areas for profile shaping.
Sampler # 1 consists of two angled sections made independently
with Horizontal Double Half Hitches. The yarn is knotted from right
to left for the first section and then from left to right. This alternating is continued until the desired length is reached. The second
section is done in the same way, but the knotting starts from left
to right. When both sections are the same length, they are interlocked simply by being placed together and secured with a row of
Horizontal Double Half Hitches on a holding cord.
Sampler # 2 consists of interknotting of colors by the angling tech-
Interlocking method for Sampler # 1
nique. One by one ends are worked across in rows of Horizontal
Double Half Hitches and are left on the right side. After a number
of ends have been done, they are brought straight down and are
used as knot-bearing cords for Vertical Double Half Hitches. The
diagrams dem onstrate the technique used.
MAC RAM
5
6
7
5
8
6
7
6
7
8
1
t
23
2
4
.5
5
6
6
7
7
8
1
8
1
2
3
2
4
812
3
4
24
KN0 TS
Headings and Picots
There are various ways of mounting ends onto a holding cord and
some are very decorative.
The picots shown here are looped knots used to give variation to
edge headings and other areas where a lacy effect is desired. Note
the Hanging Vase on page 31.
#1
#2
#3
# 1 Reversed Double
Half Hitch
#2 Double
Half Hitch
# 3 Double Half
Hitch with Picot
# 4, # 5 Square Knot and
Square Knot with Picots
#5
#4
#6
# 6 Picot, Square, Overhand ,
and Square Knots
# 8 Picot, Reversed
Double Half Hitch
#7
#8
#9
# 9 Series of picots