Tài liệu Managing the Desktop pptx
Bạn đang xem bản rút gọn của tài liệu. Xem và tải ngay bản đầy đủ của tài liệu tại đây (436.3 KB, 33 trang )
Chapter
5
Managing the Desktop
MICROSOFT EXAM OBJECTIVES COVERED IN
THIS CHAPTER
Configure and troubleshoot desktop settings.
Configure support for multiple languages or multiple locations.
Enable multiple-language support.
Configure multiple-language support for users.
Configure local settings.
Configure Windows 2000 Professional for multiple locations.
Configure and troubleshoot accessibility services.
Copyright © 2000 SYBEX Inc., Alameda, CA.
www.sybex.com
W
indows 2000 Professional offers many options for con-
figuring the Desktop to suit personal preferences. These options include cus-
tomizing the Taskbar and Start menu, creating shortcuts, and setting display
properties.
Windows 2000 Professional also includes support for multiple languages
and regional settings. The support that comes with localized versions of
Windows 2000 Professional allows users to view, edit, and print multi-
lingual documents. You can also specify locale settings for the Desktop to
customize items like the date and currency for your geographical location.
Accessibility options are used to support users with limited sight, hearing,
or mobility. You can configure the Desktop and use Windows 2000 Profes-
sional utilities to provide a higher degree of accessibility.
This chapter describes how to manage Desktop settings, multilanguage
support, and accessibility options.
Managing Desktop Settings
T
he
Desktop
, shown in Figure 5.1, appears after a user has logged on
to a Windows 2000 Professional computer. Users can configure their Desk-
tops to suit their personal preferences and to make their work more efficient.
Copyright © 2000 SYBEX Inc., Alameda, CA.
www.sybex.com
Managing Desktop Settings
209
As an administrator, you may need to troubleshoot an improperly config-
ured Desktop.
By default, the items listed in Table 5.1 appear on the Desktop.
FIGURE 5.1
The Windows 2000 Desktop
Microsoft
Exam
Objective
Configure and troubleshoot desktop settings.
Copyright © 2000 SYBEX Inc., Alameda, CA.
www.sybex.com
210
Chapter 5
Managing the Desktop
TABLE 5.1
Default Desktop Items
Item Description
My Documents By default, stores the documents
that are created. Each user has a
unique
My Documents
folder, so
even if multiple users share the
same computer, they will each have
unique personal folders.
My Computer Provides access to all local and net-
work drives, as well as Control Panel.
My Computer
is used to view and
manage the computer.
My Network Places Provides access to shared resources.
My Network Places
is used to con-
nect to resources such as local net-
work resources and Web resources.
Recycle Bin Holds files and folders that have
been deleted. Files can be retrieved
or cleared (for permanent deletion)
from the
Recycle Bin
.
Internet Explorer Along with an Internet connection,
provides an interface for accessing
the Internet or a local intranet.
Inter-
net Explorer
is the built-in Web
browser.
Taskbar Contains the Start button to open
the
Start menu
and buttons for any
programs, documents, or windows
that are running on the computer.
You can easily switch between
open items by clicking the item in
the
Taskbar
.
Connect to the Internet Starts a Wizard to configure your
Internet connection.
Copyright © 2000 SYBEX Inc., Alameda, CA.
www.sybex.com
Managing Desktop Settings
211
You can configure the Desktop by customizing the Taskbar and Start
menu, adding shortcuts, and setting display properties. These configurations
are described in the following sections.
Customizing the Taskbar and Start Menu
Users can customize the Taskbar and Start menu through the Taskbar and
Start Menu Properties dialog box, shown in Figure 5.2. The easiest way to
access this dialog box is to right-click a blank area in the Taskbar and choose
Properties from the pop-up menu.
FIGURE 5.2
The General tab of the Taskbar and Start Menu Properties dialog box
The Taskbar and Start Menu Properties dialog box has two tabs:
General and Advanced. The options on these tabs are described in the
following sections.
Configuring General Properties
Through the General tab of the Taskbar and Start Menu Properties dialog
box (see Figure 5.2), you can specify Taskbar and Start menu features such
Copyright © 2000 SYBEX Inc., Alameda, CA.
www.sybex.com
212
Chapter 5
Managing the Desktop
as whether the Taskbar is always visible and whether small icons are used on
the Start menu. Table 5.2 lists the properties on the General tab.
TABLE 5.2
General Taskbar and Start Menu Properties
Property Description
Always on Top Specifies that the Taskbar will al-
ways be displayed, even if you
maximize another window. This op-
tion is enabled by default.
Auto Hide Hides the Taskbar. This option is
disabled by default. When it is en-
abled, you show the Taskbar by
clicking the area of the screen
where the Taskbar appears.
Show Small Icons in Start Menu Reduces the size of the icons that
are displayed on the Start menu.
This option is disabled by default.
You might enable it if you have
many icons and want to display
more options without needing to
scroll.
Show Clock Displays a digital clock in the right
corner of the Taskbar. By right-
clicking the clock, you can adjust
the computer’s date and time. This
option is enabled by default
Use Personalized Menus Hides applications that have not
been recently used. You can ac-
cess the hidden applications by
clicking the arrow at the bottom of
the Programs menu. This option is
enabled by default.
Copyright © 2000 SYBEX Inc., Alameda, CA.
www.sybex.com
Managing Desktop Settings
213
Configuring Advanced Properties
The Advanced tab of the Taskbar and Start Menu Properties dialog box,
shown in Figure 5.3, allows you to customize your Start menu. You can add
or remove items from the Start menu, remove records of recently accessed
items, and specify which options are displayed.
FIGURE 5.3
The Advanced tab of the Taskbar and Start Menu Properties dialog box
To add an option to the Start menu, click the Add button in the upper-
right corner of the Advanced tab. This starts a Wizard that guides you
through the process of creating a shortcut that will be placed on the Start
menu. To delete a Start menu option, click the Remove button. If you want
to remove the records that Windows 2000 Professional keeps of recently
accessed documents, programs, and Web sites, click the Clear button. The
Advanced button allows you to add or remove items from the Start menu
through Windows Explorer. If you want to return to the defaults for the Pro-
gram menu, click the Re-sort button.
Copyright © 2000 SYBEX Inc., Alameda, CA.
www.sybex.com
214
Chapter 5
Managing the Desktop
The Start Menu Settings section of the Advanced tab allows you to con-
figure various Start menu features. These settings are listed in Table 5.3. By
default, all of these options are disabled for new users.
TABLE 5.3
The Start Menu Settings
Setting Description
Display Administrative Tools Specifies whether Administrative
Tools appears on the Programs menu
Display Favorites Specifies whether the Favorites
menu appears on the Start menu.
Display Logoff Specifies whether the Logoff menu
appears on the Start menu
Expand Control Panel Specifies that you want the contents
of Control Panel to be displayed in a
menu instead of a window
Expand My Documents Specifies that you want the contents
of My Documents to be displayed in
a menu instead of a window
Expand Network and Dial-Up
Connections
Specifies that you want the contents
of Network and Dial-Up Connections
to be displayed in a menu instead of
a window
Expand Printers Specifies that you want the contents
of Printers to be displayed in a menu
instead of a window
Scroll the Programs Menu Specifies that you want the contents
of Programs to be displayed in a
scrolling menu instead of listed in
columns
Copyright © 2000 SYBEX Inc., Alameda, CA.
www.sybex.com
Managing Desktop Settings
215
In Exercise 5.1, you will check your current Taskbar and Start menu config-
uration and then set general and advanced Taskbar and Start menu properties.
EXERCISE 5.1
Configuring Taskbar and Start Menu Options
1.
Select Start
Programs. Note the size of the icons in the Start menu.
Notice that there is no Programs menu item for Administrative Tools
or Windows Explorer.
2.
Select Start
Settings
Control Panel. A window with all of the
Control Panel contents appears.
3.
Right-click an empty space on the Taskbar and choose Properties.
4.
In the General tab of the Taskbar and Start Menu Properties dialog
box, select the Show Small Icons in Start Menu check box.
5.
Click the Advanced tab. Click the Add button. In the Create Shortcut
dialog box, type
Explorer
in the Type the Location of the Item text box
and click the
Next
button. In the Select Program Folder dialog box,
accept the default folder of Programs and click the Next button. In the
Select a Title for the Program dialog box, edit the name for the short-
cut to
Windows Explorer
and click the Finish button.
6.
In the Start Menu Settings section of the Advanced tab, check the
Display Administrative Tools and Expand Control Panel check
boxes. Click the Apply button, then click the OK button.
7.
Select Start
Programs and note the size of the icons in the Start
menu. Notice that the Programs menu lists Administrative Tools and
Windows Explorer.
8.
Select Start
Settings
Control Panel. Notice that the Control Panel
contents are displayed in a menu.
9.
Edit the Taskbar and Start Menu properties as you like, or return
them to their default settings.
Copyright © 2000 SYBEX Inc., Alameda, CA.
www.sybex.com
216
Chapter 5
Managing the Desktop
Using Shortcuts
Shortcuts
are links to items that are accessible from your computer or net-
work. You can use a shortcut to quickly access a file, program, folder,
printer, or computer from your Desktop. Shortcuts can exist in various loca-
tions, including on the Desktop, on the Start menu, and within folders.
To create a shortcut from Windows Explorer, just right-click the item you
want to create a shortcut to and select Create Shortcut from the pop-up
menu. Then you can click the shortcut and drag it to where you want it to
appear.
In Exercise 5.2, you will create a shortcut and place it on the Desktop.
Setting Display Properties
The options in the Display Properties dialog box, shown in Figure 5.4, allow
you to customize the appearance of your Desktop. You can access this dialog
box by right-clicking an empty area on the Desktop and selecting Properties
from the pop-up menu. Alternatively, you can select Start
Settings
Con-
trol Panel
Display.
EXERCISE 5.2
Creating a Shortcut
1.
Select Start
Programs
Accessories
Windows Explorer to start
Windows Explorer.
2. Expand My Computer, then Local Disk, then WINNT, then System32.
3. Right-click calc.exe and select Create Shortcut. You see an icon
labeled Shortcut to calc.exe.
4. Click the Shortcut to calc.exe icon and drag it to the Desktop.
Copyright © 2000 SYBEX Inc., Alameda, CA.
www.sybex.com
Managing Desktop Settings 217
FIGURE 5.4 The Display Properties dialog box
The Display Properties dialog box has six tabs with options that control
various aspects of your display:
The Background tab lets you pick your Desktop background, which
uses a picture or an HTML document as wallpaper.
The Screen Saver tab lets you select a screen saver that will start after
the system has been idle for a specified amount of time. You can also
specify a password that must be used to reaccess the system after it has
been idle. When the idle time has been reached, the computer will be
locked, and you must enter the password of the user who is currently
logged on to access the computer.
The Appearance tab has choices for the color scheme used for the
Desktop.
The Web tab lets you select whether or not you want to use the Active
Desktop, which makes your Desktop look and work like a Web page.
The Effects tab lets you set special visual effects for the Desktop.
Copyright © 2000 SYBEX Inc., Alameda, CA.
www.sybex.com
218 Chapter 5
Managing the Desktop
The Settings tab is used to configure display properties, which are not related
to user preferences. Configuring the display is covered in Chapter 4, “Config-
uring the Windows 2000 Environment.”
In Exercise 5.3, you will configure display options.
Through the Mouse and Keyboard icons in Control Panel, you can specify
your personal preferences for mouse and keyboard settings. Mouse and key-
board properties are covered in Chapter 4, “Configuring the Windows 2000
Environment.”
EXERCISE 5.3
Configuring Display Options
1. Right-click an unoccupied area on the Desktop and select Properties
to open the Display Properties dialog box.
2. In the Background tab, select Prairie Wind as wallpaper. From the
Picture Display drop-down list, select Stretch.
3. Click the Screen Saver tab, select the Starfield Simulation screen
saver, and specify a wait of five minutes.
4. Click the Appearance tab, select the Red, White, and Blue (VGA)
Scheme. Click the OK button to see your new display settings.
5. Set the display properties to suit your personal preferences, or reset
them to their default values.
Copyright © 2000 SYBEX Inc., Alameda, CA.
www.sybex.com
Managing Multiple Languages and Regional Settings 219
Managing Multiple Languages and Regional
Settings
Windows 2000 Professional supports multiple languages through the
use of multilanguage technology. Multilanguage technology is designed to
meet the following needs:
Provide support for multilingual editing of documents
Provide support for different language interfaces in your environment
Allow users who speak different languages to share the same computer
Choosing Windows 2000 Multiple-Language Support
Multilanguage support consists of two technologies:
Multilingual editing and viewing, which supports multiple languages
while a user is viewing, editing, and printing documents
Multilanguage user interfaces, which allow the Windows 2000 Pro-
fessional user interface to be presented in different languages
Depending on the level of language support that your environment
requires, you may use either a localized version of Window 2000 Profes-
sional or the Multilanguage version of Windows 2000 Professional. The fol-
lowing sections describe these versions and how to configure multilanguage
support.
Microsoft
Exam
Objective
Configure support for multiple languages or multiple
locations.
Enable multiple-language support.
Configure multiple-language support for users.
Configure local settings.
Configure Windows 2000 Professional for multiple locations.
Copyright © 2000 SYBEX Inc., Alameda, CA.
www.sybex.com
220 Chapter 5
Managing the Desktop
Using Localized Windows 2000
Microsoft provides localized editions of Windows 2000 Professional. For
example, users in the United States will most likely use the English version,
and users in Japan will most likely use the Japanese version.
Localized versions of Windows 2000 Professional include fully localized
user interfaces for the language that was selected. In addition, localized ver-
sions include the ability to view, edit, and print documents in more than 60
different languages. However, localized versions do not support multi-
language user interfaces.
Using Windows 2000 Multilanguage Version
Windows 2000 Multilanguage Version provides user interfaces in a number
of different languages. This version is useful in multinational corporations
where users speak different languages and must share computers. It is also
useful in cases where administrators want to deploy a single version of Win-
dows 2000 Professional worldwide. You can manage multiple users who
share a single computer and speak different languages through user profiles
(covered in Chapter 8, “Using User Profiles and Hardware Profiles”) or
through group policies (covered in Chapter 7, “Managing Groups”).
Two sets of files are necessary to support Windows 2000 Multilanguage
Version:
Language groups, which contain the fonts and files that are required
to process and display a specific language
Windows 2000 Professional Multilanguage Version files, which contain
the language content required by the user interface and help files
When you install Windows 2000 Multilanguage Version, you select the ini-
tial language that will be installed on the computer. For each language that you
wish to use, you must also have the appropriate language group installed. For
example, if you want to use the Japanese user interface, you must also install
the Japanese language group. If you want to install other language support
after installation, you can install and remove Windows 2000 Multilanguage
Version files and language groups through Regional Options in Control Panel.
Each instance of Multilanguage Version files will use approximately 45MB of
disk space. You can edit the default user language interface or add or remove
user interface languages through the Muisetup.exe file.
Copyright © 2000 SYBEX Inc., Alameda, CA.
www.sybex.com
Managing Multiple Languages and Regional Settings 221
Windows 2000 Multilanguage Version supports the following languages:
Windows 2000 Multilanguage Version is not available through retail stores.
You need to order this version of Windows 2000 Professional through
Microsoft Volume Licensing Programs. You can get more information about
the multilanguage version at www.microsoft.com/licensing.
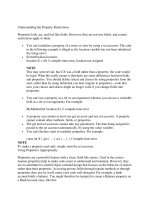
Enabling and Configuring Multilingual Support
On a localized version of Windows 2000 Professional, you enable and con-
figure multilingual editing and viewing through Regional Options in Con-
trol Panel. To access the Regional Options dialog box, shown in Figure 5.5,
select Start Settings Control Panel Regional Options.
In the list box at the bottom of the Regional Options dialog box, check the
language settings that you wish to support on the computer. After you click
OK, you may be prompted to insert the Windows 2000 Professional CD to
copy the distribution files required for multiple-language support. Then you
will need to restart your computer for the new changes to take effect.
Arabic French Norwegian
Brazilian German Portuguese
Chinese
(Simplified)
Greek Russian
Chinese
(Traditional)
Hebrew Polish
Czech Hungarian Spanish
Danish Italian Swedish
Dutch Japanese Turkish
Finnish Korean
Copyright © 2000 SYBEX Inc., Alameda, CA.
www.sybex.com
222 Chapter 5
Managing the Desktop
FIGURE 5.5 The Regional Options dialog box
After your computer restarts, you will notice a new icon on the Taskbar
that shows the current locale and keyboard inputs that are being used. You
can switch to another supported language by clicking this icon and selecting
the locale input you wish to use.
In Exercise 5.4, you will configure your computer for multilanguage support.
Configuring Locale Settings
You can also configure locale settings for numbers, currency, time, date, and
input locales (which allows you to select the input language you will use).
Like multilingual support, these settings are made through the Regional
EXERCISE 5.4
Configuring Multiple-Language Support
1. Select Start Settings Control Panel Regional Options.
2. In the Regional Options dialog box, select the language settings that
you wish to support on the computer. Then click the OK button.
3. If prompted, insert the Windows 2000 Professional CD to copy the
distribution files required for multilanguage support.
4. Restart your computer.
Copyright © 2000 SYBEX Inc., Alameda, CA.
www.sybex.com
Configuring Accessibility Features 223
Options dialog box (see Figure 5.5). Simply select the locale (location) for the
regional settings that you want to use from the drop-down list at the top of
the dialog box.
In Exercise 5.5, you will configure the locale settings on your computer.
Configuring Accessibility Features
Windows 2000 Professional supports users with limited sight, hear-
ing, or mobility through accessibility options and accessibility utilities. The
following sections describe how to use these accessibility features.
Setting Accessibility Options
Through Accessibility Options in Control Panel, you can configure key-
board, sound, display, mouse, and general properties of Windows 2000 Pro-
fessional for users with special needs. To access the Accessibility Options
EXERCISE 5.5
Configuring Locale Settings
1. Select Start Settings Control Panel Regional Options. In the
Regional Options dialog box, note your current locale.
2. Click the Numbers, Currency, Time, and Date tabs and note the
configurations.
3. Click the General tab and select the Danish locale (location) from the
drop-down list at the top of the dialog box. Then click the Apply button.
4. Click the Numbers, Currency, Time, and Date tabs and note the
configurations.
5. Click the General tab and reset your locale to the original configuration.
Then click the Apply button.
Microsoft
Exam
Objective
Configure and troubleshoot accessibility services.
Copyright © 2000 SYBEX Inc., Alameda, CA.
www.sybex.com
224 Chapter 5
Managing the Desktop
dialog box, shown in Figure 5.6, select Control Panel Accessibility
Options.
FIGURE 5.6 The Accessibility Options dialog box
This dialog box has five tabs with options to configure special behavior
for your computer:
The Keyboard tab allows you to specify whether you want to use
StickyKeys, FilterKeys, and ToggleKeys. StickyKeys allows the use of
the Shift, Ctrl, or Alt key in conjunction with another key, one key at
a time. FilterKeys ignores brief or repeated keystrokes. ToggleKeys
makes a noise whenever you press the Caps Lock, Num Lock, or Scroll
Lock key.
The Sound tab allows you specify whether you want to use Sound-
Sentry, which generates a visual warning whenever the computer
makes a sound, and ShowSounds, which displays captions for speech
and sounds on your computer.
Copyright © 2000 SYBEX Inc., Alameda, CA.
www.sybex.com
Configuring Accessibility Features 225
The Display tab allows you to configure high-contrast settings for
Windows colors and fonts.
The Mouse tab allows you to specify whether you want to use
MouseKeys, which allows you to control the mouse pointer through
the keyboard.
The General tab allows you to configure several maintenance and
administrative options. You can choose to automatically reset acces-
sibility features after these features have been idle for a specified
amount of time and to use notification features to notify you when
accessibility features are turned on or off. You can also configure SerialKey
devices to provide alternative access to keyboard and mouse features.
Administrative options allow you to apply accessibility options to the
logon Desktop and to defaults for new users.
Using Accessibility Utilities
Windows 2000 provides several accessibility utilities. These utilities include
the Accessibility Wizard, Magnifier, Narrator, On-Screen Keyboard, and
Utility Manager.
The Accessibility Wizard
The Accessibility Wizard configures a computer based on the user’s vision,
hearing, and mobility needs. The Accessibility Wizard has the user select the
text size that is the easiest to read. It also collects input to determine if the
user has difficulty with vision, hearing, and mobility.
The Magnifier Utility
The Magnifier utility creates a separate window to magnify a portion of your
screen, as shown in Figure 5.7. This option is useful for users who have poor
vision. To access Magnifier, select Start Programs Accessories Acces-
sibility Magnifier.
Copyright © 2000 SYBEX Inc., Alameda, CA.
www.sybex.com
226 Chapter 5
Managing the Desktop
FIGURE 5.7 The Magnifier utility
The Narrator Utility
The Narrator utility can read aloud on-screen text, dialog boxes, menus, and
buttons. This utility requires that you have some type of sound output device
installed and configured. To access Narrator, select Start Programs
Accessories Accessibility Narrator. This brings up the dialog box shown
in Figure 5.8.
FIGURE 5.8 The Narrator dialog box
Copyright © 2000 SYBEX Inc., Alameda, CA.
www.sybex.com
Configuring Accessibility Features 227
The On-Screen Keyboard
The On-Screen Keyboard displays a keyboard on the screen, as shown in
Figure 5.9. Users can use the On-Screen Keyboard keys through a mouse or
another input device as an alternative to the keys on the regular keyboard.
To access the On-Screen Keyboard, select Start Programs Accessories
Accessibility On-Screen Keyboard.
FIGURE 5.9 The On-Screen Keyboard
The Utility Manager
The Utility Manager allows you to start and stop the Windows 2000 Profes-
sional accessibility utilities. You can also specify whether these utilities are
automatically started when Windows 2000 Professional starts or when the
Utility Manager is started. To access the Utility Manager, select Start Pro-
grams Accessories Accessibility Utility Manager. Figure 5.10 shows
the Utility Manager.
FIGURE 5.10 The Utility Manager
Copyright © 2000 SYBEX Inc., Alameda, CA.
www.sybex.com
228 Chapter 5
Managing the Desktop
In Exercise 5.6, you will use the Windows 2000 Professional accessibility
features.
Summary
In this chapter, you learned about managing the Windows 2000 Pro-
fessional Desktop. We covered the following topics:
Managing Desktop settings, which include customizing the Taskbar
and Start menu, using shortcuts, and setting display properties
Managing multiple languages and regional settings, which include
enabling and configuring multilingual support and choosing locale
settings
Configuring accessibility options and using accessibility utilities
EXERCISE 5.6
Using Accessibility Features
1. Select Start Programs Accessories Accessibility Magnifier.
2. Experiment with the Magnifier utility. When you are finished, click
the Exit button in the Magnifier Settings dialog box.
3. Select Start Programs Accessories Accessibility On-Screen
Keyboard.
4. Select Start Programs Accessories Notepad to open Notepad.
5. Create a text document using the On-Screen Keyboard. When you
are finished, close the Notepad document without saving it.
6. Close the On-Screen Keyboard.
Copyright © 2000 SYBEX Inc., Alameda, CA.
www.sybex.com
Summary 229
Key Terms
Accessibility Options
Accessibility Wizard
Active Desktop
Desktop
Internet Explorer
locale settings
Magnifier
My Computer
My Documents
My Network Places
Narrator
On-Screen Keyboard
Recycle Bin
Regional Options
shortcut
Start menu
Taskbar
Utility Manager
Copyright © 2000 SYBEX Inc., Alameda, CA.
www.sybex.com
230 Chapter 5
Managing the Desktop
Review Questions
1. What is the purpose of the Desktop setting Use Personalized Menus?
A. To allow users to create and manage customized menus based on
a Wizard called the Personalized Menu Setup Wizard
B. To keep the Desktop clean by displaying only commonly used
applications
C. To allow users to personalize their menus by choosing colors and
fonts
D. To add the user’s name and description at the top of each menu
2. Which of the following methods can be used to configure the Taskbar
and Start menu in Windows 2000 Professional?
A. Right-click an empty space on the Taskbar and choose Properties
from the pop-up menu.
B. Select Control Panel Menu Settings.
C. Right-click My Computer and choose Manage from the pop-up menu.
D. Right-click My Computer and choose Properties from the
pop-up menu.
3. Which of the following locations can contain a shortcut? Choose all
that apply.
A. Start menu
B. MMC
C. Desktop
D. Folder
Copyright © 2000 SYBEX Inc., Alameda, CA.
www.sybex.com
Review Questions 231
4. Which Desktop option is used to make your Desktop look like a Web
page and is able to show Web content?
A. Web Enabler
B. Web Desktop
C. Active Web
D. Active Desktop
5. Which method would you use to configure a Windows 2000 Profes-
sional English version to display the user interface in Spanish?
A. Configure Regional Options to add Spanish language support.
B. Through Control Panel, Add/Remove Software icon, add Spanish
language support.
C. Configure Regional Options to add Spanish language support,
then set the locale settings for Mexico.
D. None of the above.
6. Which accessibility utility is used to enlarge a portion of the screen to
support users with poor vision?
A. Enlarger
B. Expander
C. Magnifier
D. Microscope
7. Which of the following options can be configured through the Task-
bar and Start Menu Properties dialog box? Choose all that apply.
A. Display Administrative Tools
B. Expand Control Panel
C. Expand Administrative Tools
D. Display Computer Management
Copyright © 2000 SYBEX Inc., Alameda, CA.
www.sybex.com