Tài liệu Accessing Files and Folders pdf
Bạn đang xem bản rút gọn của tài liệu. Xem và tải ngay bản đầy đủ của tài liệu tại đây (864.44 KB, 57 trang )
Chapter
10
Accessing Files and
Folders
MICROSOFT EXAM OBJECTIVES COVERED IN
THIS CHAPTER
Monitor, manage, and troubleshoot access to files and folders.
Configure, manage, and troubleshoot file compression
Control access to files and folders by using permissions.
Optimize access to files and folders.
Manage and troubleshoot access to shared folders.
Create and remove shared folders.
Control access to shared folders by using permissions.
Connect to shared resources on a Microsoft network.
Manage and troubleshoot the use and synchronization of
offline files.
Copyright © 2000 SYBEX Inc., Alameda, CA.
www.sybex.com
A
dministrators must have basic file management skills,
including the ability to create a well-defined, logically organized directory
structure and maintain that structure. Windows 2000 Professional Folder
Options allow you to configure many properties associated with files and
folders, such as what you see when you access folders, file type associations,
and the use of offline files and folders. Finally, you should know how to
search for files and folders.
Local access defines what access a user has to local resources. You can
limit local access by applying security for folders and files on NTFS parti-
tions. You should know what NTFS permissions are and how they are
applied. You can also optimize local access through the use of the Indexing
Service.
A powerful feature of networking is the ability to allow network access to
local folders. In Windows 2000 Professional, it is very easy to share folders.
You can also apply security to shared folders in a manner that is similar to
applying NTFS permissions. Once you share a folder, users with appropriate
access rights can access the folders through a variety of methods.
To effectively manage both local and network resource access and trouble-
shoot related problems, you should understand the resource-access process.
Windows 2000 Professional uses access tokens, access control lists, and
access control entries to handle resource access.
This chapter covers file and folder management tasks, beginning with the
basics of planning and creating a directory structure.
Copyright © 2000 SYBEX Inc., Alameda, CA.
www.sybex.com
File and Folder Management Basics
439
File and Folder Management Basics
B
efore you perform tasks such as managing NTFS security and net-
work shares, you need to understand how to perform basic file and folder
management tasks. The first step in file and folder management is organizing
your files and folders. After you have created the structure, you can manage
folder options. Another common task is searching for files and folders. These
tasks are covered in the following sections.
Organizing Files and Folders
When your files and folders are well organized, you can easily access the
information that is stored on your computer. Organizing your files and
folders is similar to storing your papers. If you don’t have very many
papers, the task is easy. The more papers you have, the more c hallenging
the task becomes.
The key to organization is good planning. For example, you might decide
to store all of your applications on your C: drive and all of your data on your
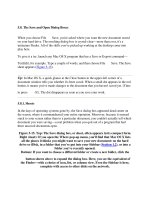
D: drive. You might organize data by function or by type. Figure 10.1 shows
an example of a directory structure that has been logically organized.
FIGURE 10.1
A sample directory structure
Once you plan your directory structure, you are ready to create the struc-
ture on your computer. This involves creating files and folders and may also
require you to rename, delete, move, and copy files and folders. These tasks
are described in the following sections.
C:\ D:\
Applications WP DOCS ACCT DATA
WP SS DB 1Q 2QProject 1 Project 2
OS
Copyright © 2000 SYBEX Inc., Alameda, CA.
www.sybex.com
440
Chapter 10
Accessing Files and Folders
Creating Folders
You can create folders in several ways, such as through Windows Explorer,
the DOS
MD
command, and My Computer. The examples in this chapter will
use Windows Explorer for file management.
You take the following steps to create a folder:
1.
Select Start
Programs
Accessories
Windows Explorer to open
Windows Explorer.
2.
Open My Computer and select the drive where the folder will be
created.
3.
Select File
New
Folder, as shown in Figure 10.2.
FIGURE 10.2
Creating a new folder
4.
A folder icon labeled New Folder appears in the Windows Explorer
window, as shown in Figure 10.3. Replace the label by typing in the
name of the new folder.
Copyright © 2000 SYBEX Inc., Alameda, CA.
www.sybex.com
File and Folder Management Basics
441
FIGURE 10.3
Naming a new folder
Creating Files
There are many ways to create files. The most common way is through applica-
tions, including the Windows 2000 Professional WordPad and Notepad utilities.
You take the following steps to create a file with Notepad:
1.
Select Start
Programs
Accessories
Windows Explorer to open
Windows Explorer.
2.
Open My Computer and select the drive where the file will be created.
3.
Select File
New
Text Document.
4.
A new file icon appears in the Windows Explorer window. Type in the
name of the new file under the file icon.
5.
Double-click the new file to open it in Notepad. Add text to the file,
as shown in Figure 10.4.
FIGURE 10.4
Editing a text document with Notepad
Copyright © 2000 SYBEX Inc., Alameda, CA.
www.sybex.com
442
Chapter 10
Accessing Files and Folders
6.
Save the file by selecting File
Exit. You will see a dialog box indi-
cating that the contents of the file have changed. Save the changes by
clicking the Yes button.
In Exercise 10.1, you will create a simple directory structure and add folders
and files. This structure will be used in the other exercises in this chapter.
EXERCISE 10.1
Creating a Directory and File Structure
1.
Select Start
Programs
Accessories
Windows Explorer to start
Windows Explorer.
2.
Expand My Computer, then Local Disk (D:). Select File
New
Folder and name the new folder
DATA
.
3.
Double-click the DATA folder to open the folder. Select File
New
Folder and name the new folder
WP DOCS
.
4.
Double-click the Data folder, select File
New
Folder, and name
the new folder
SS DOCS
folder.
5.
Confirm that you are still in the DATA folder. Select File
New
Text Document. Name the file DOC1.TXT.
6. Double-click the WP DOCS folder. Select File New Text Docu-
ment. Name the file DOC2.TXT.
7. Double-click the SS DOCS folder. Select File New Text Docu-
ment. Name the file DOC3.TXT. Your structure should look like the
one shown below.
DATA
WP DOCS SS DOCS
DOC1
DOC2 DOC3
Copyright © 2000 SYBEX Inc., Alameda, CA.
www.sybex.com
File and Folder Management Basics 443
Renaming and Deleting Folders and Files
If you need to rename a folder or a file, right-click the folder or file that you
want to rename and select Rename from the pop-up menu. The name will be
selected and boxed. Start typing to replace the existing name with your entry,
or position the cursor and edit the existing folder name or filename.
To delete a folder or file, right-click the folder or file that you want to
remove and select Delete from the pop-up menu. When prompted, click the
Yes button to confirm the deletion.
Deleted files or folders are moved to the Recycle Bin, which you can clear peri-
odically to delete files or folders permanently. If you delete a folder or file by
accident, you can usually restore the folder or file through the Recycle Bin.
Copying and Moving Folders and Files
You can easily reorganize your directory structure by copying and moving
folders and files. When you move a folder or file from its original location
(called the source) to a new location (called the destination), it no longer
exists in the source location. When you copy a folder or file, it will exist in
both the source and destination locations.
To copy or move a folder or file, right-click the folder or file that you want
to copy or move and drag and drop it to its destination location. You will see
a pop-up menu that includes the options Copy Here and Move Here, as
shown in Figure 10.5. Make the appropriate selection.
FIGURE 10.5 Choosing to move a folder
Copyright © 2000 SYBEX Inc., Alameda, CA.
www.sybex.com
444 Chapter 10
Accessing Files and Folders
Managing Folder Options
Through the Folder Options dialog box, you can configure options such as the
Desktop view and what you see when you open folders. To open the Folder
Options dialog box, start Windows Explorer and select Tools Folder Options.
Folder Options also appears as an icon in Control Panel.
The Folder Options dialog box has four tabs: General, View, File Types,
and Offline Files. The options on each of these tabs are described in the fol-
lowing sections.
General Folder Options
The General tab of the Folder Options dialog box, shown in Figure 10.6,
includes the following options:
Whether the computer is configured to use the Windows classic Desk-
top or to use the Active Desktop, which enables Web content on the
Desktop
Whether the computer is configured to use Windows classic folders or
to enable Web content in folders
Whether folders are opened in the same window or each folder is
opened in a separate window when a user is browsing folders
Whether a user opens items with a single-click or a double-click
FIGURE 10.6 The General tab of the Folder Options dialog box
Copyright © 2000 SYBEX Inc., Alameda, CA.
www.sybex.com
File and Folder Management Basics 445
Folder View Options
The options on the View tab of the Folder Options dialog box, shown in
Figure 10.7, are used to configure what users see when they open files and
folders. For example, you can change the default setting so that hidden
files and folders are shown in Windows Explorer and other file lists. The
View tab options are described in Table 10.1.
FIGURE 10.7 The View tab of the Folder Options dialog box
TABLE 10.1 Folder View Options
Option Description
Display Com-
pressed Files
and Folders
with an Alter-
nate Color
By default, compressed files and folders are dis-
played in the same color as uncompressed files and
folders. Enabling this option displays compressed
files and folders in an alternate color so that they can
be easily identified.
Display the
Full Path in
the Address
Bar
By default, the address bar in the Windows Explorer
window shows an abbreviated path of your location,
such as Chapter 10 (from the Word Documents folder).
Enabling this option displays the full path, such as
C:\Word Documents\Sybex\Prof Book\Chapter 10.
Copyright © 2000 SYBEX Inc., Alameda, CA.
www.sybex.com
446 Chapter 10
Accessing Files and Folders
Display the
Full Path in the
Title Bar
By default, the title bar at the top of the Windows Explorer
window shows an abbreviated path of your location. En-
abling this option displays the full path.
Hidden Files
and Folders
By default, Do Not Show Hidden Files and Folders is se-
lected, so that files and folders with the Hidden attribute
are not listed. Choosing Show Hidden Files and Folders
displays these items.
Hide File Ex-
tensions for
Known File
Types
By default, filename extensions, which identify the
file type (for example, .DOC for Word files and .XLS
for Excel files), are not shown. Disabling this option
displays all filename extensions.
Hide Protected
Operating Sys-
tem Files (Rec-
ommended)
By default, operating system files are not shown, which
protects operating system files from being modified or
deleted by a user. Disabling this option displays the op-
erating system files.
Launch Folder
Windows in a
Separate
Process
By default, when you open a folder, it shares memory
with the previous folders that were opened. Enabling
this option opens folders in separate parts of memory,
which increases the stability of Windows 2000 but can
slightly decrease the performance of the computer.
Remember
Each Folder’s
View Settings
By default, any folder display settings you make are re-
tained each time the folder is reopened. Disabling this
option resets the folder display settings to their defaults
each time the folder is opened.
Show My Doc-
uments on the
Desktop
By default, My Documents (a folder created by Windows
2000 for each user who accesses the computer and used
as the default location for storing user files) appears on
the Desktop. Disabling this option removes My Comput-
er from the Desktop.
Show Pop-Up
Description
for Folder and
Desktop
Options
By default, any summary information configured
through file properties (such as title, subject, and au-
thor) appears when you click a file. Disabling this option
suppresses the display of the summary information.
TABLE 10.1 Folder View Options (continued)
Option Description
Copyright © 2000 SYBEX Inc., Alameda, CA.
www.sybex.com
File and Folder Management Basics 447
File Type Options
The File Types tab of the Folder Options dialog box, shown in Figure 10.8,
is used to associate filename extensions with application file types. When an
extension is associated with a file type, users can double-click the filename in
Windows Explorer to open the file in its application. For example, if you
have associated .PDF with Adobe Acrobat Reader and you double-click the
Presentation.PDF file, Acrobat Reader will start and that file will be
opened in it.
FIGURE 10.8 The File Types tab of the Folder Options dialog box
Through the File Types tab, you can add, delete, and change file type asso-
ciations. New file extensions also may be added automatically when you
install new applications on your computer.
Offline Folder Options
Through the Offline Files tab of the Folder Options dialog box, shown in
Figure 10.9, you can configure the computer to use offline files and folders.
This is a new Windows 2000 Professional feature that allows network folders
and files to be stored on Windows 2000 clients. Then if the network loca-
tion is not available, users can still access network files.
Copyright © 2000 SYBEX Inc., Alameda, CA.
www.sybex.com
448 Chapter 10
Accessing Files and Folders
FIGURE 10.9 The Offline Files tab of the Folder Options dialog box
Offline files and folders are particularly useful for mobile users who use
the same set of files when they are attached to the network and when they are
traveling. Offline files and folders are also useful on networks where users
require specific files to perform their jobs, because they will be able to access
those files even if the network server goes down (for scheduled maintenance
or because of a power outage or another problem). Offline files and folders
also increase performance even if the network is available, because users can
use the local copy of the file instead of accessing files over the network.
Configuring offline files and folders requires a minimum of two computers:
The network computer that contains the network version of the
folders and files
The Windows 2000 client computer that will access the network files
while they are online or offline
Microsoft
Exam
Objective
Manage and troubleshoot the use and synchronization of
offline files.
Copyright © 2000 SYBEX Inc., Alameda, CA.
www.sybex.com
File and Folder Management Basics 449
The network computer does not need to be running Windows 2000, but it
must use the file and print sharing protocol SMB (Server Message Blocks). All
Microsoft operating systems use SMB, but some other operating systems do
not use SMB. For example, if you were connected to a Novell NetWare share,
you would not be able to use offline files and folders, because NetWare uses
a protocol called NCP (NetWare Core Protocol) for file and print sharing.
In order to use offline files and folders, you must complete the following tasks:
1. Attach to the shared file or folder that you want to access offline.
2. Configure your computer to use offline files and folders.
3. Make files and folders available for offline access.
4. Specify how offline files and folders will respond to network disconnection.
These tasks are covered in the following sections.
Attaching to the Share
In order to use a file or folder offline, the file or folder must first be made
available online. Someone at the server must share the file or folder, and the
user must have proper permissions to access the file or folder. Then the user
can attach to the shared file or folder. The procedure for sharing files and
folders is described in the “Managing Network Access” section later in this
chapter.
Configuring Your Computer
You configure your computer to use offline files and folders through the
Offline Files tab of the Folder Options dialog box (see Figure 10.9). In this
tab, verify that the Enable Offline Files box is checked (this option is enabled
by default). To configure automatic synchronization between the offline and
online files, make sure that the Synchronize All Offline Files before Logging
Off option is checked (this option is also enabled by default).
If you don’t configure offline files and folders to be synchronized auto-
matically when you log on or log off from your computer, you will need to
perform the synchronization manually. To manually synchronize a file or
folder, right-click the file or folder that has been configured for offline use
and select Synchronize from the pop-up menu, as shown in Figure 10.10.
Copyright © 2000 SYBEX Inc., Alameda, CA.
www.sybex.com
450 Chapter 10
Accessing Files and Folders
FIGURE 10.10 Manually synchronizing an offline folder
Making Folders or Files Available
To make a file or folder available for offline access, take the following steps:
1. Access the shared file or folder that you wish to use offline. Right-click
the file or folder and select Make Available Offline from the pop-up
menu (see Figure 10.10).
2. The Welcome to the Offline Files Wizard starts (this Wizard will run only
the first time you create an offline file or folder). Click the Next button.
3. You see a dialog box asking you how to synchronize offline files, as
shown in Figure 10.11. By default, the Automatically Synchronize the
Offline Files When I Log On and Log Off My Computer option is
selected. If you would prefer to manually synchronize files, deselect
this option. Click the Next button to continue.
4. The next dialog box, shown in Figure 10.12, allows you to configure
reminders and to create a shortcut to the Offline Files folder.
Reminders periodically remind you that you are not connected to the
network and are working offline. The Offline Files shortcut is an
easy way to access folders that have been configured for offline use.
If you are online when you access this folder, you are working
online. You can select or deselect either of these options. Then click
the Finish button.
Copyright © 2000 SYBEX Inc., Alameda, CA.
www.sybex.com
File and Folder Management Basics 451
FIGURE 10.11 Configuring the synchronization of offline files and folders
FIGURE 10.12 Configuring Reminders and the Offline Files shortcut
5. If the folder you have selected contains subfolders, you will see the
Confirm Offline Subfolders dialog box, shown in Figure 10.13. This
dialog box allows you to choose whether the subfolders should also be
made available offline. Make your selection and click the OK button.
Copyright © 2000 SYBEX Inc., Alameda, CA.
www.sybex.com
452 Chapter 10
Accessing Files and Folders
FIGURE 10.13 Configuring offline subfolder availability
The offline files will be copied (synchronized) to the local computer. You
can tell that a folder has been configured for offline access by the icon that
appears under the folder, as shown in Figure 10.14.
FIGURE 10.14 The icon for offline folders
Configuring Your Computer’s Behavior after Losing the Network
Connection
Through the Offline Files tab of the Folder Options dialog box, you can
specify whether or not your computer will begin working offline when
a network connection is lost. To configure your computer’s behavior
after a network connection is lost, click the Advanced button in the
bottom-right corner of the dialog box. This brings up the Offline Files
- Advanced Settings dialog box, as shown in Figure 10.15. In this dialog
box, you can specify Notify Me and Begin Working Offline (the default
selection) or you can select Never Allow My Computer to Go Offline.
If you have created offline files and folders for multiple servers, you can
use the Exception List portion of the dialog box to specify different
behavior for each one.
Copyright © 2000 SYBEX Inc., Alameda, CA.
www.sybex.com
File and Folder Management Basics 453
FIGURE 10.15 The Offline Files - Advanced Settings dialog box
In Exercise 10.2, you will set up your computer to use and synchronize
offline files and folders.
If your Windows 2000 Professional computer is attached to a network that has
another computer with a shared file or folder, you can also attach to the
shared file or folder that you want to access offline, make folders or files avail-
able for offline access, and configure how offline files will respond to network
disconnection, as described in the previous sections.
EXERCISE 10.2
Configuring Offline Files and Folders
1. Select Start Programs Accessories Windows Explorer.
2. In Windows Explorer, select Tools Folder Options and click the
Offline Files tab.
3. In the Offline Files tab of the Folder Options dialog box, make sure
that the following options are selected:
Enable Offline Files
Copyright © 2000 SYBEX Inc., Alameda, CA.
www.sybex.com
454 Chapter 10
Accessing Files and Folders
Troubleshooting Offline Files
If you are trying to configure offline files and folders, and you don’t see the
Make Available Offline option as a folder property, check the following:
Are you connected to a network share on a computer that uses SMB?
Offline files and folders won’t work from a network computer that
does not use SMB.
Have you configured your computer to use offline files and folders?
Before you can make a file or folder available offline, this feature must
be enabled through the Offline Files tab of the Folder Options dialog
box (accessed by selected Tools Folder Options in Windows
Explorer).
Has the folder that you want to access been shared and do you have
proper permissions to access the folder? If you don’t see a folder that
you want to configure for offline use, it may not be shared or you may
not have proper share (and NTFS) permissions to the folder.
Searching for Files and Folders
Windows 2000 Professional offers powerful search capabilities that allow
you to find a file or folder based on the filename or folder name and also
through the text that is contained in the file. This is an extremely useful fea-
ture when you know that you have saved a specific file on your computer but
you can’t find it.
Windows Explorer has a Search button on its toolbar. Clicking this
button brings up the Search dialog box, as shown in Figure 10.16.
Synchronize All Offline Files before Logging Off
Enable Reminders; Display Message Balloon Every 60 Minutes
Place Shortcut to Offline Files Folder on the Desktop
4. Click the OK button to close the dialog box.
EXERCISE 10.2 (continued)
Copyright © 2000 SYBEX Inc., Alameda, CA.
www.sybex.com
File and Folder Management Basics 455
FIGURE 10.16 The Search dialog box
In this dialog box, you can specify the following options for your search:
The filename or folder name (the name can contain wildcard characters,
such as *)
The text that you are looking for
The location that you want to look in
Depending on what you are looking for, you might specify the filename or
folder name you are looking for and/or the text that you are looking for.
Only one of these fields must be filled in for a search. The location that you
want to look in must be specified. This can be as broad as My Computer, or
you can specify a specific drive or folder.
Once you have specified your search criteria, click the Search Now button
to start the search. The results of the search are displayed in the right side of
the window, as shown in Figure 10.17.
The Search Options at the bottom of the Search dialog box allow you to configure
more advanced searches by date, type, and size. For even more complex searches,
you can select Advanced Options and specify subfolders, case sensitivity, and
search slow files (files that reside on removable storage media, such as tape or
optical drives).
Copyright © 2000 SYBEX Inc., Alameda, CA.
www.sybex.com
456 Chapter 10
Accessing Files and Folders
FIGURE 10.17 Search results
Managing Local Access
The two common types of file systems used by local partitions are FAT
(which includes FAT16 and FAT32) and NTFS. (File systems are covered in
detail in Chapter 9, “Managing Disks.”) FAT partitions do not support local
security; NTFS partitions do support local security. This means that if the file
system on the partition that users access is configured as a FAT partition,
you cannot specify any security for the file system once a user has logged on.
However, if the partition is NTFS, you can specify the access each user has
to specific folders on the partition, based on the user’s logon name and group
associations.
Microsoft
Exam
Objective
Monitor, manage, and troubleshoot access to files and
folders.
Control access to files and folders by using permissions.
Optimize access to files and folders.
Copyright © 2000 SYBEX Inc., Alameda, CA.
www.sybex.com
Managing Local Access 457
This chapter covers material related to optimizing access to files and folders
and using permissions to control access to files and folders, for the “Monitor,
manage, and troubleshoot access to files and folders” objective. Using file
compression, another subobjective for this objective, is covered in Chapter 9,
“Managing Disks.” That chapter also provides more information about opti-
mizing access to files and folders.
The following sections describe how to apply NTFS permissions and
some techniques for optimizing local access.
Applying NTFS Permissions
NTFS permissions control access to NTFS folders and files. You configure
access by allowing or denying NTFS permissions to users and groups. Normally,
NTFS permissions are cumulative, based on group memberships if the user has
been allowed access. However, if the user had been denied access through user
or group membership, those permissions override allowed permissions.
Windows 2000 Professional offers five levels of NTFS permissions:
The Full Control permission allows the following rights:
Traverse folders and execute files (programs) in the folders
List the contents of a folder and read the data in a folder’s files
See a folder’s or file’s attributes
Change a folder’s or file’s attributes
Create new files and write data to the files
Create new folders and append data to files
Delete subfolders and files
Delete files
Change permissions for files and folders
Take ownership of files and folders
The Modify permission allows the following rights:
Traverse folders and execute files in the folders
List the contents of a folder and read the data in a folder’s files
Copyright © 2000 SYBEX Inc., Alameda, CA.
www.sybex.com
458 Chapter 10
Accessing Files and Folders
See a folder’s or file’s attributes
Change a folder’s or file’s attributes
Create new files and write data to the files
Create new folders and append data to files
Delete files
The Read & Execute permission allows the following rights:
Traverse folders and execute files in the folders
List the contents of a folder and read the data in a folder’s files
See a folder’s or file’s attributes
The List Folder Contents permission allows the following rights:
Traverse folders and execute files in the folders
List the contents of a folder and read the data in a folder’s files
See a folder’s or file’s attributes
The Read permission allows the following rights:
List the contents of a folder and read the data in a folder’s files
See a folder’s or file’s attributes
The Write permission allows the following rights:
Change a folder’s or file’s attributes
Create new files and write data to the files
Create new folders and append data to files
Any user with Full Control access can manage the security of a folder. By
default, the Everyone group has Full Control permission for the entire NTFS
partition. However, in order to access folders, a user must have physical
access to the computer as well as a valid logon name and password. By
default, regular users can’t access folders over the network unless the folders
have been shared. Sharing folders is covered in the “Managing Network
Access” section later in this chapter.
You apply NTFS permissions through Windows Explorer. Right-click
the file or folder that you want to control access to and select Properties
from the pop-up menu. This brings up the folder or file Properties dialog
box. Figure 10.18 shows a folder Properties dialog box.
Copyright © 2000 SYBEX Inc., Alameda, CA.
www.sybex.com
Managing Local Access 459
The process for configuring NTFS permissions for folders and files is the
same. The examples in this chapter use a folder, since NTFS permissions are
most commonly applied at the folder level.
FIGURE 10.18 The folder Properties dialog box
The tabs in the file or folder Properties dialog box depend on the options
that have been configured for your computer. For files and folders on NTFS
partitions, the dialog box will contain a Security tab, which is where you
configure NTFS permissions. (The Security tab is not present in the Properties
dialog box for files or folders on FAT partitions, because FAT partitions do
not support local security.) The Security tab lists the users and groups that
have been assigned permissions to the folder or file. When you click a user
or group in the top half of the dialog box, you see the permissions that have
been allowed or denied for that user or group in the lower half of the dialog
box, as shown in Figure 10.19.
Copyright © 2000 SYBEX Inc., Alameda, CA.
www.sybex.com
460 Chapter 10
Accessing Files and Folders
FIGURE 10.19 The Security tab of the folder Properties dialog box
Adding and Removing User and Group NTFS Permissions
To manage NTFS permissions, take the following steps:
1. In Windows Explorer, right-click the file or folder that you want to
control access to, select Properties from the pop-up menu, and click
the Security tab of the Properties dialog box.
2. Click the Add button to open the Select Users, Computers, or Groups
dialog box, as shown in Figure 10.20. You can select users from the
computer’s local database or from the domain you are in (or trusted
domains) from the list box at the top of the dialog box. The list box
at the bottom of the dialog box lists all of the groups and users for the
location that was specified in the top list box.
3. Click the user, computer, or group that you wish to add and click the
Add button. The user, computer, or group appears in the bottom list
box. Use Ctrl+click to select noncontiguous users, computers, or
groups or Shift+click to select contiguous users, computers, or groups.
Copyright © 2000 SYBEX Inc., Alameda, CA.
www.sybex.com
Managing Local Access 461
FIGURE 10.20 The Select Users, Computers, or Groups dialog box
4. You return to the Security tab of the folder Properties dialog box.
Highlight each user, computer, or group in the top list box individu-
ally and specify the NTFS permissions that should be applied. When
you are finished, click the OK button.
Through the Advanced button of the Security tab, you can configure more
granular NTFS permissions, such as Traverse Folder/ Execute File and Read
Attributes permissions.
To remove the NTFS permissions for a user, computer, or group, high-
light the user, computer, or group you wish to remove in the Security tab and
click the Remove button.
Be careful when you remove NTFS permissions. Unlike when you delete most
other types of items in Windows 2000 Professional, you won’t be asked to
confirm the removal of NTFS permissions.
Copyright © 2000 SYBEX Inc., Alameda, CA.
www.sybex.com