Tài liệu Module 5: Using Group Policy to Manage User Environments doc
Bạn đang xem bản rút gọn của tài liệu. Xem và tải ngay bản đầy đủ của tài liệu tại đây (440.26 KB, 44 trang )
Contents
Overview 1
Introduction to Managing User
Environments 2
Using Administrative Templates 4
Lab A: Using Administrative Templates
to Assign Registry-Based Policies 14
Using Scripts 23
Lab B: Assigning Script Policies
to Users and Computers 28
Best Practices 34
Review 35
Module 5: Using Group
Policy to Manage User
Environments
Information in this document is subject to change without notice. The names of companies,
products, people, characters, and/or data mentioned herein are fictitious and are in no way intended
to represent any real individual, company, product, or event, unless otherwise noted. Complying
with all applicable copyright laws is the responsibility of the user. No part of this document may
be reproduced or transmitted in any form or by any means, electronic or mechanical, for any
purpose, without the express written permission of Microsoft Corporation. If, however, your only
means of access is electronic, permission to print one copy is hereby granted.
Microsoft may have patents, patent applications, trademarks, copyrights, or other intellectual
property rights covering subject matter in this document. Except as expressly provided in any
written license agreement from Microsoft, the furnishing of this document does not give you any
license to these patents, trademarks, copyrights, or other intellectual property.
??1999 Microsoft Corporation. All rights reserved.
Microsoft, Active Desktop, Active Directory, PowerPoint, Visual Basic, and Windows are either
registered trademarks or trademarks of Microsoft Corporation in the U.S.A. and/or other countries.
The names of companies, products, people, characters, and/or data mentioned herein are fictitious
and are in no way intended to represent any real individual, company, product, or event, unless
otherwise noted.
Other product and company names mentioned herein may be the trademarks of their respective
owners.
Project Lead and Instructional Designer: Mark Johnson
Instructional Designers : Aneetinder Chowdhry (NIIT Inc.), Kathryn Yusi
(Independent Contractor)
Lead Program Manager: Ryan Calafato
Program Manager: Joern Wettern (Wettern Network Solutions)
Graphic Artist: Julie Stone (Independent Contractor)
Editing Manager: Tina Tsiakalis
Substantive Editor: Kelly Baker (Write Stuff)
Copy Editor: Wendy Cleary (S&T OnSite)
Online Program Manager: Nikki McCormick
Online Support: Arlo Emerson (MacTemps)
Compact Disc Testing: Data Dimensions, Inc.
Production Support: Arlene Rubin (S&T OnSite)
Manufacturing Manager: Bo Galford
Manufacturing Support: Mimi Dukes (S&T OnSite)
Lead Product Manager, Development Services: Elaine Nuerenberg
Lead Product Manager: Sandy Alto
Group Product Manager: Robert Stewart
Module 5: Using Group Policy to Manage User Environments iii
Introduction
This module provides students with the knowledge and skills to manage user
environments by using Group Policy. Students will learn to manage user
environments by configuring the administrative template settings in Group
Policy. Students will also learn how to use Group Policy to run scripts at
designated times.
In the two hands-on labs in this module, students will have a chance to
configure, apply, and test the settings in Group Policy. In the first lab, students
will configure settings in both of the Administrative Templates extensions in
Group Policy, and then test the settings that they configured. In the second lab,
students will implement the running of logon and logoff scripts by using the
Scripts extension in Group Policy.
Materials and Preparation
This section provides you with the materials and preparation needed to teach
this module.
Materials
To teach this module, you need the following materials:
?? Microsoft® PowerPoint® file 1558a_05.ppt
Preparation
To prepare for this module, you should:
?? Read all the materials for this module.
?? Complete the labs.
?? Study the review questions and prepare alternative answers to discuss.
?? Anticipate questions that students may ask. Write out the questions and
provide the answers.
?? Read the white papers, Introduction to IntelliMirror and Introduction to
Windows 2000 Change and Configuration Management on the Student
Materials compact disc.
?? Look at the Web site on Windows Script Host at:
Presentation:
60 Minutes
Lab:
75 Minutes
iv Module 5: Using Group Policy to Manage User Environments
Instructor Setup for a Lab
This section provides setup instructions required to prepare the instructor
computer or classroom configuration for a lab.
Lab A: Using Administrative Templates to Assign
Registry-Based Policies
No setup required for the instructor computer.
Lab B: Assigning Script Policies to Users and Computers
??To prepare for the lab
Ensure that students can access the \\london\scripts shared folder and that
this folder contains the contents of the Student\Labfiles\Lab05\Scripts
folder. This folder should have been created during classroom setup.
Module 5: Using Group Policy to Manage User Environments v
Module Strategy
Use the following strategy to present this module:
?? Introduction to Managing User Environments
In this topic, you will introduce managing user environments by configuring
the Administrative Templates and Scripts Group Policy extensions.
Emphasize that configuring user environments by using Group Policy
allows you to immediately apply the environments to users or computers by
adding the user or computer to the organizational unit (OU) affected by the
settings. Briefly mention the task for managing user environments.
?? Using Administrative Templates
In this topic, you will explain how to use administrative template settings to
manage user environments. First, present administrative templates.
Emphasize that although they are registry-based settings, they do not
permanently change the registry. Then present how computers apply Group
Policy registry settings. Use the animated slide. Emphasize that settings and
values are located in the Registry.pol file. Next, present information on the
loopback Group Policy settings. Show students the loopback settings in
Administrative Templates.
Next, present the different types of settings in Administrative Templates.
Then present the type of settings to use if an administrator wants to
lockdown user environments. Emphasize that this is only an example and
not a recommendation. Finally, present information on implementing
administrative template settings while demonstrating the process.
?? Lab A: Using Administrative Templates to Assign Registry-Based Policies
Prepare students for the lab in which they will configure administrative
template settings for users and computers and then test the configuration.
Make sure that students run the command file for the lab and tell them that
they will have to initiate replications between their domain controllers and
their partner’s domain controllers. After students have completed the lab,
ask them if they have any questions.
?? Using Scripts
In this topic, you will explain how to use Group Policy to run scripts. First,
present how Group Policy handles scripts. Emphasize that script settings
allow an administrator to automate the running of scripts at specific times
(startup, shutdown, and when a user logs on or logs off). Then present the
order in which Microsoft® Windows® 2000 processes scripts. Emphasize
that startup scripts run synchronously, and define the term if needed.
Finally, present information on how to implement scripts. Demonstrate
the process.
?? Lab B: Assigning Script Policies to Users and Computers
Prepare students for the lab in which they will configure script settings for
logon and logoff scripts and then test the configuration. After students have
completed the lab, ask them if they have any questions.
?? Best Practices
Present best practices for using Group Policy to manage user environments.
vi Module 5: Using Group Policy to Manage User Environments
Customization Information
This section identifies the lab setup requirements for a module and the
configuration changes that occur on student computers during the labs. This
information is provided to assist you in replicating or customizing Microsoft
Official Curriculum (MOC) courseware.
The labs in this module are also dependent on the classroom
configuration that is specified in the Customization Information section at the
end of the Classroom Setup Guide for course 1558A, Advanced Administration
for Microsoft Windows 2000.
Lab Setup
The following list describes the setup requirements for the labs in this module.
Setup Requirement 1
The labs in this module require a regular user account for the student. To
prepare student computers to meet this requirement, create the user
account manually.
Setup Requirement 2
The labs in this module require the Log on locally right for domain controllers
to be assigned to the Everyone group. To prepare student computers to meet
this requirement, perform one of the following actions:
?? Run C:\MOC\Win1558A\Labfiles\Lab05\Setup\Lab05.cmd.
?? Assign the right manually.
Setup Requirement 3
The labs in this module require that a shortcut for Active Directory Domains
and Trusts, Active Directory Users and Computers, and Active Directory Sites
and Services exists on the desktop of the regular user account. To prepare
student computers to meet this requirement, perform one of the
following actions:
?? Log on to the domain by using the regular user account and run
C:\MOC\Win1558a\Labfiles\Lab05\Setup\Lab05.cmd.
?? Create the shortcuts manually and place them in
C:\Winnt\Profiles\All Users\Desktop.
Important
Module 5: Using Group Policy to Manage User Environments vii
Setup Requirement 4
The labs in this module require the following OUs and users in the student’s
domain. A number (1 or 2) assigned by you is to be substituted for the
variable x in the labs. One student in each pair uses number 1, the other student
uses number 2.
This OU In this organizational unit
East Domain Controllers
West Domain Controllers
Sales x Top Level OU in the domain
Telemarketing Sales x
Retail Sales x
This user account In this organizational unit
Sales User x Sales x
Telemarketing User x Telemarketing
Retail User x Retail
To prepare student computers to meet this requirement, perform one of the
following actions:
?? Run C:\MOC\Win1558A\Labfiles\Lab05\Setup\Lab05.cmd.
?? Create the OUs and user accounts manually.
Lab Results
Performing the labs in this module introduces the following configuration
changes:
?? Students move their domain controllers to the East OU or West OU if they
have not been moved already.
?? Students create a Group Policy object (GPO) linked to the East OU or
West OU in their domains that contains security template and Audit
policy settings.
?? Students remove GPOs linked to the East OU or West OU in their domains.
You can run
C:\MOC\Win1558A\Labfiles\Lab05\Setup\Lab05rm.cmd to remove most
configuration changes introduced during the labs in the module. Remove the
Log on locally right from the Everyone group manually. Manually delete the
GPOs created by students.
Important
Module 5: Using Group Policy to Manage User Environments 1
Overview
? Introduction to Managing User Environments
? Using Administrative Templates
? Using Scripts
? Best Practices
To manage user environments effectively, you need to ensure that users have
access to the resources that they require do to their jobs—and only those
resources. Microsoft® Windows® 2000 allows you to reduce the complexity of
user environments and remove the possibility of users corrupting their
environments or spending time on unnecessary applications, software, or files.
This can lower your total cost of ownership (TCO) by ensuring that users are
always able to perform their job responsibilities and are not distracted by
unnecessary software or configuration options.
By using the Administrative Templates and Script extensions in Group Policy,
you can set up the environments for multiple users once, and then rely on
Windows 2000 to continually implement and apply the settings that you specify
to computers and users.
At the end of this module, you will be able to:
?? Identify the benefits of controlling user environment settings by using
Group Policy.
?? Use the administrative template settings in Group Policy to control and
configure user environments.
?? Use script settings in Group Policy to run scripts that help control
user environments.
?? Apply best practices for managing user environments.
Slide Objective
To provide an overview
of the module topics
and objectives.
Lead-in
In this module, you will learn
about using Group Policy to
manage user environments.
The Group Policy settings
that you use most frequently
to manage user
environments are
administrative templates
and scripts.
Briefly present the course
objectives. Do not go into
detail on this topic.
2 Module 5: Using Group Policy to Manage User Environments
Introduction to Managing User Environments
? Use Group Policy to Immediately Define a User Environment for
a New User or Computer
? Perform the Tasks to Manage User Environments
? Control What Users Can Do in Their User Environments
? Provide Users with Only the Resources That They Need to Do
Their Jobs
? Use Group Policy Settings to Manage User Environments
Administrative Templates
(Registry-Based) Settings
Administrative Templates
(Registry-Based) Settings
Scripts Settings
Scripts Settings
Control User Environments
Control User Environments
Managing user environments means controlling what users can do when logged
on to the network. You do this by controlling their desktops, network
connections, and user interfaces. You want to ensure that users have what
they need to perform their jobs, but you do not want to give them the ability
to accidentally corrupt their environments by incorrectly configuring
the environments.
The types of Group Policy settings that you typically use to manage user
environments are administrative template settings (registry-based settings) and
script settings. You configure these settings in Group Policy in the
Administrative Templates and Script extensions.
If you have used Group Policy to set up user environments for an Active
Directory
™
directory service container, such as an organizational unit (OU), any
computer or user that you add to that OU has the Group Policy applied to him
or her automatically.
To manage user environments, perform the following tasks:
?? Enforce standard desktops. Group Policy settings provide a quick and easy
way to enforce standards, ranging from logon and password settings to
mandating the use of a particular wallpaper or screen saver. In this way, you
prevent users from making changes to their desktops that could make them
more complex than necessary.
?? Limit user access to selected portions of the operating system. You can
remove users’ ability to open Control Panel and prevent users from shutting
down their computers. By preventing users from gaining access to critical
operating system components and configuration options, you reduce the
possibility of users corrupting their systems and the number of technical
support calls required. For example, you can remove users’ ability to open
Control Panel or prevent users from shutting down their computers.
Slide Objective
To explain how managing
user environments by using
Group Policy settings
simplifies network
administration.
Lead-in
Managing user
environments means
controlling what users can
do when logged on to the
network, as well as what
appears on their desktops.
Describe the tasks involved
in managing user
environments with Group
Policy. Do not go into too
much detail, because this is
an introductory topic.
Remind students that they
can set up Group Policy
once, and then
Windows 2000 will
continually enforce it.
Key Points
If Group Policy settings that
control user environments
are set up for an OU, when
an administrator adds a new
user or computer to that OU,
the Group Policy settings
immediately apply. This
means that the user
environment is immediately
set up for that user
or computer.
Administrators can use
Group Policy to provide
users with what they need to
do their jobs while curtailing
user actions that could
accidentally corrupt the user
environments.
Module 5: Using Group Policy to Manage User Environments 3
?? Ensure that users always have their desktops and personal data. By
managing user desktop settings with registry-based policies, you ensure that
users have the same computing environments even if they log on from
different computers. You can control how Windows 2000 manages user
profiles. This includes how users’ personal data is made available to them
when connecting across slow links, what the user profiles contain when they
are downloaded, and the size of the profiles.
?? Restrict the use of Windows 2000 tools and components. These tools and
components include Microsoft Internet Explorer, Windows Explorer, and
the Microsoft Management Console (MMC). You can ensure that users
never see these tools unless they have a genuine need for them.
?? Populate user desktops. You can ensure that users have the files, shortcuts,
and network connections (including maps to network drives and printer
connections) that they need for their work.
?? Clean up client computers and the desktop. You configure settings to
automatically clean up a computer when the user logs off or shuts down the
computer. For example, when the user logs off, you can remove all the
items with which you populated the desktop when the user logged on. Then,
if different users log on to the same client computer, you can ensure that
items set up for one particular user are not on the desktop.
4 Module 5: Using Group Policy to Manage User Environments
? Using Administrative Templates
? What Are Administrative Template Settings?
? How Computers Apply Group Policy Registry Settings
? What Is Group Policy Loopback?
? Types of Administrative Template Settings
? Settings for Locking Down User Environments
? Implementing Administrative Template Settings
Administrative template settings are a multitude of registry-based Group Policy
settings that you can use to control user environments. These settings apply to
both computers and user accounts and allow you to lockdown user
environments. Locking down user environments prevents users from changing
desktop configurations, using certain applications, and making changes to
system files.
Slide Objective
To introduce administrative
template settings.
Lead-in
Administrative template
settings provide you with
the capability of managing
user environments.
Make sure that students
know what it means to
lockdown user
environments.
Module 5: Using Group Policy to Manage User Environments 5
What Are Administrative Template Settings?
? Administrative Template Settings Modify Registry
Settings That Control User Environments
? Settings Modify Registry Settings in the Registry Hives
? HKEY_LOCAL_MACHINE for computer settings
? HKEY_CURRENT_USER for user settings
? Group Policy Registry Settings Are Not Permanent
Because They Write to:
? \Software\Policies
? \Software\Microsoft\Windows\CurrentVersion\Policies
? Windows 2000 Applies Both Group Policy and Local
Default-Registry Settings Unless There Is a Conflict
Administrative templates are a collection of Group Policy settings that modify
registry settings. You use the Administrative Templates extension in Group
Policy to configure user and computer registry-based settings that control the
user’s working environment. This includes controlling users’ desktops,
interface options, network connections, the behavior of system services,
operating system components, and the default values for application settings.
Administrative template settings modify the settings stored in two
Windows 2000 registry hives of a computer. The hives are:
?? HKEY_LOCAL_MACHINE (HKLM). When a computer starts, the
Group Policy settings that apply to the computer are written to this registry
location. The computer then continues initializing and replacing its local
default-registry settings with settings from Computer
Configuration\Administrative Templates.
?? HKEY_CURRENT_USER (HKCU). When a user logs on to a computer,
Group Policy settings that apply to the user are written to this registry
location. The computer then continues initializing and replacing its local
default-registry settings from User Configuration\Administrative Templates.
The administrative templates settings that Group Policy provides do
not permanently change the registry, because registry settings
specified by Group Policy write to special locations in the registry hives
(HKLM and HKCU). These locations are \Software\Policies or
\Software\Microsoft\Windows\CurrentVersion\Policies. When settings reside
in these locations, Windows 2000 enforces them without removing the local
default-registry settings.
Windows 2000 applies both the Group Policy and the default registry settings to
users and computers. If there are conflicts, the Group Policy settings prevail. If
you delete the Group Policy object (GPO) containing the settings, or unlink it
from a container, the settings are removed from the registry hive the next time
that Group Policy is refreshed, and the local default-registry settings apply.
Slide Objective
To explain what
administrative template
settings are and where
they reside.
Lead-in
Group Policy administrative
template settings are
registry-based settings that
you can use to manage
user environments.
Make sure that students
remember what a registry
hive is.
Key Points
Administrative template
settings modify the settings
stored in the two registry
hives. The hives are
HKEY_LOCAL_MACHINE
for computer settings, and
HKEY_CURRENT_USER
for user settings.
Registry settings specified
by Group Policy write to
special locations in the
registry. They do not
permanently change the
local registry settings.
If you remove the Group
Policy settings, only the
local registry settings apply.
6 Module 5: Using Group Policy to Manage User Environments
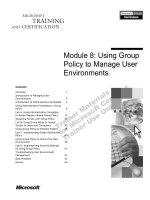
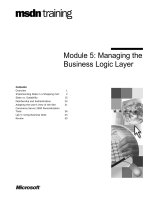
How Computers Apply Group Policy Registry Settings
Registry.pol Files Contain the Registry Settings and Values
Sysvol
Sysvol
Registry
.pol
Registry
.pol
Registry
.pol
Registry
.pol
GPT
GPT
GPO List
Registry
.pol
Registry
.pol
HKCU
HKCU
Registry
.pol
Registry
.pol
HKLM
HKLM
Client computer starts, user logs on, and the domain controller
provides a list of GPOs
Client computer starts, user logs on, and the domain controller
provides a list of GPOs
1
1
1
Client computer connects to Sysvol and locates the Registry.pol files
Client computer connects to Sysvol and locates the Registry.pol files
2
2
2
Client computer writes to the registry hives (HKLM and HKCU)
Client computer writes to the registry hives (HKLM and HKCU)
3
3
3
The administrative templates settings and the values for the settings that
Windows 2000 applies are stored in a Registry.pol file in the Group Policy
template (GPT) on domain controllers. There are two files: one for computer
settings, and one for user settings.
The path for the Registry.pol file is
systemroot\SYSVOL\Sysvol/domain_name\Policies\GPO_GUID_identifier
\Machine or \User. Typically, the systemroot folder (the folder that contains the
Windows 2000 system files) is C:\Winnt.
The process that a Windows 2000 computer uses to apply administrative
template settings and write them to the registry hives is as follows:
1. When the client computer starts or the user logs on, the domain controller
provides the client computer with the list of GPOs to apply and the order in
which to apply them.
2. The client computer connects to the Sysvol folder on the domain controller,
and then locates the Registry.pol files under Machine\Registry.pol and
the User\Registry.pol files in the GPT for each GPO that contains registry-
based settings.
3. The client computer writes the registry settings and their values in the
Registry.pol file to the appropriate registry hives (HKLM and HKCU). The
computer continues initializing the operating system and enforces the
registry settings—applying computer settings to computers, and user
settings to users.
The settings in the Group Policy section of the registry hives apply even
when there is a conflict with settings in the local default registry settings.
Slide Objective
To describe the Registry.pol
file and the process for
applying administrative
template settings.
Lead-in
Now let us look at the
process in which Group
Policy registry settings
are applied.
The slide for this topic is
animated. Display a new
step on the slide as you talk
about it.
Delivery Tip
Open Windows Explorer
and show students the
Registry.pol files in the path
provided in the Note in the
student text.
Key Points
The administrative template
settings that Windows 2000
applies are stored in the
Registry.pol file in the GPT
on domain controllers.
The values for the registry
settings are contained in the
Registry.pol file.
Note
Module 5: Using Group Policy to Manage User Environments 7
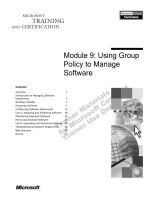
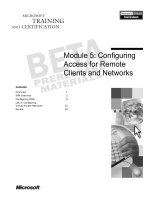
What Is Group Policy Loopback?
Loopback:
? Applies Configuration
Settings to Computers
? Is Used for Computers
Dedicated to Specific
Tasks
? Replaces User Settings
for a User with User
Settings for a Computer
User1 logs on to Computer1
1. User1 user settings applied
2. Computer1 user settings applied
User1 logs on to Computer1
1. User1 user settings applied
2. Computer1 user settings applied
Computer1
Cd Burners
Sales
Nwtraders.com
User1
User
Settings
User
Settings
User
Settings
User
Settings
The loopback setting is a Group Policy setting that causes administrative
template user settings in a GPO to apply to the computers affected by that GPO.
These user settings then apply to all users that log on to the computer and
replace the user settings applied directly to the users. Because the settings for
the computer are applied last, they take precedence.
Loopback is most useful for computers that are dedicated to specific tasks or
that have special software installed on them (for example, computers that are set
up to create compact discs). The desktop environment of these computers
should not changed.
To enable loopback, perform the following steps:
1. Open Group Policy, and then expand Computer
Configuration\Administrative Templates\System\Group Policy.
2. Double-click User Group Policy loopback processing mode.
3. In the Properties dialog box for the settings, make sure that the User Group
Policy loopback processing mode check box is selected and has a white
background, and then select one of the following modes:
?? Replace. This mode replaces the user settings that are typically applied
to users logging on to the computer.
?? Merge. This mode combines the user settings applied to the computer
and the user settings applied to the user. If there is a conflict, the user
settings applied to the computer prevail.
Slide Objective
To explain what loopback is
and when to use it.
Lead-in
Windows 2000 allows you to
alter the typical method in
which Group Policy settings
are applied by enabling a
loopback setting.
Delivery Tip
Demonstrate configuring the
User Group Policy
loopback processing
mode setting that is located
in Group Policy. Define the
Replace and Merge modes.
Key Points
The Group Policy loopback
setting causes
administrative template
settings for users to apply
to computers.
Loopback is most useful for
computers that are
dedicated to specific tasks
or that have special
software installed on them.
8 Module 5: Using Group Policy to Manage User Environments
Types of Administrative Template Settings
Setting types
Setting types
Setting types
Controls
Controls
Controls
Applies to
Applies to
Applies to
Windows
Components
Windows
Components
The parts of Windows 2000 and its tools and components to
which users can gain access, including MMC
The parts of Windows 2000 and its tools and components to
which users can gain access, including MMC
System
System
Logon and logoff, Group Policy, disk quotas, and
loopback policy
Logon and logoff, Group Policy, disk quotas, and
loopback policy
Network
Network
The properties of network connections and dial-in
connections
The properties of network connections and dial-in
connections
Printers
Printers
Printer settings that can force printers to be published in
Active Directory and disable Web-based printing
Printer settings that can force printers to be published in
Active Directory and disable Web-based printing
Start Menu &
Taskbar
Start Menu &
Taskbar
What users can gain access to from the Start menu and
makes the Start menu read-only
What users can gain access to from the Start menu and
makes the Start menu read-only
Desktop
Desktop
The Active Desktop, including what appears on desktops,
and what users can do with the My Documents folder
The Active Desktop, including what appears on desktops,
and what users can do with the My Documents folder
Control Panel
Control Panel
The use of Add/Remove Programs, Printers, and Display
in Control Panel
The use of Add/Remove Programs, Printers, and Display
in Control Panel
Administrative template settings are organized into seven types, for which there
are both user and computer settings. The computer settings focus more on the
management of Windows 2000, while user settings focus more on controlling
how users can affect their desktop environments.
The following table provides the types of settings in the Administrative
Templates extension.
Setting type Controls Applies to
Windows
Components
The parts of Windows 2000 and its tools and
components to which users can gain access
This includes controlling user access to
MMC.
Computers and
users
System Logon and logoff procedures (including the
ability of a user to log off from a kiosk
computer). System settings also allow you to
manage Group Policy (including when refresh
occurs), enable disk quotas, and implement
loopback policy.
Computers and
users
Network The properties of network connections and
dial-in connections (including shared
network access).
Computers and
users
Printers Printer settings that can force printers to be
automatically published in Active Directory
and can disable Web-based printing.
Computers (for
these printer
settings only)
Slide Objective
To explain the different
types of administrative
template settings.
Lead-in
Because there are dozens
of administrative template
settings, Windows 2000 has
organized them into seven
different types.
Because of the large
number of administrative
template settings,
encourage users to explore
the Administrative
Templates extension in
Group Policy.
Delivery Tip
Show students the different
types of administrative
template settings in Group
Policy. Mention that some
types apply to both
computers and users.
Key Point
Computer settings focus
more on the management of
Windows 2000, while user
settings focus more on
controlling how users can
affect their desktop
environments.
Module 5: Using Group Policy to Manage User Environments 9
(continued)
Setting type Controls Applies to
Start Menu &
Taskbar
What users can gain access to from the Start
menu. For example, by removing the Run
command, users are prevented from running
applications for which there is no icon or
shortcut. You can also make the Start menu
read-only and disable the user’s ability to
make changes.
Users
Desktop The Active Desktop. You can control users’
ability to gain access to the network and the
Internet by hiding the appropriate desktop
icons and controlling what they can do with
their My Documents folder.
Users
Control Panel Several applications in Control Panel. This
includes restricting the use of Add/Remove
Programs , Display, and Printers .
Users
Windows 2000 provides you with the ability to add additional templates
to Administrative Templates in Group Policy if the preconfigured templates do
not provide you with the settings that you require. For more information about
adding additional templates, see module 7, “Configuring Administrative
Templates” in course 1563A, Designing a Change and Configuration
Management Infrastructure for Microsoft Windows 2000 Professional.
Note
10 Module 5: Using Group Policy to Manage User Environments
Settings for Locking Down User Environments
To Lockdown the Desktop, Configure Settings in the
Setting Types:
? Windows Components
? Desktop
? Start Menu &Taskbar
To Lockdown User Access to Resources,
Configure Settings in the Setting Types:
? Windows Components
? Desktop
? Start Menu & Taskbar
To Lockdown User Access to Administrative Tools and
Applications, Configure Settings in Setting Types:
? Windows Components
? Desktop
? Start Menu & Taskbar
? System
The example presented in this section list the types of administrative template
sub-settings used to lockdown user environments. You should only lockdown
the desktops of users that perform defined and specific tasks (for example, users
who perform telemarketing or data entry, or users that are in training
environments).
Locking Down User Desktops
The following table provides the setting types that contain settings to configure
when locking down user desktops, as well as examples of the possible effects of
these kinds of configurations.
Setting type Lockdown examples
Windows
Components
Shortcut menus do not appear when users right-click the desktop
or items in Windows Explorer. Users cannot make changes to
their desktops, including customizing Microsoft
Active Desktop
™
or creating shortcuts in Windows Explorer.
Desktop Users cannot save certain changes made to their desktops when
they log off. For example, changes to icons, windows, and the
taskbar are not saved.
Start Menu &
Taskbar
Control Panel is removed from the Start menu. Users cannot
start Control Panel or run any Control Panel applications,
including changing their displays or adding and removing
programs. The Taskbar & Start Menu option is removed from
Settings on the Start menu. Users cannot open the Properties
dialog box for Taskbar or configure their Start menus
or taskbars.
Slide Objective
To provide examples of
using administrative
template settings to
lockdown user
environments.
Lead-in
You may want to lockdown
all or part of user
environments. We will now
look at examples of the
different types of
administrative template
settings that you might
configure to lock down
user environments.
Emphasize that these tables
provide examples (not
recommendations) for the
type of administrative
settings to configure to
lockdown user environment
desktop settings. These
examples show a very
restrictive application of the
settings, but students may
want to use these in
their networks.
Tell students that the
different sections of the
Administrative Templates
extensions contain a
multitude of settings.
Module 5: Using Group Policy to Manage User Environments 11
Locking Down User Access to Resources
The following table provides the setting types that contain settings to configure
when locking down user access to resources, as well as examples of the
possible effects of these kinds of configurations.
Setting type Lockdown examples
Windows
Components
Users cannot use the Search option or the Windows Explorer
File menu to locate and access network resources. They cannot
map network drives or disconnect or modify preconfigured
network drives. Users can only view predefined resources in
My Network Places.
Desktop Users cannot use Active Desktop or see My Network Places or
My Computer on their desktops.
Start Menu &
Taskbar
Users cannot see the Search
option and do not have access to the
Windows Update icon from the Start menu. Users only see
predetermined icons. Users cannot use Run to gain access to
network resources.
Locking Down User Access to Administrative Tools and
Applications
The following table provides the setting types that contain settings to configure
when locking down user access to administrative tools and applications, as well
as examples of the possible effects of these kinds of configurations.
Setting type Lockdown examples
Windows
Components
Users cannot start applications by using the Windows Explorer
File menu and can only gain access to predetermined
administrative tools.
Desktop Users cannot see application icons on the desktop and therefore
cannot start the applications.
Start Menu &
Taskbar
Users cannot use Run to start applications or administrative
tools. Users cannot see common applications, including
Administrative Tools on the Start menu.
System Users can run only the applications determined by
the administrator.
12 Module 5: Using Group Policy to Manage User Environments
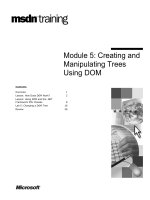
Implementing Administrative Template Settings
Hide My Network Places icon on desktop
Policy
Hide My Network Places icon on desktop
Explain
Enabled
Enabled
Hide My Network Places icon on desktop
Policy
Hide My Network Places icon on desktop
Explain
Disabled
Disabled
Or
Or
Hide My Network Places icon on desktop
Policy
Hide My Network Places icon on desktop
Explain
Or
Or
Not configured
(default)
Not configured
(default)
? Selecting One of the Three States Configures a Setting
? Configuring the Same Setting Differently for Different
GPOs Can Cause Conflicts
Implement administrative template settings by configuring the settings in the
Administrative Templates extension in Group Policy.
In most instances, you configure a setting by selecting one of three states for the
setting. You select the state on the Policy tab of the Properties dialog box for
the Group Policy setting.
The following list provides descriptions of the three states:
?? Enabled. Windows 2000 applies the setting if the box on the Policy tab
is selected. Windows 2000 adds the change to the appropriate
Registry.pol file.
?? Disabled. Windows 2000 prevents the setting from being applied if the box
on the Policy tab is not selected. Windows 2000 adds the change to the
appropriate Registry.pol file.
?? Not configured. Windows 2000 ignores the setting and makes no changes to
the computer if the box on the Policy tab is dimmed and is selected. This
state does not specify a value change in the registry.
Besides selecting a state for a setting, you may need to provide additional
information (for example, the duration of the setting, or the size for a
disk quota).
The enabled and disabled states can produce conflicting GPOs. This occurs, for
example, when a setting is enabled in one GPO and the same setting is disabled
in another GPO—but both GPOs apply to the same users or computers. Unless
Group Policy inheritance is modified, the last setting applied prevails.
Slide Objective
To explain how to
implement administrative
template settings by
selecting one of the three
states for a setting.
Lead-in
You implement
administrative template
settings by selecting the
state of the setting.
Delivery Tip
Demonstrate configuring a
setting by selecting a state
for an administrative
template setting. The
example in the slide is in
Group Policy\User
Configuration\Administrative
Templates\Desktop.
Key Points
The not configured state
makes no change to the
Registry.pol file.
Conflicts can arise from
configuring the same
settings differently in
different GPOs. When these
conflicts arise, the last
setting applied prevails,
unless Group Policy
inheritance is modified.
Module 5: Using Group Policy to Manage User Environments 13
To gain access to the Policy tab for an administrative template setting, perform
the following steps:
1. Right-click the appropriate Active Directory container (site, domain, or
OU), and then click Properties.
2. On the Group Policy tab, create or select an existing GPO, and then
click Edit.
3. In Group Policy, expand Computer Settings or User Settings, and then
expand Administrative Templates until you locate the setting that you
want to modify (for example, User Configuration\Administrative
Templates\Desktop).
4. In the details pane of Group Policy, double-click the Group Policy setting
that you want to modify.
The Policy tab appears on the top.
When you create a GPO that contains only settings for users or
computers, you can disable the other type of settings (user or computer) to
speed up processing of the Group Policy settings. You can disable the settings
on the General tab of the Properties dialog box for the GPO.
Note
14 Module 5: Using Group Policy to Manage User Environments
Lab A: Using Administrative Templates to Assign
Registry-Based Policies
Objectives
After completing this lab, you will be able to configure, apply, and test registry-
based policies by using administrative templates.
Prerequisites
Before working on this lab, you should be familiar with:
?? Working with Active Directory Users and Computers.
?? Managing disk quotas and scheduled tasks.
?? Using Run as to run applications as another user.
?? When to assign administrative template settings.
Lab Setup
To complete this lab, you need the following:
?? A computer running Microsoft® Windows® 2000 Server configured as a
domain controller in a child domain of nwtraders.msft.
?? To log on as (where domain is your
domain name) with a password of password and run
C:\MOC\Win1558A\Labfiles\Lab05\Setup\Lab5.cmd. This command file:
?? Assigns the Log on locally right for domain controllers to the Everyone
group, if this right was not already assigned.
?? Creates shortcuts on your desktop to Active Directory Users and
Computers, Active Directory Sites and Services, and Active Directory
Domains and Trusts.
Slide Objective
To introduce the lab.
Lead-in
In this lab, you will configure
and apply registry-based
Group Policy settings by
using Administrative
Templates.
Explain the lab objectives.
Ensure that students run
the .cmd file before
starting the lab.
Module 5: Using Group Policy to Manage User Environments 15
?? Creates the following organizational units (OUs) in your domain.
This OU In this organizational unit
East Domain Controllers
West Domain Controllers
Sales x Top Level OU in the domain
Telemarketing Salesx
Retail Salesx
?? Creates the following user accounts with the password of password.
This user account In this organizational unit
Sales User x Sales x
Telemarketing User x Telemarketing
Retail User x Retail
?? To create a regular user account for yourself while logged on as
Administrator, if you have not created such an account in a previous lab.
Make a note of the logon name and the password of the user account here.
____________________________________________________________
?? A number (1 or 2) assigned by your instructor to be substituted for the x
variable in this lab. One student in each pair uses number 1, the other
student uses number 2. Write your assigned number here.
____________________________________________________________
Estimated time to complete this lab: 45 minutes
16 Module 5: Using Group Policy to Manage User Environments
Exercise 1:
Moving a Domain Controller
Scenario:
You need to assign Group Policy settings to an individual domain controller in your
domain. To ensure that the default domain policy continues to apply, and to provide
administrative flexibility, you have decided to move the domain controller into a child OU
of the Domain Controllers OU.
Your Tasks:
Move your computer to a child OU in the Domain Controllers OU. You will move your
computer to the West OU if your assigned number is 1, or the East OU if your assigned
number is 2. After moving your computer, you will replicate Active Directory
™
directory
service changes to the other domain controller in your domain.
Task Detail
1. Move your computer to the East
or West child OU of the Domain
Controllers OU.
a) Log on as (where domain
is your domain name) with a password of password.
b) Start Active Directories Users and Computers, expand your
domain, and then click Domain Controllers.
c) In the details pane, right-click your computer, and then
click Move .
d) In the Move dialog box, expand your domain, expand Domain
Controllers, click West if your assigned number is 1, or East if
your assigned number is 2, and then click OK.
e) Quit Active Directories Users and Computers.
2. Replicate Active Directory
changes to other domain
controllers.
a) Start Windows Explorer, expand the C:\MOC\Win1558a\Labfiles
folder, and then double-click Replicate.
Module 5: Using Group Policy to Manage User Environments 17
Exercise 2:
Implementing Administrative Template Policies for
Computers
Scenario:
You need to assign additional policy settings for a domain controller in your domain that is
not included in the default domain policy linked to the Domain Controllers OU. The policy
settings that you need to apply to enhance the settings in the default domain controller
policy are to satisfy the following management requirements:
?? Disk quotas must be enabled for all volumes so that disk space usage can be
easily tracked.
?? Disk quota limits should not be enforced. No limits will be enforced until you can
determine the average disk utilization for the server and install additional disk
capacity if required.
?? Users must not be able to run the New Task wizard to ensure that server
performance is not impacted.
Your Tasks:
Create a Group Policy object (GPO) linked to the East or West OU, and configure the GPO
with policy settings that satisfy the scenario requirements. After the GPO is configured,
replicate the changes that you made to the other domain controller in your domain, then
restart your computer to ensure that the policy settings have been applied.
Task Detail
1. Create a GPO for the East or
West OU.
a) While logged on as Administrator, start Active Directories Users
and Computers.
b) In the console tree, expand your domain, and then click Domain
Controllers.
c) In the details pane, right-click West if your assigned number is 1,
or East if your assigned number is 2, and then click Properties.
d) On the Group Policy tab, click New, type West Policy if your
assigned number is 1, or East Policy if your assigned number is 2,
and then press ENTER.
2. Edit the administrative template
settings for the new GPO to:
?? Enable disk quotas.
?? Prevent disk quota limits from
being enforced.
?? Prevent users from running
the New Task wizard.
a) Select the new policy, and then click Edit.
b) In the Group Policy console tree, expand Computer
Configuration, and then expand Administrative Templates.
c) In the console tree, expand System, click Disk Quotas, and then,
in the details pane, double-click Enable disk quotas.
d) In the Properties dialog box for Enable disk quotas, on the
Policy tab, select the Enable disk quotas check box.
e) Click OK.
f) In the details pane, double-click Enforce disk quota limit, and in
the Properties dialog box for Enforce disk quota limit, click the
Enforce disk quota check box twice to clear it.
g) Click OK.
h) In the console tree, expand Windows Components, click Task
Scheduler, and then, in the details pane, double-click Disable
New Task Creation.