Tài liệu Configuring OSPF ppt
Bạn đang xem bản rút gọn của tài liệu. Xem và tải ngay bản đầy đủ của tài liệu tại đây (35.04 KB, 6 trang )
1 - 6 Semester 5: Advanced Routing v2.0 - Lab 4.6.1 Copyright 2001, Cisco Systems, Inc.
4.6.1 Configuring OSPF
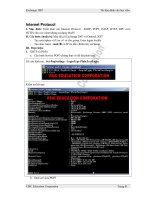
Lo0 192.168.31.22 /32
Fa0/0 192.168.1.2 /24
Lo0 192.168.31.33 /32Lo0 192.168.31.11 /32
Fa0/0 192.168.1.1 /24 Fa0/0 192.168.1.3 /24
AREA 0
SanJose2
SanJose1 SanJose3
Objective
In this lab, you configure OSPF on three Cisco routers. First, you configure loopback
interfaces to provide stable OSPF Router IDs. Then you configure the OSPF process and
enable OSPF on the appropriate interfaces. After OSPF is enabled, you tune the update
timers and configure authentication.
Scenario
The backbone of International Travel Agency’s (ITA) WAN, located in San Jose, consists
of three routers connected via an Ethernet core. You must configure these core routers
as members of OSPF Area 0. Because the core routers are connected to the Internet,
you decide to implement security, preventing unauthorized routers from joining Area 0.
Also, within the core, you want network failures to be realized quickly.
Step 1
Build and configure the network according to the diagram, but do not configure OSPF yet.
A switch or hub is required to connect the three routers via Ethernet.
Use ping to verify your work and test connectivity between the FastEthernet interfaces.
Step 2
On each router, configure a loopback interface with a unique IP address. Cisco routers
use the highest loopback IP address as the OSPF Router ID. In the absence of a
loopback interface, the router uses the highest IP address among its active interfaces,
which might force a router to change router IDs if an interface goes down. Because
loopback interfaces are immune to physical and data-link problems, they should be used
2 - 6 Semester 5: Advanced Routing v2.0 - Lab 4.6.1 Copyright 2001, Cisco Systems, Inc.
to derive the router ID. To avoid conflicts with registered network addresses, use private
network ranges for your loopback interfaces. Configure your core routers using the
following commands:
SanJose1(config)#interface loopback 0
SanJose1(config-if)#ip address 192.168.31.11 255.255.255.255
SanJose2(config)#interface loopback 0
SanJose2(config-if)#ip address 192.168.31.22 255.255.255.255
SanJose3(config)#interface loopback 0
SanJose3(config-if)#ip address 192.168.31.33 255.255.255.255
Step 3
Now that loopback interfaces are configured, you must configure OSPF. Use the
following commands as an example to configure each router:
SanJose1(config)#router ospf 1
SanJose1(config-router)#network 192.168.1.0 0.0.0.255 area 0
Note: An OSPF process ID is locally significant; it does not need to match neighboring
routers. The ID is needed to identify a unique instance of an OSPF database, because
multiple processes can run concurrently on a single router.
Step 4
After you enable OSPF routing on each of the three routers, verify its operation using
show commands. Several important show commands can be used to gather OSPF
information. First, issue the show ip protocols command on any of the three routers,
as shown here:
SanJose1#show ip protocols
Routing Protocol is "ospf 1"
Sending updates every 0 seconds
Invalid after 0 seconds, hold down 0, flushed after 0
Outgoing update filter list for all interfaces is
Incoming update filter list for all interfaces is
Redistributing: ospf 1
Routing for Networks:
192.168.1.0
Routing Information Sources:
Gateway Distance Last Update
Distance: (default is 110)
3 - 6 Semester 5: Advanced Routing v2.0 - Lab 4.6.1 Copyright 2001, Cisco Systems, Inc.
Note: The update timers are set to 0. Updates are not sent at regular intervals; they are
event-driven. Next, use the show ip ospf command to get more details about the OSPF
process, including the router ID:
SanJose1#show ip ospf
Routing Process "ospf 1" with ID 192.168.31.11
Supports only single TOS(TOS0) routes
SPF schedule delay 5 secs, Hold time between two SPFs 10 secs
Minimum LSA interval 5 secs. Minimum LSA arrival 1 secs
Number of external LSA 0. Checksum Sum 0x0
Number of DCbitless external LSA 0
Number of DoNotAge external LSA 0
Number of areas in this router is 1. 1 normal 0 stub 0 nssa
External flood list length 0
Area BACKBONE(0)
Number of interfaces in this area is 1
Area has no authentication
SPF algorithm executed 5 times
Area ranges are
Number of LSA 4. Checksum Sum 0x1CAC4
Number of DCbitless LSA 0
Number of indication LSA 0
Number of DoNotAge LSA 0
Flood list length 0
1. What address is your router using as its router ID?
You should see the loopback interface as the router ID. To see your OSPF neighbors,
use the show ip ospf neighbor command. The output of this command displays all
known OSPF neighbors, including their router IDs, their interface addresses, and their
adjacency status. Also issue the show ip ospf neighbor detail command, which
outputs even more information:
SanJose1#show ip ospf neighbor
Neighbor ID Pri State Dead Time Address
Interface
192.168.31.22 1 FULL/BDR 00:00:36 192.168.1.2
FastEthernet0/0
192.168.31.33 1 FULL/DR 00:00:33 192.168.1.3
FastEthernet0/0
SanJose1#show ip ospf neighbor detail
Neighbor 192.168.31.22, interface address 192.168.1.2
In the area 0 via interface FastEthernet0/0
Neighbor priority is 1, State is FULL, 6 state changes
DR is 192.168.1.3 BDR is 192.168.1.2
Options 2
Dead timer due in 00:00:34
Index 2/2, retransmission queue length 0, number of
retransmission 2
First 0x0(0)/0x0(0) Next 0x0(0)/0x0(0)
Last retransmission scan length is 1, maximum is 1
Last retransmission scan time is 0 msec, maximum is 0 msec
Neighbor 192.168.31.33, interface address 192.168.1.3
In the area 0 via interface FastEthernet0/0
Neighbor priority is 1, State is FULL, 6 state changes
DR is 192.168.1.3 BDR is 192.168.1.2
Options 2
Dead timer due in 00:00:30
Index 1/1, retransmission queue length 0, number of
retransmission 1
First 0x0(0)/0x0(0) Next 0x0(0)/0x0(0)
Last retransmission scan length is 1, maximum is 1
Last retransmission scan time is 0 msec, maximum is 0 msec
4 - 6 Semester 5: Advanced Routing v2.0 - Lab 4.6.1 Copyright 2001, Cisco Systems, Inc.
2. Based on the output of this command, which router is the Designated Router (DR) on this
network?
3. Which router is the Backup Designated Router (BDR)?
Most likely, the router with the highest router ID is the DR, the router with the second-
highest router ID is the BDR, and the other router is a DRother.
Because each interface on a given router is connected to a different network, some of the
key OSPF information is interface-specific. Issue the show ip ospf interface
command for your router’s FastEthernet interface as shown here:
SanJose1#show ip ospf interface fa0/0
FastEthernet0/0 is up, line protocol is up
Internet Address 192.168.1.1/24, Area 0
Process ID 1, Router ID 192.168.31.11, Network Type BROADCAST,
Cost: 1
Transmit Delay is 1 sec, State DROTHER, Priority 1
Designated Router (ID) 192.168.31.33, Interface address
192.168.1.3
Backup Designated router (ID) 192.168.31.22, Interface address
192.168.1.2
Timer intervals configured, Hello 10, Dead 40, Wait 40,
Retransmit 5
Hello due in 00:00:09
Index 1/1, flood queue length 0
Next 0x0(0)/0x0(0)
Last flood scan length is 0, maximum is 1
Last flood scan time is 0 msec, maximum is 0 msec
Neighbor Count is 2, Adjacent neighbor count is 2
Adjacent with neighbor 192.168.31.22 (Backup Designated
Router)
Adjacent with neighbor 192.168.31.33 (Designated Router)
Suppress hello for 0 neighbor(s)
4. Based on the output of this command, what OSPF network type is your router’s Ethernet
interface connected to?
5. What is the Hello update timer set to?
6. What is the Dead timer set to?
Ethernet networks are known to OSPF as broadcast networks. The default timer values
are 10-second hello updates and 40-second dead intervals.
Step 5
You decide to adjust OSPF timers so that the core routers will detect network failures in
less time. This will increase traffic, but this is less of a concern on your high-speed core
Ethernet segment than on a busy WAN link. You decide the need for quick convergence
at the core outweighs the extra traffic. Manually change the Hello and Dead intervals on
SanJose1:
SanJose1(config)#interface fastethernet 0/0
SanJose1(config-if)#ip ospf hello-interval 5
SanJose1(config-if)#ip ospf dead-interval 20
5 - 6 Semester 5: Advanced Routing v2.0 - Lab 4.6.1 Copyright 2001, Cisco Systems, Inc.
These commands set the Hello update timer to 5 seconds and the Dead interval to 20
seconds. Although the Cisco IOS does not require it, you should configure the Dead
interval to four times the Hello interval. This ensures that routers experiencing temporary
link problems can recover and are not declared dead unnecessarily, causing a ripple of
updates and recalculations throughout the internetwork.
After you change timers on SanJose1, issue the show ip ospf neighbor command.
1. Does SanJose1 still show that it has OSPF neighbors?
To find out what happened to SanJose1’s neighbors, use the IOS debug feature. Enter
the command debug ip ospf events.
SanJose1#debug ip ospf events
OSPF events debugging is on
SanJose1#
00:08:25: OSPF: Rcv hello from 192.168.31.22 area 0 from
FastEthernet0/0 192.168.1.2
00:08:25: OSPF: Mismatched hello parameters from 192.168.1.2
00:08:25: Dead R 40 C 20, Hello R 10 C 5 Mask R 255.255.255.0
C 255.255.255.0
SanJose1#
00:08:32: OSPF: Rcv hello from 192.168.31.33 area 0 from
FastEthernet0/0 192.168.1.3
00:08:32: OSPF: Mismatched hello parameters from 192.168.1.3
00:08:32: Dead R 40 C 20, Hello R 10 C 5 Mask R 255.255.255.0
C 255.255.255.0
2. According to the debug output, what is preventing SanJose1 from forming relationships
with the other two OSPF routers in Area 0?
The Hello and Dead intervals must be the same before routers within an area can form
neighbor adjacencies.
Turn off debug using undebug all, or just u all.
SanJose1#undebug all
All possible debugging has been turned off
The Hello and Dead intervals are declared in Hello packet headers. In order for OSPF
routers to establish a relationship, their Hello and Dead intervals must match.
Configure the SanJose2 and SanJose3 Hello and Dead timers to match the timers on
SanJose1. Before you continue, verify that these routers can now communicate by
checking the OSPF neighbor table.
Step 6
Whether intentional, or by accident, you do not want any unauthorized routers
exchanging updates within Area 0. You accomplish this by adding encrypted
authentication to each OSPF packet header. You select message digest (MD5)
authentication. This mode of authentication sends a message digest, or hash, in place of
the password. OSPF neighbors must be configured with the same message digest key
number, encryption type, and password in order to authenticate using the hash.
6 - 6 Semester 5: Advanced Routing v2.0 - Lab 4.6.1 Copyright 2001, Cisco Systems, Inc.
To configure a message digest password for SanJose1 to use on its Ethernet interface,
use these commands:
SanJose1(config)#interface fastethernet 0/0
SanJose1(config-if)#ip ospf message-digest-key 1 md5 7 itsasecret
SanJose1(config-if)#router ospf 1
SanJose1(config-router)#area 0 authentication message-digest
After you enter these commands, wait 20 seconds, and then issue the show ip ospf
neighbor command on SanJose1.
1. Does SanJose1 still show that it has OSPF neighbors?
Use the debug ip ospf events command to determine why SanJose1 does not see
its neighbors:
SanJose1#debug ip ospf events
OSPF events debugging is on
SanJose1#
00:49:32: OSPF: Send with youngest Key 1
SanJose1#
00:49:33: OSPF: Rcv pkt from 192.168.31.33, FastEthernet0/0 :
Mismatch Authentication type. Input packet specified type
0, we use type 2
00:49:33: OSPF: Rcv pkt from 192.168.31.22, FastEthernet0/0 :
Mismatch Authentication type. Input packet specified type ,
we use type 2
SanJose1#u all
All possible debugging has been turned off
Again, you see that OSPF routers will not communicate unless certain configurations
match. In this case, the routers are not communicating because the authentication fields
in the OSPF packet header are different.
Correct this problem by configuring authentication on the other two routers. Remember
that you must use the same key number, encryption type, and password on each router.
After your configurations are complete, verify that the routers can communicate by using
the show ip ospf neighbors command.
SanJose1#show ip ospf neighbors
Neighbor ID Pri State Dead Time Address
Interface
192.168.31.33 1 FULL/DR 00:00:16 192.168.1.3
FastEthernet0/0
192.168.31.22 1 FULL/BDR 00:00:15 192.168.1.2
FastEthernet0/0
Step 7
Save your configurations to NVRAM. They will be used to begin the next lab. At the
conclusion of each lab, it is recommended that you copy and save each router’s
configuration file for future reference.