Tài liệu The Adobe Photoshop Layers Book P1 ppt
Bạn đang xem bản rút gọn của tài liệu. Xem và tải ngay bản đầy đủ của tài liệu tại đây (3.22 MB, 40 trang )
The Adobe
Photoshop
Layers Book
Prelims-K52076.indd iPrelims-K52076.indd i 6/21/07 4:59:04 PM6/21/07 4:59:04 PM
This page intentionally left blank
The Adobe
Photoshop
Layers Book
Harnessing Photoshop’s Most Powerful
Tool, covers Photoshop CS3
Richard Lynch
AMSTERDAM • BOSTON • HEIDELBERG • LONDON • NEW YORK • OXFORD
PARIS • SAN DIEGO • SAN FRANCISCO • SINGAPORE • SYDNEY • TOKYO
Focal Press is an imprint of Elsevier
Prelims-K52076.indd iiiPrelims-K52076.indd iii 6/21/07 4:59:06 PM6/21/07 4:59:06 PM
Focal Press is an imprint of Elsevier
Linacre House, Jordan Hill, Oxford OX2 8DP, UK
30 Corporate Drive, Suite 400, Burlington, MA 01803, USA
First published 2007
Copyright © 2007, Richard Lynch. Published by Elsevier Ltd. All rights reserved
The right of Richard Lynch to be identi ed as the author of this work has been
asserted in accordance with the Copyright, Designs and Patents Act 1988
No part of this publication may be reproduced, stored in a retrieval
system or transmitted in any form or by any means electronic, mechanical,
photocopying, recording or otherwise without the prior written permission of
the publisher
Permissions may be sought directly from Elsevier’s Science & Technology
Rights Department in Oxford, UK: phone (+44) (0) 1865 843830; fax (+44) (0)
1865 853333; email: Alternatively you can submit
your request online by visiting the Elsevier website at />locate/permissions, and selecting Obtaining permission to use Elsevier material
Notice
No responsibility is assumed by the publisher for any injury and/or damage to
persons or property as a matter of products liability, negligence or otherwise,
or from any use or operation of any methods, products, instructions or ideas
contained in the material herein. Because of rapid advances in the medical
sciences, in particular, independent veri cation of diagnoses and drug
dosages should be made
British Library Cataloguing in Publication Data
A catalogue record for this book is available from the British Library
Library of Congress Number: 2007930479
ISBN: 978-0-240-52076-6
For information on all Focal Press publications
visit our website at www.focalpress.com
Printed and bound in Canada
07 08 09 10 11 11 10 9 8 7 6 5 4 3 2 1
Prelims-K52076.indd ivPrelims-K52076.indd iv 6/21/07 4:59:07 PM6/21/07 4:59:07 PM
Dedicated to
Vivian Lynch (1933–2005)
Prelims-K52076.indd vPrelims-K52076.indd v 6/21/07 4:59:07 PM6/21/07 4:59:07 PM
This page intentionally left blank
Acknowledgements . . . . . . . . . . . . . . . . . . . . . . . . . . . . . . . . . . . . . . xi
Introduction . . . . . . . . . . . . . . . . . . . . . . . . . . . . . . . . . . . . . . . . . . . xiii
Chapter 1: The Basics of Layers: Layer Functions and
Creation . . . . . . . . . . . . . . . . . . . . . . . . . . . . . . . . . . . . . . . . 1
What is a Layer? . . . . . . . . . . . . . . . . . . . . . . . . . . . . . . . . . . . . . . 2
Layer Palettes and Menus . . . . . . . . . . . . . . . . . . . . . . . . . . . . 5
Types of Layers . . . . . . . . . . . . . . . . . . . . . . . . . . . . . . . . . . . . .11
Layer Viewing Preferences . . . . . . . . . . . . . . . . . . . . . . . . . . 13
Getting Started Creating Layers . . . . . . . . . . . . . . . . . . . . . 14
Exercise . . . . . . . . . . . . . . . . . . . . . . . . . . . . . . . . . . . . . . . . . . . . 18
Summary . . . . . . . . . . . . . . . . . . . . . . . . . . . . . . . . . . . . . . . . . . .24
Chapter 2: Layer Management: Concepts of a
Layer-Based Work ow . . . . . . . . . . . . . . . . . . . . . . . . . .25
The Outline for Image Editing . . . . . . . . . . . . . . . . . . . . . . .26
Setup . . . . . . . . . . . . . . . . . . . . . . . . . . . . . . . . . . . . . . . . . . . . 27
Capture . . . . . . . . . . . . . . . . . . . . . . . . . . . . . . . . . . . . . . . . . . 29
Evaluation . . . . . . . . . . . . . . . . . . . . . . . . . . . . . . . . . . . . . . .30
Editing and Correction . . . . . . . . . . . . . . . . . . . . . . . . . . . 31
Purposing and Output . . . . . . . . . . . . . . . . . . . . . . . . . . . . 32
Photoshop’s Essential Tools List . . . . . . . . . . . . . . . . . . . . . . 33
External Applications . . . . . . . . . . . . . . . . . . . . . . . . . . . . .34
Commands . . . . . . . . . . . . . . . . . . . . . . . . . . . . . . . . . . . . . . 36
Functions . . . . . . . . . . . . . . . . . . . . . . . . . . . . . . . . . . . . . . . .38
Freehand Tools . . . . . . . . . . . . . . . . . . . . . . . . . . . . . . . . . . . 39
Filters . . . . . . . . . . . . . . . . . . . . . . . . . . . . . . . . . . . . . . . . . . . . 41
The Logic of Layers . . . . . . . . . . . . . . . . . . . . . . . . . . . . . . . . . .41
When to Create a New Layer . . . . . . . . . . . . . . . . . . . . . .42
Naming Layers . . . . . . . . . . . . . . . . . . . . . . . . . . . . . . . . . . .42
Grouping Layers . . . . . . . . . . . . . . . . . . . . . . . . . . . . . . . . . . 46
vii
CONTENTS
Prelims-K52076.indd viiPrelims-K52076.indd vii 6/21/07 4:59:07 PM6/21/07 4:59:07 PM
Merging Layers . . . . . . . . . . . . . . . . . . . . . . . . . . . . . . . . . . .51
Clipping Layers . . . . . . . . . . . . . . . . . . . . . . . . . . . . . . . . . . . 55
Linked Layers . . . . . . . . . . . . . . . . . . . . . . . . . . . . . . . . . . . .56
Summary . . . . . . . . . . . . . . . . . . . . . . . . . . . . . . . . . . . . . . . . . . .57
Chapter 3: Object and Image Area Isolation in Layers . . . . . . .59
Isolating Correction in Adjustment Layers . . . . . . . . . . . 60
Applying Levels for Color Correction . . . . . . . . . . . . . .60
Detailing the Levels Slider Changes . . . . . . . . . . . . . . .61
Isolating Image Objects . . . . . . . . . . . . . . . . . . . . . . . . . . . . . 65
Adding Layers for a Change . . . . . . . . . . . . . . . . . . . . . . . . . 73
Simple Layer Repair Example . . . . . . . . . . . . . . . . . . . . . 73
The Art of Color Balance. . . . . . . . . . . . . . . . . . . . . . . . . . . . . 77
Summary . . . . . . . . . . . . . . . . . . . . . . . . . . . . . . . . . . . . . . . . . . .79
Chapter 4: Masking: Enhanced Area Isolation . . . . . . . . . . . . . . .81
Expanding on Process . . . . . . . . . . . . . . . . . . . . . . . . . . . . . .82
Clean Up . . . . . . . . . . . . . . . . . . . . . . . . . . . . . . . . . . . . . . . . . . .83
Reducing Image Noise . . . . . . . . . . . . . . . . . . . . . . . . . . . . .84
Enhancing Natural Color and Tone . . . . . . . . . . . . . . . . . . 92
Add Soft Focus . . . . . . . . . . . . . . . . . . . . . . . . . . . . . . . . . . . . .96
Color Enhancements . . . . . . . . . . . . . . . . . . . . . . . . . . . . . .101
Sharpen and Enhance Contrast . . . . . . . . . . . . . . . . . . . .102
Additional Manual Sharpening . . . . . . . . . . . . . . . . . . . .105
Summary . . . . . . . . . . . . . . . . . . . . . . . . . . . . . . . . . . . . . . . . .107
Chapter 5: Applying Layer E ects . . . . . . . . . . . . . . . . . . . . . . . . 111
The Basics of E ects and Styles . . . . . . . . . . . . . . . . . . . .112
Saving Styles . . . . . . . . . . . . . . . . . . . . . . . . . . . . . . . . . . . .117
Managing Styles . . . . . . . . . . . . . . . . . . . . . . . . . . . . . . . .119
Manual E ects . . . . . . . . . . . . . . . . . . . . . . . . . . . . . . . . . . . . .120
Automated Manual E ects Tools . . . . . . . . . . . . . . . . .122
Combining Manual E ects and Styles. . . . . . . . . . . . . . .124
Summary . . . . . . . . . . . . . . . . . . . . . . . . . . . . . . . . . . . . . . . . . .131
Chapter 6: Exploring Layer Modes . . . . . . . . . . . . . . . . . . . . . . . 133
Layer Mode Behavior . . . . . . . . . . . . . . . . . . . . . . . . . . . . . .134
Normal. . . . . . . . . . . . . . . . . . . . . . . . . . . . . . . . . . . . . . . . . .136
Contents
viii
Prelims-K52076.indd viiiPrelims-K52076.indd viii 6/21/07 4:59:08 PM6/21/07 4:59:08 PM
Dissolve . . . . . . . . . . . . . . . . . . . . . . . . . . . . . . . . . . . . . . . . .136
Darken . . . . . . . . . . . . . . . . . . . . . . . . . . . . . . . . . . . . . . . . . .137
Multiply . . . . . . . . . . . . . . . . . . . . . . . . . . . . . . . . . . . . . . . . .137
Color Burn . . . . . . . . . . . . . . . . . . . . . . . . . . . . . . . . . . . . . .138
Linear Burn . . . . . . . . . . . . . . . . . . . . . . . . . . . . . . . . . . . . . .138
Darker Color . . . . . . . . . . . . . . . . . . . . . . . . . . . . . . . . . . . .139
Lighten . . . . . . . . . . . . . . . . . . . . . . . . . . . . . . . . . . . . . . . . .139
Screen . . . . . . . . . . . . . . . . . . . . . . . . . . . . . . . . . . . . . . . . . .140
Color Dodge . . . . . . . . . . . . . . . . . . . . . . . . . . . . . . . . . . . .140
Linear Dodge . . . . . . . . . . . . . . . . . . . . . . . . . . . . . . . . . . .141
Lighter Color . . . . . . . . . . . . . . . . . . . . . . . . . . . . . . . . . . . .141
Overlay . . . . . . . . . . . . . . . . . . . . . . . . . . . . . . . . . . . . . . . . .142
Soft Light . . . . . . . . . . . . . . . . . . . . . . . . . . . . . . . . . . . . . . .142
Hard Light . . . . . . . . . . . . . . . . . . . . . . . . . . . . . . . . . . . . . .143
Vivid Light . . . . . . . . . . . . . . . . . . . . . . . . . . . . . . . . . . . . . .143
Linear Light . . . . . . . . . . . . . . . . . . . . . . . . . . . . . . . . . . . . .144
Pin Light . . . . . . . . . . . . . . . . . . . . . . . . . . . . . . . . . . . . . . . .144
Hard Mix . . . . . . . . . . . . . . . . . . . . . . . . . . . . . . . . . . . . . . . .145
Di erence . . . . . . . . . . . . . . . . . . . . . . . . . . . . . . . . . . . . . . .145
Exclusion . . . . . . . . . . . . . . . . . . . . . . . . . . . . . . . . . . . . . . . .146
Hue . . . . . . . . . . . . . . . . . . . . . . . . . . . . . . . . . . . . . . . . . . . . .146
Saturation . . . . . . . . . . . . . . . . . . . . . . . . . . . . . . . . . . . . . . .147
Color . . . . . . . . . . . . . . . . . . . . . . . . . . . . . . . . . . . . . . . . . . . .147
Luminosity . . . . . . . . . . . . . . . . . . . . . . . . . . . . . . . . . . . . . .148
Separating Color and Tone . . . . . . . . . . . . . . . . . . . . . . . . .149
Sharpening Calculation . . . . . . . . . . . . . . . . . . . . . . . . . . . .153
Summary . . . . . . . . . . . . . . . . . . . . . . . . . . . . . . . . . . . . . . . . . .157
Chapter 7: Advanced Blending with Blend If . . . . . . . . . . . . . . 161
Blend If: An Overview . . . . . . . . . . . . . . . . . . . . . . . . . . . . . .161
Heavier Lifting with Blend If . . . . . . . . . . . . . . . . . . . . . . . .168
Blend If as a Mask . . . . . . . . . . . . . . . . . . . . . . . . . . . . . . . . . .179
Creating a Color-Based Mask . . . . . . . . . . . . . . . . . . . . .182
Summary . . . . . . . . . . . . . . . . . . . . . . . . . . . . . . . . . . . . . . . . . .187
Chapter 8: Breaking Out Components . . . . . . . . . . . . . . . . . . . . 189
An Historic Interlude . . . . . . . . . . . . . . . . . . . . . . . . . . . . . . .190
Contents
ix
Prelims-K52076.indd ixPrelims-K52076.indd ix 6/21/07 4:59:08 PM6/21/07 4:59:08 PM
Creating Color from Black and White . . . . . . . . . . . . . .190
An Alternative: Creating Filtered Color . . . . . . . . . .199
Separating a Color Image into RGB
Components . . . . . . . . . . . . . . . . . . . . . . . . . . . . . . . .204
Using Separations . . . . . . . . . . . . . . . . . . . . . . . . . . . . . . . .209
Summary . . . . . . . . . . . . . . . . . . . . . . . . . . . . . . . . . . . . . . . .215
Chapter 9: Taking an Image through the Process . . . . . . . . 217
The Image . . . . . . . . . . . . . . . . . . . . . . . . . . . . . . . . . . . . . . .218
General Image Editing Steps: A Review . . . . . . . . . . .219
Applying the Image Editing Checklist . . . . . . . . . . . . .220
Summary . . . . . . . . . . . . . . . . . . . . . . . . . . . . . . . . . . . . . . . .242
Chapter 10: Making a Layered Collage or
Composite Image . . . . . . . . . . . . . . . . . . . . . . . . . . . 245
What Is a Collage? . . . . . . . . . . . . . . . . . . . . . . . . . . . . . . . .246
Guidelines for Collage . . . . . . . . . . . . . . . . . . . . . . . . . . . .246
An Example Collage . . . . . . . . . . . . . . . . . . . . . . . . . . . . . .247
Creating a Panorama . . . . . . . . . . . . . . . . . . . . . . . . . . . . .250
Summary . . . . . . . . . . . . . . . . . . . . . . . . . . . . . . . . . . . . . . . .253
Index . . . . . . . . . . . . . . . . . . . . . . . . . . . . . . . . . . . . . . . . . . . . . . . . . . 255
Contents
x
Prelims-K52076.indd xPrelims-K52076.indd x 6/21/07 4:59:08 PM6/21/07 4:59:08 PM
T
his has been the best and easiest book project I’ve ever worked
on, not in small part due to the e orts of the publisher and
other current partners and friends. Thanks to the crew at my new
publisher, Focal Press: Paul Temme for taking his email seriously;
Emma Baxter for having the good sense to see the value of my
proposal; Asma Palmeiro for calling to keep me on time, out of
trouble and for adjusting my mood; and all those behind the
scenes who did the great job with layout and soft hands in editing
(Mark Lewis, Lisa Jones, Mani Prabakaran, David Albon). Thanks to
all the folk at betterphoto.com (students and sta ) who helped me
establish my online courses that helped me re ne the concepts
for the book, especially: Jim Miotke and Kerry Drager. Even more
thanks to those few trusted sounding boards I have in the book
business: Greg Georges (gregorygeorges.com) and Al Ward
(actionfx.com). Thanks to people and organizations who helped
with equipment and information: Joyce Fowler (permissions) at
Adobe, Keri Friedman at Lens Babies, Mark Dahm (the answer man)
at Adobe, Nils Christo ersen (foreign legion), ColorVision (Spyder
does it!), amvona.com and wacom.com. Additional thanks to
others at the fringes: Doug Nelson (retouchpro.com), Todd Jensen
(the neartoriginals.com), Fred Showker (60-seconds.com), Barbara
Brundage, Katrin Eismann and Luke Delalio (lukedelalio.com).
Thanks to home support for their extreme patience, ability to plan
around, occasional input and inspiration: the lovely Lisa, the ghetto
Julia, the good-humored Isabel and the a ectionate but noisy Sam.
Special thanks … For those who gave me the chance in the past:
Mitch Waite, Stephanie Wall, Beth Millett, Bonnie Bills and Pete
Gaughan. For being wrong: Dave Cross and Je [the Ax] Shultz
(Contract? What contract …). For delay: Dan Brodnitz and Steve
Weiss. Robert Blake for the ‘F’.
Tokens for tons of other characters that roll in and out and a ect
the ebb and tide: Alan R. Weeks, Kevin Harvey, Larry Woiwode,
Tony Zenos, Joe Reimels, Hagen-Dumenci, Rexetta, Grandma97,
Stephen (aka. KENNY), Murphy (1988–2007), AT, VDL, TV, SB, P-G,
TC, DL, and various Lynches, Nardecchias and Hongs.
xi
ACKNOWLEDGEMENTS
Prelims-K52076.indd xiPrelims-K52076.indd xi 6/21/07 4:59:08 PM6/21/07 4:59:08 PM
This page intentionally left blank
S
ometime in early 1993, I was working for a how-to photography
book publisher as an editor/designer. We had Photoshop 2.5
and I used it to make adjustments to scan the images and
illustrations to make them ready for print. Photoshop was fairly
new at the time; it didn’t yet have all of the features that would, not
much later, make it the industry standard in image editing.
One particular project I remember working on was scanning
topographic maps for a book on various New York waterfalls. The
book had been self-published by an author who added the maps
to the book to give the reader an idea of the landscape around
each of the falls. We were planning on redoing it and bringing it to
a larger audience.
For the original book, the author had public domain maps scanned
and placed in the book at the original size. They accounted for
a signi cant number of pages in the original book. We made the
decision to size the maps for each of the falls into a single page
or set of facing pages to make the whole landscape visible at a
glance. When the author had the maps scanned for the original
book, he didn’t ask for the image les. We had to rescan the maps
for the new book.
It sounded like it should have been an easy thing. We had a decent
atbed scanner, and scanning the maps was easy enough. I t as
much of a map as I could onto the scanner glass and scanned each
map in even columns and rows, leaving a little overlap, and saved
the scans to separate les. I’d planned to assemble them all later in
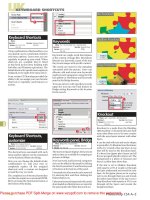
Photoshop. Like making a puzzle using numbered pieces, it would
be easy (see Figure 1).
After I made all the scans, I opened the scanned map les, made
a new le large enough to hold all the scans and then started
placing them in the image one at a time via copy and paste.
Placing the rst image was easy, and everything at that point
was working as planned. The next image wasn’t nearly as easy.
The lines for the topographic maps didn’t line up very well. I tried
doing some rotation, but I couldn’t get all the lines to match up at
INTRODUCTION
xiii
Prelims-K52076.indd xiiiPrelims-K52076.indd xiii 6/21/07 4:59:08 PM6/21/07 4:59:08 PM
Introduction
xiv
FIG 1 (a) The topographical map was far to big to t on the atbed scanner. (b) The plan was to scan the map in pieces and t them all
together. (c) When reassembled the new map would look like the original whole – at least that was the plan.
(a)
(b)
(c)
one time, no matter what I did and how I fussed. When I got the
lines near the bottom to align, the ones at the top would be o ,
if I nudged right or left, it would x one thing and goof up
something else.
As it turned out, lining up the pieces of the map was a nightmare.
I did the best I could in aligning that second piece, and nally
decided it would never align perfectly – it seemed I was a victim
of scanner distortion besides lacking perfect alignment between
scans. When I deselected the pasted piece, it merged with the
original, misaligned gradation lines and all (see Figure 2). All I could
do was Undo and try it again, or move on. I went on to the next
puzzle piece, the rst in the next row, hoping I wouldn’t have the
same problem. It was just as hard to get it to align correctly. The
fourth piece was even harder as I had to try and align to two edges
(top and left) of the piece. None of the subsequent pieces aligned
perfectly, and I was left with many disconnected gradation lines.
I continued putting the pieces together and after I was all done
I went back and painstakingly corrected every line by patching. It
took many hours of additional time to make, nesse and blending
all of the repairs.
Several months after the map project, Adobe came out with
Photoshop 3. I read about the new version, which featured layers
Prelims-K52076.indd xivPrelims-K52076.indd xiv 6/21/07 4:59:09 PM6/21/07 4:59:09 PM
Introduction
xv
as the key new addition. Layers were a way to let you store parts
of your image independently in the same image, letting you stack
your changes without committing them. In a way, I surmised
that layers could act like selections, but with more permanence.
Instead of the situation you had before where selected parts of
the image would automatically merge into a single image plain
when deselected, you had the option of keeping the area separate.
Layers o ered the opportunity to reposition the objects you had
on separate layers at any time.
I thought back to the maps and how even that simplistic view of
layers would have saved me hours of time. I could have pasted
the separate scans to their own layers so I could move each
independently even after I had all of the scans in one image
(see Figure 3).
There were many other advantages to layers that I would discover
in the coming months that went far beyond the simple way I rst
thought of them. I would have power over opacity and could lower
it for any given layer (say to 50%) to see through to the content of
the layers underneath and see better how the layers might align.
I would be able to erase areas of the map that I was adding to
blend the overlap optimally, and lessen the need for patching.
I could have made patches for the gradation lines in new layers
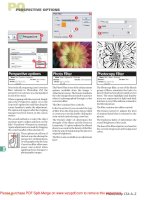
FIG 2 The gradation lines mismatched every time a piece was put in place.
Prelims-K52076.indd xvPrelims-K52076.indd xv 6/21/07 4:59:14 PM6/21/07 4:59:14 PM
Introduction
xvi
and greatly simpli ed blending in those adjustments. In all, the
advantages of layers would have cut the work I had to do on the
map by days, not just hours.
Over the years and through the next seven-plus versions of
Photoshop, I would discover many other uses for layers, including:
• using layers as an organizational tool for image corrections and
the center of work ow;
• using layers for storing multiple versions of an image in one le;
• using layers to set up complex adjustment scenarios that allow
more exibility and power than standard Photoshop tools like
Channel Mixer or Calculations;
• using layers to imitate other color modes (Lab and CMYK)
without converting from RGB;
• using layers to create custom CMYK and duotone separations
for print;
• using layers to develop powerful techniques for color and tone
enhancement, sharpening and e ects;
• using layers to enhance control of the application of any tool in
Photoshop;
• leveraging layer power to allow completely non-destructive
image editing throughout the process of image editing.
Layers have seen some enhancement, though they were
remarkably well matured in that initial release. Layer functionality
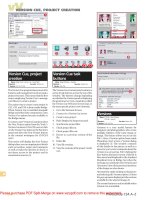
FIG 3 Layers would allow image areas to remain separated as if each were placed on its own pane of glass in the image
Prelims-K52076.indd xviPrelims-K52076.indd xvi 6/21/07 4:59:16 PM6/21/07 4:59:16 PM
Introduction
xvii
includes some extraordinary powers that I have still barely seen
mentioned in tutorials and books, and even when these features
are mentioned, they are never explored to their potential.
Layers – what I consider the most powerful tool in all of
Photoshop – a feature in Photoshop used so extensively that it will
a ect the correction of every image – has never been the subject
of a book.
This is very surprising considering more esoteric features such
as Channels and Actions have books written about them. Every
Photoshop book mentions layers, and some have dedicated
chapters to them, but no book has focused on and explored
the advantages of using layers as the core of obtaining the best
images with the least amount of work until now.
The Goal of This Book
The goal of The Adobe Photoshop Layers Book is to give the
reader a complete approach to editing images using Layers
as a springboard. Layers will be used as a catalyst to organize
corrections and solidify work ow (the holistic process of editing
images), and act as the central component to corrections in every
change. The reader will learn professional correction techniques
that can be applied to any image, and they will become familiar
with the power of layers as an organizational, correction and
revision tool. The ultimate goal is to portray layers as the heart and
soul of image correction, and build a foundation of good practices
to help approach correction and enhancement of any image.
Achieving the Goals
The process of discovering layers starts with the essence of
learning what layers are and exploring the layers interface and
commands in detail. Exploration continues by applying layers
in real-life image editing situations using images found on the
CD. The approach looks at the fundamentals of images and
image editing, and shows how layers enable users to make
any adjustment to an image in a non-destructive fashion using
essential tools and concepts.
The techniques provided in this book help you take your
corrections to a professional level without hocus-pocus or steps
that are impossible to comprehend. You’ll see what happens
Prelims-K52076.indd xviiPrelims-K52076.indd xvii 6/21/07 4:59:18 PM6/21/07 4:59:18 PM
Introduction
xviii
behind the scenes in step-by-step procedures, and you’ll be given
the tools – customized actions created just for this book – to move
through those steps quickly to set up image editing scenarios.
This book will divulge
• A process of approaching image corrections (a work ow)
centered on layered development with proven methods and
a proven, core tool set.
• High-powered editing techniques and scenarios that leverage
the power of layers to enhance your ability to make any image
adjustment.
• Realistic image editing situations with real images by using
realistic expectations to get real results.
• Timeless techniques that span many versions of Photoshop
based on good core fundamentals and essential understanding
that can be used with any image.
This book will not
• Show you eeting techniques that emphasize the newest tools
just because they are new.
• Examine a plethora of rarely used tools in excruciating detail just
because they are there.
• Show you how to create crazy e ects that you may use once in a
lifetime, if ever.
Who Should Read This Book
This book is for anyone who is serious about enhancing their
Photoshop skills and getting better results from all of their digital
images. It applies to those using either a digital camera or scanner
with Mac or PC computers.
Readers of this book should not be absolute beginners with
Photoshop. This book is for intermediate and advanced Photoshop
users who have at least dabbled in using layers, perhaps knowing
they could make more of them.
It is assumed that the reader is familiar with the basic Photoshop
tools (or that they are competent to research these in Photoshop
Help). This book is written for:
• Intermediate and advanced users who want to understand
how to use layers optimally for non-destructive adjustment and
organizing image corrections.
Prelims-K52076.indd xviiiPrelims-K52076.indd xviii 6/21/07 4:59:18 PM6/21/07 4:59:18 PM
Introduction
xix
• Serious hobbyists who want to get more from their investment
in Photoshop by leveraging the power of its most potent tool.
• Those with some rudimentary experience with Photoshop who
are looking for an organized approach to editing any image and
getting consistently better image results.
How This Book Is Organized
As you go through this book, you will discover a mixture of
practical theories, examples of the types of changes you’ll make
in images daily, and projects to work on to help you understand
the process as well as why it works. Projects are devised so that
you don’t just complete an exercise or press a button and ogle
the result, but so that you see what goes on behind the scenes to
help understand what you have done. When you understand, you
can apply that understanding to other images predictably, either
by using tools provided to drive the processes or by manually
applying learned techniques.
A routine is established so that you set clear goals, and establish
a method of approaching your images consistently. The examples
provided ensure that you can see the changes when they have
achieved the desired result. This understanding will enable you
to apply the techniques you learn to other images so that your
images can be improved consistently.
In Photoshop, many tools and functions can be accessed
by more than one method. When following along with this
book’s step-by-step instructions, use the suggested steps
for accessing the tools. Using other methods may cause
sequences to behave unpredictably. For example, opening
Levels with the keyboard shortcut (CommandϩL / CtrlϩL) will
open the Levels dialog box but will not produce an adjustment
layer, and this can a ect the outcome of a procedure that
depends on the adjustment layers being created.
You will learn multiple color-separation methods to take apart
image color and tone, as well as di erent ways to isolate color
components, image objects and areas. When you can isolate colors
and image areas, you can correct those areas separately from the
rest of the image and exchange, move, and replace elements to
Prelims-K52076.indd xixPrelims-K52076.indd xix 6/21/07 4:59:18 PM6/21/07 4:59:18 PM
Introduction
xx
make better images. Actions included on the CD are introduced in
the exercises and will reveal functional scenarios that can be used
with any image and simplify the process of applying what you learn.
The chapters build from one to the next, each using some ideas
from the previous chapter(s), building to chapters which follow
image process from beginning to end by using a single image.
Chapters will incorporate mini exercises that invite the reader to
Try It Now, using a hands-on approach to learning. All images used
in these exercises can be found on the CD, so the user can work
along. No book of any length can completely explore every facet
of every concept that they present, but they should give you a
pretty good idea. Each chapter ends with a segment that considers
possibilities for using the techniques and concepts you’ve learned
in each chapter. The purpose and content of each chapter is listed
below:
Chapter 1 – The Basics of Layers: Layer Functions and Creation
Understanding how to work with layers starts with understanding
some basics about what layers are, what their capabilities are,
what functions are in the layers palette, and how to locate all
that you need to apply basic layer power. Readers will explore
the layers palette, see how all the basic functionality ts into the
layers palette and menus, learn how to create layers, access and
apply basic layer functions, and how to adjust the layer viewing
preferences. We’ll run through a hands-on no-knowledge-
necessary example of using layers and see some simple e ects
that can be achieved in the world of layers.
Chapter 2 – Layer Management: Concepts of a Layer-Based
Work ow
Exploring practical application of layers shows the exibility that
layers o er and organization they provide, and leads to using
layers most e ectively. There are reasons to create layers based on
the scope of layer capabilities and the changes you want to make;
in a similar vein, there are reasons not to create layers, reasons to
delete or combine layers, and means of managing layer content
such as merging, linking and grouping. E ectively managing layers
and layer content will help keep image corrections on track, will
allow users the exibility to step back in corrections, and will also
keep images from bulking up to ridiculous sizes unnecessarily.
This discussion will include a brief discussion of layer types, such
Prelims-K52076.indd xxPrelims-K52076.indd xx 6/21/07 4:59:19 PM6/21/07 4:59:19 PM
Introduction
xxi
as type and adjustment layers, linking, alignment and activating
(multiple deletes and duplication). Readers will test out all the
layer creation and combining features, and will be introduced to
the steps of a digital work ow.
Chapter 3 – Object and Image Area Isolation in Layers
For users who have ever wanted to change just one small part of
an image, this chapter begins to look at how to do that e ectively
with layers. Sure you can isolate areas with selection, but selection
has disadvantages in that changes are all or nothing and selected
areas are only temporarily isolated. Layers enhance your freedom
to correct image areas by isolating areas completely from the rest
of the image. Once areas are isolated, users can make adjustments,
and then ne-tune adjustments in ways that are impossible with
simple selective change. We’ll look at using layers to isolate image
areas and objects using copy and paste, and applying a simple
layered e ect using layer styles and manual e ects. We’ll also look
at blending layers using Opacity, and the idea of adding external
components to an image to look at how layers o er exibility to
control composition.
Chapter 4 – Masking: Enhanced Area Isolation
Even more advanced means of isolating image areas exist in
the form of masking. Masking allows users to hide areas of a layer
without actually removing those areas from the image; masked
areas are hidden in the image rather than permanently erased.
We’ll look at masking as it applies to layer transparency, layer
clipping, Adjustment layers, and proper layer masks. We’ll use
layer masking to paint in e ects, a ect image sharpness
selectively, and change image color selectively.
Chapter 5 – Applying Layer E ects
With the ability to isolate image areas comes the advantage
of applying layer-based e ects. We will look at the e ect
possibilities, practical uses and application. We’ll consider the
di erence between Fill and Opacity. We’ll peek around the corner
to Chapter 6 by using layer modes and revisit examples from
Chapter 1. Then we’ll look at how you can create layer e ects
manually, using concepts from Chapters 3 and 4 to isolate and
mask image areas. Global settings will be explored for applying
e ect direction.
Prelims-K52076.indd xxiPrelims-K52076.indd xxi 6/21/07 4:59:19 PM6/21/07 4:59:19 PM
Introduction
xxii
Chapter 6 – Exploring Layer Modes
People that get involved in using layer modes often just apply
them willy-nilly like lters, and experiment till they see something
that they like. There is a better approach to layer modes: actually
knowing what they do and when they can be helpful. Not all
layer modes are really useful for everyday correction but some
are, and they are very powerful tools. We’ll look at ways that
users can use layer modes everyday for image enhancements
and improvements. Calculations will be explored in making
some simple separation of image components into color and
luminosity to see how components of an image can be separated
to allow useful change. Manual e ects like dodge and burn, image
comparison, contrast enhancement and more will be explored.
Chapter 7 – Advanced Blending with Blend If
Photoshop has several advanced blending modes that allow
users to blend layers based on components/channels, qualities
in the current layer and qualities in layers below the current layer.
This capacity is mostly encompassed by Blend If and component
targeting. These powerful tools are often great to use as adjuncts to
more familiar layer tools, but we will explore examples of more than
one type, in practical examples that use Blend If for image change.
Chapter 8 – Breaking Out Components
This chapter looks at ways to leverage the power of layers to
separate out image areas by tone or color. These powerful
methods of separating images into components can lead to a
plethora of advantages in creating layer-based masks based on
speci c image qualities, and can open the door to a world of
creativity in manipulating tone, color, shape and composition.
Custom tools will be provided for users to create involved image
scenarios that allow layer-based channel mixing of di erent sorts
and targeting tone and color change in a more powerful way
than other channel mixing options or controls o ered as standard
Photoshop tools.
Chapter 9 – Taking an Image through the Process
Now that we have explored the parts of layers and what they can
do, we will look at applying layers as a complete process to an
image from beginning to end. This chapter o ers the opportunity
to review every preceding chapter as part of an actual application
in image correction. It o ers the opportunity to focus on the
Prelims-K52076.indd xxiiPrelims-K52076.indd xxii 6/21/07 4:59:19 PM6/21/07 4:59:19 PM
Introduction
xxiii
work ow, it reinforces the idea of outlining what to do with an
image before approaching corrections, and it shows how to keep
everything organized during the process.
Chapter 10 – Making a Layered Collage or Composite Image
As an exercise in creativity and an opportunity to break out all
the tools that readers encountered in the course of this book, the
nal chapter is devoted to exploration of compositing and collage
work. The emphasis will be on considering the idea of collage,
and then how changes and additions are implemented using the
power of layers. Source images will be provided from the examples
in this book for looking at panorama stitching, composites and
collage. Readers will be encouraged to exercise their layer muscles
by using techniques from previous chapters to make a creative
collage from a variety of source images.
The CD
One of the most important parts of this book is the CD. First, the
CD contains all the images from this book so that readers can work
through the corrections exactly as they are portrayed. Second,
the CD contains a set of custom actions that will help readers set
up scenarios in their images and to repeat long sets of steps that
are in this book but would otherwise be tedious to apply. To use
the actions and simplify procedures you’ll have to do nothing
more than load and run an action. These actions/tools are meant
for readers of this book only and should not be shared freely
with other Photoshop users. The actions must be installed into
Photoshop via the actions palette to be accessible. The CD,
images and actions will operate on Windows and Macintosh
computers.
To install the actions, rst locate the actions folder on the CD.
Actions in this folder can be dragged directly to the actions palette
in Photoshop, or they can be loaded through the Load Actions
function on the Actions palette menu (see Figure 4).
After you’ve installed the actions, you’ll be able to access them
in the Actions palette. Open the Actions palette by choosing
Actions from the Window menu. The usage of the actions is
discussed in this book, and all are described in the readme le
for the actions on the CD. Please make use of the website for this
book and use the online forum to discuss any problems you may
Prelims-K52076.indd xxiiiPrelims-K52076.indd xxiii 6/21/07 4:59:19 PM6/21/07 4:59:19 PM
Introduction
xxiv
be having with the CD. Find links for the forums on the website
The images used as practice les in this book are provided on
the accompanying CD so that readers can work along with the
exercises. They are mostly provided as .psd les (Photoshop
documents) but may be in other formats as appropriate to
a particular exercise. These images are copyrighted and for
educational purposes only; please use them only in the context
of the exercises. Work with the images by opening them with
Photoshop directly o the CD, and save them as you need
them to your hard drive. The images are all compatible with
Macintosh and Windows computers.
Mac and PC Compatibility
The actions and images on the CD are completely compatible
with Mac and PC platforms, and they work in the same way within
FIG 4 Open the Actions palette from
the Photoshop Windows menu, then
choose Load Actions from the palette
menu.
Prelims-K52076.indd xxivPrelims-K52076.indd xxiv 6/21/07 4:59:19 PM6/21/07 4:59:19 PM