Tài liệu Excel 2010 part 4 pdf
Bạn đang xem bản rút gọn của tài liệu. Xem và tải ngay bản đầy đủ của tài liệu tại đây (2.38 MB, 10 trang )
30
11
22
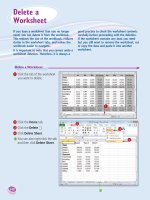
2 Type the date.
Note: The format you use
depends on your location. In the
United States, for example, you
can use the month/day/year
format — 8/23/2010. See the
Tip on the next page.
3 When your date is complete,
press
.
•
If you do not want Excel to
move the selection, click Enter
(
) or press +
instead.
Excel closes the cell for editing.
Enter a Date
1 Click the cell in which you
want to enter the date.
•
Excel marks the current cell by
surrounding it with a thick,
black border.
Enter a Date or Time into a Cell
Many Excel worksheets use dates either as part
of the sheet data or for use in calculations, such
as the number of days an invoice is overdue.
Excel worksheets also often use times, such as
recording when a transaction took place or
calculating the total number of hours an
employee has worked in a given period.
For these and similar uses, you need to know
how to enter date and time values into a cell.
Enter a Date or
Time into a Cell
04_577639-ch02.indd 3004_577639-ch02.indd 30 3/15/10 2:36 PM3/15/10 2:36 PM
31
Entering and Editing Excel Data
CHAPTER
2
11
22
How can I tell which date and time formats my
version of Excel accepts?
Follow these steps:
1 Click the Home tab.
2 Click the dialog box launcher button in the
bottom right corner of the Number group.
3 Click the Number tab.
4 Click Date.
5 Click the Locale (location) drop-down arrow and then click your location.
6 Examine the Type list to see the formats you can use to enter dates.
7 Click Time.
8 Examine the Type list to see the formats you can use to enter times.
9 Click Cancel.
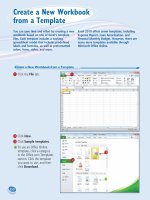
Enter a Time
1 Click the cell in which you
want to enter the time.
•
Excel marks the current cell by
surrounding it with a thick,
black border.
2 Type the time.
Note: The general format
for entering a time is
hour:minute:second AM/PM; for
example, 3:15:00 PM. See the
following Tip.
3 When your time is complete,
press
.
•
If you do not want Excel to
move the selection, click Enter
(
) or press + instead.
Excel closes the cell for editing.
77
66
55
99
33
44
04_577639-ch02.indd 3104_577639-ch02.indd 31 3/15/10 2:36 PM3/15/10 2:36 PM
32
22
33
11
44
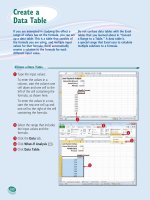
3 Click the Insert tab.
4 Click Symbol.
1 Click the cell in which you
want the symbol to appear.
2 Type the text that you want
to appear before the symbol,
if any.
Insert a Symbol
You can make your Excel worksheets more
readable and more useful by inserting special
symbols that are not available via your
keyboard’s standard keys. These special symbols
include foreign characters such as ö and é,
mathematical symbols such as
÷ and ∞, financial
symbols such as ¢ and ¥, commercial symbols
such as © and ®, and many more.
Insert a
Symbol
04_577639-ch02.indd 3204_577639-ch02.indd 32 3/15/10 2:36 PM3/15/10 2:36 PM
33
Entering and Editing Excel Data
CHAPTER
2
99
55
66
77
Are there keyboard shortcuts available for symbols I use frequently?
Yes, in many cases. In the Symbol dialog box, click in the from list and select
ASCII (decimal). Click the symbol you want to insert and then examine the
number in the Character code text box. This number tells you that you can
enter the symbol via the keyboard by holding down
, pressing , and then
typing the number. For example, you can enter the © symbol by pressing
+
. Be sure to type all the numbers using your keyboard’s numeric
keypad.
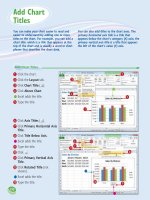
The Symbol dialog box
appears.
5 Click the Symbols tab.
6 Click the symbol you want to
insert.
Note: Many other symbols are
available in the Webdings and
Wingdings fonts. To see these
symbols, click the Font
, and
then click either Webdings or
Wingdings.
7 Click Insert.
•
Excel inserts the symbol.
8 Repeat Steps 6 and 7 to insert
any other symbols you require.
9 Click Close.
04_577639-ch02.indd 3304_577639-ch02.indd 33 3/15/10 2:36 PM3/15/10 2:36 PM
34
11
33
•
Excel opens the cell for editing
and moves the cursor to the
end of the existing data.
•
Excel displays Edit in the
status bar.
•
You can also click inside the
Formula bar and edit the cell
data there.
3 Make your changes to the
cell data.
1 Click the cell in which you
want to edit the text.
2 Press .
You can also double-click the
cell you want to edit.
Edit Cell Data
Once you enter text, a number, a date, or a
time into a cell, that cell data is not set in
stone. If the data you entered into a cell has
changed or is incorrect, you can edit the data
to the updated or correct value. You can edit
cell data either directly in the cell or by using
the Formula bar.
Edit Cell
Data
04_577639-ch02.indd 3404_577639-ch02.indd 34 3/15/10 2:36 PM3/15/10 2:36 PM
35
Entering and Editing Excel Data
CHAPTER
2
Is there a faster way to
open a cell for editing?
Yes. Move over the cell
you want to edit, and center
over the character where
you want to start editing.
Double-click the mouse. Excel
opens the cell for editing and
positions the cursor at the
spot where you double-clicked.
•
Excel closes the cell for editing.
•
If you pressed , Excel
moves the selection to the cell
below.
4 When you finish editing the
data, press
.
•
If you do not want Excel to
move the selection, click Enter
(
) or press +
instead.
I made a mistake when I edited a cell. Do
I have to fix the text by hand?
Most likely not. If the cell edit was the last
action you performed in Excel, press
+
or click the Undo button ( ) in the Quick
Launch Toolbar. If you have performed other
actions in the meantime, click the Undo
and then click the edit in the list that appears.
Note, however, that doing this will also undo
the other actions you performed after the
edit.
04_577639-ch02.indd 3504_577639-ch02.indd 35 3/15/10 2:36 PM3/15/10 2:36 PM
36
11
22
33
44
2 Click the Home tab.
3 Click Clear ( ).
4 Click Clear Contents.
Note: You can also delete cell
data by pressing
Delete
.
Delete Cell Data
1 Select the cell that contains the
data you want to delete.
Delete Data from a Cell
If your worksheet has a cell that contains data
you no longer need, you can delete that data.
This helps to reduce worksheet clutter and
makes your worksheet easier to read. If you
want to delete data from multiple cells, you
must first select those cells; see “Select a Range”
in Chapter 3. To delete cells and not just the
data, see “Delete a Range” in Chapter 3.
Delete Data
from a Cell
04_577639-ch02.indd 3604_577639-ch02.indd 36 3/15/10 2:36 PM3/15/10 2:36 PM
37
Entering and Editing Excel Data
CHAPTER
2
11
22
When I delete cell data, Excel
keeps the cell formatting intact. Is
it possible to delete the data and
the formatting?
Yes. Excel offers a command that deletes
everything from a cell. First, select the
cell with the data and formatting that
you want to delete. Click Home, click
, and then click Clear All. Excel
removes both the data and the
formatting from the selected cell.
Is it possible to delete just a cell’s
formatting?
Yes. Excel offers a command that
deletes just the cell formatting while
leaving the cell data intact. Select the
cell with the formatting that you want
to delete. Click Home, click
, and
then click Clear Formats. Excel
removes just the formatting from
the selected cell.
Undo Cell Data Deletion
1 Click the Undo .
2 Click Clear.
Note: If the data deletion was
the most recent action you
performed, you can undo it by
pressing
+ or by clicking
Undo (
).
•
Excel restores the data to the
cell.
•
Excel removes the cell data.
04_577639-ch02.indd 3704_577639-ch02.indd 37 3/15/10 2:36 PM3/15/10 2:36 PM
Chapter
Chapter
3
3
3
3
Working with
Excel Ranges
In Excel, a range is a collection
of two or more cells that you
work with as a group rather
than separately. This enables
you to fill the range with values,
move or copy the range, sort
the range data, filter the range
to show only certain values,
insert and delete ranges, hide
entire rows or columns, and
merge two or more cells. You
learn these and other range
techniques in this chapter, and
in later chapters you learn techniques such as formatting a range, applying a
formula to a range, and building a chart from a range.
05_577639-ch03.indd 3805_577639-ch03.indd 38 3/15/10 2:38 PM3/15/10 2:38 PM
Chapter
3
3
3
Select a Range . . . . . . . . . . . . . . . . . . . . . . . . . . . . . . . 40
Fill a Range with the Same Data . . . . . . . . . . . . . . . . . . . 42
Fill a Range with a Series of Values . . . . . . . . . . . . . . . . . 44
Move or Copy a Range . . . . . . . . . . . . . . . . . . . . . . . . . 46
Insert a Row or Column . . . . . . . . . . . . . . . . . . . . . . . . . 48
Insert a Cell or Range . . . . . . . . . . . . . . . . . . . . . . . . . . 50
Delete Data from a Range . . . . . . . . . . . . . . . . . . . . . . . 52
Delete a Range . . . . . . . . . . . . . . . . . . . . . . . . . . . . . . 54
Hide a Row or Column . . . . . . . . . . . . . . . . . . . . . . . . . 56
Freeze Rows or Columns . . . . . . . . . . . . . . . . . . . . . . . . 58
Merge Two or More Cells . . . . . . . . . . . . . . . . . . . . . . . 60
Transpose Rows and Columns . . . . . . . . . . . . . . . . . . . . . 62
05_577639-ch03.indd 3905_577639-ch03.indd 39 3/15/10 2:38 PM3/15/10 2:38 PM