Tài liệu Web Programming with HTML, XHTML, and CSS Second Edition- P3 docx
Bạn đang xem bản rút gọn của tài liệu. Xem và tải ngay bản đầy đủ của tài liệu tại đây (1.11 MB, 50 trang )
The title Attribute
As mentioned at the start of the chapter, a title attribute is vital for any links that are images, and can also
help provide additional information to visitors in the form of a visual text tooltip in most browsers or an
auditory clue in voice browsers for the visually impaired. Figure 2-2 near the beginning of this chapter
showed you what the
title attribute looks like in Firefox when a user hovers over the link.
The type Attribute
The type attribute specifies the MIME type of the link. Appendix H includes a list of MIME types. An
HTML page would have the MIME type
text/html, whereas a JPEG image would have the MIME type
img/jpeg. The following is an example of the type attribute being used to indicate that the document
the link points to is an HTML document:
<a href=”index.html” type=”text/html”>Index</a>
Theoretically, the browser could use the information in the type attribute to either display it differently
or indicate to the user what the format of the destination is, although none do use it at present.
Try It Out Creating Links Within Pages
Now it’s your turn to try making a long page with links between different parts of the page. In this
example, you are going to create a page that is a restaurant menu. So open your text editor or authoring
tool and follow these steps:
1. Start with the XML declaration, DOCTYPE declaration, and the elements for the skeleton of the
document:
<html>, <head>, <title>, and <body>. Remember to give the document a title and
add in the namespace identifier on the root
<html> element:
<?xml version=”1.0” ?>
<!DOCTYPE html PUBLIC “-//W3C//DTD XHTML 1.0 Strict//EN”
“ /><html xmlns=” lang=”en”>
<head>
<title>A menu example</title>
</head>
<body>
</body>
</html>
2. Inside the <body> element, add the headings for the page. Each of these should have a destina-
tion anchor so that you can link directly to that part of the page. The main heading will be used
for “Back to top” links, whereas each course of the menu will have an
id attribute that describes
its sections:
<body>
<h1><a id=”top”>Wrox Cafe Menu</a></h1>
<h2><a id=”starters”>Starters</a></h2>
<h2><a id=”mains”>Main Courses</a></h2>
<h2><a id=”desserts”>Desserts</a></h2>
</body>
71
Chapter 2: Links and Navigation
59313c02.qxd:WroxPro 3/24/08 11:31 PM Page 71
Please purchase PDF Split-Merge on www.verypdf.com to remove this watermark.
3. Between the title and the starters, not only will there be an introductory paragraph, but also a
menu linking to each of the courses. In order to be Strict XHTML, the links at the top will go in
a block-level
<div> element:
<h1><a id=”top”>Wrox Cafe Menu</a></h1>
<div id=”nav”><a href=”#starters”>Starters</a> | <a href=”#mains”>Main
Courses</a> | <a href=”#desserts”>Desserts</a></div>
<p>Welcome to the Wrox Cafe, where we pride ourselves on good, honest home
cooked food at good, honest prices.</p>
<h2><a id=”starters”>Starters</a></h2>
4. At the bottom of the page, you will have a description of vegetarian dishes. Links next to vege-
tarian items will point to this description, so it needs to have a destination anchor.
<p><a id=”vege”>Items marked with a (v) are suitable for vegetarians.</a></p>
5.
Finally, you can just add in the items on the menu in a bulleted list. Note how the vegetarian
items have a link down to the description of vegetarian dishes. Don’t forget to add the “Back to
top” links.
<h2><a id=”starters”>Starters</a></h2>
<ul>
<li>Chestnut and Mushroom Goujons (<a href=”#vege”>v</a>)</li>
<li>Goat Cheese Salad (<a href=”#vege”>v</a>)</li>
<li>Honey Soy Chicken Kebabs</li>
<li>Seafood Salad</li>
</ul>
<p><small><a href=”#top”>Back to top</a></small></p>
<h2><a id=”mains”>Main courses</a></h2>
<ul>
<li>Spinach and Ricotta Roulade (<a href=”#vege”>v</a>)</li>
<li>Beef Tournados with Mustard and Dill Sauce</li>
<li>Roast Chicken Salad</li>
<li>Icelandic Cod with Parsley Sauce</li>
<li>Mushroom Wellington (<a href=”#vege”>v</a>)</li>
</ul>
<p><small><a href=”#top”>Back to top</a></small></p>
<h2><a id=”desserts”>Desserts</a></h2>
<ul>
<li>Lemon Sorbet (<a href=”#vege”>v</a>)</li>
<li>Chocolate Mud Pie (<a href=”#vege”>v</a>)</li>
<li>Pecan Pie (<a href=”#vege”>v</a>)</li>
<li>Selection of Fine Cheeses from Around the World</li>
</ul>
<p><small><a href=”#top”>Back to top</a></small></p>
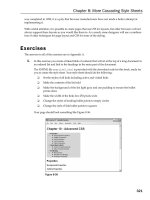
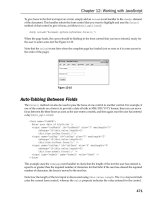
6. Save your example as menu.html and take a look at it in your browser. You should end up with
something that looks like Figure 2-8.
72
Chapter 2: Links and Navigation
59313c02.qxd:WroxPro 3/24/08 11:31 PM Page 72
Please purchase PDF Split-Merge on www.verypdf.com to remove this watermark.
Figure 2-8
How It Works
You have already seen the skeleton parts for the page (along with the declarations that come before it),
so let’s focus on the links.
There are three source anchors just under the first heading that form a simple navigation bar. When clicked,
these will take users to the appropriate section of the page. These items are kept inside a <div> element
because
<a> elements should appear inside a block-level element in Strict XHTML 1.0 — although any
earlier versions would allow you to leave this off.
<div id=”nav”><a href=”#starters”>Starters</a> | <a href=”#mains”>Main courses
</a> | <a href=”#esserts”>Desserts</a></div>
The id attribute on the <div> element is there just to identify the purpose of this block-level grouping
element. Because this element does not have a specific purpose like some of the other elements (such as
<p> or <h2>), it helps to add this attribute as a reminder of what it is grouping.
Three additional source anchors are underneath each section of the menu to take you back to the top of
the page.
<p><small><a href=”#top”>Back to top</a></small></p>
Finally, source anchors with the text v indicate items are vegetarian, and to take you to a key at the bot-
tom of the page that explains what the
v stands for.
<li>Mushroom wellington (<a href=”#vege”>v</a>)</li>
73
Chapter 2: Links and Navigation
59313c02.qxd:WroxPro 3/24/08 11:31 PM Page 73
Please purchase PDF Split-Merge on www.verypdf.com to remove this watermark.
The destination anchors are using the id attribute to indicate the potential targets of links. Each of the
headings contains a destination anchor. The main menu heading requires an anchor so that the “Back to
top” links will take the user to the top of the page, while the subheadings have anchors so that the navi-
gation menu at the top can take them to that part of the page.
Remember that destination anchors must have some content — they cannot be empty or the browser
might not recognize them, which is why they have been put inside the heading elements surrounding
the actual heading name:
<h1><a id=”top”>Wrox Cafe Menu</a></h1>
<h2><a id=”starters”>Starters</a></h2>
<h2><a id=”mains”>Main courses</a></h2>
<h2><a id=”desserts”>Desserts</a></h2>
Similarly, the paragraph at the bottom that indicates what the (v) sign means contains a destination
anchor, just like the heading.
<p><a id=”vege”>Items marked with a (v) are suitable for vegetarians.</a></p>
Advanced E-mail Links
As you saw at the beginning of the chapter, you can make a link open up the user’s default e-mail editor,
and address an e-mail to you — or any other e-mail address you give — automatically. This is done like so:
<a href=”mailto:”></a>
You can also specify some other parts of the message, too, such as the subject, body, and people that it
should be cc’d or bcc’d to.
To add a subject to an e-mail, you follow the e-mail address with a question mark to separate the extra
values from the e-mail address. Then you use the name/value pairs to specify the additional properties
of the mail you want to control. The name and the value are separated by an equal sign.
For example, to set the subject to be Enquiry, you would add the
subject property name and what you
wanted to be the subject, like so:
<a href=”mailto:?subject=Enquiry”>
You can specify more than one property by separating the name/value pairs with an ampersand. Here
you can see that the subject and a cc address have been added in:
<a href=”mailto:?subject=XHTML&cc=”></a>
The table that follows includes a full list of properties you can add.
74
Chapter 2: Links and Navigation
59313c02.qxd:WroxPro 3/24/08 11:31 PM Page 74
Please purchase PDF Split-Merge on www.verypdf.com to remove this watermark.
If you want to add a space between any of the words in the subject line, you should add %20 between the
words instead of the space. If you want to take the body part of the message onto a new line you should
add
%0D%0A (where 0 is a zero, not a capital O).
It is common practice to add only the e-mail address in e-mail links. If you want to add subject lines or
message bodies you are better off creating an e-mail form, like the one you will see in Chapter 5.
Summary
In this chapter you learned about links — the part of XHTML that puts the “hyper” in hypertext. Links
enable visitors to your site to jump between pages and even between parts of pages (so that they don’t
have to scroll to find the place they need).
You have seen that you can use the
<a> element to create source anchors, which are what most people
think of when you mention links on the Web. The content of the source anchor is what users can click —
and this should usually be an informative, concise description of what the target is (rather than text such
as “click here”), or it can be an image (as you will see in Chapter 3).
You can also use the
<a> element to create destination anchors. Destination anchors are a little like index
points or special markers because they allow you to create links that take you directly to that part of the
page. Destination anchors should always have some content, and the old
name attribute that HTML
introduced for destination anchors has been replaced in Strict XHTML by the
id attribute (although this
works only in version 3+ browsers).
Along the way, you learned more about URLs, in particular the difference between an absolute URL, like those
that appear in the address bar of your browser, and relative URLs, which describe where a resource is in rela-
tion to the document containing it. Learning the different ways in which relative URLs can be used will also be
helpful as you head to the next chapter and learn about adding images and other objects into your documents.
Property Purpose
subject
Adds a subject line to the e-mail; you can add this to encourage the user to use a
subject line that makes it easier to recognize where the mail has come from.
body
Adds a message into the body of the e-mail, although you should be aware that
users would be able to alter this message.
cc
Sends a carbon copy of the mail to the cc‘d address; the value must be a valid e-mail
address. If you want to provide multiple addresses you simply repeat the property,
separating it from the previous one with an ampersand.
bcc
Secretly sends a carbon copy of the mail to the bcc‘d address without any recipient
seeing any other recipients; the value must be a valid e-mail address. If you want to
provide multiple addresses, you simply repeat the property, separating it from the
previous one with an ampersand.
75
Chapter 2: Links and Navigation
59313c02.qxd:WroxPro 3/24/08 11:31 PM Page 75
Please purchase PDF Split-Merge on www.verypdf.com to remove this watermark.
Exercises
You can find the answers to all of the exercises in Appendix A.
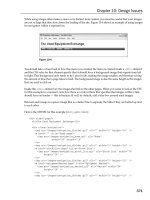
1. Look back at the Try It Out example where you created a menu, and create a new page that has
links, like those at the top of the menu page, to each of the courses in the menu example. Then
add a link to the main Wrox Press web site (
www.wrox.com). The page should look something
like Figure 2-9.
Figure 2-9
2. Take the following sentence and place <a> elements around the parts that should have the link.
<p>To find out why advertising on our site works, visit the testimonials
page.</p>
3. What is wrong with the positioning of the <a> element here?
<p>You can read the full article <a>here</a>.</p>
76
Chapter 2: Links and Navigation
59313c02.qxd:WroxPro 3/24/08 11:31 PM Page 76
Please purchase PDF Split-Merge on www.verypdf.com to remove this watermark.
3
Images and Objects
In this chapter, you begin learning some aspects of web design that will really breathe life into your
web pages. You start by learning how to add images into your documents using the
<img> element.
You will see the difference between some of the main formats used for images on the Web and learn
how to prepare your images for use on the Web. You will also learn how to make an image a link,
and even how to divide an image up into sections so that different parts of the image link to differ-
ent pages — this is known as an image map.
Then you will go on to meet the
<object> element that you can use to insert all manner of objects
into pages, from MP3s and Flash movies to Active X controls and even images.
Adding Images to Your Site
Images and graphics can really bring your site to life. In this section you will not only learn how to
insert images and graphics into your pages, but also the different image formats you can use on the
Web (such as GIFs, JPEGs, and PNGs). You will also learn when you should choose which format.
You will see how careful you have to be when using images on the Web because if you don’t prepare
images correctly, they can really slow down the speed it takes for a page to load — and slow sites
frustrate users. Furthermore, because you will probably be writing your first sites on your desktop/
laptop computer, you might not realize how long a page will take to load until it is actually on the
Web. So choosing the right format for your images and saving them correctly will help make your
site faster and result in happier visitors.
For practice purposes, you can download images from other sites by right-clicking the image (or
Ctrl-clicking) and selecting either the
download image to disk or save image as options.
Remember, however, that images are subject to copyright, and you could land yourself in legal
trouble if you use other people’s images on your site.
Once you’ve learned how to insert the right kind of images into your pages, you will then see how
to turn them into links and even how to write code that divides them up, so that when users click
different parts of the image they get taken to different web pages.
59313c03.qxd:WroxPro 3/22/08 4:21 PM Page 77
Please purchase PDF Split-Merge on www.verypdf.com to remove this watermark.
Types of Image Formats
To start off, it would help to look at how computers store and render pictures. Graphics are created for
computers in two main ways:
❑ Bitmapped graphics
divide a picture into a grid of pixels and specify the color of each pixel, much
as a computer tells a screen the color of each pixel. Broadly speaking, bitmaps are ideal for photo-
graphs and complicated gradations of shade and color. There are several different Bitmap formats;
common ones include JPEG, GIF, TIFF, PNG, and the rather confusingly named bitmap or BMP.
You will be learning more about JPEGs, GIFs, and PNGs later in the chapter.
❑ Vector graphics break the image into lines and shapes (like a wireframe drawing), and store the
lines as coordinates. They then fill the spaces between the lines with color. Vector graphics are
commonly used for line art, illustration, and animation. They often feature large areas of flat
color (as opposed to textures, shades of colors, and photographic styles).
In the early days, bitmaps were the main image format for the Web, although more recently some formats
such as Flash and SVG are making use of vector graphics.
Bitmap Images
Most static images on the Web are bitmapped images. As mentioned, the image is divided into a grid of
pixels. If you look very closely at your computer screen you may be able to make out the pixels that make
up the screen. If you look at Figure 3-1, you can see an example of a bitmap image with one section that
has been modified so that you can see how pixels make up the image.
Figure 3-1
78
Chapter 3: Images and Objects
59313c03.qxd:WroxPro 3/22/08 4:21 PM Page 78
Please purchase PDF Split-Merge on www.verypdf.com to remove this watermark.
The number of pixels in every square inch of the screen is known as the resolution of the image. Images on
the Web can show a maximum of 72 pixels per inch; images used in print are usually higher resolution and
are often supplied to printers at 300 dots per inch (note how onscreen we refer to pixels per inch, while in
print we call them dots per inch). The more pixels or dots per inch an image contains, the larger the size
of the file will be. As a result, any images that you use on the Web, you save at a resolution of 72 dots
per
inch. If you saved it any larger, this would create unnecessarily large files that would take longer to
download.
Note that while you can easily save an image that is 300 dots per inch at 72 pixels per inch for the Web,
you cannot simply increase an image from 72 pixels per inch to 300 dots per inch because you do not
know what color the 228 pixels that are missing from every square inch should be. If you just try to
increase the resolution of the image, it will often look grainy. Therefore, if you have a high-resolution
300-dots-per-inch picture, it is often helpful to keep a copy of it at that size just in case you ever wish
to show it larger or at a higher resolution.
Browsers tend to support three common bitmap graphics formats, and most graphics programs will save
images in these formats:
❑ GIF: Graphics Interchange Format (pronounced either “gif” or “jif”)
❑ JPEG: Joint Photographic Experts Group Format (pronounced “jay peg”)
❑ PNG: Portable Network Graphics (pronounced “ping” or “pee en gee”)
Let’s take a quick look at each of these because understanding how the format works helps you choose
how to save an image.
GIF Images
In the early days of the Web, the GIF (or Graphics Interchange Format) was the standard for all web
graphics. GIF images are created using a palette of up to 256 colors and each pixel of the image is one of
these 256 colors. Every different GIF image can have a different palette of 256 colors selected from a range
of over 16 million colors. The program that saves the image also selects the palette that will best represent
the images.
The GIF file stores the palette of colors in what is called a lookup table, and each pixel references the color
information in the lookup table rather than each pixel having to specify its own color information. So, if
many pixels use the same colors, the image does not have to repeat the same color information and the
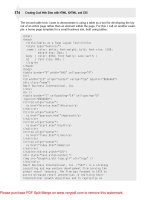
result is a smaller file size. This way of storing images is known as is an indexed color format. Figure 3-2
shows a GIF file being created in Adobe Photoshop. You can see the color palette that is being used for
this image represented in the set of squares halfway down the image on the right.
Because of the way GIF images save color information in a lookup table, they are particularly suited to
images where there are large flat areas of color. A flat area of color is a section that is just one shade; for
example, a rectangle that uses just one green is a flat color, whereas a picture of grass contains lots of dif-
ferent greens. The fewer colors the image uses, the smaller the GIF file is.
If a GIF contains less than 16 colors (in which case it can be referred to as a 4-bit GIF), the image will be
less than half the file size of a GIF using 256 colors (known as an 8-bit GIF). Therefore, if you are creating
an image that uses less than 16 colors, it is worth checking whether your program automatically saves your
image as a 4-bit GIF because this will result in a smaller file that’s quicker to download than an 8-bit GIF.
79
Chapter 3: Images and Objects
59313c03.qxd:WroxPro 3/22/08 4:21 PM Page 79
Please purchase PDF Split-Merge on www.verypdf.com to remove this watermark.
Figure 3-2
If your text or lines are two colors (say black and white) and you have used anti-aliased edges to make
them look smoother, your image will contain more than two colors because the edges use a variety of
other colors to make them look smooth.
If the GIF needs to use more than 256 colors, then most graphics programs, when saving GIFs, will use a
technique called dithering to better represent the extra colors. Therefore, they use two or more colors in
adjacent pixels to create an effect of a third color. Dithering has the following two drawbacks:
❑ It can result in some banding in colors. This usually occurs when patches of the image look flat to
the eye in the original, but are actually very slightly different shades. For example, when there is
a smooth transition between one color and another color (referred to as a gradient), dithering uses
a lot of different colors to create the smooth effect. In this case, the changes between colors can
become more visible.
❑ If you place a flat color next to a dithered color you will be able to see where the change occurs
(because the dithered color is really made up of more than one color).
Figure 3-3 illustrates how even a simple gradient, when saved as a GIF, can result in banding because the
image contains more than 256 colors — if you look closely you can see that the gradient had vertical lines
rather than a smooth transition from black to white.
Because GIFs support only 256 colors and have to use dithering to achieve any further colors, they are not
really suitable for detailed photographs, which tend to contain more than 256 colors. If you have a photo-
graph, gradient, or any image with similar shades of the same color next to each other, you are often better
off using a JPEG, which can support unlimited colors, or sometimes a PNG — both of which you will
learn about shortly.
80
Chapter 3: Images and Objects
59313c03.qxd:WroxPro 3/22/08 4:21 PM Page 80
Please purchase PDF Split-Merge on www.verypdf.com to remove this watermark.
Figure 3-3
GIFs do have another handy feature: you can specify one or more colors in a GIF to represent a transparent
background — in parts of the image that are the specified colors, the background will be allowed to show
through. You should be aware, however, that each pixel is either on or off, opaque or transparent — there
are not degrees of transparency, as there are in alpha-color transparency formats. As a result, if you try to
use it with curved corners, the corners may appear pixelated. To help overcome this problem you should
try to make the transparency color as close to the background color as possible (or if you are using Photoshop
you can use the matte feature).
Figure 3-4 shows how a pixelated effect is created when a GIF is not created on a suitable background
(notice the corners in particular).
Figure 3-4
To make the GIF files smaller, they are compressed using a technique called LZW compression, which scans
rows of the image looking for consecutive pixels that share the same color. When it comes across them, it
indicates that x number of pixels should be written from this point onwards using the same color.
LZW compression is known as a lossless compression technique because no data is lost and therefore there
is no loss of quality (this is contrasted with lossy compression techniques where some of the data is discarded
during compression and cannot therefore be recovered from the compressed file). However, when there are
not many consecutive pixels of the same color, there is little saving in file size. Thus, the format does not
compress photographic images well because, while the adjacent pixels may look the same in photo
graphs,
81
Chapter 3: Images and Objects
59313c03.qxd:WroxPro 3/22/08 4:21 PM Page 81
Please purchase PDF Split-Merge on www.verypdf.com to remove this watermark.
they tend to be very slightly different. Furthermore, if the picture uses complex dithering to
achieve
subtle coloring effects, there is less chance of finding pixels of the same consecutive color, and therefore
file size cannot be compressed.
Some programs will give you an option of saving the file as an interlaced image. Interlacing means that lines
of the image are stored in a different order than they would appear in the image, allowing a browser to
display every eighth row in turn and then fill in the lines between. The idea behind interlaced images was
that, if you had a large file on a slow connection, the user would see something appearing early on, and
the image would get progressively clearer. However, as connection speeds on the Web have improved,
interlaced GIFs are not commonly seen anymore.
Animated GIFs
GIF images can store more than one frame (or copy of the image) within a file, allowing the GIF to rotate
between the versions/frames and create a simple animation. It works in a similar way to a flip-book ani-
mation, where the drawing on each page of the book changes slightly from the previous one, so that when
a user flips the pages it looks as if the images are moving.
This works especially well if your animated image contains large areas of flat color. Compression for this
technique is quite effective because only the changed pixels need storing with each frame, along with
their positions. It is not suitable, however, for photographic images because you end up with a very large
image.
You should be very careful about the use of animated GIFs. A lot of sites offer animated GIFs, from car-
toon characters doing something amusing to bouncing or flaming bullet points. Although they might be
impressive or fun the first time you see a page, they soon become tiresome, slow down the site, and dis-
tract users from the real content. So while animated GIFs can be fun on a personal home page, you will
very rarely find such animations on the sites of large companies. If you are trying to create a professional
looking site, you should use animated GIFs only if the animation gives additional information to the user.
JPEG Images
The JPEG image format was developed as a standard for storing and compressing images such as photo-
graphs with wide ranges of colors. When you save a JPEG, you can usually specify by how much, if at all,
you want to compress the image — which depends upon the image quality you want. The process of com-
pressing
a JPEG involves discarding color data that people would not normally perceive, such as small
color changes. However, because the image format discards this data when the image is compressed, some
of the data is lost and the original cannot be recreated from a compressed version — hence it is known as
lossy compression.
The amount of compression you apply will change from image to image, and you can only judge how
much to compress a JPEG by looking at it. Hence the size of the file varies depending upon how much
you compress the image. When you are saving the image, you will often be asked for a percentage of
quality to be used; 100 percent does not compress the picture at all, and for a photo you can usually get
down to around 60 percent (but not usually much lower). Some programs use words such as excellent,
very good, good, and so on to describe the image quality instead of percentages.
A good image-editing program enables you to compare the original image side by side with the compressed
version as you choose how much compression to add. Figure 3-5 shows you how Adobe Photoshop lets
you compare two versions of the image next to each other as you prepare to save the JPEG for the Web.
On
the left, you have the original image, and on the right is the version that it is saving for use on the Web.
82
Chapter 3: Images and Objects
59313c03.qxd:WroxPro 3/22/08 4:21 PM Page 82
Please purchase PDF Split-Merge on www.verypdf.com to remove this watermark.
Figure 3-5
Because the JPEG format was designed to work with photo-realistic images, they do not work so well with
images that have large amounts of flat color, or high-contrast hard edges (such as lettering and line draw-
ings). As you increase compression in a JPEG you may also see banding start to show in colors that are
very similar.
JPEG does support interlacing using the Progressive JPEG, allowing an initially blocky view of the image
to download first, with greater detail being filled in as the rest of the image loads. The most helpful aspect
of this is that it gives the user an idea of the size of the image that is being downloaded, and a rough idea
of how complete it is. However, they are not commonly used on the Web any more, and because JPEGs
tend to have a lot of detail, you often need a lot of the image to come through before you really get to see
the intended picture.
PNG Images
The Portable Network Graphics format is the most recent format on the block. It was developed in the
late 1990s because the company that owns the patent for GIFs (Unisys) decided to charge companies that
developed software for creating and viewing GIFs a license fee to use the technology. While web design-
ers and web surfers are not affected by this charge, the companies that make the software they use are.
The PNG format was designed for the same uses as GIF images, but while it was being created the designers
decided to solve what they thought were some of the disadvantages with the GIF format. The result is two
types of PNG. The 8-bit PNG has the same limitations as an 8-bit GIF — only 256 colors, and when trans-
parency is used each pixel is either on or off. Then there is the enhanced PNG-24, a 24-bit version, which
has the following advantages:
❑ The number of colors available for use in an image is not restricted, and so any color can be
included without losing any data.
❑ A map (like the lookup table that indicates the color of each pixel in GIFs) is used to provide dif-
ferent levels of transparency for every pixel, which allows for softer, anti-aliased edges.
83
Chapter 3: Images and Objects
59313c03.qxd:WroxPro 3/22/08 4:21 PM Page 83
Please purchase PDF Split-Merge on www.verypdf.com to remove this watermark.
❑ The approach of sampling one in eight lines was replaced with a two-dimensional sample which
can display an image eight times faster than a GIF.
❑ PNG 24-bit files can contain gamma correction information to allow for slight differences in color
between different monitors and platforms.
Furthermore, all PNGs tend to compress better than a GIF equivalent. The real drawback with the PNG
format, however, is that not all browsers support it. While basic support was offered in early versions of
browsers some of the more advanced features took longer to be implemented. For example, Internet
Explorer was unable to deal with transparency correctly until version 6.
Keeping File Sizes Small
You will usually want to save the images for your site in the format that best compresses the image and
therefore results in a smaller file size. This will not only make your pages quicker to load, but can also
save you on the charges made for hosting your site.
Usually one or another format will be the obvious choice for you. The rule of thumb is:
❑ Use JPEGs for photo-realistic pictures with a lot of detail, or subtle shade differences you want
to preserve.
❑
Use GIFs for images with flat color (rather than textured colors), and hard edges, such as diagrams,
text, or logos.
You can also consider using PNGs if you do not need the advanced features such as transparency, or if you
know the majority of your visitors will be using more recently released browsers.
If you look at the following images (see Figure 3-6) — one a photograph of Autumn leaves, and the sec-
ond, the logo of a fictional company called Wheels that uses only two colors — you can see the file size
of each saved as a GIF and as a JPEG (where the JPEG is saved at 60 percent quality).
As you can see, the Wheels logo has areas of flat, plain color, whereas the photo of the forest uses lots of
different shades. Therefore, the logo is better suited to the GIF or PNG formats, while the photo of the
forest with all its shadows is suited better to the JPEG format.
Good image editing software is very helpful if you use a lot of images on your site. Adobe Photoshop
is the most popular software used by professionals, although it is very expensive. There is, however, a
limited functionality version called Photoshop Elements that includes many of the common features —
including the Save for Web options. Two other popular image editing programs are Paint Shop Pro
made by JASC software and a free image editing program called Gimp which you can download from
www.GIMP.org.
Image JPEG GIF
Leaves
54.81k 116.3
Wheels
8.26 6.063k
84
Chapter 3: Images and Objects
59313c03.qxd:WroxPro 3/22/08 4:21 PM Page 84
Please purchase PDF Split-Merge on www.verypdf.com to remove this watermark.
Figure 3-6
If you have to include many large, complex photographic images on your site, it’s good practice to offer
users smaller versions of the images when the pages first load and then add a link to the larger
version.
These smaller images are often referred to as thumbnails, and you will usually see them in image gal-
leries
or on pages that contain summaries of information (such as the home pages of news sites and pages
that list several products, from which you link to a page with more detail and larger images).
When creating the smaller version, scale the image down in an image-editing program. Do not simply
alter the
width and height attributes of the <img /> or <object> elements because users still
have to download the full-sized image even though they are getting to see only a smaller version of it.
(The full-sized image takes much longer to download.) By creating a special thumbnail of any smaller
images you use, your pages will load a lot quicker.
Vector Images
Illustration and animation software tends to use vector formats to save images, and the most popular
vector graphics format on the Web is Flash (which you will see on a lot of sites).
Vector formats store information in terms of coordinates between which lines are drawn, and then inside
the lines a colored fill can be specified. Because vector formats are based on the coordinates that mark points
on lines, it is very easy for vector formats to scale to different sizes simply by increasing or decreasing the
gap between each point the coordinates are plotted against.
Browsers and XHTML do not, by default, support any vector graphics formats, although the main browsers
now ship with the Flash Player that is required to view Flash files. As a result, Flash is currently the most
popular way of deploying vector graphics and animations on the Web. While the Flash Player is free for down-
load, and the browsers feature it, you should be aware that Adobe charges for the software to create Flash
files and that learning to use the software is an entirely new skill (which is outside the scope of this book).
As an alternative vector graphics format, the W3C developed Scalable Vector Graphics (SVG), which (like
XHTML) is written in XML, and would thus be easily integrated with XHTML. (Furthermore, it is an open
standard, not the creation of an individual company as Flash is.) A number of tools support SVG, although
at the time of this writing it is not used very widely.
85
Chapter 3: Images and Objects
59313c03.qxd:WroxPro 3/22/08 4:21 PM Page 85
Please purchase PDF Split-Merge on www.verypdf.com to remove this watermark.
Microsoft has also come up with a technology called Silverlight that uses vector graphics and competes
with Flash. It has been gaining interest from developers, although the player required for Silverlight does
not have widespread support at the time of this writing.
Flash, Silverlight, and SVG files tend to be included in pages using the more recent
<object> element (or
written into the page using JavaScript). Indeed, the W3C would prefer to see all images included using
this element in the long run, but for the moment images are added using the
<img> element.
Adding Images Using the <img> Element
Images are usually added to a site using the <img> element. It must carry the src attribute indicating the
source of the image and an
alt attribute whose value is an alternate description for the image in case it
does not load or the user has a visual impairment.
For example, the following line would add the image called
wrox_logo.gif into the page (in this case,
the image lives in a directory called images, and this images directory resides inside the same directory
that holds the XHTML file). You can find this code at
ch03_eg01.html.
<img src=”logo.gif” alt=”Wrox logo” />
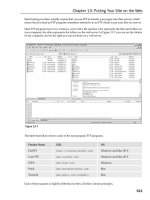
Figure 3-7 shows you what this image looks like in a browser.
Figure 3-7
In addition to carrying all of the universal attributes and the UI event attributes, the
<img> element can
carry the following attributes:
src alt align border height width hspace vspace ismap usemap longdesc name
The src Attribute
The src attribute is required to specify the URL of the image to load.
src=”url”
86
Chapter 3: Images and Objects
59313c03.qxd:WroxPro 3/22/08 4:21 PM Page 86
Please purchase PDF Split-Merge on www.verypdf.com to remove this watermark.
The URL can be an absolute URL or a relative, just like the URLs when linking between pages, which is
discussed in Chapter 2. The URL can also use the same shorthand notations that links between XHTML
pages to indicate which folder an image is in.
It’s a good idea to create a separate directory (or folder) in your web site for images. If you have a very
large site, you might even create separate folders for different types of images. (For example, one folder
for images that are used in the interface, and one for each subsection of the site.)
Generally speaking, images for your site should always reside on your server. It is not good practice to
link to images on other sites because if the owner of the other site decides to move that image your users
will no longer be able to see the image on your site.
The alt Attribute
The alt attribute is required to specify a text alternative for the image in case the user cannot see the image
(for any of a number of reasons). For example:
alt=”Wrox logo”
Often referred to as alt text, it is important that the value of this attribute really describes the image. Two
common reasons why images are not visible to users are:
❑ Because the browser did not download the file correctly; the file cannot be found
❑ Because the user has visual impairment that prevents him or her from seeing the image
Sometimes images do not convey any information, and are only used to enhance the layout of the page.
(For example, you might have an image that is just a design element but does not add any information
to the page.) Then the
alt attribute should still be used but given no value, as follows:
alt=”“
The align Attribute (deprecated)
The align attribute is used to align the image within the page or the element that contains the image
(such as a table cell).
align=”right”
It can take one of the values in the table that follows.
You may come across the
absbottom, texttop, absmiddle, and baseline values, but these are non-
standard extensions that can produce inconsistent results.
87
Chapter 3: Images and Objects
59313c03.qxd:WroxPro 3/22/08 4:21 PM Page 87
Please purchase PDF Split-Merge on www.verypdf.com to remove this watermark.
The border Attribute (deprecated)
The border attribute specifies the width of the border around the image in pixels:
border=”2”
If the attribute is not used, there will not be a border unless the image is used as a link, in which case you
could specify
border=”0” (see the “Using Images as Links” section later in this chapter). This attribute
has been replaced by the CSS
border property.
The height and width Attributes
The height and width attributes specify the height and width of the image:
height=”120” width=”180”
The values for these attributes are almost always shown in pixels.
Technically, the values of these attributes can be a percentage of the page or containing element (in which
case the number will be followed by the percent sign) but this is very rare, and showing an image at any
size other than the size it was created can result in a distorted or fuzzy image.
Specifying the size of the image can help browsers lay out pages faster and more smoothly because they
can allocate the correct amount of space to the image and continue to render the rest of the page before
the image has finished loading.
If you really want to show an image smaller than it is stored on your web server, you can just provide
the value for either the
height or width attributes and leave out the other attribute, in which case the
browser maintains the correct aspect ratio for the image (its width compared to the height). Your image,
however, might not be as sharp. You can even distort images by providing a different width in relation
to height.
Value Purpose
top
The top of the image is aligned with top of the current line of text.
middle
The middle of the image is aligned with the current text baseline.
bottom
The bottom of the image is aligned with the baseline of the current line of text (the
default), which usually results in images rising above the text.
left
The image is aligned to the left side of the containing window or element and any
text flows around it.
right
The image is aligned to the right side of the containing window or element and any
text flows around it.
88
Chapter 3: Images and Objects
59313c03.qxd:WroxPro 3/22/08 4:21 PM Page 88
Please purchase PDF Split-Merge on www.verypdf.com to remove this watermark.
Figure 3-8 shows an image at its actual size (top: 130 pixels by 130 pixels), the image magnified (middle:
the
width attribute is given a value of 160 pixels), and the image distorted (bottom: the width attribute
is given a value of 80 pixels and the
height attribute a value of 150 pixels).
Figure 3-8
Here is the code for this example (
ch03_eg02.html):
<p>Fixed size: width 130 height 130</p>
<img src=”images/apple.jpg” alt=”Photo of red apple” width=”130”
height=”130” />
<p>Enlarged: width 160 (no height specified)</p>
<img src=”images/apple.jpg” alt=”Photo of red apple” width=”160” />
<p>Stretched: width 80 height 150</p>
<img src=”images/apple.jpg” alt=”Photo of red apple” width=”80” height=”150” />
If you want to display the image a lot smaller than the original version, rather than just specifying the
smaller dimensions for the same image, you should resize the image in an image manipulation program
to create the smaller version for use on the web site. If you reduce the size of the image using the
height
and width attributes, the user will still have to download the full-sized image, which takes longer than a
special small version and uses up more bandwidth.
89
Chapter 3: Images and Objects
59313c03.qxd:WroxPro 3/22/08 4:21 PM Page 89
Please purchase PDF Split-Merge on www.verypdf.com to remove this watermark.
The hspace and vspace Attributes (deprecated)
The hspace and vspace attributes can be used to control the amount of whitespace around an image.
hspace=”10”
vspace=”14”
The value is the amount in pixels of whitespace that should be left around the image, and is similar to a
white border. Before CSS, the
hspace and vspace attributes were particularly helpful because text can
flow around an image and, unless there is a gap between the text and the image, the text becomes hard
to read and doesn’t look as professional. Figure 3-9 illustrates this idea (
ch03_eg03.html).
Figure 3-9
These attributes have been deprecated, and you can achieve the same result by using the
border or
margin properties in CSS.
The ismap and usemap Attributes
The ismap and usemap attributes are used with image maps. Image maps are covered in the “Image
Maps” section later in the chapter.
The longdesc Attribute
The longdesc attribute is used to indicate the URL of a document (or part of a document) containing a
description for the image in more detail.
90
Chapter 3: Images and Objects
59313c03.qxd:WroxPro 3/22/08 4:21 PM Page 90
Please purchase PDF Split-Merge on www.verypdf.com to remove this watermark.
longdesc=” /accessibility/profit_graphs.txt”
It is designed for users who cannot see the image, and to provide extra information that cannot be seen in
the image. A good example of where it might be used is in providing a text explanation for a graph or chart.
Unfortunately, the longdesc attribute is not widely supported. However, a commonly used alternative
is to place a link next to the image that takes you to a long description of the image (usually a link to the
bottom of that page). Between the opening
<a> tag and closing </a> tag is the letter D (which stands for
description). You can see an example of this in Figure 3-10 (
ch03_eg04.html).
Figure 3-10
The name Attribute (deprecated)
The name attribute allows you to specify a name for the image so that it can then be referenced from script
code. It is the predecessor to, and has been replaced by, the
id attribute.
name=”image_name”
91
Chapter 3: Images and Objects
59313c03.qxd:WroxPro 3/22/08 4:21 PM Page 91
Please purchase PDF Split-Merge on www.verypdf.com to remove this watermark.
Try It Out Adding Images to a Document
In this example, you’re going to add some images to a document; they will be some brightly colored images
of food accompanied by a description of each. So, open up your text editor or web page authoring tool
and follow these steps:
1.
Start with the XML and DOCTYPE declarations and add the skeleton of the XHTML document, like so:
<?xml version=”1.0” encoding=”UTF-8”?>
<!DOCTYPE html PUBLIC “-//W3C//DTD XHTML 1.0 Strict//EN”
“ /><html xmlns=” lang=”en”>
<head>
<title>Fruit Pictures</title>
</head>
<body>
</body>
</html>
2. Add the following to the body of the page. Pay particular attention to the <img> elements:
<h1>The Fruit Pictures Page</h1>
<p>The first image is an image of an apple.</p>
<img src=”images/apple.jpg” alt=”Photo of red apple” width=”130” height=”130” />
<p>The second image is an image of an orange cut in half.</p>
<img src=”images/orange.jpg” alt=”Photo of orange” width=”130” height=”130” />
<p>The third image shows a group of bananas.</p>
<img src=”images/banana.jpg” alt=”Photo of bananas” width=”130” height=”130” />
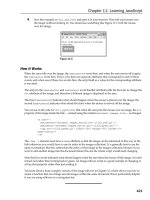
3. Save the file as fruit.html and open it in your browser. You should end up with something
that resembles Figure 3-11.
How It Works
You have met most of this code enough times already. But the parts to concentrate on are the <img />
elements. Each <img /> element adds a new image. There are three in the example.
<img src=”images/apple.jpg” alt=”Photo of red apple” width=”130” height=”130” />
The src attribute indicates the URL for the image. The URLs in this example are all relative URLs pointing
to an images directory that is contained in the same directory as the example page. You might remember
from Chapter 2 that I said organizing your file structure was very important — you can see here why this
is the case (it makes it clear where the images should be within the site structure).
The
alt attribute should be used on every <img /> element you write. It will be shown if the browser
cannot load the image and tells what the image is to those who have vision impairments.
The width and height attributes tell the browser how big the image should be displayed. By including these
attributes, the browser can lay out the page quicker because it can continue to display other items on the page
without waiting for the image to download. While you can use these attributes to stretch or scale up an image
,
it is best to have the image the size you want to use it, and if you want to make the image smaller, you should
save a new version of it rather than just using these attributes to save your viewers’ time and bandwidth.
92
Chapter 3: Images and Objects
59313c03.qxd:WroxPro 3/22/08 4:21 PM Page 92
Please purchase PDF Split-Merge on www.verypdf.com to remove this watermark.
Figure 3-11
Adding Other Objects with the <object>
Element
The W3C introduced the <object> element into HTML 4 with the intention that it be used to embed all
media types into documents, not just graphics but also MP3 files, Flash movies, QuickTime movies,
JavaScript objects, Java applets, and so on. It is even intended that in the long run the <object> element
be used to include images in documents.
While we are used to browsers supporting GIFs, JPEGs, and, more recently, PNGs, the same cannot be
said of including MP3 audio files, Flash movies, QuickTime movies, or Java applications. Rather, in these
cases, the
<object> element is used to include some other kind of software that is used to play or load
these files. For example:
❑ Flash movies are played with the Flash Player;
❑ Windows Media Files require Windows Media Player;
❑ MP3s can be played in various players including Flash Player, Windows Media Player, and
QuickTime Player.
93
Chapter 3: Images and Objects
59313c03.qxd:WroxPro 3/22/08 4:21 PM Page 93
Please purchase PDF Split-Merge on www.verypdf.com to remove this watermark.
So when it comes to embedding audio, video, or Java/JavaScript programs on your web page, you not
only need to have the file, but you also have to choose an application to embed into your page that will
play/run the file.
Including the right tool in the page can be complicated because not every computer will have the application
that you want to use installed. In addition, each player has lots of different versions. At the time of writing,
the most common way of embedding moving graphics and video into web pages, without asking the user
first, is by using Flash (Flash was being used to serve most of the video and audio files on sites such as
YouTube and MySpace). However, while Flash is often quoted as being installed on over 95 percent of com-
puters worldwide, support for playing audio and video was only included in later versions of the Flash player.
Before the <object> element was introduced, a range of elements was used to insert multimedia objects
into pages, such as the
<applet>, <embed> and <bgsound> elements, but these elements have been
depre-
cated (they are covered in Appendix I).
The <object> element was initially introduced by Microsoft to support its Active X technology; however, it
was soon used to embed all kinds of object in web pages. To embed an object into a page, you need to specify:
❑ The location of the code used to display or play the object (sometimes referred to as the implemen-
tation of the object)
❑ The actual data to be rendered (for example a movie, an audio file, a program)
❑ Any additional values the object needs at runtime
The first two are added using the <object> element, while additional values are provided in the <param>
element, which can be a child of the <object> element.
While the
<object> element can contain a child <param> element, any other content of the <object>
element should be displayed only if the browser cannot render the object:
<object>
Your browser does not appear to support the format used in this film clip,
for more details please look <a href=” /help/video.htm”>here</a>
</object>
You can nest <object> elements in order of preference for viewing, so you can put an alternative format
of object inside your preferred one. If neither is supported, the browser then displays the text content. To
support older or different versions of browsers you might add older code, such as the deprecated <embed>
and <applet> elements inside the <object> element.
It is worth noting that, when any video or audio is added into a page, it is widely considered good practice
to offer a button to turn the music off.
The <object> Element’s Attributes
The <object> element can carry all of the universal attributes, the UI event attributes, and the following
attributes:
archive border classid codebase codetype data declare height width hspace
vspace name standby tabindex usemap
94
Chapter 3: Images and Objects
59313c03.qxd:WroxPro 3/22/08 4:21 PM Page 94
Please purchase PDF Split-Merge on www.verypdf.com to remove this watermark.
We’ll take a look at each of these here, although the ones you will most commonly use to start are the
classid attribute (covered below), the type attribute, and the id attributes (discussed in Chapter 1).
The archive Attribute
The archive attribute is particularly of use with Java-based applications. It allows you to preload classes or
collections of objects in an archive — for example, when one class relies on others — and it
tends to be
used to improve speed. The value should be one or more URLs to the resources in a space-separated list.
The border Attribute (deprecated)
The border attribute specifies the width of the border to appear around the object; the value is specified
in pixels. However, it is deprecated and you should use the
border property in CSS instead.
The classid Attribute
The classid attribute is designed to specify the implementation of the object. When you are trying to
include Flash or QuickTime files and a plug-in needs to be loaded, this value would indicate the applica-
tion required to play or run the file. When you are working with Java, the value of this attribute is likely
to be the Java class you want to include.
Here is an example of a
classid to embed a player to show a QuickTime movie:
classid=”clsid:02BF25D5-8C17-4B23-BC80-D3488ABDDC6B”
The codebase Attribute
The codebase attribute is supposed to give an alternative base URL for any relative URLs in the <object>
element. If this attribute is not specified, then the folder the page is in will be used. For example, if you
were working with Java, it might look like this:
codebase=” />However, when it comes to files such as QuickTime movies and Flash, IE uses it to specify where the pro-
gram required to play or run the file can be found. For example, the QuickTime ActiveX control (required
to play QuickTime movies) can be downloaded from here:
codebase=” />It can also identify the version of the file that should be downloaded. If the object isn’t installed on the
machine loading the page, the browser should go to the URL specified to get it (although it should show
users an alert first before starting to download).
The codetype Attribute
The codetype attribute specifies the MIME type expected by the browser. It is relevant only if a classid
attribute has already been specified. For example, if you are working with Java, it might be:
codetype=”application/java”
If you wanted to embed a QuickTime movie, you would use a value like this:
codetype=”video/quicktime”
95
Chapter 3: Images and Objects
59313c03.qxd:WroxPro 3/22/08 4:21 PM Page 95
Please purchase PDF Split-Merge on www.verypdf.com to remove this watermark.