Web Programming with HTML, XHTML, and CSS Second Edition- P9
Bạn đang xem bản rút gọn của tài liệu. Xem và tải ngay bản đầy đủ của tài liệu tại đây (1.05 MB, 50 trang )
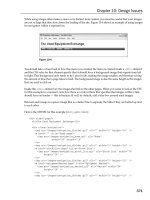
While using images often makes a menu very distinct from content, you must be careful that your images
are not so large that they slow down the loading of the site. Figure 10-6 shows an example of using images
for navigation within a separate box.
Figure 10-6
You should take a closer look at how this menu was created; the menu is created inside a
<div>
element;
and the CSS rules for that element specify that it should have a background image that repeats from left
to right. That background only needs to be 1 pixel wide, making the image smaller, and therefore saving
the amount of time that a page takes to load. The background image is also the same height as the images
that are used to click on.
Inside this
<div>
element are the images that link to the other pages. When you come to look at the CSS
for this example in a moment, note how there is a rule in there that specifies that images within a link
should have no border — this is because IE will, by default, add a blue box around such images.
Between each image is a spacer image that is a darker line to separate the links if they are butted up next
to each other.
Here is the XHTML for this example (
ch10_eg06.html
):
<div class=”page”>
<h1>The Used Equipment Exchange</h1>
<div class=”navigation”>
<img src=”images/navigation_divider.gif” alt=”” width=”2” height=”16” />
<a href=”/” title=”Home page”>
<img src=”images/navigation_home.gif” alt=”Home”
width=”38” height=”16”
</a>
<img src=”images/navigation_divider.gif” alt=”” width=”2” height=”16” />
<a href=”stocklList.aspx” title=”Stock List”>
<img src=”images/navigation_stock_list.gif” alt=”Stock List” width=”70”
height=”16” />
</a>
<img src=”images/navigation_divider.gif” alt=”” width=”2” height=”16” />
<a href=”equipmentWanted.aspx” title=”Equipment Wanted”>
<img src=”images/navigation_wanted.gif” alt=”Wanted” width=”54”
height=”16” />
</a>
<img src=”images/navigation_divider.gif” alt=”” width=”2” height=”16” />
371
Chapter 10: Design Issues
59313c10.qxd:WroxPro 3/23/08 11:57 AM Page 371
Please purchase PDF Split-Merge on www.verypdf.com to remove this watermark.
<a href=”contactUs.aspx” title=”Contact Us”>
<img src=”images/navigation_contact_us.gif” alt=”Contact Us” width=”75”
height=”16” />
</a>
<img src=”images/navigation_divider.gif” alt=”” width=”2” height=”16” />
</div>
</div>
</body>
And here is the CSS for this example (
ch10_eg06.html
):
body {
background-color:#ffffff;
font-family:arial, verdana, sans-serif; font-size:12px;}
.page {width:700px;}
.navigation {
background-image:url(images/backdrop.gif);
background-repeat:repeat-x;}
a img {border:none;}
Because all these images are fairly small (and they were saved for the Web using the Save for Web option
in Adobe Photoshop), they should not add too much time when downloading the page.
If You Use Icons to Represent a Link, Make Sure Everyone Will
Understand Them
Many web sites use images known as icons for links. These icons are images such as a magnifying glass
to indicate a search feature. If you are going to use icons, make sure your target audience will understand
these images or users will not click them.
Many users are familiar with the following icons:
❑ A house to indicate the home page
❑ A magnifying glass to indicate a search feature
❑ An envelope to indicate an e-mail address or link
❑ A question mark to indicate help files
If you use icons that are less common, it’s a good idea to add the link in words as well as using the image.
(Don’t expect that users will hover over a link to find a tooltip that tells them more about that link.)
Menus Must Be Quick and Easy to Read
As I have already mentioned, when browsing web pages, most visitors do not really read them — they
scan them. Making your menu distinct from the main part of a page (and using bold, a different color,
or underlined text for links within the body of a page) will help users scan and register the navigation
items more easily.
Any words or images you use in a menu must be large enough to read (especially for users who have
high screen resolutions that make text appear smaller), and text must contrast well with its background.
372
Chapter 10: Design Issues
59313c10.qxd:WroxPro 3/23/08 11:57 AM Page 372
Please purchase PDF Split-Merge on www.verypdf.com to remove this watermark.
Links should also be short and concise. For example, a link that just reads “Home” is a lot more obvious
and easier to read and understand than a link that says “Front door.” Having said that, a couple of simple
words are always better than one word of jargon.
Grouping of Menu Items Must Be Logical
If you have a lot of pages, you might well decide to create submenus. If so, it’s very important that you
group menu items so that visitors will understand where to look for something without having to search
through several sections or categories.
If you do use submenus, you should make sure that they are clearly distinguishable from the main menu,
and that it is clear which items belong to which section. Submenus often make use of a different colored
background, smaller font, an indented position, or an alternate color to show they are distinct from the
main menu.
For example, if you are creating a site for a computer store, you might create a grouping something like
this with three main sections, each containing its own subsections:
❑ Computers: Desktop computers, laptop computers
❑ Software: Business software, games
❑ Peripherals: Printers, scanners
This would be easier to navigate than an alphabetized menu of all sections.
Menus Items Must Be Easy to Select
If a menu item is too small or there is not enough space between menu items, it can be very difficult for
some users to select the correct menu item. A user with a dodgy mouse, poor eyesight, or difficulties with
motor control may have trouble hitting a small or tight target, and even those most able to control a point-
ing device will find it easier to hit larger targets. Furthermore, most users can find moving targets either
irritating or hard to hit — and they are best avoided in most designs.
When you are creating a menu, you need to make sure it will work on all the main browsers. As the Web
has grown up, there have been many menus (particularly drop-down menus that use JavaScript) that do
not work even on some of the more common browsers.
There are two ways around this problem:
❑ Test your menu on many different types of browsers (particularly older versions).
❑ Avoid complex code in menus.
Drop-down or pop-up menus, which make new items appear as you hover your mouse over a heading,
tend to be particularly problematic for two reasons:
❑ They are often written in JavaScript, which is implemented slightly differently in the various
browsers — particularly the older ones. So while a menu might appear to work fine in the
designer’s browser, some other visitors will simply not be able to navigate the site.
❑ They can be too sensitive or move too quickly for users to select the item they require.
373
Chapter 10: Design Issues
59313c10.qxd:WroxPro 3/23/08 11:57 AM Page 373
Please purchase PDF Split-Merge on www.verypdf.com to remove this watermark.
Over the years, I have come across many sites that have attempted to implement drop-down menus
that simply do not work in my browser. As a result, and for usability reasons, I now avoid these menus
completely.
Some designers play with more experimental types of menu (particularly in Flash) that often require quite
dexterous control — these menus often move and slide between items as the user moves the mouse to the
left or right when hovering over an item. While such menus that require fine control of a pointing device
often look great on experimental sites, they can exclude those who do not have excellent control over their
pointing device, and are therefore best left to the realms of more experimental sites than regular business
sites.
Menus Must Load Quickly
When creating a menu you should not expect that every visitor to your site has a fast Internet connection —
some visitors may still be on dial-up connections or in an office building with a lot of users on the same con-
nection. Although connection speeds are constantly improving, your menu should load within the first cou-
ple of seconds. If your menu takes longer than around eight seconds to load, many users will think that the
page is not loading or that the browser has frozen — they will try to reload the page or, even worse, click
their Back button or go to another page.
The loading speed is particularly important for designers who use graphics or Flash in their menus (plain
text loads very quickly). If you want an image to change when the user rolls his mouse over an image to
make it appear highlighted, then your loading time can double (as a second image is required for each
image that the user rolls over).
Note that some browsers require the content of a table to load completely before displaying the table, so
if you are putting images in a table, users might have to wait quite a while for a page to load.
Menus Must Be Consistent Across a Site
The more pages a site contains, the more navigation items you are going to require. As soon as you have
to introduce submenus, the navigation becomes more complicated and will vary from page to page. It is
very important that the primary navigation remains consistent across all pages.
The submenus in each section of your site should be in the same position on each page and have a similar
look and feel, so that users know exactly where to go to navigate the site.
Links
In addition to the menus your visitors will be using to navigate the site, many web pages contain other
hyperlinks in the text that makes up the body of the document. This short section addresses two topics
regarding links that are not part of the main menu:
❑ Text links
❑ Images as links
374
Chapter 10: Design Issues
59313c10.qxd:WroxPro 3/23/08 11:57 AM Page 374
Please purchase PDF Split-Merge on www.verypdf.com to remove this watermark.
Text Links
By default, text links tend to be blue and underlined. Some experts on usability suggest that all links
should be left to their default appearance. However, from your experience of the Web, you probably
know that using a color that’s clearly different from the main text makes it easy to tell what text makes
up a link.
As you saw in Chapter 7, you can change the appearance of links as a user hovers over them and when a
user has already visited them. Here is a quick reminder of how you change the appearance of links using
CSS (
ch10_eg07.css
):
a {font-weight:bold; color:#ff0000; text-decoration:none;}
a:hover {color:#FF9900; text-decoration:underline; background-color:#f9f0f0;}
a:visited {color:#990000;}
As users hover over links, these links will be underlined, change color, and gain a background color. The
visited links will be in a different shade reminding users where they have been. You can see this best if
you run the example available with the download code for the chapter.
It is generally a bad idea to use a different weight of text when a user hovers over a link because this
changes the width of the font, making it hard to read and changing the width of the line.
Images as Links
Images are often used as links in menus, advertisements, photos to click on, graphical icons, and so on.
Whenever you use an image as a link you should use two attributes on the image:
❑
alt =”description of image or text on image”
: Use this to tell users who cannot see
the image what the image is of or what it says.
❑
title=”where the link will take the user”
: Use this to show users a tooltip that says
where the link will take them; this is also used by screen readers.
If you do not use CSS to control the border of images that are links (and set them to “no border”), you
should also add the
border
attribute:
❑
border=”0”
: If you don’t use CSS to control borders or this attribute you will get a border
around the image in many browsers, which can look unsightly.
You saw an example of using images as links earlier in the chapter (
ch10_eg06.html
). In Chapter 12,
you’ll see an example of using JavaScript to create what are known as rollover images, or images that
change as the user hovers over them.
Site Search Features
The third way a user can navigate your site is by using a search feature. A search feature allows users to
immediately look for a keyword (or words) that relate to the information they are trying to find from your
375
Chapter 10: Design Issues
59313c10.qxd:WroxPro 3/23/08 11:57 AM Page 375
Please purchase PDF Split-Merge on www.verypdf.com to remove this watermark.
site. Searching can save users from having to learn your scheme for navigating the site and offers another
way to find the information if they are having difficulty finding what they came for.
Search Features Make Sites More Usable
Search features are increasingly important as your sites grow. If you have only a few pages then your
menu should be rather easy to understand anyway. However, larger sites, which may incorporate sub-
menus where not all options are featured on every page, can really benefit from this addition.
There are many ways in which you can implement a search feature on your site. While some methods
require fairly advanced programming experience, there are ways in which you can add a fairly simple
search feature.
Large commercial sites, where the content is stored in a database, can use programming commands called
queries to ask the database which pages contain the terms a user searched for, or they can use a special
indexing application to index the site and make the search facilities available.
For sites that do not use databases or indexing tools, the easiest way to add a search feature to your site
is to use a third-party search utility to index your site for you. These services also give you the code to
create a search box that will send queries to the service’s site. When visitors to your site use a search box,
their query gets sent to the server of the company offering the search service, and the server will then
return the answers to the user on your behalf.
The best-known company to offer this kind of service is Google, which does it for free at the time of this
writing. (Google makes its revenue from supplying ads with the search results — but as you can see from
Figure 10-7, these are not intrusive; they appear only on the right side of the results page, as they do when
you send a query to Google.com.)
Adding a Google Search to Your Site
Google, which is currently the most widely used search engine on the Internet, offers a very powerful
and flexible service whereby you can use its search engine to provide a search feature on your own site.
At the time of this writing you have to register in order to use the service. However, the instructions and
setup on the site are quite simple and the service is free.
Figure 10-7 shows you how an arts and music site called
Neumu.net
has a small search box underneath
the navigation bar.
When a visitor to this site searches the Neumu site, the request is sent to Google, which then generates
a page with items from Neumu containing those words and sends it to the user. Obviously, the results
point back to the Neumu site, as you can see in Figure 10-8.
You can see the code for the search box by selecting View Source on the menu.
376
Chapter 10: Design Issues
59313c10.qxd:WroxPro 3/23/08 11:57 AM Page 376
Please purchase PDF Split-Merge on www.verypdf.com to remove this watermark.
Another site that offers a free search service for a limited number of pages is
www.Atomz.com
, but it
does charge for larger sites.
Figure 10-7
Remember that you cannot just copy this code; you need to register for the service
yourself.
377
Chapter 10: Design Issues
59313c10.qxd:WroxPro 3/23/08 11:57 AM Page 377
Please purchase PDF Split-Merge on www.verypdf.com to remove this watermark.
Figure 10-8
Shading Multiple Rows of a Table
When dealing with tables that contain multiple rows of information, you can make it easier for visitors to
follow the rows of the tables if you alternate the background color of the rows very slightly. Figure 10-9
shows you an example of a table that has alternating colors for each row.
This was achieved using
odd
and
even
classes on rows like so (
ch10_eg08.html
):
<table>
<tr>
<th>Item</th>
<th>Description</th>
<th>Cost</th>
378
Chapter 10: Design Issues
59313c10.qxd:WroxPro 3/23/08 11:57 AM Page 378
Please purchase PDF Split-Merge on www.verypdf.com to remove this watermark.
<th>Subtotal</th>
</tr>
<tr class=”even”>
<td>Imation CD-R 25pk</td>
<td>Blank CDs 25pk 700mb data and audio</td>
<td>16.99</td>
<td>16.99</td>
</tr>
<tr class=”odd”>
<td>Biro</td>
<td>Bic biro black</td>
<td>.25</td>
<td>17.24</td>
</tr>
<tr class=”even”>
<td>Envelopes</td>
<td>25 pack DL size brown</td>
<td>2.50</td>
<td>19.74</td>
</tr>
</table>
Figure 10-9
Here is the CSS that goes with this example:
body{
color:#000000; background-color:#ffffff;
font-family:arial, verdana, sans-serif; font-size:12pt;}
th {font-weight:bold; text-align:left; background-color:#fff336;}
.odd {background-color:#d6d6d6;}
.even {background-color:#ffffff;}
Remember that whatever background colors you use, there must be a good contrast between the back-
ground and the text in order for the user to be able to read it easily. The very light gray in this example is
a good example of a color that does not dramatically affect the readability of the table itself.
379
Chapter 10: Design Issues
59313c10.qxd:WroxPro 3/23/08 11:57 AM Page 379
Please purchase PDF Split-Merge on www.verypdf.com to remove this watermark.
Forms
I have yet to meet anyone who enjoys filling in forms — especially on the Web. Therefore, if your site
must include a form, good design is essential or people will not fill it in (and if you are an online shop
that is an essential part of your core business).
In this section you are going to learn about the following:
❑ What to do before designing the form
❑ How to design a form, select the right form controls, group them correctly, and label them
❑ How best to lay out a form
To work through the points in this section, you will see an example of a basic form that users have to fill
in before they can register for an online service.
Before Designing the Form
Before you address how a form should really look, you need to do some preparation — this is just like the
preparation you need to do before you start designing a site, although it should take less time.
Listing Required Information First
When designing a form, you should start out by creating a complete list of the information you require
from a user. You might start with a general list with items such as login details, name, mailing address,
and e-mail address, but you need to make sure for each item that you know what makes up these require-
ments. For example, do you need to get a user’s first name and last name separately? If so these will have
to be separate items on the form. What makes up the address: house number/name, street name, suburb,
ZIP Code, and so on? Which ones need to be separated from the others?
Here is a list of the information that is needed for our registration form:
❑ Login information
❑ User’s name
❑ User’s address
❑ User’s contact details
When this is broken down, the exact information that’s needed is as follows:
❑ Login information: Username and password
❑ Name: First name, last name
❑ Land address: Street address, city ZIP Code
❑ Contact information: E-mail address, area code, phone number
When you are creating forms, you should ask only for the information you really need to get a job done.
It’s very tempting when gathering information from visitors to ask as many questions as you can; but the
longer a form is, the less likely it is that users will complete it.
380
Chapter 10: Design Issues
59313c10.qxd:WroxPro 3/23/08 11:57 AM Page 380
Please purchase PDF Split-Merge on www.verypdf.com to remove this watermark.
If you want to collect lots of nonessential information (for example, to get a better idea of the demographic
of visitors to your site), consider offering users an incentive to participate and answer the questions after
they have registered/purchased an item, such as an entry into a prize draw.
Group-Related Information
Once you know what information you want to collect from a visitor to your site, you need to look to see if
there is a logical grouping to the information you require from visitors to help them understand the form.
If you find such a grouping in related information, you should make sure that these items go together in
the form. In the example for this section you need three groups of information:
❑ Name and e-mail address
❑ Login details
❑ Other contact details
In this example, the grouping is the same as the initial list of required information before it was broken
down, but sometimes the grouping can be quite different.
Model Paper Forms Users Are Familiar With
If you are creating an online application that represents a form that would previously have been filled in on
paper and that your users would be familiar with, then you should make sure that your online form reflects
that paper form. (Note that if the form would not have been familiar to users this is not necessary.) If the
goal of your application is to put existing software online, then it could also be modeled on the software.
The reason for modeling your form on something the user is familiar with is quite obvious; it makes it
easier for the user to fill in. That is not to say that the layout of the form should be exactly the same (often
paper forms cram too many questions into a small space). Rather, you should be asking similar questions
in a similar order and grouping.
Are Users Going to Provide the Same Information Each Time?
Will users have to provide the same information each time they visit the site? Or will some data be stored
in a database (or other application) and retrieved when they log in again? For example, if you are working
on an online store, once the user has logged in, will the application remember the user’s name, address,
and contact details?
If you are going to store information about users — in particular their credit card details — you must
make sure you are abiding by your country’s laws on storage of such information.
You should also consider how your form is going to be processed. If it’s going to be processed by a human,
the human can interpret the data the user enters, whereas if it goes straight into a database, users must be a
lot more precise about the information they enter. This may affect your choice of form control required to
collect the information.
Note that when collecting and storing information about customers, you must also
ensure that you meet the data protection laws of your country.
381
Chapter 10: Design Issues
59313c10.qxd:WroxPro 3/23/08 11:57 AM Page 381
Please purchase PDF Split-Merge on www.verypdf.com to remove this watermark.
What Else Needs to Appear on the Form?
Several forms contain extra information, such as shipping information, price lists, legal notices, and so
on. Before you start designing the form you should be aware of all the information that might be put on
it, not just the form controls themselves.
Designing the Form
Now that you know what information must be captured by the form, you can design it. You can start by
selecting the appropriate type of control and then grouping the controls together and labeling them. You
can then add final touches to the layout of the form to control its presentation.
Selecting the Type of Form Control
You learned in Chapter 5 about the different types of form controls that you can use. It’s important that you
choose the correct type of form control for the information that you are trying to collect. Once you have
decided on which form control to use for each piece of information you’ll have an idea of the possible
length and layout of the form.
Entering text:
❑ If there is just one line of text, you use an
<input>
element whose
type
attribute has the value
of
text
.
❑ If you want the user to enter more than one line of text you use the
<textarea>
element.
❑ If the information is sensitive (such as a credit card or password) use an
<input>
element
whose
type
attribute has a value of
password
.
Giving the user a limited choice of options:
❑ If the user can select only one option (from several), use a group of radio buttons (with the same
name) or a drop-down select box.
❑ If the user can select multiple items, use checkboxes or a multiple select box.
Also consider how visitors would be used to giving this kind of information. For example, use a set of
text inputs for each line of an address rather than, say, using a combination of a text input for the street
name and a select box to indicate whether the street is a street, road, or avenue for the first line of the
address.
Remember that each form control should use a name that describes its content. Rather than just arbitrary
names such as
input1
and
input2
, you will often see form control names that are given a prefix to describe
what kind of form control they relate to:
❑ txtName for text boxes and text areas
❑ radName for radio buttons
❑ chkName for checkboxes
❑ selName for select boxes
382
Chapter 10: Design Issues
59313c10.qxd:WroxPro 3/23/08 11:57 AM Page 382
Please purchase PDF Split-Merge on www.verypdf.com to remove this watermark.
Radio Buttons and Checkboxes
Although radio buttons and checkboxes take up more room than select boxes, they tend to be easier
for visitors to use because users can see all the options at once (as long as the list of options is not too
long, such as a list of all the countries in the world, in which case you might use a drop down select
box instead).
If there are only three or four options, and the user is allowed to pick only one, then radio buttons are
usually a better choice than select boxes because all are visible. An exception to this rule would be if the
design contained several select boxes (in which case the consistency of design is more important).
If there are only three or four options, and the user is allowed to pick several, then the use of checkboxes
for multiple selections is usually better than a multiple select box no matter how much space they take —
not only because checkboxes are more common, but also because if you use a multiple select box you should
generally tell the user that they can select multiple items and how to go about this.
Checkboxes are also ideal if users have to indicate that they agree to or have read something, such as
terms and conditions. It’s important to use a checkbox in these cases rather than a radio button. When
you have selected a radio button you can change your choice to a different radio button, but there is no
way to deselect all the radio buttons in a group (whereas you can click on the same checkbox to clear it).
You should never use a programming language (such as JavaScript) to change the intention of radio
buttons or checkboxes. In other words, you should never make checkboxes mutually exclusive (as
radio buttons are), and you should not allow a user to select more than one radio button from a
group because this will confuse users who expect radio buttons and checkboxes to follow their
normal default behavior. Also, be careful not to repeatedly mix radio buttons and checkboxes in
the same form or you will confuse users.
Radio buttons and checkboxes also allow you to provide more information to the user than a select box.
A radio button or checkbox can have a long description next to it, whereas if you use a long description
in a select box the whole box grows wider. You can see an example of a long drop-down (which goes off
the screen) and a set of radio buttons in Figure 10-10 (
ch10_eg09.html
).
If your radio buttons represent an optional question, you should not automatically select one item by
default. You cannot deselect all radio buttons by clicking them again as you can checkboxes; you can
make only a different choice. It is also often helpful to give users an “other” option if they might not
choose one of the options you have given.
Figure 10-10
383
Chapter 10: Design Issues
59313c10.qxd:WroxPro 3/23/08 11:57 AM Page 383
Please purchase PDF Split-Merge on www.verypdf.com to remove this watermark.
Select Boxes
Select boxes, also known as drop-down list boxes, save space on the screen, especially when there are
lots of options, although as Figure 10-10 showed they do not look very good with long descriptions for
each option. Indeed, the width of a select box is the width of the widest option in it.
You should remember when providing a select box to include options for all users. For example, if you
use a drop-down for U.S. states and you have visitors from outside the U.S., you should have at least one
option for those who do not live in a U.S. state, even if the option is just “Outside U.S.”
The order of items in a select box should reflect users’ experience; for example, if you use month names,
put them in chronological order, whereas if you use states or countries, alphabetical lists are easier to use.
If one (or a few options) within a long list are more popular or more likely to be chosen than other options,
then you should put these at the top of the select box so that the user comes to them first.
Text Boxes
Text boxes tend to be the most natural way for users to offer the majority of information. Generally speak-
ing, text areas should be large enough for users to enter what they want without having scrollbars appear-
ing (unless they are very long, such as the body of an e-mail or an article for a web site).
Be aware that users often take the size of the text box to be an indication of the length of text that they
should provide. This can be especially helpful for things such as dates, as you can see in Figure 10-11,
where you want the user to enter four digits for a year.
Figure 10-11
Grouping Controls
Once you’ve decided what form controls you’re going to use, you can start to put them on the page. As I
already mentioned, these should be grouped together into related items of information — and these groups
should reflect the users’ understanding of the topic.
You can group form elements in the following ways:
❑ Fieldsets
❑ Labels
❑ Splitting the form into several pages
You can also use padding and shading as you saw in the first section of this chapter, which covered
white space.
384
Chapter 10: Design Issues
59313c10.qxd:WroxPro 3/23/08 11:57 AM Page 384
Please purchase PDF Split-Merge on www.verypdf.com to remove this watermark.
Using <fieldset> Elements
You already learned about the
<fieldset>
element in Chapter 5. It allows you to group sections of a
form between the opening
<fieldset>
and closing
</fieldset>
tags. The form can also carry a
<legend>
element to indicate a caption for the box.
For example, here is a form for a user to enter their login details (
ch10_eg11.html
):
<form name=”frmLogin” action=”login.aspx” method=”post”>
<fieldset>
<legend>Login</legend>
User name: <input type=”text” size=”12” name=”txtUserName” /><br />
Password: <input type=”password” size=”12” name=”txtPassword” /><br />
Confirm password: <input type=”password” size=”12”
name=”txtPasswordConfirmed” /><br />
<input type=”submit” value=”Log in” />
</fieldset>
</form>
Fieldsets were introduced in IE4 and Netscape 6. Older browsers just ignore the
<fieldset>
and
<legend>
buttons if they do not understand them, so you can safely add these elements to all forms.
You can see what this example looks like in Figure 10-12.
Figure 10-12
You may also choose to use an alternative to fieldsets to group together parts of a form, such as line
breaks, background colors, or a table with associated style rules, but fieldsets have specifically been
introduced for grouping form elements, and you can associate styles with the
<fieldset>
element,
as was done in this example (
ch10_eg11.css
):
fieldset {
width:250px;
padding:10px;
font-size:12px;
text-align:right;}
Note here how the
width
property has been set in the style sheet. This is particularly helpful to add to
<fieldset>
elements because they will otherwise stretch to the width of the browser window (or con-
taining element).
385
Chapter 10: Design Issues
59313c10.qxd:WroxPro 3/23/08 11:57 AM Page 385
Please purchase PDF Split-Merge on www.verypdf.com to remove this watermark.
Splitting a Form into Separate Pages
Long forms not only put off users but also make the form harder for the user to fill in. And if you are
writing validation and error handling (such as the error messages to say a form field has not been filled
in or contains the wrong sort of information), then this code becomes more complicated as a form gets
longer. Therefore, if you have a long form you can split it up into several pages. The reasons you might
do this include:
❑ Smaller forms are less intimidating.
❑ When related information is put on the same page, it is easier to digest.
As a general guide, your form should be not much more than a “screenful” (at 1024 × 768 resolution) so
the user does not have to scroll much.
If you split a form into separate pages you should clearly indicate to the users how far they are through the
form. You can see, in Figure 10-13, a form that has been split up into four pages and a confirmation page.
Splitting a form into several pages can introduce new complexities into the programming because the
program has to remember what a user has entered between each form; however, there are several ways
of doing this with a little extra effort. You will generally want users to go through these steps in order
rather than allowing them to go between pages at random, so avoid links that allow them to jump to
any page.
Figure 10-13
386
Chapter 10: Design Issues
59313c10.qxd:WroxPro 3/23/08 11:57 AM Page 386
Please purchase PDF Split-Merge on www.verypdf.com to remove this watermark.
Number Questions
If you have a lot of questions, as in an application form or an online test, you should number questions
so that the users know where questions start and end. This can also be a help if you want to indicate to a
user that he or she should jump to another section of the form because you can explicitly indicate which
number question they should be going to.
Layout of Forms
Ideally, a layout of a form should reflect what a user would expect to see when dealing with such data.
Layout is related to the user’s experiences with paper forms or software equivalents. You can even con-
sider an everyday experience such as how a user writes out his or her address. (We usually write our
address on a few separate lines as opposed to using drop-down boxes.)
Labeling Controls
The first issue concerned with layout of forms is the labeling of controls. It’s very important that each
control is clearly labeled so that users know what information they should be adding and where. There
are two types of labels:
❑ Implicit labels that are normal text and markup next to the control
❑ Explicit labels that use the
<label>
element
You should consider the following as guidelines for where the label for an element should generally appear:
❑ Text entry fields: To the left of the input or directly above
❑ Checkboxes and radio buttons: To the right of the checkbox or radio button
❑ Buttons: On the button itself — its value
Implicit controls are the simplest way to label a control. To add an implicit label, you simply add text
directly next to the label in question. For example (
ch10_eg12.html
):
First name: <input type=”text” name=”txtFirstName” size=”12” /> <br />
Last name: <input type=”text” name=”txtLastName” size=”12” /> <br />
E-mail address: <input type=”text” name=”txtEmail” size=”12” /> <br />
<input type=”submit” value=”subscribe” />
The disadvantage with this approach is that the presentation is not very attractive — and gets worse
with longer forms — because the form controls are not aligned well with each other, as you can see in
Figure 10-14.
While
<label>
elements do require a little extra programming effort, it is generally a good idea to get into
the habit of using them. You may remember from Chapter 5 that the
<label>
element must either contain
the form control or use the
for
attribute whose value is the value of the
id
attribute on the form control:
<label for=”firstName”>First name: </label>
<input type=”text” name=”txtFirstName” size=”12” id=”firstName” />
<label for=”lastName”>Last name: </label>
387
Chapter 10: Design Issues
59313c10.qxd:WroxPro 3/23/08 11:57 AM Page 387
Please purchase PDF Split-Merge on www.verypdf.com to remove this watermark.
<input type=”text” name=”txtLastName” size=”12” id=”lastName” />
<label for=”email”>E-mail address: </label>
<input type=”text” name=”txtEmail” size=”12” id=”email” />
Figure 10-14
Unfortunately, this will look just the same as the previous example shown in Figure 10-14, but the
<label>
element does have advantages:
❑ It makes it easier for screen readers to associate a control with its label. In particular, you can
associate labels with form controls even when the label is not next to that item — for example,
in a table the label might be in a row above the form control.
❑ Labels can increase the clickable area of a radio button or checkbox, which some users find hard
to accurately click on because the user can click on the label.
Labels were first supported only in IE4 and Netscape 6 and later versions; however, older browsers just
ignore the
<label>
element and display their contents, so you are safe to use them on any form.
Here you can see the example of a form that allows you to indicate how you heard about a company. When
the users click the label, the radio button associated with that form will be selected (
ch10_eg13.html
):
<form name=”frmExample” action=”” method=”post”>
<fieldset>
<legend>How did you hear about us?</legend>
<input type=”radio” id=”referrer1” name=”radReferrer” value=”Mouth” />
<label for=”referrer1” >Word of Mouth</label><br />
<input type=”radio” id=”referrer2” name=”radReferrer” value=”Google” />
<label for=”referrer2” >Google Search</label><br />
<input type=”radio” id=”referrer3” name=”radReferrer”
value=”Magazine Ad” />
<label for=”referrer3” >Magazine Ad</label><br />
<input type=”radio” id=”referrer4” name=”radReferrer” value=”Other” />
<label for=”referrer4” >Other</label>
<input type=”text” value=”txtOther” size=”12” /><br />
<input type=”submit” value=”Submit” />
</fieldset>
</form>
You can see this form in Figure 10-15.
388
Chapter 10: Design Issues
59313c10.qxd:WroxPro 3/23/08 11:57 AM Page 388
Please purchase PDF Split-Merge on www.verypdf.com to remove this watermark.
Figure 10-15
Remember that when choosing the prompt or the label for a form, you must choose words that will really
mean something to users. What might be obvious to you might not be so clear to a visitor who is not as
familiar with the topic as you — for example, a
productId
number might be a unique identifying
number for a product, but a customer can’t be expected to know this or where to find it.
Using Tables for Layout
Many designers and programmers use tables to lay out and position form elements on their web pages.
However, you must remember how tables linearize in a screen reader (as discussed in Chapter 4).
To remind you how a screen reader would linearize a simple table, look at the following table.
The cells of this table would generally be read row by row in the following order:
Row 1 Column 1, Row 1 Column 2, Row 2 Column 1, Row 2 Column 2,
Row 3 Column 1, Row 3 Column 2.
So, the correct way to lay out the previous example in a table would be as shown here (
ch10_eg14.html
).
Note that this example does not use the
<label>
element so that you can understand the order in which
elements are read without the use of this
<label>
element:
<table>
<tr>
<td class=”formPrompt”>First name: </td>
<td><input type=”text” name=”txtFirstName” size=”12” /></td>
</tr>
<tr>
<td class=”formPrompt”>Last name: </td>
<td><input type=”text” name=”txtLastName” size=”12” /></td>
</tr>
<tr>
Row 1 Column1 Row 1 Column 2
Row 2 Column 1 Row 2 Column 2
Row 3 Column 1 Row 3 Column 3
389
Chapter 10: Design Issues
59313c10.qxd:WroxPro 3/23/08 11:57 AM Page 389
Please purchase PDF Split-Merge on www.verypdf.com to remove this watermark.
<td class=”formPrompt”>E-mail address: </td>
<td><input type=”text” name=”txtEmail” size=”12” /></td>
</tr>
</table>
This will order the elements correctly, and users with a screen reader will understand the form. Note that the
class=”formPrompt”
on the
<td>
elements that are labels is associated with a CSS style sheet rule that
indicates the text should be right-aligned in the table. This makes for a much neater display on the pages
and prevents large gaps between a label and its associated control. You can see the result in Figure 10-16.
Figure 10-16
Tables that get more complex than this need a lot of consideration. For example, take a look at Figure 10-17.
Figure 10-17
Here there are two columns of form controls and the labels are above the elements. This design would
necessitate the use of the
<label>
element; otherwise a screen reader would read the labels on the first
row and then the two form controls on the second (
ch10_eg15.html
):
<table>
<tr>
<td><label for=”fname”>First name:</label></td>
<td><label for=”lname”>Last name:</label></td>
</tr>
<tr>
<td><input type=”text” name=”txtFirstName” id=”fname” size=”12” /></td>
<td><input type=”text” name=”txtLastName” id=”lname” size=”12” /></td>
</tr>
<tr>
390
Chapter 10: Design Issues
59313c10.qxd:WroxPro 3/23/08 11:57 AM Page 390
Please purchase PDF Split-Merge on www.verypdf.com to remove this watermark.