Tài liệu Networking with Microsoft Windows Vista- P4 ppt
Bạn đang xem bản rút gọn của tài liệu. Xem và tải ngay bản đầy đủ của tài liệu tại đây (1.59 MB, 50 trang )
FIGURE 5.11
The Status dialog box for a wireless network connection.
➔ For information about the Wireless Properties button in the Status dialog box for a wireless
connection, see “Working with Wireless Connection Properties,” p. 163.
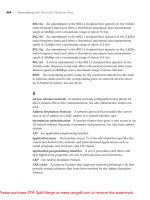
3. Click Details. Vista displays the Network Connection Details dialog
box, shown in Figure 5.12. This dialog box tells you, among other
things, your NIC’s MAC address (the Physical Address value), your
computer’s IP address, and the addresses of your ISP’s DNS servers.
4. Click Close to return to the Status dialog box.
5. Click Close.
134
Networking with Microsoft
®
Windows Vista
™
5
Please purchase PDF Split-Merge on www.verypdf.com to remove this watermark.
FIGURE 5.12
The Network Connection Details dialog box displays your computer’s IP address, among other
values.
Customizing Your Network
When you first open the Network Center, in
most cases, you won’t have a profile set up
for the network, so Vista configures the
network with three default settings:
■ A default name, usually either
Network or the SSID of the wireless
network.
■ The network type, which depends
on the network location you chose
when you first connected to the net-
work.
■ A default network icon, which
depends on the network location
you chose when you first connected
to the network. (In the miniature
network map shown in Figure 5.4,
the default Home icon is the one
shown above
logophilia.)
CHAPTER 5 Working with Vista’s Basic Network Tools and Tasks
135
5
Windows Vista sup-
ports three types of
network categories: private, pub-
lic, and domain. Private networks
are usually home or small office
networks where you need to
work with a few nearby comput-
ers. To that end, Windows Vista
turns on network discovery and
file and printer sharing. Public
networks are usually wireless hot
spot connections in airports, cof-
fee shops, hotels, and other pub-
lic places. When you designate a
network as public, Vista turns off
network discovery and file and
printer sharing. The domain cate-
gory applies to networks that are
part of a corporate domain.
note
Please purchase PDF Split-Merge on www.verypdf.com to remove this watermark.
To change any of these defaults, follow these steps:
1. Open the Network and Sharing Center, as described earlier (see
“Accessing the Network and Sharing Center”).
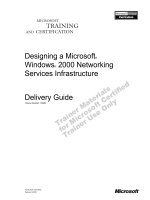
2. Click Customize to display the Customize Network Settings dialog box
shown in Figure 5.13.
136
Networking with Microsoft
®
Windows Vista
™
5
FIGURE 5.13
In the Network and Sharing Center, click Customize to display this dialog box so that you can
change the network name, type, and icon.
3. Type a name in the Network Name
text box.
4. Select either Public or Private. (You
see the Domain option only if you
are connected to a network with a
domain.)
5. To change the icon, click Change to
open the Change Network Icon dia-
log box, select an icon, and then
click OK.
6. Click Next. Vista displays the User
Account Control dialog box.
The Change Network
Icon dialog box initially
shows you a small collection of
icons from the
%SystemRoot%\
system32\pnidui.dll
file. To
get a larger choice of icons, type
any of the following pathnames
into the Look for Icons in This File
text box (and press Enter after
you enter the pathname):
%SystemRoot%\system32\
shell32.dll
%SystemRoot%\system32\
pifmgr.dll
%SystemRoot%\explorer.exe
tip
Please purchase PDF Split-Merge on www.verypdf.com to remove this watermark.
7. Enter your UAC credentials. Vista applies the new network settings.
8. Click Close. Vista updates the Network and Sharing Center window
with the new settings.
From Here
■ To find out more information about the Network Connections window,
see “Opening the Network Connections Window,” p. 140.
■ For information on the Wireless Properties button in the Status dialog
box for a wireless connection, see “Working with Wireless Connection
Properties,” p. 163.
■ To learn more about the Manage Wireless Networks window, see
“Opening the Manage Wireless Networks Window,” p. 158.
■ To learn how to enable sharing, see “Activating File and Printer
Sharing,” p. 185.
■ If you can’t connect to your wireless network successfully, see
“Troubleshooting Wireless Network Problems,” p. 426.
CHAPTER 5 Working with Vista’s Basic Network Tools and Tasks
137
5
Please purchase PDF Split-Merge on www.verypdf.com to remove this watermark.
This page intentionally left blank
Please purchase PDF Split-Merge on www.verypdf.com to remove this watermark.
6
CHAPTER
IN THIS CHAPTER
■
Opening the Network
Connections Window
■
Renaming a Network
Connection
■
Enabling Automatic IP
Addressing
■
Setting Up a Static IP Address
■
Finding a Connection’s MAC
Address
■
Using a Network Connection to
Wake Up a Sleeping Computer
■
Disabling a Network
Connection
■
From Here
Managing Network
Connections
I
n Windows Vista, you can link to many different types of
remote resources, including dial-up and broadband Inter-
net services, dial-up and Internet-based virtual private
networking (VPN), and the ethernet and wireless networking
that are the subject of this book. In Vista, all of these remote
links are called network connections, and Vista maintains a
Network Connections window that lists all your network
connections. Each network interface card (NIC) attached to
your computer gets its own connection icon in the list, and
you can use those icons to work with your network connec-
tions.
For example, you can rename a connection, disable an
unused connection, switch a connection between using a
dynamic and a static IP address, and find out a connection’s
Internet Protocol (IP) and Media Access Control (MAC)
addresses. You learn about these and other tasks in this
chapter. For more information about wireless connections,
see Chapter 7, “Managing Wireless Network Connections.”
Please purchase PDF Split-Merge on www.verypdf.com to remove this watermark.
Opening the Network Connections Window
You do most of your work in this chapter in Vista’s Network Connections win-
dow, and Vista gives you two main ways to access this window:
■ In the Network and Sharing Center, click the Manage Network
Connections link in the Tasks list.
■ Press Windows Logo+R (or select Start, All Programs, Accessories, Run)
to open the Run dialog box, type
control ncpa.cpl, and then click OK.
Figure 6.1 shows an example of the Network Connections window.
140
Networking with Microsoft
®
Windows Vista
™
6
Wired connection
Wireless connection
Connection has a problem
FIGURE 6.1
Windows Vista’s Network Connections window.
By default, Vista groups the Network Connections window via the Type field.
If you’ve previously created a direct broadband Internet connection, a dial-up
Internet connection, or a connection to a VPN, you see groups named
Broadband, Dial-up, and Virtual Private Network, respectively (as shown in
Figure 6.1). However, you always see the LAN or High-Speed Internet group,
which usually includes two types of icons:
Wired These ethernet connections take the default name Local Area
Connection, and you can recognize them by the RJ-45 jack
shown with the icon. If you have more than one ethernet NIC
installed in your computer, you see a wired connection icon for
each one (with subsequent connections named Local Area
Connection 2, and so on).
Please purchase PDF Split-Merge on www.verypdf.com to remove this watermark.
Wireless These connections take the default name Wireless Network
Connection, and you can recognize them by the green signal
bars shown with the icon.
When you’re in the default Tiles view, both wired and wireless icons show the
name of the network to which they’re connected (or the icon shows
Disconnected if no current connection is present) and the name of the NIC
through which each connection is made. (Details view shows you more data
such as the current connectivity setting—such as
Access to Local Only or
Access to Local and Internet—and the network category—Private, Public, or
Domain.) If the network connection currently has a problem, you see a red X
added to the icon (see Figure 6.1), and the connection’s Status field may dis-
play an error message (such as
Network cable unplugged).
Renaming a Network Connection
The default network connection names—Local Area Connection and Wireless
Network Connection—don’t tell you much other than whether the connection
is wired or wireless. Similarly, if your computer has two ethernet NICs, having
connections named Local Area Connection and Local Area Connection 2
doesn’t give you much to go on if you need to differentiate between them.
For these reasons, you might consider renaming your connections. For exam-
ple, if you have Linksys and D-Link routers on your network, you could
rename your connections as Linksys Connection and D-Link Connection. Here
are the steps to follow:
1. Open the Network Connections window, as described earlier.
2. Click the icon of the network connection you want to rename.
3. Click Rename This Connection in
the taskbar, or press F2. Vista adds
a text box around the connection
name.
4. Type the new name and press Enter.
The Use Account Control dialog box
appears.
5. Enter your User Account Control
(UAC) credentials to continue.
CHAPTER 6 Managing Network Connections
141
6
You use the same
rules for naming net-
work connections as you use for
naming files. That is, the maxi-
mum name length is about 255
characters, and you can include
any letter, number, or symbol
except the following: * | \ : “ < > /
and ?.
note
Please purchase PDF Split-Merge on www.verypdf.com to remove this watermark.
Enabling Automatic IP Addressing
Every computer on your network requires a
unique designation so that packets can be
routed to the correct location when infor-
mation is transferred across the network. In
a default Microsoft peer-to-peer network, the network protocol that handles
these transfers is Transfer Control Protocol / Internet Protocol (TCP/IP), and the
unique designation assigned to each computer is the IP address.
By default, Windows Vista computers obtain their IP addresses via the
Dynamic Host Configuration Protocol (DHCP). In Chapter 3, “Configuring Your
Router,” you learned how to turn on your router’s DHCP server, which the
router uses to provide each network computer at logon with an IP address
from a range of addresses.
➔ See “Enabling the DHCP Server,” p. 81.
However, activating the router’s DHCP server is only the first step toward
automating the assignment of IP addresses on your network. The second step
is to make sure that each of your Vista machines is configured to accept auto-
matic IP addressing. This feature is turned on by default in most Windows
Vista installations, but it’s worth checking, just to be sure.
Confirming That Windows Vista Is Configured for Dynamic IP Addressing
Here are the steps to follow to check (and, if necessary, change) Vista’s auto-
matic IP addressing setting:
1. Open the Network Connections window, as described earlier.
2. Select the connection you want to work with.
3. In the taskbar, click Change Settings
of This Connection. The User
Account Control dialog box
appears.
4. Enter your UAC credentials to con-
tinue. Vista display’s the connec-
tion’s Properties dialog box.
5. In the Networking tab’s list of items,
select Internet Protocol Version 4
(TCP/IPv4).
142
Networking with Microsoft
®
Windows Vista
™
6
The instructions in
this section work for
both wired and wireless connec-
tions.
note
If you don’t see the
Change Settings of This
Connection command, either
maximize the window or click
the double arrow (>>) that
appears on the right side of the
task bar to display the com-
mands that won’t fit. Note, too,
that you can also right-click the
connection and then click Prop-
erties.
tip
Please purchase PDF Split-Merge on www.verypdf.com to remove this watermark.
6. Click Properties to display the Properties dialog box for Internet
Protocol Version 4.
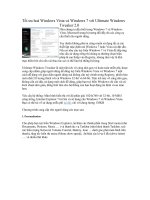
7. Select the Obtain an IP Address Automatically option, as shown in
Figure 6.2.
CHAPTER 6 Managing Network Connections
143
6
FIGURE 6.2
Select the Obtain an IP Address Automatically option to configure Vista to accept the
dynamic IP addresses assigned by your network’s router.
8. Select the Obtain DNS Server Address Automatically option.
9. Click OK to return to the connection’s Properties dialog box.
10. Click Close.
11. Repeat steps 2 through 10 for your other network connections.
Displaying the Computer’s Current IP Address
There may be times when you need to know the current IP address assigned to
your Vista machine. For example, one networking troubleshooting process is to
see whether you can contact a computer over the connection, a process known
as pinging the computer (because you use Vista’s
PING command). In some
cases, you need to know the computer’s IP address for this method to work.
➔ For the details on using PING as a troubleshooting tool, see “Checking Connectivity with the
PING Command,”p. 419.
Please purchase PDF Split-Merge on www.verypdf.com to remove this watermark.
To find out the current IP address of the Windows Vista machine, use any of
the following methods:
■ In the Network Connections window, click the network icon, click the
taskbar’s View Status of This Connection command (or double-click the
network connection) to open the connection’s Status dialog box. Click
Details to open the Network Connection Details dialog box. As shown
in Figure 6.3, the computer’s current IP address appears as the IPv4 IP
Address value.
144
Networking with Microsoft
®
Windows Vista
™
6
DNS addresses
MAC address
Current IP address
FIGURE 6.3
In the network connection’s Status dialog box, the IPv4 IP Address value displays the Vista
computer’s current IP address.
■ Select Start, All Programs,
Accessories, Command Prompt to
open a command-line window. At
the prompt, type
ipconfig | more
and press Enter. Vista displays
information about each network
connection, including the IP
address associated with each con-
nection, as shown in the following
(partial) example output:
I’ve added the MORE
command here to
control the output of the
IPCONFIG results. Vista displays a
screenful of data, then displays
—
More —
at the bottom of the
screen. Press Enter to scroll
through the rest of the results
one line at a time, or press Space-
bar to see the results one screen
at a time.
note
Please purchase PDF Split-Merge on www.verypdf.com to remove this watermark.
Windows IP Configuration
Ethernet adapter Local Area Connection 2:
Connection-specific DNS Suffix . :
Link-local IPv6 Address . . . . . : fe80::94ba:8241:988d:c199%12
IPv4 Address. . . . . . . . . . . : 192.168.1.101
Subnet Mask . . . . . . . . . . . : 255.255.255.0
Default Gateway . . . . . . . . . : 192.168.1.1
Wireless LAN adapter Wireless Network Connection:
Connection-specific DNS Suffix . :
Link-local IPv6 Address . . . . . : fe80::130:2a68:fde5:d668%8
IPv4 Address. . . . . . . . . . . : 192.168.1.105
Subnet Mask . . . . . . . . . . . : 255.255.255.0
Default Gateway . . . . . . . . . : 192.168.1.1
Setting Up a Static IP Address
Your router’s DHCP server offers each client
a lease on the IP address, and in most
cases that lease expires after 24 hours.
When the expiration time approaches, the
client asks for a new IP address. In small
networks, the DHCP server often assigns
each client the same IP address each time,
but that’s not guaranteed. Because when
you’re working with Vista you rarely need
to know a connection’s IP address, how-
ever, a changing IP address is no big deal
the vast majority of the time.
However, there are times when a con-
stantly changing IP address can be a big
problem. For example, when you learn
how to turn a Windows Vista machine into
a lightweight web server in Chapter 19,
“Setting Up a Website,” you see that a
dynamic IP address makes it much harder
for people to find and use the website. You can fix this problem by assigning a
static IP address to a network connection.
CHAPTER 6 Managing Network Connections
145
6
Instead of assigning a
static IP address to the
Vista computer, you might be
able to get your router to handle
this for you. Log on to your
router’s configuration pages and
look for an option that enables
you to map a static IP address to
the computer MAC (see “Finding
a Connection’s MAC Address,”
later in this chapter) address. This
means that whenever the com-
puter requests a new DHCP
lease, the router supplies the
computer the same IP address
each time. Note that not all
routers offer this option.
tip
The instructions in
this section work for
both wired and wireless connec-
tions.
note
Please purchase PDF Split-Merge on www.verypdf.com to remove this watermark.
Displaying the Current DNS Addresses
When you use a dynamic IP address, in
most cases you also use dynamic DNS
(domain name system) addresses, which are
supplied by your Internet service provider
(ISP). (The DNS enables computers and
servers connected to the Internet to find
resources using domain names rather than
IP addresses.) When you switch your Vista
computer to a static IP address (as shown in the next section), Vista also dis-
ables the feature that allows Vista to obtain DNS addresses automatically. In
other words, when you specify a static IP address, you must also specify static
DNS addresses.
Therefore, before performing the procedure for converting Vista to a static IP
address, you need to determine your ISP’s current DNS addresses. To find out
the current DNS addresses for a network connection, use either of the follow-
ing methods:
■ In the Network Connections window, click the icon of the connection
you want to work with, click the taskbar’s View Status of This
Connection command (or double-click the network connection) to open
the connection’s Status dialog box. Click Details to open the Network
Connection Details dialog box. As shown earlier in Figure 6.3, the cur-
rent DNS addresses appear as the IPv4 DNS Servers values.
■ Select Start, All Programs, Accessories, Command Prompt to open a
command-line window. At the prompt, type
ipconfig /all | more and
press Enter. Vista displays information about each network connection,
including the IP addresses of your ISP’s DNS servers, as shown in the
following (partial) example output:
Windows IP Configuration
Host Name . . . . . . . . . . . . : OfficePC
Primary Dns Suffix . . . . . . . :
Node Type . . . . . . . . . . . . : Hybrid
IP Routing Enabled. . . . . . . . : No
WINS Proxy Enabled. . . . . . . . : No
146
Networking with Microsoft
®
Windows Vista
™
6
Remember that
when using MORE,
you control the output of the
results by either pressing Enter (to
scroll through the results one line
at a time) or press Spacebar (to
see the results one screen at a
time).
note
Please purchase PDF Split-Merge on www.verypdf.com to remove this watermark.
Ethernet adapter Local Area Connection 2:
Connection-specific DNS Suffix . :
Description . . . . . . . . . . . : D-Link DGE-530T Gigabit Ethernet Adapter
Physical Address. . . . . . . . . : 00-13-46-95-84-28
DHCP Enabled. . . . . . . . . . . : Yes
Autoconfiguration Enabled . . . . : Yes
Link-local IPv6 Address . . . . . : fe80::94ba:8241:988d:c199%12(Preferred)
IPv4 Address. . . . . . . . . . . : 192.168.1.101(Preferred)
Subnet Mask . . . . . . . . . . . : 255.255.255.0
Lease Obtained. . . . . . . . . . : Tuesday, August 28, 2007 10:01:41 AM
Lease Expires . . . . . . . . . . : Wednesday, August 29, 2007 10:01:40 AM
Default Gateway . . . . . . . . . : 192.168.1.1
DHCP Server . . . . . . . . . . . : 192.168.1.1
DHCPv6 IAID . . . . . . . . . . . : 301994822
DNS Servers . . . . . . . . . . . : 207.164.234.193
67.69.184.223
NetBIOS over Tcpip. . . . . . . . : Enabled
Specifying the Static IP Address
You’re now just about ready to assign a static IP address to your Vista com-
puter. The last bit of information you need to know is the IP address to use.
This is important because you don’t want to use an address that your router
has already assigned to another computer. The easiest way to do this is to
choose an address outside of the DHCP server’s range. For example, if you con-
figured the DHCP server to assign addresses from the range 192.168.1.100 to
192.168.1.150, an address such as 192.168.1.50 or 192.168.1.200 will work.
(Remember, too, not to use the address assigned to your router.)
With an IP address in hand, follow these steps to assign it to a network con-
nection in Windows Vista:
1. Open the Network Connections win-
dow, as described earlier.
2. Select the connection you want to
work with.
3. In the taskbar, click Change Settings
of This Connection. (You can also
CHAPTER 6 Managing Network Connections
147
6
It’s probably a good idea
to check your router’s
DHCP table to see which
addresses it has assigned. I
showed you how to do this in
Chapter 3.
tip
Please purchase PDF Split-Merge on www.verypdf.com to remove this watermark.
right-click the connection and then click Properties.) The User Account
Control dialog box appears.
4. Enter your UAC credentials to continue. Vista display’s the connection’s
Properties dialog box.
5. In the Networking tab’s list of items, select Internet Protocol Version 4
(TCP/IPv4).
6. Click Properties to display the Properties dialog box for Internet
Protocol Version 4.
7. Click to activate the Use the Following IP Address option.
8. Use the IP Address box to type the IP address you want to use.
9. Use the Subnet Mask box to type the IP addresses for the subnet mask.
(Windows Vista should fill this in for you automatically; the most com-
mon value is 255.255.255.0.)
10. Use the Default Gateway box to type the IP address of your network’s
router.
11. Use the Preferred DNS Server and Alternate DNS Server boxes to type
the IP addresses of your ISP’s DNS servers. Figure 6.4 shows a com-
pleted version of the dialog box.
148
Networking with Microsoft
®
Windows Vista
™
6
FIGURE 6.4
You can assign a static IP address to a network connection on a Windows Vista computer.
Please purchase PDF Split-Merge on www.verypdf.com to remove this watermark.
12. Click OK to return to the connection’s Properties dialog box.
13. Click Close.
Finding a Connection’s MAC Address
A NIC’s MAC address seems like a pretty
obscure value, but you’d be surprised how
often it comes up. Here are two instances
in this book:
■ Later in this chapter, I show you
how to wake up a remote computer that’s in Vista’s Sleep mode, and
the utility I mention requires the MAC address of a NIC on the remote
computer.
■ In Chapter 15, “Implementing Wireless Security,” you learn that you
can use wireless NIC MAC addresses to beef up the security of your
wireless network.
➔ See “Enabling MAC Address Filtering,” p. 356.
To find out the MAC address of the NIC associated with a network connection,
use either of the following methods:
■ In the Network Connections window, click the icon of the connection
you want to work with, click the taskbar’s View Status of This
Connection command (or double-click the network connection) to open
the connection’s Status dialog box. Click Details to open the Network
Connection Details dialog box. As shown earlier in Figure 6.3, the con-
nection’s MAC address appears as the Physical Address value.
■ Select Start, All Programs, Accessories, Command Prompt to open a
command-line window. At the prompt, type
ipconfig /all | more and
press Enter. Vista displays information about each network connection,
including the MAC addresses, as shown in the following (partial)
example output (see the
Physical Address value):
Windows IP Configuration
Host Name . . . . . . . . . . . . : OfficePC
Primary Dns Suffix . . . . . . . :
Node Type . . . . . . . . . . . . : Hybrid
CHAPTER 6 Managing Network Connections
149
6
The instructions in
this section work for
both wired and wireless connec-
tions.
note
Please purchase PDF Split-Merge on www.verypdf.com to remove this watermark.
IP Routing Enabled. . . . . . . . : No
WINS Proxy Enabled. . . . . . . . : No
Ethernet adapter Local Area Connection 2:
Connection-specific DNS Suffix . :
Description . . . . . . . . . . . : D-Link DGE-530T Gigabit Ethernet Adapter
Physical Address. . . . . . . . . : 00-13-46-95-84-28
DHCP Enabled. . . . . . . . . . . : Yes
Autoconfiguration Enabled . . . . : Yes
Link-local IPv6 Address . . . . . : fe80::94ba:8241:988d:c199%12(Preferred)
IPv4 Address. . . . . . . . . . . : 192.168.1.101(Preferred)
Subnet Mask . . . . . . . . . . . : 255.255.255.0
Lease Obtained. . . . . . . . . . : Tuesday, August 28, 2007 10:01:41 AM
Lease Expires . . . . . . . . . . : Wednesday, August 29, 2007 10:01:40 AM
Default Gateway . . . . . . . . . : 192.168.1.1
DHCP Server . . . . . . . . . . . : 192.168.1.1
DHCPv6 IAID . . . . . . . . . . . : 301994822
DNS Servers . . . . . . . . . . . : 207.164.234.193
67.69.184.223
NetBIOS over Tcpip. . . . . . . . : Enabled
Wireless LAN adapter Wireless Network Connection:
Connection-specific DNS Suffix . :
Description . . . . . . . . . . . : D-Link AirPremier DWL-AG530 Wireless PCI
Adapter
Physical Address. . . . . . . . . : 00-11-95-F5-BC-96
DHCP Enabled. . . . . . . . . . . : Yes
Autoconfiguration Enabled . . . . : Yes
Link-local IPv6 Address . . . . . : fe80::130:2a68:fde5:d668%8(Preferred)
IPv4 Address. . . . . . . . . . . : 192.168.1.105(Preferred)
Subnet Mask . . . . . . . . . . . : 255.255.255.0
Lease Obtained. . . . . . . . . . : Tuesday, August 28, 2007 10:02:08 AM
Lease Expires . . . . . . . . . . : Wednesday, August 29, 2007 10:02:06 AM
Default Gateway . . . . . . . . . : 192.168.1.1
DHCP Server . . . . . . . . . . . : 192.168.1.1
150
Networking with Microsoft
®
Windows Vista
™
6
Please purchase PDF Split-Merge on www.verypdf.com to remove this watermark.
DHCPv6 IAID . . . . . . . . . . . : 134222229
DNS Servers . . . . . . . . . . . : 207.164.234.193
67.69.184.223
NetBIOS over Tcpip. . . . . . . . : Enabled
Using a Network Connection to Wake Up a Sleeping Computer
Most Windows Vista computers are configured to go into Sleep mode after a
certain amount of idle time. Sleep mode is the new low-power state that Vista
uses to replace the confusing Standby and Hibernate modes from earlier ver-
sions of Windows. (Standby mode preserved your work and enabled you to
restart quickly, but didn’t entirely shut off the machine’s power; Hibernate
mode preserved your work and completely shut off the machine, but also took
a relatively long time to restart—faster than shutting down your computer
entirely, but slower than Standby.)
Vista’s Sleep state combines the best of the old Standby and Hibernate modes:
■ As in Standby, you enter Sleep mode within just a few seconds.
■ As in both Standby and Hibernate, Sleep mode preserves all your open
documents, windows, and programs.
■ As in Hibernate, Sleep mode shuts down your computer, except it
maintains power to the memory chips so that it can preserve the con-
tents of RAM for when you restart.
■ As in Standby, you resume from Sleep mode within just a few seconds.
To use Sleep mode, you have two choices:
■ To launch Sleep mode by hand, open the Start menu and click the
Sleep button, shown in Figure 6.5. (You can also click the arrow beside
the Lock button and then click Sleep.) Vista saves the current state and
shuts off the computer in a few seconds.
■ To configure Vista to go into Sleep mode automatically, select Start,
Control Panel, System and Maintenance, Power Options. In the Power
Options window, click the Change Plan Settings link under the cur-
rently selected power plan. Use the Put the Computer to Sleep list to
select the number of minutes or hours of idle time after which Vista
automatically puts the computer to sleep (see Figure 6.6). Click Save
Changes.
CHAPTER 6 Managing Network Connections
151
6
Please purchase PDF Split-Merge on www.verypdf.com to remove this watermark.
FIGURE 6.5
Click the Sleep button to quickly shut down your computer and save your work.
152
Networking with Microsoft
®
Windows Vista
™
6
Sleep button Lock button
FIGURE 6.6
You can configure Vista to put the computer to sleep after a certain number of minutes or
hours of idle time.
Please purchase PDF Split-Merge on www.verypdf.com to remove this watermark.
Having a computer go to sleep when
you’re not using it is a good idea because
it conserves power. However, it can be a
pain if you need to access the computer
remotely over your network because you
have no way to wake up the sleeping com-
puter (which normally requires a physical
action such as jiggling the mouse or press-
ing the computer’s power button).
Fortunately, most new NICs support a fea-
ture called wake-on-LAN, which enables the
NIC to wake up the computer when the
NIC receives a special ethernet packet
called a magic packet (usually the hexadec-
imal constant FF FF FF FF FF FF followed by
several repetitions of the computer’s MAC address) .
For this to work, you must first configure the NIC to handle wake-on-LAN.
Here are the steps to follow:
1. In the Network Connections window, right-click the connection that
uses the NIC you want to configure, and then click Properties. The User
Account Control dialog box appears.
2. Enter your UAC credentials to con-
tinue. The connection’s Properties
dialog box appears.
3. In the Networking tab, click
Configure to open the NIC’s
Properties dialog box.
4. Display the Power Manage-
ment tab.
5. Click to activate the Allow This
Device to Wake the Computer check
box (see Figure 6.7).
6. Click OK.
With the computer’s NIC configured, you
need to download a utility that can send a
magic packet to the remote computer
whenever you need to wake up the
CHAPTER 6 Managing Network Connections
153
6
If the Allow This
Device to Wake the
Computer check box is disabled,
it probably means your NIC
doesn’t support wake-on-LAN.
However, it may also mean that
this support has been disabled. In
the NIC’s Properties dialog box,
display the Advanced tab and
look for a property named Wake
Up Capabilities. Click this prop-
erty, and then choose On in the
Value list. Click OK to put the new
setting into effect, and then retry
the steps in this section.
note
When you use the wake-
on-LAN feature, you
probably don’t want the remote
computer to wake to the Vista
Welcome screen. Instead, it’s
almost always better to have the
computer wake directly to the
desktop. To disable the password
requirement on wakeup, select
Start, Control Panel, System and
Maintenance, Power Options. In
the Power Options window, click
the Require a Password on
Wakeup link to open the System
Settings window. Click Change
Settings That Are Currently
Unavailable, and then enter your
UAC credentials. Activate the
Don’t Require a Password option,
and then click Save Changes.
tip
Please purchase PDF Split-Merge on www.verypdf.com to remove this watermark.
machine. I use MatCode Software’s free Wake-on-LAN utility, available at
www.matcode.com/wol.htm. (This utility requires the NIC’s MAC address; see
“Finding a Connection’s MAC Address,” earlier in this chapter.) You can also
try Googling “wake-on-lan utility”.
154
Networking with Microsoft
®
Windows Vista
™
6
FIGURE 6.7
To turn on a NIC’s wake-on-LAN support, activate the Allow This Device to Wake the
Computer check box.
Disabling a Network Connection
It’s possible that your Vista computer has a network connection that it doesn’t
use. For example, if you upgraded to a Gigabit Ethernet NIC, you may no
longer use your machine’s old Fast Ethernet motherboard NIC. You can’t
detach a motherboard NIC from your computer (not easily, anyway), so the
network connection icon remains, cluttering the Network Connections window
and using up a few Windows Vista resources. If you don’t plan on using such
a connection, you’re better off disabling it by following these steps:
1. In the Network Connections window, click the connection you want to
work with, and then click the taskbar’s Disable This Network Device
command. (You can also right-click the connection and then click
Disable.) The User Account Control dialog box appears.
Please purchase PDF Split-Merge on www.verypdf.com to remove this watermark.
2. Enter your UAC credentials to continue.
As shown in Figure 6.8, Vista changes the connection’s status to
Disabled. If
you want to use the connection again later on, click it, and then click the
taskbar’s Enable This Network Device command.
CHAPTER 6 Managing Network Connections
155
6
Disabled
connection
FIGURE 6.8
You can disable a network connection that you no longer use.
From Here
■ For information about how to turn on the DHCP server for various
routers, see “Enabling the DHCP Server,” p. 81.
■ To learn more about wireless connections, see Chapter 7, “Managing
Wireless Network Connections,” p. 157.
■ To learn how to enable sharing, see “Sharing Resources with the
Network,” p. 184.
■ To learn how to use wireless NIC MAC addresses to beef up the security
of your wireless network, see “Enabling MAC Address Filtering,” p. 356.
■ For the details on using
PING as a troubleshooting tool, see “Checking
Connectivity with the PING Command,” p. 419.
Please purchase PDF Split-Merge on www.verypdf.com to remove this watermark.
This page intentionally left blank
Please purchase PDF Split-Merge on www.verypdf.com to remove this watermark.
7
CHAPTER
IN THIS CHAPTER
■
Opening the Manage Wireless
Networks Window
■
Making Other Wireless
Connections
■
Working with Wireless
Connection Properties
■
Renaming Wireless Connections
■
Reordering Wireless
Connections
■
Creating User-Specific Wireless
Connections
■
Removing Wireless Connections
■
From Here
Managing Wireless
Network Connections
M
ost small networks use just a single wireless con-
nection—the connection to your network’s wireless
access point. However, it’s no longer unusual to
have multiple wireless networks configured on your com-
puter. For example, you might have two or more wireless
gateways in your home or office; you might have a wireless
hot spot nearby; and as you see in this chapter, Windows
Vista also enables you to set up computer-to-computer
wireless connections to share files or an Internet connection
without going through a wireless access point.
Vista comes with a Manage Wireless Networks feature that
lists your saved wireless networks and enables you to add
new wireless connections, reorder the connections, and
remove existing connections. This chapter shows you how
to perform these and other wireless networking tasks.
Please purchase PDF Split-Merge on www.verypdf.com to remove this watermark.
Opening the Manage Wireless Networks Window
Most of the chores in this chapter take place in Vista’s Manage Wireless
Networks window. To get this window onscreen, open the Network and
Sharing Center, and then click the Manage Wireless Networks link in the Tasks
list. Figure 7.1 shows the Manage Wireless Networks window with a couple of
networks displayed.
158
Networking with Microsoft
®
Windows Vista
™
7
FIGURE 7.1
Windows Vista’s Manage Wireless Networks window.
By default, Vista groups the wireless networks using the Extended Tiles view,
and you can’t change this view. The networks are listed in the order that Vista
uses to attempt connections (more on this later; see “Reordering Wireless
Connections”). If your computer comes with multiple wireless network interface
cards (NICs) and you use those NICs to create separate connections, you can
switch from one NIC to another by pulling down the Change Adapter list and
selecting the NIC you want to work with.
Making Other Wireless Connections
In Chapter 4, “Putting Your Network Together,” you learned how to make
a standard connection to a wireless network. However, Windows Vista
also enables you to make two other wireless connections: to a hidden
Please purchase PDF Split-Merge on www.verypdf.com to remove this watermark.