Networking with Microsoft Windows Vista- P10
Bạn đang xem bản rút gọn của tài liệu. Xem và tải ngay bản đầy đủ của tài liệu tại đây (2.05 MB, 50 trang )
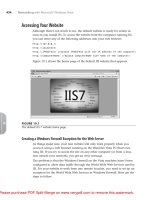
Accessing Your Website
Although there’s not much to see, the default website is ready for action as
soon as you install IIS. To access the website from the computer running IIS,
you can enter any of the following addresses into your web browser:
http://127.0.0.1/
http://localhost/
http://IPAddress/ (replace IPAddress with the IP address of the computer)
http://ComputerName/ (replace ComputerName with name of the computer)
Figure 19.1 shows the home page of the default IIS website that appears.
434
Networking with Microsoft
®
Windows Vista
™
19
FIGURE 19.1
The default IIS 7 website home page.
Creating a Windows Firewall Exception for the Web Server
As things stand now, your new website will only work properly when you
access it using a web browser running on the Windows Vista PC that’s run-
ning IIS. If you try to access the site on any other computer (or from a loca-
tion outside your network), you get an error message.
The problem is that the Windows Firewall on the Vista machine hasn’t been
configured to allow data traffic through the World Wide Web Services used by
IIS. For your website to work from any remote location, you need to set up an
exception for the World Wide Web Services in Windows Firewall. Here are the
steps to follow:
Please purchase PDF Split-Merge on www.verypdf.com to remove this watermark.
1. Select Start, Control Panel to open
the Control Panel window.
2. Under Security, click the Allow a
Program through Windows Firewall
link. The User Account Control dia-
log box appears.
3. Enter your UAC credentials. The Windows Firewall Settings dialog box
appears.
4. Select the Exceptions tab.
5. Click to activate the check box beside the World Wide Web Services
(HTTP) item, as shown in Figure 19.2.
CHAPTER 19 Setting Up a Website
435
19
HTTP is short for
Hypertext Transport
Protocol, the protocol used to
exchange information on the
World Wide Web.
note
FIGURE 19.2
You need to configure Windows Firewall on the Vista machine to allow traffic over the World
Wide Web Services.
6. Click OK to put the exception into effect.
Please purchase PDF Split-Merge on www.verypdf.com to remove this watermark.
Accessing Your Website Over the Network
With the Windows Firewall exception for the World Wide Web Services in
place, you can now access the website from any remote computer on your net-
work. You do this by launching your web browser and entering one of the fol-
lowing addresses:
http://IPAddress/ (replace IPAddress with the IP address of the IIS
computer)
http://ComputerName/ (replace ComputerName with name of the IIS computer)
Accessing Your Website Over the Internet
People on your network can now access your website, but you may also want
to allow website access to people from outside your network (that is, from the
Internet). To set this up, you must do three things:
1. Set up the Vista machine that’s hosting the website with a permanent
IP address, as described in Chapter 6, “Managing Network
Connections.”
➔ See “Setting Up a Static IP Address,” p. 145.
2. Configure your router to forward TCP traffic on port 80 to the IP
address you specified in step 1. See Chapter 16, “Making Remote
Network Connections,” for the details.
➔ See “Setting Up Port Forwarding,” p. 384.
3. (Optional) If you want people to access your website using a domain
name, you need to sign up for and configure a dynamic DNS (DDNS)
service, as described in Chapter 16.
➔ See “ Using Dynamic DNS to Access Your Network,” p. 389.
An Internet user can now access your website by entering the following
addresses into a web browser:
http://IPAddress/ (replace IPAddress with your router’s external IP
address)
http://DomainName/ (replace DomainName with your Dynamic DNS domain name)
➔ To learn how to find out your router’s external IP address, see“Checking the Router Status,”
p. 90.
436
Networking with Microsoft
®
Windows Vista
™
19
Please purchase PDF Split-Merge on www.verypdf.com to remove this watermark.
Understanding the Default Website
As you saw earlier, the default website set
up by IIS isn’t much to look at. That’s okay
because a bit later you’ll be adding plenty
of your own content to the site. For now,
the simplicity of the site is an advantage
because it makes it easy for you to look
around and see how the default site is con-
structed. This will help you down the road to customize the site and to add
your own content.
Viewing the Default Website Folder
Let’s begin by examining the folder that holds the website content:
1. Select Start, Computer to open the computer window.
2. Double-click the hard drive on which Windows Vista is installed.
3. Open the
inetpub
folder.
4. Open the
wwwroot
subfolder.
The
wwwroot
folder holds the IIS default website files, as shown in Figure 19.3
CHAPTER 19 Setting Up a Website
437
19
The Vista hard drive is
usually the C: drive. If
you’re not sure, look for the drive
icon that has the Windows flag
superimposed on it. You may
need to pull down the Views
menu and select Large Icons or
Tiles to see the flag.
tip
FIGURE 19.3
The contents of the IIS
wwwroot
folder.
Please purchase PDF Split-Merge on www.verypdf.com to remove this watermark.
The
wwwroot
folder has one subfolder
(
aspnet_client
, which you can ignore) and
two files:
iisstart.htm
This file contains the
code that is used to dis-
play the home page you
saw earlier in Figure 19.1.
welcome.png
This file is the image that
you see in the home page.
Viewing the Default Website with IIS Manager
The
wwwroot
folder enables you to examine the physical files and subfolders
associated with the IIS default website. However, you probably won’t often
deal with the
wwwroot
folder (or any folder) directly when creating and config-
uring your own web pages and websites. Instead, you’ll most often use a
Microsoft Management Console snap-in called the IIS Manager.
To display this snap-in and the default IIS website, follow these steps:
1. Select Start, Control Panel to open the Control Panel window.
2. Click System and Maintenance.
3. Click Administrative Tools.
4. Double-click Internet Information Server (IIS) Manager. The User
Account Control dialog box appears.
5. Enter your UAC credentials. The Internet Information Services (IIS)
Manager window appears.
6. Open the Computer branch (where Computer is the name of your
Windows Vista PC).
7. Open the Web Sites branch.
8. Select the Default Web Site branch.
IIS Manager gives you two ways to view
the website files:
■ Click the Content View button to
see the site contents. As you can see
in Figure 19.4, you see the same
subfolder and files as you saw ear-
lier (see Figure 19.3) when you
examined the contents of the
wwwroot
folder.
438
Networking with Microsoft
®
Windows Vista
™
19
You can also launch IIS
Manager by pressing
Windows Logo+R (or by selecting
Start, All Programs, Accessories,
Run) to open the Run dialog box,
typing
inetmgr
, and clicking OK.
tip
You can also use IIS
Manager to open the
website in your default web
browser. In IIS Manager, open the
Computer, Web Sites branch
(where Computer is the name of
the computer running IIS), select
Default Web Site, and then click
Browse in the Actions pane. (You
can also right-click Default Web
Site, and then click Browse in the
shortcut menu.)
tip
Please purchase PDF Split-Merge on www.verypdf.com to remove this watermark.
FIGURE 19.4
Click Content View to see the site’s files and subfolders.
CHAPTER 19 Setting Up a Website
439
19
FIGURE 19.5
Click Features View to see icons associated with the site’s features.
Much of the rest of this chapter shows you how to use IIS Manager to create
and configure Windows Vista website content.
■ Click Features View to see a collection of icons associated with the site’s
features, as shown in Figure 19.5. Most of these are advanced features,
so you’ll be using only a small subset of them.
Please purchase PDF Split-Merge on www.verypdf.com to remove this watermark.
Adding Folders and Files to the Default Website
By far, the easiest way to set up your own web content in Windows Vista is to
add that content to the existing default website. This requires no reconfigura-
tion of the server, of IIS, of the Windows Vista firewall, of the client computers,
or of the router. You simply add the content, and it’s ready for browsing.
Setting Permissions on the Default Website Folder
Somewhat annoyingly, Windows Vista makes it difficult for you to modify the
contents of the
wwwroot
folder. For example, if you copy a file to the folder, you
need to enter your UAC credentials to allow the copy. Even worse, you get
read-only access to the files, so if you edit a file you can’t save your changes.
To avoid these hassles, you need to adjust the Security permissions on the
wwwroot
folder to give your Vista user account Full Control. Here are the steps
to follow:
1. Select Start, Computer and navigate to the
inetpub
folder on your sys-
tem drive.
2. Right-click the
wwwroot
folder, and then click Properties to open the
folder’s Properties dialog box.
3. Select the Security tab.
4. Click Edit. You may see the User Account Control dialog box.
5. Enter your UAC credentials. Vista displays the Permissions for wwwroot
dialog box.
6. Click Add to display the Select Users
or Groups dialog box.
7. In the Enter the Object Names to
Select text box, type your username,
and then click OK to return to the
Permissions dialog box.
8. Select your username in the Group
or User Names list.
9. In the Permissions list, under the
Allow column, click to activate the
Full Control check box, as shown in
Figure 19.6.
10. Click OK to return to the Securi-
ty tab.
11. Click OK to put the new security set-
tings into effect.
440
Networking with Microsoft
®
Windows Vista
™
19
For a primer on
Hypertext Markup
Language (HTML) and Cascading
Style Sheets (CSS), check out my
book The Complete Idiot’s Guide to
Creating a Website. You can find
out more about it at my own site
located at http://www.
mcfedries.com/.
note
Don’t use
spaces in the
names of files (or folders) that you
add to your website. Although
Internet Explorer may display
such pages successfully, other
browsers may not.
caution
Please purchase PDF Split-Merge on www.verypdf.com to remove this watermark.
FIGURE 19.6
For hassle-free editing in the
wwwroot
folder, give your user account Full Control permission.
Adding a File to the Default Website
If you have just a few web content files that
you want to add to the Windows Vista web-
site, you can add them directly to the
default website folder. First, create your web
content file (HTML, ASP, or whatever). Here’s
a sample HTML file—which I’ve named
HelloWorld.htm
—that I’ll use as an example:
<html>
<head>
<title>Hello World!</title>
</head>
<body>
<p>
<font style=”size: 20pt; font-family:
Verdana; color: DarkBlue”>
Hello Windows Vista World!
<font>
</p>
</body>
</html>
CHAPTER 19 Setting Up a Website
441
19
If your web
content file
references other files—for exam-
ple, an HTML file that uses the
<img>
tag to reference an image
file—be sure to copy those files to
the
wwwroot
folder. You can either
put the files in the root, or you can
store them in a subfolder. For
example, you might want to cre-
ate a subfolder named
images
and use it to store your image
files. If you store the files in sub-
folders, make sure you adjust the
path in your code, as required. For
example, if you place a file named
HelloWorld.jpg
in the
images
subfolder, you need to add the
subfolder to the
<img>
tag, like so:
<img src=”images\
HelloWorld.jpg” />
caution
Please purchase PDF Split-Merge on www.verypdf.com to remove this watermark.
Next, save the file to the
wwwroot
folder.
Figure 19.7 shows the
HelloWorld.htm
file
copied to the
wwwroot
folder, and Figure
19.8 shows the file displayed with Internet
Explorer.
442
Networking with Microsoft
®
Windows Vista
™
19
A quick way to navigate
to the
wwwroot
folder
from IIS Manager is to open the
Computer, Web Sites branch
(where Computer is the name of
the computer running IIS), select
Default Web Site, and then click
Explore in the Actions pane. (You
can also right-click Default Web
Site, and then click Explore in the
shortcut menu.)
tip
FIGURE 19.7
You can add individual files directly to the
wwwroot
folder.
FIGURE 19.8
The
HelloWorld.htm
file displayed with Internet Explorer.
Please purchase PDF Split-Merge on www.verypdf.com to remove this watermark.
Changing the Default Website Home Page
One of the first things you’ll probably want to do with your new website is
change the home page. To do that, you need to create a new HTML (or other
web content) file in the
wwwroot
folder and give the file one of the following
names:
default.htm
default.asp
index.htm
index.html
See “Setting the Website’s Default Document,” later in this chapter, to learn
more about these special filenames. For example, here’s some bare-bones
HTML code that I’ve put in a file named
default.htm
:
<html>
<head>
<title>Home Page</title>
</head>
<body>
<p style=”text-align: center”>
<font style=”size: 24pt; font-family: Verdana; color: Navy”>
Welcome to Our Website!
<font>
</p>
</body>
</html>
Figure 19.9 shows
default.htm
added to the Default Web Site in IIS Manager,
and Figure 19.10 shows the site’s new home page in a web browser.
Adding a Folder to the Default Website
To add a folder to the Windows Vista default website, you have two choices:
■ Add the folder manually
■ Add the folder as a new virtual directory
The next two sections provide you with the details.
CHAPTER 19 Setting Up a Website
443
19
Please purchase PDF Split-Merge on www.verypdf.com to remove this watermark.
FIGURE 19.10
The
default.htm
file now appears as the website’s home page.
Adding a Folder Manually
Adding a folder to the Windows Vista default website is not all that different
from adding a file. That is, you can create a new subfolder within the
wwwroot
folder, or copy or move an existing folder and paste it within
wwwroot
. To
access web content within the new folder, tack the folder name and filename
to the default website address. For example, if you create a subfolder named
photos
within the
wwwroot
folder, and the main page is named
photos.htm
, you
access the content by entering the following address into the browser:
http://localhost/photos/photos.htm
Note that you can save some wear and tear on your typing fingers by chang-
ing the name of the main content file to one of the following:
444
Networking with Microsoft
®
Windows Vista
™
19
FIGURE 19.9
The
default.htm
file added to the Default Web Site.
Please purchase PDF Split-Merge on www.verypdf.com to remove this watermark.
default.htm
default.asp
index.htm
index.html
default.aspx
When you use one of these names, IIS displays the file by default if you
don’t specify a filename as part of the URL. For example, if you rename the
photos.htm
file to
default.htm
, you can access the file just by specifying the
folder path in the URL:
http://localhost/photos/
I discuss default content files in more detail later in this chapter (see “Setting
the Website’s Default Document”).
Adding a Folder as a New Virtual Directory
When you add a folder manually, IIS Manager detects the new folder and
adds it to the folder content. (If you don’t see the folder right away, switch to
Content View, right-click Default Web Site, and then click Refresh.) However,
you can also use IIS Manager to create a new folder within the default web-
site. Here are the steps to follow:
1. In IIS Manager, open the Computer, Web Sites, Default Web Site branch
(where Computer is the name of your Windows Vista PC).
2. Right-click Default Web Site and then click Add Virtual Directory. IIS
Manager displays the Add Virtual Directory dialog box. Figure 19.11
shows a completed version of the dialog box.
3. Use the Alias text box to enter an alias for the virtual directory. The
alias is the name that will appear in IIS Manager as a sub-branch of
the Default Web Site.
4. To specify the location of the virtual directory, you have three choices:
■ If the folder exists and you know the full pathname (drive and
folders), type it in the Physical
Path text box.
■ If the folder exists and you’re
not sure of the full pathname
(or it’s too long to type), click
the Browse (…) button, use the
Browse for Folder dialog box
to select the folder, and then
click OK.
CHAPTER 19 Setting Up a Website
445
19
The alias doesn’t
have to be the same
as the name of the virtual direc-
tory itself. For example, if you give
the name
photos
to the new vir-
tual directory, you could use
something like
Photos Virtual
Directory
as the alias.
note
Please purchase PDF Split-Merge on www.verypdf.com to remove this watermark.
FIGURE 19.11
Use the Add Virtual Directory dialog box to add a folder to your website using IIS Manager.
■ If the folder doesn’t exist, click Browse (…), use the Browse for
Folder dialog box to select the folder within which you want the
new folder to appear (for example,
wwwroot
), click Make New
Folder, type the folder name, press Enter, and then click OK.
5. Click OK.
Figure 19.12 shows the Default Web Site in IIS Manager with the new virtual
directory added.
446
Networking with Microsoft
®
Windows Vista
™
19
FIGURE 19.12
The new virtual directory appears as part of the Default Web Site in IIS Manager.
Please purchase PDF Split-Merge on www.verypdf.com to remove this watermark.
Controlling and Customizing Your Website
At this point, you could use your website as is and just continue adding web
pages, folders, and other content. However, IIS Manager offers a number of
features and settings that enable you to control your website and to customize
its look and feel. For example, you can stop and start the website, change the
default name of the site, and specify the default content page. The rest of this
chapter takes you through the most useful of these IIS Manager features.
Stopping Your Website
By default, when you start Windows Vista, the World Wide Web Publishing
Service starts automatically, and that service automatically starts your web-
site. This is reasonable behavior because in most cases you’ll want your web-
site available full time (that is, as long as the Vista computer is running).
However, there might be occasions when you don’t want your site to be avail-
able:
■ If you plan on making major edits to the content, you might prefer to
take the site offline while you make the changes.
■ You might only want your web-
site available at certain times of
the day.
■ If you’re developing a web applica-
tion, certain changes may require
that you stop and then restart the
website.
For these and similar situations, you can
stop the website. Here are the steps to fol-
low:
1. Open IIS Manager.
2. Select Computer, Web Sites, Default
Web Site (where Computer is the
name of the computer running IIS).
3. In the Actions pane, click Stop. (You
can also right-click Default Web Site
and then click Stop.) IIS Manager
stops the website.
CHAPTER 19 Setting Up a Website
447
19
If you’d prefer that your
website not start auto-
matically when you log on to
Windows Vista, select Default
Web Site, and then click
Advanced Settings in the Actions
pane. (You can also right-click
Default Web Site, and then click
Advanced Settings.) In the Start
Automatically setting, select
False, and then click OK.
If you only want your website to
not start the next time you launch
Windows Vista, stop the site and
then shut down Vista. When you
next log on to Vista, your website
won’t start. Note, however, that if
you then restart the website dur-
ing the Vista session, the website
will start automatically the next
time you start Vista.
tip
Please purchase PDF Split-Merge on www.verypdf.com to remove this watermark.
Restarting Your Website
When you’re ready to get your website
back online, follow these steps to restart it:
1. Open IIS Manager.
2. Select Computer, Web Sites, Default
Web Site (where Computer is the
name of the computer running IIS).
3. In the Actions pane, click Start.
(You can also right-click Default
Web Site and then click Start.) IIS
Manager starts the website.
Renaming the Default Website
The name Default Web Site is innocuous enough, I suppose, but it’s a bit on
the bland side. If you prefer to use a more interesting name, follow these steps
to change it:
1. Open IIS Manager.
2. Open the Computer, Web Sites branch (where Computer is the name of
the computer running IIS).
3. Right-click Default Web Site and then click Rename in the shortcut
menu. IIS Manager adds a text box around the name.
4. Type the new name for the website.
5. Press Enter.
Changing the Website Location
By default, your website’s home folder is the
wwwroot
folder, but that isn’t nec-
essarily permanent. You may decide to move the website to a different home
folder, or you may decide to rename the
existing folder. In either case, you must use
IIS Manager to specify the new home
folder. Here are the steps to follow:
1. Open IIS Manager.
2. Open the Computer, Web Sites
branch (where Computer is the
name of the computer running IIS).
448
Networking with Microsoft
®
Windows Vista
™
19
If your website is stuck
or behaving erratically,
you can often solve the problem
by stopping and restarting the
site. However, instead of per-
forming two separate opera-
tions—clicking Stop and then
clicking Start—IIS Manager lets
you perform both actions in one
shot by clicking Restart.
tip
When you
rename the
site, the new name can be up to
259 characters long, but you must
be sure to not use any of the fol-
lowing illegal characters:
@ $ & = + | \ ; : “ ‘ , < > / ?
caution
Please purchase PDF Split-Merge on www.verypdf.com to remove this watermark.
3. Select Default Web Site.
4. In the Action pane, click Basic Settings to open the Edit Web Site dialog
box, shown in Figure 19.13.
CHAPTER 19 Setting Up a Website
449
19
FIGURE 19.13
Use the Edit Web Site dialog box to change the site’s home folder.
5. To specify the website’s new home folder, you have three choices:
■ If the folder exists and you know the full pathname (drive and
folders), type it in the Physical Path text box.
■ If the folder exists and you’re not sure of the full pathname (or
it’s too long to type), click the Browse (…) button, use the Browse
for Folder dialog box to select the folder, and then click OK.
■ If the folder doesn’t exist, click Browse (…), use the Browse for
Folder dialog box to select the folder within which you want the
new folder to appear, click Make New Folder, type the folder
name, press Enter, and then click OK.
6. Click OK.
Setting the Website’s Default Document
A normal website URL looks like the following:
http://name/folder/file
Here,
name
is a domain name or hostname,
folder
is a folder path, and
file
is
the filename of the web page or other resource. Here’s an example:
http://localhost/photos/default.htm
Intriguingly, you can view the same web page by entering the following
address into the browser:
http://localhost/photos/
Please purchase PDF Split-Merge on www.verypdf.com to remove this watermark.
This works because IIS defines
default.htm
as one of its default document file-
names. Here are the others:
default.asp
index.htm
index.html
iisstart.htm
default.aspx
This means that as long as a folder contains a file that uses one of these
names, you can view the corresponding page without specifying the filename
in the URL.
Note, too, that these default documents have an assigned priority, with
default.htm
having the highest priority, followed by
default.asp
, then
index.htm
, then
index.html
, then
iisstart.htm
, and finally
default.aspx
. This
priority defines the order in which IIS looks for and displays the default docu-
ment pages. That is, IIS first looks for
default.htm
; if that file doesn’t exist in a
folder, IIS next looks for
default.asp
, and so on.
For your own websites, you can add new default documents (for example,
default.html
and
index.asp
), remove existing default documents, and change
the priority of the default documents. Here are the steps to follow:
1. Open IIS Manager.
2. Open the Computer, Web Sites branch (where Computer is the name of
the computer running IIS).
3. Select Default Web Site.
4. Click Features View.
5. Double-click the Default Document icon. IIS Manager displays the
Default Document page, shown in Figure 19.14.
6. To specify a new default document, type the filename in the File
Name(s) text box, making sure you separate each name with a
comma.
7. To delete a default document, select it in the File Name(s) text box and
then press Delete.
8. To change the default document priority order, cut and paste the items
in the File Name(s) text box.
9. In the Actions pane, click Apply to put the new settings into effect.
10. Click the Back button to return to the website’s main page in IIS
Manager.
450
Networking with Microsoft
®
Windows Vista
™
19
Please purchase PDF Split-Merge on www.verypdf.com to remove this watermark.
FIGURE 19.14
Use the Default Document page to add, remove, and reorder a site’s default content pages.
Working Without a Default Document
Using a default document is usually a good idea because it enables users to
access your site without knowing the name of any file. However, for security
reasons, you might want to allow access to the site only to users who know a
specific filename on the site (for example, through a URL that you’ve pro-
vided). In that case, you have two choices:
■ Don’t include a file that uses one of the default document names.
■ Disable the default documents.
Here are the steps to follow to disable default documents for your website:
1. Open IIS Manager.
2. Open the Computer, Web Sites branch (where Computer is the name of
the computer running IIS).
3. Select Default Web Site.
4. Click Features View.
5. Double-click the Default Document icon to display the Default
Document page.
6. In the Actions pane, click Disable. IIS Manager disables the default
documents for the site.
7. Click the Back button to return to the website’s main page in IIS
Manager.
CHAPTER 19 Setting Up a Website
451
19
Please purchase PDF Split-Merge on www.verypdf.com to remove this watermark.
At this point, you may still have a security risk because it’s possible that any
anonymous user who surfs to the site without specifying a filename will see a
listing of all the files and subfolders in the website’s home folders! An example
is shown in Figure 19.15.
452
Networking with Microsoft
®
Windows Vista
™
19
FIGURE 19.15
If you’ve disabled the default documents but directory browsing is enabled, anonymous users
who don’t specify a filename see a listing of the contents of the home folder.
This is called directory browsing, and it’s normally disabled in IIS 7, but just to
make sure, follow these steps:
1. Open IIS Manager.
2. Open the Computer, Web Sites branch (where Computer is the name of
the computer running IIS).
3. Select Default Web Site.
4. Click Features View.
5. Double-click the Directory Browsing
icon to display the Directory
Browsing page.
6. In the Actions pane, look for the
message
Directory browsing has
been disabled
, as shown in Figure
19.16. If you see the message, skip
to step 8.
In the directory list-
ing shown in Figure
19.15, you see a file named
web.config
. This is a file created
by IIS Manager to store some of
the settings you’ve been working
with so far, including the name
and order of the default docu-
ments and whether default docu-
ments are enabled.
note
Please purchase PDF Split-Merge on www.verypdf.com to remove this watermark.
FIGURE 19.16
Make sure that your website has directory browsing disabled.
7. If you do not see the message, click the Disable link to disable directory
browsing. IIS Manager disables directory browsing for the site.
8. Click the Back button to return to the website’s main page in IIS
Manager.
Now when an anonymous user surfs to your website without specifying a file-
name (and assuming you still have default documents disabled), that person
sees the error message shown in Figure 19.17.
CHAPTER 19 Setting Up a Website
453
19
Look for this message
FIGURE 19.17
If you’ve disabled default documents and directory browsing, anonymous users who don’t
specify a filename see the error message shown here.
Please purchase PDF Split-Merge on www.verypdf.com to remove this watermark.



![Tài liệu Microsoft Windows Vista Tutorials [VTC] pptx](https://media.store123doc.com/images/document/13/ce/pe/medium_pew1387001705.jpg)
