Tài liệu Wiley - Microsoft SQL Server 2008 For Dummies (2008)02 pptx
Bạn đang xem bản rút gọn của tài liệu. Xem và tải ngay bản đầy đủ của tài liệu tại đây (652.97 KB, 10 trang )
21
Chapter 2: Building Your SQL Server
Microsoft strongly recommends the use of Windows authentication mode
as a security best practice. Using this approach, you maintain a single set
of accounts for both server and database access, and errors are much less
likely to occur. You should use mixed authentication mode only if you have
a specific requirement for it in your organization, such as an application that
doesn’t support Windows authentication.
Choosing service accounts
During the installation process, you’ll be asked to choose service accounts
for several SQL Server services. Every program in Windows must run using
the permissions of an account; when you make this decision, you’re choosing
the account(s) that will be used to run SQL Server and its components.
For security reasons, I strongly recommend that you ask your domain admin-
istrator to create dedicated domain accounts for the SQL Server Agent and
SQL Server service accounts. These accounts should be configured with the
minimum permissions necessary to run their respective services and should
not be used for any other purpose.
Selecting the collation
Collations define how SQL Server stores and sorts data. They differ based
upon the character set used in different parts of the world. Some common
collations include:
ߜ Latin1_General: collation for English and German
ߜ Arabic collation for Arabic languages
ߜ French: collation for French
ߜ Modern_Spanish collation for Spanish
SQL Server Setup will choose a default collation for you based upon the set-
tings of the underlying Windows operating system. In general, you should not
change this default unless one of the following situations exists:
ߜ The database collation must support a different language than that of
the underlying operating system. For example, you might have a server
hosted in one country supporting a database server used by individuals
in another country.
ߜ The database server participates in a replication relationship with
another server that uses a different collation. A replication relationship is
when two servers are kept synchronized. (I discuss replication in more
in Chapter 15.). In replication relationships, all servers must use the
same collation.
06_224656-ch02.indd 2106_224656-ch02.indd 21 8/21/08 5:27:34 PM8/21/08 5:27:34 PM
22
Part I: Welcome to SQL Server 2008
Performing the installation
After making decisions about the instance, authentication mode, service
accounts, and collation (covered in the preceding sections), you’re ready to
begin the SQL Server installation process. Here’s how to install SQL Server:
1. Insert the SQL Server DVD into your computer’s DVD drive.
2. Click OK to install prerequisites, if necessary.
If your system doesn’t have updated versions of the Microsoft .NET
Framework and Windows Installer, the SQL Server installation program
will pop up a warning message asking you to install them before begin-
ning the SQL Server setup process. You may need to answer some addi-
tional questions regarding those installations before proceeding, and the
system may require a reboot.
3. When the SQL Server Installation Center appears, click the Installation
link.
4. Click the New SQL Server Stand-Alone Installation or Add Features to
an Existing Installation link.
SQL Server Setup performs a system configuration check to determine
whether your system is ready for SQL Server 2008.
5. Click the OK button to close the Setup Support Rules screen.
6. Select the appropriate licensing mode on the Product Key screen and
click the Next button to continue.
If you have a license for SQL Server, you may enter your product key on
this screen. If you don’t have a license, you may select a 180-day trial of
Enterprise Edition or the free installation of Express Edition.
7. Select the I Accept the License Terms check box in the License Terms
window and then click the Next button to continue.
SQL Server Setup displays a list of installation prerequisites, if any are
necessary.
8. If all checks pass, click the Next button to continue.
If some prerequisites are missing, you must click the Install button to
install them before you can continue.
9. In the Feature Selection window, select the check boxes next to the
features you want to install.
At a minimum, you probably want to install the Database Engine
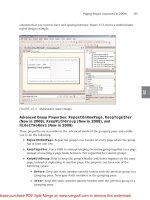
Services, Client Tools, and Books Online, as shown in Figure 2-1.
10. Click the Next button to continue.
The Instance Configuration window appears, as shown in Figure 2-2.
06_224656-ch02.indd 2206_224656-ch02.indd 22 8/21/08 5:27:34 PM8/21/08 5:27:34 PM
23
Chapter 2: Building Your SQL Server
Figure 2-1:
Selecting
your SQL
Server
features to
install.
Figure 2-2:
The
Instance
Configur-
ation
window.
06_224656-ch02.indd 2306_224656-ch02.indd 23 8/21/08 5:27:34 PM8/21/08 5:27:34 PM
24
Part I: Welcome to SQL Server 2008
11. If you’re installing a named instance, select the Named Instance radio
button and provide a name for the instance in the adjacent text box.
If you are installing the server’s default instance, you do not need to
change any settings on this screen.
12. Click the Next button to continue.
13. Review the Disk Usage Summary and click Next to continue.
SQL Server shows you the disk space requirements for the features you
selected.
14. In the appropriate text boxes, provide the username and password for
the domain accounts that will be used to run each of the SQL Server
services.
When providing account credentials, you must use an account that
already exists on the system. SQL Server won’t create an account for
you. You may need to contact the system administrator for assistance.
As noted earlier in the chapter, it is a best practice to use separate
domain accounts for these services, as shown in Figure 2-3.
Also, if you need to change the default collation, you may do so on this
screen by clicking the Collation tab.
15. Click the Next button to continue.
Figure 2-3:
Setting
SQL Server
service
accounts.
16. Click the Next button in the Database Engine Configuration window to
accept the default Windows authentication mode.
06_224656-ch02.indd 2406_224656-ch02.indd 24 8/21/08 5:27:35 PM8/21/08 5:27:35 PM
25
Chapter 2: Building Your SQL Server
You may also specify accounts that will serve as SQL Server administra-
tors on this screen, as shown in Figure 2-4.
At this point in the process, you may need to provide additional configu-
ration details for any optional components that you chose to install.
Figure 2-4:
Configuring
SQL server
authenti-
cation.
17. Click the Next button to advance past the Error and Usage Reporting
window.
18. Click the Next button to advance past the Installation Rules window.
19. Click the Install button to begin SQL Server installation.
20. Review the status screen to determine whether installation completed
successfully.
21. Click the Next button to review the release notes.
22. Click the Close button.
Upgrading an Existing
SQL Server Installation
If you’re already running SQL Server 2000 or SQL Server 2005 on your system
and want to upgrade to SQL Server 2008, you have several options. In this
section, I explain the preliminary steps you should perform to ensure that
you’re ready for the upgrade. Then I discuss your upgrade options.
06_224656-ch02.indd 2506_224656-ch02.indd 25 8/21/08 5:27:36 PM8/21/08 5:27:36 PM
26
Part I: Welcome to SQL Server 2008
Preparing for an upgrade
with Upgrade Advisor
SQL Server Upgrade Advisor is included on the SQL Server 2008 installation
DVD. It provides you with an automated means to determine whether your SQL
Server 2000 and SQL Server 2005 databases are ready for an upgrade to
SQL Server 2008. Here’s how to install Upgrade Advisor:
1. Insert the SQL Server 2008 DVD into the computer.
2. Select Install SQL Server Upgrade Advisor from the SQL Server
Installation Center screen.
3. Click the Next button when the Installation Wizard appears.
4. Select the I Accept the Terms in the License Agreement radio button
and then click Next.
5. Click Next to accept the default name and company; then click Next
again to accept the default features.
6. Click the Install button to install SQL Server Upgrade Advisor.
7. Click the Finish button when the installation completes.
When you’ve completed the installation process, run Upgrade Advisor as
follows:
1. From the Start menu, choose All Programs➪Microsoft SQL Server
2008➪SQL Server 2008 Upgrade Advisor.
2. When you see the Upgrade Advisor welcome screen, click the Launch
Upgrade Advisor Analysis Wizard link.
3. Click the Next button to bypass the welcome screen.
4. Specify the server name in the appropriate text box and click the
Detect button to automatically identify the service(s) for Upgrade
Advisor to analyze (see Figure 2-5).
You may manually override the automatically detected services by using
the check boxes.
5. Click the Next button to continue.
6. On the Connection Parameters screen, select the instance you want
Upgrade Advisor to analyze from the drop-down list.
If the server you want to analyze does not use Windows authentication,
you also need to select SQL Server authentication from the authentica-
tion drop-down list and provide appropriate SQL Server credentials.
7. Click the Next button to continue.
06_224656-ch02.indd 2606_224656-ch02.indd 26 8/21/08 5:27:36 PM8/21/08 5:27:36 PM
27
Chapter 2: Building Your SQL Server
Figure 2-5:
Selecting
the services
to analyze.
8. Click the Next button to accept the default setting of analyzing all
databases on the instance.
9. Review the Upgrade Advisor Settings and click the Run button to
begin the analysis.
This analysis may take several minutes or longer, depending upon the
complexity of the database(s) analyzed.
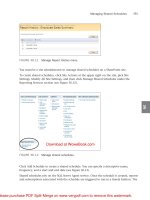
10. When the analysis completes, click the Launch Report button to view
the results.
Review the report (a sample appears in Figure 2-6) and correct any
issues before attempting an upgrade to SQL Server 2008.
Upgrading Your Installation
When you upgrade a SQL Server installation, you have two basic choices for
a migration path: a side-by-side migration or a direct upgrade.
Side-by-side migration
In this approach, you build a SQL Server 2008 server and then transfer your
databases to it one at a time. This approach is costly because it requires you
to provision a second server, but it is the safest because it provides a fall-
back plan. If your migration fails for any reason, you can simply revert to the
older database and try again later. I strongly recommend that you use this
approach whenever possible.
06_224656-ch02.indd 2706_224656-ch02.indd 27 8/21/08 5:27:36 PM8/21/08 5:27:36 PM
28
Part I: Welcome to SQL Server 2008
Figure 2-6:
SQL Server
Upgrade
Advisor
report.
Direct upgrade
If you do not have the resources available to perform a side-by-side migra-
tion, you can directly upgrade a SQL Server 2000 or SQL Server 2005 database
instance to SQL Server 2008.
Performing a direct upgrade is dangerous and involves a significant risk of data
loss. Be certain to back up your databases before attempting a direct upgrade.
The process of performing a direct upgrade is very similar to installing a
new SQL Server 2008 instance. For more information on performing a direct
upgrade, consult SQL Server Books Online (the reference material included
with SQL Server.
Configuring Database Mail
SQL Server’s Database Mail technology allows your applications to send
e-mail messages. Most SQL Server instances require the use of Database Mail
06_224656-ch02.indd 2806_224656-ch02.indd 28 8/21/08 5:27:37 PM8/21/08 5:27:37 PM
29
Chapter 2: Building Your SQL Server
functionality. SQL Server does not enable Database Mail by default, so you
must configure it using the Database Mail Configuration Wizard. Do so by fol-
lowing these steps:
1. From the Start menu, choose All Programs➪Microsoft SQL Server
2008➪SQL Server Management Studio.
2. If you are connecting to a SQL Server instance other than the default
instance, select it from the Server Name drop-down list.
3. If you are not using Windows Authentication, select SQL Server
Authentication from the Authentication drop-down list and provide
the login name and password in the appropriate text boxes.
4. Click the Connect button.
5. Click the plus sign (+)to the left of the Management folder.
6. Right-click Database Mail and select Configure Database Mail from the
pop-up menu.
7. Click the Next button to advance past the welcome screen.
SQL Server displays the Select Configuration Task window, shown in
Figure 2-7.
Figure 2-7:
Selecting
the
Database
Mail con-
figuration
task.
06_224656-ch02.indd 2906_224656-ch02.indd 29 8/21/08 5:27:37 PM8/21/08 5:27:37 PM
30
Part I: Welcome to SQL Server 2008
8. Select Set up Database Mail by Performing the Following Tasks and
click the Next button to continue.
SQL Server warns you that Database Mail is not currently enabled by
displaying the message shown in Figure 2-8.
Figure 2-8:
The
Database
Mail Not
Enabled
Message.
9. Click the Yes button to confirm that you would like to install Database
Mail.
The New Profile screen, shown in Figure 2-9, appears.
10. Provide a name and description for your Database Mail profile by
typing them in the appropriate text boxes.
Figure 2-9:
Creating
a New
Database
Mail profile.
06_224656-ch02.indd 3006_224656-ch02.indd 30 8/21/08 5:27:38 PM8/21/08 5:27:38 PM