apress taking your ipad to the max, ios 5 edition (2012)
Bạn đang xem bản rút gọn của tài liệu. Xem và tải ngay bản đầy đủ của tài liệu tại đây (20.5 MB, 512 trang )
For your convenience Apress has placed some of the front
matter material after the index. Please use the Bookmarks
and Contents at a Glance links to access them.
iii
Contents at a Glance
Contents iv
About the Authors xii
About the Technical Reviewer xiii
■Chapter 1: Bringing Your iPad Home 1
■Chapter 2: Putting Your Data and Media on Your iPad 23
■Chapter 3: Exploring the iPad Hardware 57
■Chapter 4: Interacting with Your iPad 77
■Chapter 5: Connecting to the Internet 119
■Chapter 6: Browsing the Internet with Safari 137
■Chapter 7: Touching Your Music and Video 165
■Chapter 8: Shopping for Apps, Books, Music, and More 203
■Chapter 9: Reading Books and Newspapers with iBooks
and Newsstand 227
■Chapter 10: Leveraging Your Desk Set 261
■Chapter 11: Setting Up and Using Mail 285
■Chapter 12: Working with Maps 317
■Chapter 13: Touching Your Digital Photos 349
■Chapter 14: On the Go with iWork 395
■Chapter 15: Using the iPad Cameras with Camera, Photo Booth,
and FaceTime 429
■Chapter 16: Other Great Ways to Use Your iPad 459
Index 487
1
Chapter
Bringing Your iPad Home
Purchasing your first iPad should be a fun and exciting experience for you. Compared to
buying a full-fledged desktop or laptop computer, there aren’t as many options to
complicate matters. The price tag on an iPad isn’t as daunting as that for an Apple
MacBook Pro, so the impact to your wallet won’t be outrageous even if you don’t
happen to make the perfect choice. In this chapter, you’ll discover what decisions you
should make before either heading to your local Apple retailer or ordering an iPad online.
You’ll learn what you need in addition to an iPad, what you can do if you’re not pleased
with your purchase or get a faulty unit, and how to get your iPad ready for everyday use.
Here are all the basic facts you need to select, buy, and set up your iPad.
Picking Your iPad
Especially at this early stage of the life cycle of the iPad, you have a relatively easy
decision to make regarding which model of the device to purchase. There are never that
many iPad models available at any particular time, since Apple does a good job of
keeping its product lines small and up-to-date. The big questions you’ll have to ask
yourself are whether you need 3G wireless capabilities, whether your 3G iPad should run
on a GSM or CDMA network, how much storage you want in your iPad, and whether or
not to purchase a used iPad. Let’s look into these four questions in more detail.
Wi-Fi or Wi-Fi + 3G?
The iPad is an Internet-connected device. Sure, it can work as an electronic book reader
or a gaming device without an Internet connection, but an iPad without Internet is like a
Porsche with a flat tire. Apple gives you two choices: Wi-Fi (wireless network
connectivity) models and Wi-Fi + 3G (wireless network plus 3G mobile data connectivity)
models. If you ever want an Internet connection away from a Wi-Fi hotspot, you’ll need
to buy the Wi-Fi + 3G version of the iPad, because you cannot add the functionality to
an iPad later.
The Wi-Fi + 3G models are slightly more expensive than the models with Wi-Fi only, to
the tune of US$130 more than their Wi-Fi counterparts. What you’re paying for is built-in
1
CHAPTER 1: Bringing Your iPad Home
2
3G circuitry, a Global Positioning System (GPS) receiver, and an antenna, which is a
fancy way of saying that your iPad (with an optional subscription to a data plan with your
local wireless carrier) can surf the Web, send and receive e-mail, and connect to the
iBookstore from any location with 3G wireless service. Do you need 3G capabilities?
Here are some questions you need to ask yourself:
Will you be using your iPad in places where there are no Wi-Fi hotspots?
If you plan on using your iPad around your Wi-Fi equipped home and
office and if most of the locations that you visit (stores, libraries, coffee
shops, airports, and hotels) provide free Wi-Fi, then you might not need
the Wi-Fi + 3G model. However, if you often find yourself in need of an
Internet connection when you’re in your car, on a soccer field, or at
some other location without Wi-Fi, then the Wi-Fi + 3G iPad may be the
correct choice for you.
Do you have another way to connect to a 3G network? You may already
have a different method of accessing a wide-area wireless network. If
you have a 3G router such as the Sierra Wireless Overdrive 3G/4G or
Novatel MiFi for use with a laptop, then you can use it and your existing
wireless data plan to connect to the Internet. If you have an iPhone 4
running iOS 4.3 or newer, you might want to consider using the Personal
Hotspot feature on the phone as your gateway to the Internet (a
separate data plan is required).
Are you willing to pay extra for both your iPad and the 3G data plan? To
begin with, a Wi-Fi + 3G iPad costs $130 more than the corresponding
model without 3G. That’s not the only additional cost you’ll incur, since
your wireless carrier is going to charge you for a data plan. In the United
States, AT&T provides 3G data service without a contract for $14.99 per
month for 250MB of data, or $25 monthly for 2GB of data. The other
U.S. carrier, Verizon Wireless, has rates beginning at 1GB of data for
$20 per month and up to 10GB for $80 per month. International carriers
offer similar plans, so check with your carrier for details about the cost
and capacity of data plans in your country.
Do you need to use apps that are aware of the location of the iPad? The
Wi-Fi iPad has the ability to determine its location through something
called the Wi-Fi Positioning System. This service, provided in North
America by Skyhook Wireless, uses the known location of Wi-Fi access
points to approximate the location of an iPad. Although this can provide
location data to within 20 to 30 meters in crowded population centers in
the United States and Canada, it doesn’t work at all when the iPad is away
from Wi-Fi. The Wi-Fi + 3G iPad contains a full Assisted GPS (A-GPS)
receiver for pinpointing the location of the device using GPS. As a result,
accurate location can be determined almost anywhere on the planet
provided that the Wi-Fi + 3G iPad can “see” the sky.
CHAPTER 1: Bringing Your iPad Home
3
GSM vs. CDMA
If you decide to purchase the Wi-Fi + 3G iPad, you’ll also have to decide what mobile
wireless network to run on. In the United States, there are two choices: GSM, the
standard used by AT&T Wireless, and CDMA, which is the technology behind Verizon’s
mobile network. The majority of wireless networks throughout the world use GSM, so
frequent international travelers may want to consider that fact when making a purchase
decision.
For all practical purposes, the speeds and capabilities of the two 3G networks are
similar. The main differentiator for most U.S. iPad buyers is the coverage provided by
the two carriers in the area where you live and work. Verizon Wireless customers who
are happy with the voice signal quality that they currently get with their mobile phones
can stay with their existing carrier for iPad data. Likewise, AT&T Wireless customers with
five bars of signal strength and good service may want to stay with their current carrier.
How Much Storage?
Once you’ve decided whether to purchase the Wi-Fi or Wi-Fi + 3G iPad, your next
thought should be about the quantity of built-in storage you want in your iPad. Although
the amount of working memory, or RAM, in the iPad is identical across the different
models (256MB for the original iPad, 512MB for the iPad 2), the flash drives used for
storing applications and data come in three different sizes: 16GB, 32GB, and 64GB. You
cannot upgrade the flash drive in the iPad, so you’re stuck with whatever you buy. Like
any electronic device, the iPad will evolve over time, so larger storage capacities are
likely in the future. Also keep in mind that the pre-installed OS and apps on the iPad take
up some space already (up to half a GB), so you’ll actually have a little less free space
on the iPad than stated by Apple.
At the launch of the iPad, the difference between the 16GB and 32GB models was only
$100, while maxing out the iPad’s storage at 64GB was only $200 more than buying the
base model. Before deciding how much storage you want to buy, consider these
questions:
How big is your music library? If your library is small and you want to
listen to music on your iPad, no problem. If it’s large, the extra space on
the larger iPad models helps you store additional music and podcasts.
Of course, if you already own a music device such as an iPod, you may
want to continue using it for listening. iPods come in a variety of
capacities and are much more portable than your iPad.
CHAPTER 1: Bringing Your iPad Home
4
How many videos do you want to carry around? A single two-hour movie
may occupy more than a gigabyte of storage. If you travel a lot,
especially on airplanes, you may want to pay more to store additional
movies and TV shows with those extra gigabytes. In Chapter 7 of this
book, we’ll talk about using Handbrake to transfer video from DVDs to a
format that your iPad can use. Although Handbrake does a great job of
compressing video, movies can still be as large as 500MB to 1GB in
size. If you also own a second-generation Apple TV, you might consider
using Apple’s AirPlay and Home Sharing to stream video to your iPad,
reducing the need for more storage.
Do you plan to carry lots of pictures? Although many digital pictures are
pretty small (a typical photo is 300KB to 1.2MB in size), if you carry a
few thousand of them around, they do add up to some serious storage.
Do you laugh at the idea of carrying that many pictures around on your
iPad? Apple’s built-in support for the Mac iPhoto application makes it
simple to put years of photo archives onto your iPad with a single
synchronization option. Moving photos directly from a digital camera to
your iPad is easy using the iPad Camera Connection Kit, so the idea of
backing up a trip’s worth of memories on your iPad while on vacation
isn’t entirely out of the question.
Do you need to carry lots of data? You might not think of your iPad as a
data storage device, but there are ways to use it (mostly involving e-
mailing documents to yourself or using a third-party application) to bring
data along with you on the road. If you think you might need to do this,
maybe those extra gigabytes could be put to good use.
How long do you plan to use this iPad? If you’re an early adopter who
plans to trade up at the earliest possible opportunity whenever Apple
offers a new unit, you may want to save your pennies now in the hope
that a better unit with more memory quickly debuts. If, instead, you want
to get the most use out of the iPad for the longest period of time, paying
more up front means you won’t outgrow the memory quite as fast.
Should You Buy a Used iPad?
Now that the iPad has been on the market for a while, some owners are moving up to
newer or more capable iPads, and used devices are often available for less money than
new ones. If you don’t need the latest and greatest iPad, a used one can be your
gateway into the iPad world without impacting your wallet as much.
Believe it or not, Apple is the best vendor for used iPads. The company often makes
refurbished iPads available for sale at less than the suggested retail price of new
equipment, and the iPad will come with the original factory warranty. You can find the
refurbished equipment in the Apple Online Store at or on
Amazon.com.
CHAPTER 1: Bringing Your iPad Home
5
eBay is often a good place to purchase used computer equipment, because sellers are
given ratings by buyers so that it’s possible to see at a glance how others have fared in
their transactions with a particular seller. As with any online auction, however, the buyer
should beware. Make sure that the seller has pictures of the exact unit you are bidding
on, has a return policy, and has a flawless approval rating.
If you’re buying an iPad from someone locally, you might want to consider having an
Apple Authorized Service Provider (www.apple.com/buy/locator/service/) check the
unit over before you make a commitment. While it’s easy for you to make a visual
inspection of the screen and case for scratches or dents, it’s not so easy to see if there
is hidden damage caused by water or if there are connectors that have been broken.
Finally, you might be able to afford a new iPad when the next generation is announced
(usually in March or April). Retailers need to make room for the incoming iPads and
discount their existing stock. Your patience can be rewarded!
Considering System Requirements
Even though you no longer need a computer to set up your iPad, you’ll still most likely
find yourself using your iPad in conjunction with your Mac or PC. This means your
computer will need to have some basic requirements in order for it to talk to your iPad. It
will need a USB 2.0 port and an Internet connection running the most recent version of
iTunes. Also, the PC needs to be a Mac running OS X 10.5.8 or newer or a Windows
computer running Windows XP (Home or Professional with Service Pack 3 or newer),
Windows Vista, or Windows 7.
NOTE: If you haven’t yet put iTunes on your computer, you can get a free copy from
www.apple.com/itunes. It’s available for both Mac OS X and Windows systems and is quick
and easy to install.
Buying Your iPad
After deciding among the available iPad models, you’re probably ready to pull out your
credit card and go buy that iPad (see Figure 1–1). Where should you go? To an Apple
Store? To an authorized Apple retailer or Best Buy store? Or should you buy online? You
might be surprised to learn that there are better and worse choices.
We recommend buying your iPad in person at a store. You can ask questions. You can
make human connections. If something goes wrong with your purchase, you have a
person who’s there to help you work through it. This is not to say that calling Apple’s
support line is insufficient; it’s just that being face to face with a real person makes
solutions happen more readily.
The sad fact of the matter is that, on occasion, iPad purchases do not go smoothly.
Some people end up with a screen flaw, such as dead screen pixels. It’s not an
CHAPTER 1: Bringing Your iPad Home
6
uncommon problem, and if found soon after purchase, it may involve a trade-in for a
new unit. Others may have problems connecting to Wi-Fi or 3G networks. The chances
of resolving these issues increase significantly when you have a real person to talk to.
As for the question of Apple or other retailers, we lean slightly toward buying at an Apple
Store. It’s an Apple product you’re buying, and the Apple staff members are simply
more knowledgeable about that product.
Figure 1–1. That nice shiny box contains the Apple of your eye, your iPad. Remember to keep all your packaging,
receipts, and other purchase information just in case you need to return it to the store.
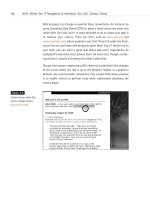
Purchasing Your iPad Online
Depending where you live, there might not be a physical store nearby for picking up an
iPad. In that case, the Apple Online Store is your best bet for getting your hands on an
iPad as soon as possible.
NOTE: There are two quick ways to buy your iPad online. First click the iPad tab at the top of the
Apple web site (www.apple.com), and then click the blue Buy Now button. The second way?
Point your browser to the iPad page (
shop_ipad/family/ipad) in the Apple Online Store. Be sure to have your credit card ready.
Apple makes it easy for you to purchase your iPad online. The individual models all have
their own Select button, and a click brings you to a page that lets you choose which
Apple accessories you want to add to your purchase. Adding those accessories to your
purchase just requires a click of the radio button near each item, and when you are
finally ready to check out, clicking the Add to Cart button displays the contents of your
virtual shopping cart as well as a Check Out Now button. An estimate of the shipping
date is displayed in your shopping cart next to each item so you know when to start
waiting for the delivery truck driver to ring your doorbell.
CHAPTER 1: Bringing Your iPad Home
7
Repairs, Returns, Warranties, AppleCare, and Insurance
In most situations, the iPad you buy will be in perfect working order, and you should
never need to return it to Apple. However, if you do get an iPad that just isn’t working
properly or that fails during the first year of ownership, there is a tried-and-true process
to follow.
First, visit the iPad Support web page (www.apple.com/support/ipad/) to see whether
you have set up something improperly or whether there is a known issue and solution. If
the online support does not resolve the problem, then it is time to either take the iPad to
your Apple retailer or send the iPad to Apple.
For iPads that have been purchased at an Apple Store, the easiest thing to do is to grab
your receipt, the iPad, the original box, and all the contents of that box, and then head
to the store. The Apple Store staff may ask you to work with a person at the Genius Bar
in an attempt to resolve the problem, in which case there may be a delay until they can
fit you into their busy schedule.
At other Apple authorized retailers, the return policy may be different, so be sure to
check that policy when you purchase your iPad.
iPads purchased online from Apple require a Return Material Authorization (RMA). To
initiate the return process, call Apple’s support phone number at 1–800-275-2273 and
speak to an iPad support specialist. If that person determines the iPad is faulty and is
eligible for repair or replacement, they will issue an RMA to you.
NOTE: Outside of the United States, you can refer to www.apple.com/support/
contact/phone_contacts.html for a list of international phone numbers for Apple Support.
In the first paragraph of this section, we called attention to “the first year of ownership.”
That’s the complimentary warranty period for any iPad. If you want to extend that
warranty for another year, you can purchase an AppleCare Protection Plan for iPad for
$99. This extends your hardware repair coverage to two years. If interested, you can
purchase this option at the online Apple Store. Once the warranty expires, you’ll have to
pay the going rate for repairs or battery replacements.
American Express cardholders can double their iPad warranty simply by purchasing the
device with their Amex card. This Extended Warranty program may be provided by other
credit card companies, so be sure to check your card terms and conditions for details.
If you can, make sure to back up your iPad by syncing it to iTunes before bringing it in
for service. Apple will usually restore your iPad to factory condition, which means you’ll
lose any data stored on the iPad during the repair and service process.
Is AppleCare worth buying? In our opinion, it is. In one case, AppleCare more than paid
for the replacement of a logic board with a faulty FireWire port on an Apple PowerBook
G4 almost three years into the plan.
CHAPTER 1: Bringing Your iPad Home
8
You’re entitled to complimentary phone support for 90 days after the purchase of your
iPad. AppleCare extends that period to a full two years, and you can call Apple’s experts
as many times as you want to get your questions answered.
What about a situation where you find that an iPad isn’t what you really needed, or what
if you decide that you want the 64GB model instead of the 32GB iPad that you bought?
Apple realizes that people change their minds or may be dissatisfied for one reason or
another, so you have 14 calendar days to return your purchase. You must return the
iPad in the original, unmarked packaging including any accessories (such as the power
adapter), manuals, documentation, and registration that shipped with the product. There
is a cost for this flexibility, because Apple assesses a 10 percent restocking fee on the
return.
Apple does not offer an insurance plan for the iPad, and it’s unlikely that the company will
do so in the future. Instead, you’ll need to call your renter’s or home insurance carrier to
see how much you’ll have to pay for an iPad rider (a rider is placed on top of an existing
policy, adding coverage for a specific item not covered under the standard plan).
Unboxing Your iPad
Once you arrive home with your iPad or it is delivered to your door, it’s time to unpack it
and set it up. iPad packaging (see Figure 1–2) is a small work of art. The iPad ships in a
box that contains the device, a Dock Connector to USB Cable, a 10-watt USB power
adapter, and a packet of documentation. Each of these items is important and will help
you in your day-to-day use.
Cable: The USB cable attaches your iPad to either your computer or the
AC adapter. Whether you’re charging your iPad for another day of use or
you are syncing with your computer to get the latest software update, the
Dock Connector to USB Cable is a crucial part of your iPad kit.
USB power adapter: The AC power adapter included with your iPad
plugs directly into the wall and allows you to charge your iPad (or any
USB device, for that matter). It offers a single USB port. To use it, just
connect your iPad to the adapter using the USB cable. It supplies the 5
volts required for powering USB devices.
CHAPTER 1: Bringing Your iPad Home
9
Figure 1–2. There’s not much inside the iPad box: the iPad, a Dock Connector to USB Cable, a
10-watt AC adapter, and some simple documentation.
iPad Feature Overview
Once you’ve unpacked your iPad, take a few minutes to discover more about your new
purchase. Figure 1–3 introduces the basic features on your iPad.
The top of the iPad houses a jack into which you can plug your earbuds, a built-in
microphone (on the top front of the iPad 2), and a Sleep/Wake button that is used to
power on and off certain features. If you purchased a Wi-Fi + 3G model, the top (or left
side on the iPad 2) will also house a micro–Subscriber Identity Module (SIM) tray where
your phone’s micro-SIM card is stored. The bottom of your iPad has a built-in speaker
and an indented slot for connecting to the Dock Connector to USB Cable or a dock. The
iPad’s front has a large touchscreen and a single Home button. You will not see this
interactive screen until you have set up your iPad through iTunes.
Newer iPads also feature two cameras: one in the front for playing with Photo Booth or
making FaceTime video calls (see Chapter 15) and one in the back that can record high-
definition video and take still photos.
On the right side of the iPad (as you look at it from the front), you’ll find a volume rocker
and an orientation lock slider.
CHAPTER 1: Bringing Your iPad Home
10
Figure 1–3. Feature breakdown displaying the buttons and ports on the iPad 2. The dock connector port is on the
bottom of the iPad near the Home button.
Preparing for Setup
You have unpacked your iPad but haven’t yet connected it to iTunes. Now is a good
time to review the data on your computer. When your iPad is first set up, it will
synchronize itself to iTunes and, depending on your computer, to your e-mail accounts,
your calendars, and so forth. Before you go forward, here are some items you may want
to review and clean up so your iPad starts out its life with the freshest possible data:
Contacts: The iPad can sync with Outlook 2003 or 2007 and Windows
Address Book on Windows, Address Book, Outlook, or Entourage on a
Mac, and Yahoo! Address Book or Google Contacts on the Internet. To
prepare for your first sync, review your existing contacts, and make sure
they’re up-to-date with current phone numbers and e-mail addresses. If
you use another program to manage contacts, consider migrating your
contacts to one of these solutions. If you’d rather not, that’s OK too.
You can add contact information directly to your iPad, although it’s not
as convenient as having the information automatically loaded for you.
Calendar: Your iPad can synchronize with computer-based calendars
just like it does with contacts. The iPad supports iCal, Outlook, and
Entourage calendars on the Mac and Outlook calendars on Windows.
Get your calendars into shape before your first synchronization, and
you’ll be ready to immediately manage your schedule both from your
computer and from your iPad.
CHAPTER 1: Bringing Your iPad Home
11
E-mail: Your iPad works with most e-mail providers, including Yahoo! Mail,
Google Gmail, and AOL. If your e-mail provider uses the industry-standard
POP3, IMAP, or Exchange services, your service will work with iPad. You
may want to establish new accounts with these providers before you set
up your iPad. That way, they’ll load onto your unit the first time you
synchronize. You can always add new e-mail accounts later, but it’s nice
to have them all set up and available for use right away.
Media: Some iPad models offer relatively small storage space when
compared to, for example, iPod Classic’s generous 160GB hard drive.
To make the most of this limited space, set up playlists for your favorite
songs, TV shows, movies, and podcasts. Since, in all likelihood, you
won’t be able to synchronize your entire library to your new iPad, invest
time now in weeding through your media to find those items you most
want to have on hand.
Software and OS: Update to iTunes 10.5 or newer before you attempt to
set up your iPad. If you’re using a Mac, make sure you’ve updated your
OS to at least OS X 10.5.8. Windows computers must be running
Windows 7, Windows Vista, or Windows XP Home or Professional with
Service Pack 3 or newer. You can download the latest version of iTunes
from Apple at www.itunes.com/download.
iTunes account: Apple requires a current iTunes account in order to set
up your iPad. If you do not already have one, you must sign up for an
account with the iTunes Store. If you want to make purchases through
the iTunes Store, App Store, or iBookstore, you’ll need to have a valid
address and credit card. Here are the steps you’ll need to follow in order
to create that new iTunes account:
1. Launch the iTunes application on your computer, and wait for it to load.
2. Locate iTunes Store in the column on the left side of the window. Click
iTunes Store, and wait for the store window to load. You must be
connected to the Internet for this to happen, because all the storefront
information is stored at Apple.
3. Click the Sign In link at the top-right corner of the screen. iTunes opens
the sign-in screen shown in Figure 1–4, which will allow you either to
sign in with an existing account or to create a new one.
CHAPTER 1: Bringing Your iPad Home
12
Figure 1–4. The iTunes sign-in screen allows you to sign in to iTunes with your existing account or begin the
process of creating a new account.
4. Click Create New Account. The screen clears, and a message
welcoming you to the iTunes Store displays. Click the Continue button.
5. Review the terms of service, check the box marked “I have read and
agree to these terms and conditions,” and click Continue. A new
window appears prompting you to create your account.
6. Enter your e-mail address and a password (you must enter the
password twice for verification). Also enter a question and answer that
will help verify your identity, as well as the month and day of your birth.
Review the other options on the page, and adjust them as desired
before clicking Continue. Again, the screen will clear, and you’ll move on
to the final account creation step.
7. Enter a valid credit card and the billing information for that credit card.
These must match to finish creating your account. When you have
entered the information, click Continue.
After following these steps, you will receive a confirmation e-mail at the address you
specified while signing up. The e-mail welcomes you to the iTunes Store and provides
you with the customer service web address (www.apple.com/support/itunes/store).
You don’t need a credit card to get an iTunes App Store account. If you’re planning on
only downloading free apps and don’t have a credit card, there’s a way to create an
iTunes App Store account from your iPad. The following instructions assume that you
don’t already have an account and that you’ve already unwrapped your iPad. Don’t
worry; you can always come back to these instructions later if you’d like to wait.
1. Launch the App Store app on your iPad by tapping its icon.
2. Look for a free app. It can be anything, but just make sure that the price is listed
as Free. Tap the Free button to start the “purchase” process; then tap Install App.
CHAPTER 1: Bringing Your iPad Home
13
3. A dialog appears asking you to sign into the iTunes App Store by using an
existing Apple ID or by creating a new Apple ID. Tap the Create New Apple ID
button.
4. You’ll be asked to choose a country or region for the store that matches the billing
address for your payment method. Select one from the list that appears when you
tap the country name next to the word Store; then tap the Next button.
5. Agree to the iTunes Store Terms & Conditions.
6. Now you’re asked to enter new account information, including your e-mail
address, a password, a secret question and answer, and your date of birth. When
you’ve entered that info, tap Next.
7. On the Billing Information screen, tap the name next to the word Credit Card, and
select None as your billing method. Enter a valid name and billing address, and
then tap Next.
8. At this point, an Email Verification screen should appear. Tap Finish, and then
open Mail on your iPad (that’s assuming it’s already set up; if not, you can do this
part on another computer).
9. Open the e-mail from Apple, and tap the Verify Now link. You’re asked to sign in
to complete the account creation.
10. Tap the Use Existing Account button, enter the username (e-mail address) and
password that you just created, and then tap OK.
11. You’ll see a message telling you that your iTunes Store account has been
successfully created. Tap the Done button, and then you can start downloading
any free apps, books, music, or videos from iTunes, the App Store, or the
iBookstore. Read more about these stores in Chapter 8.
Configuring Your iPad
With iOS 5, Apple has cut the cord from your iPad to your computer. This new “PC free”
world of iOS devices is a new era in computing technology. Oh, you still have to plug the
iPad into your computer or charger to recharge the battery all right, but now you no
longer need to plug the iPad into your computer to begin using it. You can buy it in the
store, open it up right there, and go through a simple setup procedure right on the iPad.
Follow the steps in this section to set up your iPad right out of the box:
1. Take your iPad out of its packaging.
CHAPTER 1: Bringing Your iPad Home
14
2. Press the power button on top of the iPad to turn it on. You’ll see the screen in
Figure 1–5. If your iPad does not automatically power on and display this screen,
press and hold the Sleep/Wake button. With the main screen facing toward you,
you can find this button at the top left of the iPad. After a few seconds, the iPad
should wake up and display the white Apple logo as it powers on. If the iPad does
not respond and does not display either the white Apple logo or the Connect to
iTunes screen, contact the store where you purchased the iPad.
Figure 1–5. The iPad setup welcome screen
3. Slide the configure slider to begin setting up your iPad.
4. Select your language on the next screen.
5. On the screen that appears with the panning globe, select your country or region.
6. On the next screen you’ll get a choice to enable or disable Location Services.
Location Services allows the iPad and its apps to estimate your current location.
After you have chosen to enable or disable Location Services, tap the Next
button.
7. The Wi-Fi Networks screen appears next. Select your wireless network, enter your
Wi-Fi password, and tap the Join button. This will allow you iPad to join your Wi-
Fi network and make use of its Internet connection for a number of things, such
as connecting to iCloud or using the Maps app.
8. On the next screen you can choose to set up your iPad as a new device or restore
it from an iCloud or iTunes backup. If you’ve never owned an iPad before, select
Set Up as New iPad. If you are restoring from a previous iPad, select the iCloud or
iTunes backup option (see Figure 1–6).
CHAPTER 1: Bringing Your iPad Home
15
Figure 1–6. The iPad restore option screen
9. On the next screen, enter your Apple ID. You have an Apple ID if you’ve ever
bought anything from the iTunes Store. If you don’t have an Apple ID, tap the
Create a Free Apple ID button. Alternately, you can skip this step. When finished
entering your Apple ID, tap the Next button. You’ll have to agree to Apple’s Term
and Conditions. Read them if you want; then tap Next again.
10. Once you’ve entered your Apple ID, you are taken to the Set Up iCloud screen.
We’ll talk all about iCloud in Chapter 2. For now, just choose whether you want to
use iCloud or not; then tap Next.
11. If you’ve chosen to use iCloud, the backup screen appears next. Select whether
you want to back up your iPad to iCloud or to your computer; then tap Next.
12. As part of iCloud, Apple lets users track their iOS devices and Macs using a
feature called Find My iPad. Select whether you want to allow you iPad to be
found using your iCloud account. This free service is part of your iCloud account
and allows you to track down your iPad should it become lost or stolen. We’ll talk
more about Find My iPad in Chapter 12. Click Next after you’ve made your
selection.
13. On the next screen, choose whether you want to send anonymous diagnostics to
Apple to help the company improve the iOS and iPad experience. Tap the Next
button after making your selection.
14. After you’ve successfully navigated all those setup screens, you’ll see the one
pictured in Figure 1–7. Congratulations! You’ve set up your iPad. Simply tap the
Start using iPad button to begin playing with your new favorite toy!
CHAPTER 1: Bringing Your iPad Home
16
Figure 1–7. Completing the iPad setup process
Once you’ve set up your iPad, you can begin using it right away if you have most of your
media stored in the cloud through iCloud. However, if you are still storing most of your
media on your computer, you’ll need to pair your iPad with your computer in order to get
your music, movies, and TV shows on it.
Pairing Your iPad to Your Computer
As we mentioned earlier, a big feature of iOS 5 is that it’s “PC free.” That means it has
the ability for your iPad to sync wirelessly with your computer. But before you can sync
wirelessly, you must pair your iPad to your computer. This must be done through the
USB cable that came with your iPad. You need to do this only once.
To pair your iPad to your computer, follow these steps:
1. Locate the two ends of the USB cable that was included with your iPad. One is
thin and marked with a standard three-pronged USB symbol. The other is wide
and marked with a rectangle with a line in it.
2. Orient your iPad. On the back of your iPad, the Apple logo and the word iP ad
show you which way is up. The dock connector is at the bottom of your iPad.
3. Connect the wide end of the USB cable to the bottom of your iPad. Be gentle but
firm, without twisting or forcing the connection. Connect the thin end to a spare
USB 2.0 port on your computer (for a direct-connected sync) or a USB power
adapter (for a Wi-Fi sync).
4. iTunes launches, and your iPad chimes softly.
CHAPTER 1: Bringing Your iPad Home
17
5. Since this is the first time you are pairing your iPad with your computer,
the iPad Setup Assistant appears in iTunes (Figure 1–8). This screen
allows you to name your iPad and choose what items to automatically
sync to it. If you want to name your iPad something other than “your
name’s iPad,” enter a new name into the “The name of my iPad is” field.
Do not press Enter or Return, and do not click the Done button. We
recommend you uncheck both boxes: “Automatically sync songs to my
iPad” and “Automatically sync photos to my iPad.” It’s far easier to
manage these choices manually.
6. Click the Done button. iTunes closes the Setup Assistant.
Figure 1–8. The iPad Setup Assistant lets you name your iPad and decide which items to automatically
synchronize to it.
Once you’ve paired your new iPad, you’re ready to perform your first synchronization. In
the iTunes source list, which is the light blue column on the left side of the iTunes
screen, locate the Devices section, and click the name of your iPad. This opens its
Preferences window (see Figure 1–9). The tabs along the top of the Preferences window
allow you to set each of the options associated with your iPad. We go into what each of
these tabs does in detail in Chapter 2.
TIP: Click your iPad’s name a second time to open a text edit field that allows you to edit the
name. You can name your iPad more creatively than the default (your name and “iPad”).
CHAPTER 1: Bringing Your iPad Home
18
Figure 1–9. iTunes lets you manage the content loaded onto and synchronized with your iPad. Each tab at the top
of the screen offers a variety of controls, allowing you to choose the information that is loaded onto your touch at
each sync.
Syncing the iPad to Your Computer
After you have initially paired your iPad to your computer, you can choose to sync your
iPad wirelessly or directly (by connecting it to your computer) for all future syncs.
However, if you want to sync wirelessly, you first have to enable wireless syncing.
Do this by checking the box that says “Sync with this iPad over Wi-Fi” (Figure 1–10) on
your iPad’s Summary page in iTunes. After you’ve done this, the steps to sync your iPad
wirelessly or through a USB cable are pretty much the same.
Figure 1–10. Check “Sync with this iPad over Wi-Fi” to enable Wi-Fi syncing.
To sync via a USB cable, follow these steps:
1. Plug your iPad in to your computer via the USB-to-dock connector cable. Your
iPad begins syncing.
CHAPTER 1: Bringing Your iPad Home
19
2. Unplug the iPad when the sync is finished.
To sync wirelessly, follow these steps:
1. Both your iPad and computer must be turned on and connected to the same Wi-
Fi network.
2. When your iPad appears under the Device header in the iTunes source list, click
the Sync button in iTunes to begin your sync.
3. Don’t leave the Wi-Fi network until the sync notification in your iPad’s status bar
disappears (Figure 1–11). When it does, you know your sync is complete.
Figure 1–11. The rotating arrows in the status bar tell you your iPad is syncing to your iTunes library.
No matter which way you choose to sync, you can continue to use your iPad while it
syncs to your library. We discuss all your syncing options in detail in the next chapter.
Accessorizing Your iPad
If you purchase your iPad in an Apple Store, your Apple sales associate will show you
many accessories that are available for it. These accessories are from Apple and third-
party sources, and they provide your iPad with protection and added functionality.
Apple sells iPad docks to make charging and syncing your iPad a snap. The $29 iPad
Dock and iPad 2 Dock support your iPad in an upright position and work with other
accessories and optional audio cables. For the original iPad, text entry into iPad apps is
enhanced with the iPad Keyboard Dock ($69), which charges the iPad as you type.
For protection of the iPad 2, Apple provides the iPad Smart Cover ($29; Figure 1–12),
which can also be folded into a variety of positions for supporting the iPad 2 on flat
surfaces. The colorful Smart Cover attaches to the iPad 2 magnetically and
automatically turns the iPad’s display on when opened or off when closed.
CHAPTER 1: Bringing Your iPad Home
20
Figure 1–12. Available in a rainbow of colors, the iPad 2 Smart Cover protects the iPad’s display while adding
very little weight or thickness.
Photographers will want to buy the iPad Camera Connection Kit ($29; Figure 1–13),
which includes two adapters—one for connecting a camera through a USB 2.0 cable,
the other for reading SD memory cards. The USB adapter can also be used to connect
USB headsets and keyboards to the iPad.
Figure 1–13. The iPad Camera Connection Kit includes two adapters. The one on the left connects to a standard
USB cable for direct connection to a digital camera, while the adapter on the right can be used to read or write SD
memory cards.
Since you might want to show slide shows or Keynote presentations from an iPad,
Apple sells the iPad Dock Connector to VGA Adapter ($29). The VGA end of the adapter
can be connected to external monitors, some TVs, and PC projectors. On the iPad 2,
whatever is on the screen can be mirrored to an external display, while the original iPad
is limited to displaying only apps that have been specifically written to provide video-out
capabilities.
CHAPTER 1: Bringing Your iPad Home
21
The Apple Digital AV Adapter ($39) is perfect for putting slides, movies, photos, and
anything else visible on your iPad onto your HDTV. This adapter provides a standard
HDMI connector as well as a dock connector port for charging your iPad while it is
connected to your display.
The Apple Component AV Cable ($39) and Composite AV Cable ($39) also work with the
iPad, providing two more methods of linking external monitors and projectors to the
device. The same application limitations apply with these cables as well.
Finally, the Apple Wireless Keyboard ($69) and most other Bluetooth keyboards are
iPad-compatible, providing an alternative way of entering text into iPad applications.
Summary
In this chapter, you’ve seen how to select and purchase your iPad. You’ve discovered
what’s involved in setting up an iTunes account, activating your iPad, and pairing your
iPad to your computer. To wind things up, here is a quick overview of some key points
from this chapter:
There are several models of the iPad, but whichever unit you choose,
you’ll probably want to buy it in person at a store, unless you need an
online-only feature such as engraving.
To use your iPad, you no longer need to own a computer. You can buy
your iPad and configure it right out of the box. However, it’s always
helpful to sync your iPad with iTunes on a computer so it is loaded
with all of the media you already own.
iPads are not cheap. Protect your investment by insuring your touch,
and consider adding AppleCare for two years of coverage (from the
date of purchase) against hardware repairs.
Your iPad purchase entitles you to one complimentary support
incident within the first 90 days of product ownership.
There are almost as many accessories for the iPad as there are songs
in the iTunes Store. You may have to do a lot of browsing before you
know which accessories are right for you.
23
Chapter
Putting Your Data and
Media on Your iPad
So, you’ve unboxed your iPad and connected it to iTunes. Now what? Chapter 1 briefly
introduced the basics of syncing your iPad with your music, movies, photos, and other
data via iTunes. Now this chapter explores the options you have for syncing your data
with your iPad. Whether you’ve bought your songs and videos from the iTunes Store or
have imported them into the program from CDs and DVDs, iTunes can synchronize your
iPad to nearly any content in its library. If you want a rich media and applications library
on your iPad, you need to sync those contents from the library on your computer.
iTunes determines which app, music, and video files transfer to and load onto your iPad.
You’re about to discover how to bring all this content together in iTunes and send it to
your iPad via the USB Dock Connector data cable. You’ll see how to choose which
items you want to synchronize and how to keep your iPad content fresh and up-to-date.
Working with iTunes
Before you begin to choose which songs, videos, podcasts, and audiobooks will be
synchronized, you must first physically connect your iPad to your computer and launch
the iTunes application. Use the USB cable that shipped with your iPad (or an equivalent
dock) to connect your iPad to a spare USB port on your system. Launch iTunes by
clicking the iTunes application icon on your computer. If your iPad uses a lock code, you
must unlock your device before iTunes can connect to it (see Figure 2–1).
2
CHAPTER 2: Putting Your Data and Media on Your iPad
24
NOTE: It’s best to connect using USB 2.0. USB 2.0 provides superior bandwidth and better
connectivity. Although USB 1.1 is supported, iTunes will complain if you attempt to sync using
USB 1.1 and will recommend that you switch to a USB 2.0 port. Your iPad generally will not be
able to recharge while syncing. Do not be alarmed by the Not Charging message that appears at
the right of your iPad’s topmost status bar. Instead, use the 10-watt wall plug connector included
in the iPad package to provide the power level your iPad needs to charge. Your iPad has a
phenomenal onboard battery. You will find that, unlike other mobile devices, you need to
recharge it only every day or two. Yes, you can sync more often but you don’t really have to if
your only concern is to keep the charge ready for use.
Figure 2–1. iTunes prompts you to unlock your iPad before it will connect to the device.
Once connected, your iPad appears in the list on the left side of the iTunes window. This
light blue column, called the source list, is divided into several sections for your media
library, the iTunes Store, devices, and playlists. The iPad, along with any other devices
connected to your computer, is listed under the Devices header, as shown in Figure 2–2.
If you do not see your iPad in this list, make sure you’ve physically connected your iPad
through the USB cable and that the cable is firmly inserted into both the computer and
the iPad. Next, make sure your iPad is powered on. Your iPad is listed when it’s active
or asleep, but it won’t show up when it’s powered down. If your iPad is correctly
connected and powered on but still does not appear, do a Google search for
disappearing iPads. There are known (however occasional) support issues with iOS
devices not appearing in iTunes. You will find that others have experienced the same
problem, and you might be able to find a solution.