microsoft sql server 2000 performance optimization and tuning handbook 2001
Bạn đang xem bản rút gọn của tài liệu. Xem và tải ngay bản đầy đủ của tài liệu tại đây (6.72 MB, 293 trang )
Microsoft SQL Server 2000 Performance
Optimization and Tuning Handbook
Ken England
Digital Press An imprint of Butterworth-Heinemann
Boston * Oxford * Auckland * Johannesburg * Melbourne * New Delhi
Copyright © 2001 Butterworth-Heinemann
A member of the Reed Elsevier group
All rights reserved.
Digital Press™ is an imprint of Butterworth-Heinemann.
All trademarks found herein are property of their respective owners.
No part of this publication may be reproduced, stored in a retrieval system, or transmitted in
any form or by any means, electronic, mechanical, photocopying, recording, or otherwise,
without the prior written permission of the publisher.
Recognizing the importance of preserving what has been written, Butterworth-Heinemann
prints its books on acid-free paper whenever possible.
Library of Congress Cataloging-in-Publication Data
England, Ken, 1955-
Microsoft SQL server 2000 performance optimization and tuning handbook / Ken England.
p. cm.
Includes index.
ISBN 1-55558-241-9 (pbk.: alk. paper)
1. Client/server computing. 2. SQL server. 3. Relational databases. I. Title.
QA76.9.C55 E635 2001
005.75'85-dc21
2001017498
British Library Cataloging-in-Publication Data
A catalogue record for this book is available from the British Library.
The publisher offers special discounts on bulk orders of this book. For information, please
contact:
Manager of Special Sales
Butterworth-Heinemann
225 Wildwood Avenue
Woburn, MA 01801-2041
Tel: 781-904-2500
Fax: 781-904-2620
For information on all Butterworth-Heinemann publications available, contact our World
Wide Web home page at: .
10 9 8 7 6 5 4 3 2 1
Printed in the United States of America
Related Titles From Digital Press
Tony Redmond, Microsoft® Exchange Server for Windows 2000: Planning, Design and
Implementation,
ISBN 1-55558-224-9, 1072pp, 2000
Jerry Cochran, Mission-Critical Microsoft® Exchange 2000: Building Highly Available
Messaging and Knowledge Management Systems,
ISBN 1-55558-233-8, 320pp, 2001
Kieran McCorry, Connecting Microsoft® Exchange Server,
ISBN 1-55558-204-4, 416pp, October 1999
John Rhoton, Programmer's Guide to Internet Mail: SMTP, POP, IMAP, and LDAP,
ISBN 1-55558-212-5, 312pp, October 1999
Mike Daugherty, Monitoring and Managing Microsoft® Exchange 2000 Server,
ISBN 1-55558-232-X, 440pp, 2001
For more information or to order these and other Digital Press titles please visit our
website at www.bhusa.com/digitalpress
!
At www.bhusa.com/digitalpress
you can:
• Join the Digital Press Email Service and have news about our books delivered right to
your desktop
• Read the latest news on titles
• Sample chapters on featured titles for free
• Question our expert authors and editors
• Download free software to accompany select texts
To Margaret, Michael, and Katy
Ken England is President and Founder of Database Technologies, a database consultancy,
product evaluation, and training firm. He is also a Microsoft Certified Systems Engineer and a
Microsoft Certified Trainer. His previous books for Digital Press have helped thousands of
professionals make the best possible use of their SQL databases.
Acknowledgments
Most of all, I would like to thank Margaret, Michael, and Katy England for their long
suffering while I was locked in my study writing this text. Writing about databases is,
unfortunately, not an activity in which most of the family can join in. Because of this, writing
and being sociable are usually mutually exclusive!
Margaret had to spend many a weekend anchored to the house. Michael missed out on
computer game time, kicking a ball around, and tinkering with our old Series II Land Rover.
He was very patient while his dad kept disappearing in front of a PC for protracted periods of
time. Katy missed out on company while she watched cartoons.
Also an apology to Holly, my German Shepherd, who missed out on many walks. It's best not
to annoy German Shepherds too much!
As well as the friends and colleagues who encouraged me with the book, I would like to give
an extra special thanks to the following people.
A very special thank you to Keith Burns, who always has a bubbling enthusiasm for SQL
Server; Nigel Stanley and the folk at ICS Solutions for helping to put SQL Server on the map;
Dave Gay from Microsoft (UK), an old friend, who stimulates my grey matter through many
deep discussions; Chris Atkinson from Microsoft, another old friend, who has helped me out
on many occasions and has also stimulated my grey matter; and also, Doctor Lilian Hobbs, a
database comrade-in-arms, and Doctor Jeff Middleton for debating many SQL Server and
related topics while on 20 mile hikes!
I would also like to thank Karl Dehmer, Lori Oviatt, and Adam Shapiro from Microsoft
Training Development, who came all the way over to the United Kingdom to teach an
absolutely superb SQL Server 6.5 performance tuning and optimization course a few years
ago. Their enthusiasm then for SQL Server performance tuning rubbed off on me and gave
me a much-needed boost to complete the SQL Server 6.5 book and now this one. Another
special thanks goes to friends at Butterworth-Heinemann. Many thanks to our other friends in
Microsoft, without whose skill and hard work SQL Server 2000 would not be the excellent
product it is today.
Ken England
January 2001
Preface
My last SQL Server performance book was aimed at SQL Server 6.5. When Microsoft
released SQL Server 7.0 it was almost as if it were a new product. Although it was backward
compatible in many areas with SQL Server 6.5, the architecture was very different. For
starters, the on-disk structure was completely changed. The usage of files was much improved
over SQL Server 6.5, and SQL Server 7.0 now had an 8 Kb database page size. The query
optimizer was greatly enhanced with many new query plans possible, in particular in the use
of multiple indexes and table joins. The query processor could also now execute complex
queries in parallel. As well as all these changes and many more, Windows 2000 was
beginning to slowly appear on the horizon.
For these reasons, I decided that upgrading a SQL Server 6.5 performance and tuning book to
SQL Server 7.0 was not going to be a trivial task and would be much more than an editing
exercise. I decided that my goal would be to work with SQL Server 7.0 through its lifetime in
my usual performance-tuning-consultancy capacity and not rewrite the book until I felt
confident with the way the new architecture behaved. Of course, nothing stays still for long
with software, especially Microsoft software, and so the actual book-writing goal was to write
a SQL Server 2000 version.
SQL Server 2000 has added many useful enhancements to SQL Server 7.0, but it is still the
SQL Server 7.0 architecture and, therefore, behaves pretty much in the same way. I say to my
students that if you know SQL Server 7.0, you pretty much know SQL Server 2000.
So here goes-the follow-up to the SQL Server 6.5 performance and tuning book. I hope you
like this updated SQL Server 2000 version.
The chapters are written to follow one another in a logical fashion, building on some of the
topics introduced in previous chapters. The structure of the chapters is as follows:
• Chapter 1 introduces the goals of performance tuning and the elements of the physical
database design process including data volume analysis and transaction analysis. It
also introduces the example BankingDB database.
• Chapter 2 describes the SQL Server storage structures including database files,
databases, database pages, and extents.
• Chapter 3 introduces clustered indexes and nonclustered indexes. How data is inserted
and retrieved and choosing the appropriate index for a given situation are discussed.
• Chapter 4 introduces the query optimizer and steps in the query optimization process.
This chapter also discusses the special approach to query optimization used by stored
procedures.
• Chapter 5 looks at the interaction between SQL Server and Windows 2000 in the areas
of CPU, memory, and disk I/O. How to track down and remove bottlenecks is
explored.
• Chapter 6 introduces SQL Server locking mechanisms and strategies and the methods
and tools available for monitoring locks.
• Chapter 7 looks at performance monitoring and the tools available to assist the
database administrator.
• Chapter 8 provides a performance tuning aide-mémoire.
I really enjoy tuning databases and making them run fast. Even more, I really enjoy taking an
elusive performance problem, tracking it down, and fixing it. I hope you, too, find the same
level of enjoyment that I do and that this book kick-starts your interest in performance tuning
SQL Server.
Chapter 1: Introducing Performance
Tuning and Physical Database Design
1.1 What is performance tuning?
What is the goal of tuning a SQL Server database? The goal is to improve performance until
acceptable levels are reached. Acceptable levels can be defined in a number of ways. For a
large online transaction processing (OLTP) application the performance goal might be to
provide subsecond response time for critical transactions and to provide a response time of
less than two seconds for 95 percent of the other main transactions. For some systems,
typically batch systems, acceptable performance might be measured in throughput. For
example, a settlement system may define acceptable performance in terms of the number of
trades settled per hour. For an overnight batch suite acceptable performance might be that it
must finish before the business day starts.
Whatever the system, designing for performance should start early in the design process and
continue after the application has gone live. Performance tuning is not a one-off process but
an iterative process during which response time is measured, tuning performed, and response
time measured again.
There is no right way to design a database; there are a number of possible approaches and all
these may be perfectly valid. It is sometimes said that performance tuning is an art, not a
science. This may be true, but it is important to undertake performance tuning experiments
with the same kind of rigorous, controlled conditions under which scientific experiments are
performed. Measurements should be taken before and after any modification, and these
should be made one at a time so it can be established which modification, if any, resulted in
an improvement or degradation.
What areas should the database designer concentrate on? The simple answer to this question
is that the database designer should concentrate on those areas that will return the most
benefit. In my experience, for most database designs I have worked with, large gains are
typically made in the area of query and index design. As we shall see later in this book,
inappropriate indexes and badly written queries, as well as some other contributing factors,
can negatively influence the query optimizer such that it chooses an inefficient strategy.
To give you some idea of the gains to be made in this area I once was asked to look at a query
that joined a number of large tables together. The query was abandoned after it had not
completed within 12 hours. The addition of an index in conjunction with a modification to the
query meant the query now completed in less than eight minutes! This magnitude of gain
cannot be achieved just by purchasing more hardware or by twiddling with some arcane SQL
Server configuration option. A database designer or administrator's time is always limited, so
make the best use of it! The other main area where gains can be dramatic is lock contention.
Removing lock bottlenecks in a system with a large number of users can have a huge impact
on response times.
Now, some words of caution when chasing performance problems. If users phone up to tell
you that they are getting poor response times, do not immediately jump to conclusions about
what is causing the problem. Circle at a high altitude first. Having made sure that you are
about to monitor the correct server use the System Monitor to look at the CPU, disk
subsystem, and memory use. Are there any obvious bottlenecks? If there are, then look for the
culprit. Everyone blames the database, but it could just as easily be someone running his or
her favorite game! If there are no obvious bottlenecks, and the CPU, disk, and memory
counters in the System Monitor are lower than usual, then that might tell you something.
Perhaps the network is sluggish or there is lock contention. Also be aware of the fact that
some bottlenecks hide others. A memory bottleneck often manifests itself as a disk bottleneck.
There is no substitute for knowing your own server and knowing the normal range of System
Monitor counters. Establish trends. Measure a set of counters regularly, and then, when
someone comments that the system is slow, you can wave a graph in front of him or her
showing that it isn't!
So, when do we start to worry about performance? As soon as possible, of course! We want to
take the logical design and start to look at how we should transform it into an efficient
physical design.
1.2 The physical database design process
Once the database logical design has been satisfactorily completed, it can be turned into a
database physical design. In the physical design process the database designer will be
considering such issues as the placement of data and the choice of indexes and, as such, the
resulting physical design will be crucial to good database performance. The following two
important points should be made here:
1. A bad logical design means that a good physical design cannot be performed. Good
logical design is crucial to good database performance, and a bad logical design will
result in a physical design that attempts to cover up the weaknesses in it. A bad logical
design is hard to change, and once the system is implemented it will be almost
impossible to do so.
2. The physical design process is a key phase in the overall design process. It is too often
ignored until the last minute in the vain hope that performance will be satisfactory.
Without a good physical design, performance is rarely satisfactory and throwing
hardware at the problem is rarely completely effective. There is no substitute for a
good physical design, and the time and effort spent in the physical design process will
be rewarded with an efficient and well-tuned database, not to mention happy users!
Before embarking on the physical design of the database, it is worth stepping back and
considering a number of points, as follows:
• What kind of system are we trying to design? Is it a fast online transaction processing
(OLTP) system comprised of perhaps hundreds of users with a throughput of hundreds
of transactions per second (TPS) and an average transaction response time that must
not exceed two seconds? Is it a multigigabyte data warehouse, which must support few
online users but must be able to process very complex ad hoc queries in a reasonable
time, or is it a combination of the two?
The type of system will strongly influence the physical database design decisions that
must be made. If the system is to support OLTP and complex decision support, then
maybe more than one database should be considered-one for the operational OLTP
system and one, fed by extracts from the operational OLTP system, to support
complex decision support.
• What are our hardware and budget constraints? The most efficient physical database
design will still have a maximum performance capability on any given hardware
platform. It is no use spending weeks trying to squeeze the last few CPU cycles out of
a CPU bound database when, for a small outlay, another processor can be purchased.
Similarly, there is little point purchasing another CPU for a system that is disk I/O
bound.
• Has the database design been approached from a textbook normalization standpoint?
Normalizing the database design is the correct approach and has many benefits, but
there may be areas where some denormalization might be a good idea. This might
upset a few purists, but if a very short response time is needed for a specific query it
might be the best approach. This is not an excuse for not creating a normalized design.
A normalized design should be the starting point for any effort made at
denormalization.
• How important is data consistency? For example, is it important that if a query rereads
a piece of data within a transaction it is guaranteed that it will not have changed? Data
consistency and performance are enemies of one another, and, therefore, if consistency
requirements can be relaxed, performance may be increased.
How does a database designer move from the logical design phase to a good physical database
design? There is no single correct method; however, certain information should be captured
and used as input to the physical design process. Such information includes data volumes,
data growth, and transaction profiles.
1.2.1 Data volume analysis
It is very important to capture information on current data volumes and expected data
volumes. Without this information it is not even possible to estimate the number and size of
the disk drives that will be required by the database. Recording the information is often a case
of using a simple spreadsheet, as shown in Table 1.1.
Table 1.1: Capturing Simple Data Volume Information
Table
Name
# of
Rows
Row
Size
Space
Needed
% Annual
Growth
Space Needed in 12
Months
Accounts 25,000 100 2,500,000 10 2,750,000
Branches 100 200 20,000 5 21,000
Customers 10,000 200 2,000,000 20 2,400,000
Transactions 400,000 50 20,000,000 25 25,000,000
This may appear to be a trivial operation, but it is surprising how few database designers do it.
It is also interesting to find the different views from business users on what the figures should
be! Another column that could be added might represent how volatile the data is in a
particular table. The percentage annual growth of a table might be zero, but this may be
because a large amount of data is continually being removed as well as being added.
Simple addition of these figures gives the data size requirements, but this is only part of the
calculation. The database designer must take into account the space required by indexes, the
transaction log, and the backup devices; no experienced database designers would ask for the
disk space that came out of the sum in Table 1.1. They would, of course, add on a percentage
for safety. Users typically do not phone you to complain that you oversized the database by 20
percent; however, they do phone you to complain that the system just stopped because the
database was full!
So how are the size of indexes calculated? The Creating and Maintaining Databases online
book gives sample calculations to assist in the sizing of tables, as well as clustered and
nonclustered indexes with both fixed, and variable-length columns. It is highly recommended
that these calculations are performed, and it is worth using a spreadsheet such as Microsoft
Excel to perform the calculations in order to save time and effort. Watch the newsgroups for
stored procedures in circulation that do these calculations. Also check out the SQL Server
resource kits. At the time of writing the Microsoft BackOffice 4.5 Resource Kit contains a
tool named data sizer, which will assist in the sizing of databases.
A rule of thumb is to double the size of the user data to estimate the size of the database.
Crude though this appears, by the time indexes and some space for expansion have been
added, double the size is not far off!
What about the size of the transaction log? This is difficult to size, since it depends on the
write activity to the database, frequency of transaction backups, and transaction profiles.
Microsoft suggests that about 10 percent to 25 percent of the database size should be chosen.
This is not a bad start, but once the system testing phase of the development has started the
database designer can start monitoring the space use in the transaction log with dbcc sqlperf
(logspace). The transaction log space is a critical resource and running out of it should be
avoided.
Unfortunately, many factors contribute to transaction log growth. These include the rate per
second of transactions that change database data and the amount of data these transactions
change. Remember that in an operational system, if a transaction log backup fails for some
reason, the transaction log will continue to fill until the next successful transaction log
backup. It may be desirable to have a transaction log large enough so that it can accommodate
the failure of one transaction log backup. Replication failures will impact the effectiveness of
transaction log backups, and, of course, there is always the user who runs a job that updates a
million-row table without warning you.
For all these reasons, do not be tight with transaction log space. With the price of disk space
as it is, a transaction log can be created with a large amount of contingency space.
Finally, do not forget that as a database designer/administrator, you will need lots of disk
space to hold at least one copy of the production database for performance tuning testing. Not
having a copy of the production database can really hinder you.
So, we now have documented information on data volumes and growth. This in itself will
determine a minimum disk configuration; however, it is only a minimum, since transaction
analysis may determine that the minimum disk configuration will not provide enough disk I/O
bandwidth.
If data volume analysis is concerned with the amount of data in the database and the space it
needs, transaction analysis is concerned with the way in which data is manipulated and at
what frequency.
1.2.2 Transaction analysis
Data in the database may be manipulated by code, such as Visual Basic, or a tool such as
Microsoft Access, or a third-party product accessing SQL Server. Whichever way the data is
accessed, it will presumably be as a result of a business transaction of some kind. Transaction
analysis is about capturing information on these business transactions and investigating how
they access data in the database and in which mode. Table 1.2 shows some attributes of a
business transaction it might be useful to record.
Table 1.2: Capturing Transaction Attributes
Attribute Explanation
Name A name assigned to the transaction
Average frequency Average number of times executed per hour
Peak frequency Peak number of times executed per hour
Priority A relative priority assigned to each transaction
Mode Whether the transaction only reads the database or writes to it also
Tables accessed Tables accessed by the transaction and in which mode
Table keys Keys used to access the table
Clearly, by their very nature, it is not possible to capture the information shown in Table 1.2
for ad hoc transactions nor is it practical to capture this information for every business
transaction in anything other than a very simple system. However, this information should be
captured for at least the most important business transactions. By most important we mean
those transactions that must provide the fastest response times and/or are frequently executed.
A business transaction that runs every three months and can be run during a weekend is
unlikely to appear on the list of most important transactions!
It is important to prioritize transactions, since it is virtually impossible to be able to optimize
every transaction in the system. Indexes that will speed up queries will almost certainly slow
down inserts.
An example of the attributes captured for a transaction are shown in Table 1.3
.
Table 1.3: Example Transaction Attributes
Attribute Value
Name Order Creation
Average
frequency
10,000 per hour
Peak frequency 15,000 per hour
Priority 1 (high)
Mode Write
Tables accessed Orders (w), Order Items (w), Customers (r), Parts (r)
Table keys Orders (order_number), Order Items (order_number), Customers
(cust_number), Parts (parts_number)
There are various ways to document the transaction analysis process and some modeling tools
will automate part of this documentation. The secret is to document the important transactions
and their attributes so that the database designer can decide which indexes should be defined
on which tables.
Again, it is often a case of using simple spreadsheets, as shown in Table 1.4.
Table 1.4: Capturing Simple Transaction Analysis Information
Transactions/Tables Orders Order_items Parts Customers
Customer inquiry R
Order inquiry R R
Order entry I I R R
Customer inquiry cust_number
Order inquiry order_number order_number
Order entry order_number order_number parts_number cust_number
The first spreadsheet maps the transactions to the mode in which they access tables; the
modes are I for insert, R for read, U for update, and D for delete. The second spreadsheet
maps the transactions to the key with which they access tables. Again, there is nothing
complex about this but it really pays to do it. Depending on how the system has been
implemented, a business transaction may be modeled as a number of stored procedures, and,
if desired, one may wish to use these instead of transaction names.
It is also important when considering the key business transactions not to forget triggers. The
trigger accesses tables in various modes, just as the application code does.
Data integrity enforcement using declarative referential integrity should also be included.
Foreign key constraints will access other tables in the database and there is nothing magical
about them. If an appropriate index is not present, they will scan the whole table like any
other query.
Once the transaction analysis has been performed, the database designer should have a good
understanding of the tables that are accessed frequently, in which mode, and with which key.
From this information one can begin to derive the following:
• Which tables are accessed the most and therefore experience the most disk I/O?
• Which tables are written to frequently by many transactions and therefore might
experience the most lock contention?
• For a given table, which columns are used to access the required rows; that is, which
common column combinations form the search arguments in the queries?
In other words where are the hot spots in the database?
The database designer, armed with this information, should now be able to make informed
decisions about the estimated disk I/O rates to tables, the type of indexes required on those
tables, and the columns used in the indexes.
Relational databases, and SQL Server is no exception, are reasonably easy to prototype, so
there is no excuse for not testing the physical design you are considering. Load data into your
tables, add your indexes, and stress your database with some representative Transact-SQL.
See how many transactions a second you can perform on a given server or, to look at it
another way, how much disk I/O does a named transaction generate? Which resource-CPU or
disk-do you run out of first?
Start stress testing with simple experiments. Jumping in at the deep end with many users
testing complex functionality is likely just to confuse the issue. Begin with simple
transactions issued by one user and then try more complex transactions.
Do not forget multiuser testing! Lock contention cannot be tested unless some kind of
multiuser testing is performed. In its simplest form this might involve persuading a number of
potential users to use the test system concurrently by following set scripts while performance
statistics are monitored. In its more sophisticated form this might involve the use of a
multiuser testing product, which can simulate many users while running automated scripts.
Transaction analysis and performance testing can be approached in a much more sophisticated
way than has been described above. The important point, however, is that it should be done-
the level of sophistication being determined by the available resource, be it time or money.
Again, note that physical design and performance testing are ongoing activities. Systems are
usually in a constant state of flux, because business requirements are usually in a constant
state of flux. Therefore, performance should be regularly monitored and, if necessary, the
database tuned.
1.2.3 Hardware environment considerations
The previous section described preproduction performance testing. This should have given the
database designer a feel for the hardware requirements of the production system. Obviously,
there is a hardware budget for any project, but it is clearly critical to have sufficient hardware
to support the workload of the system. It is also critical to have the correct balance and correct
type of hardware.
For example, there is no point in spending a small fortune on CPU power if only a small
amount of money is spent on the disk subsystem. Similarly, there is no point in spending a
small fortune on the disk subsystem if only a small amount of money is spent on memory.
Would the application benefit from a multiprocessor configuration or a single powerful
processor?
If the application's main component is a single report that runs through the night but must be
finished before 9:00 A.M., a single powerful processor might be a better choice. On the other
hand, if the application consists of a large number of users in an OLTP system, a more cost-
effective solution would probably be a multiprocessor configuration.
Take a step back and look at the application and its hardware as a whole. Make sure the
system resource is not unbalanced and do not forget the network!
.3 Where to next?
Once we have performed our data volume and transaction analysis we can start to consider
our physical design. We will need to decide what transactions need to be supported by
indexes and what type of index we should use. Chapter 3 discusses indexes in detail, but
before we look at indexes we need a more general view of the storage structures used in SQL
Server, and these are covered in the next chapter.
Chapter 2: SQL Server Storage Structures
2.1 Introduction
A developer of application code is probably quite content to consider a SQL Server as a
collection of databases containing tables, indexes, triggers, stored procedures, and views. As a
database designer and a person who will be responsible for the performance of those
databases, it is useful to be able to look a little deeper at the storage structures in SQL Server.
A lot of the internals of SQL Server are hidden and undocumented, but we can still learn a fair
amount about the way the product works. This chapter investigates the storage structures that
SQL Server uses and the methods available to view them.
2.2 Databases and files
A database contains all the tables, views, indexes, triggers, stored procedures, and user data
that make up an application. A SQL Server will typically host many databases. Usually
individual databases are backed up, restored, and integrity checked, so a database can also be
thought of as a unit of administration. Because a database is the container for our objects, we
will need to spend some time here looking at how databases are structured and managed. We
will then drill down into the database files and investigate database pages and other structures.
A database resides in one or more operating system files, which may reside on FAT, FAT32,
or NTFS partitions depending on the operating system. These operating system files are
known in SQL Server terminology as database files. These database files may be used to hold
user and system tables (data files) or track changes made to these tables (transaction log files).
There can be as many as 32,767 files per database and 32,767 databases hosted by a SQL
Server. A database can be as large as 1,048,516 terabytes (TB). A data file in a database can
be as large as 32 TB and a transaction log file as large as 4 TB. Of course, most sites will
never come remotely close to these numbers, but it is nice to know that there is plenty of
headroom!
The files used by a SQL Server 2000 database belong exclusively to that database. In other
words, a file cannot be shared by databases. Also, a file cannot be used to hold both data and
transaction log information. This means that a database must consist of a minimum of two
files. This is a much cleaner model that used in previous versions (prior to SQL Server 7.0).
There are three file types associated with a SQL Server 2000 database, as follows:
1. The primary data file is the starting point of the database and contains the pointers to
the other files in the database. All databases have a single primary data file. The
recommended file extension for a primary data file is an .mdf extension.
2. Secondary data files hold data that does not fit on the primary data file. Some
databases may not have any secondary data files, while others have multiple secondary
data files. The recommended file extension for secondary data files is an .ndf
extension.
3. Log files hold all of the log information used to recover the database. There is at least
one log file for each database. The recommended file extension for log files is an .ldf
extension.
The primary data file will hold the system tables and may hold user tables. For most users,
placing all their database tables in this file and placing the file on a suitable RAID
configuration will be sufficient. For some users, their user tables may be too large to place in
a single file, since this would mean that the file would be too large to place on one of the
storage devices. In this case, multiple data files—a primary and multiple secondary files—
may be used. User tables would then be created and populated. SQL Server would allocate
space from each file to each table so that the tables were effectively spread across the files
and, consequently, the physical storage devices.
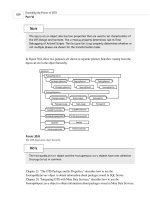
Figure 2.1 shows a simple database topology using a single file to hold the system tables and
user tables and a single file for the transaction log. The files reside on separate physical
storage devices, which may be single disks or RAID configurations. RAID configurations are
discussed in Chapter 5.
Figure 2.1: A simple database topology
Figure 2.2 shows a more complex database topology using multiple files to hold the system
tables and user tables and multiple files for the transaction log. The files reside on separate
physical storage devices, which may be single disks or RAID configurations.
Figure 2.2: A more complex database topology
For those users with even greater database performance and size requirements, filegroups may
be used. The role of a filegroup is to gather data files together into collections of files into
which database tables, indexes, and text/image data can be explicitly placed. This gives the
database administrator great control over the placement of these database objects. Perhaps two
database tables that are very heavily accessed can be separated into two filegroups consisting
of two sets of data files residing on two sets of physical storage devices. The tables could also
be separated from their nonclustered indexes in a similar fashion. Nonclustered indexes are
described in Chapter 3. From an administration perspective, individual filegroups can be
backed up allowing a large database to be backed up in parts.
Some rules govern the use of filegroups. Transaction logs are never members of filegroups—
only data files are. Also, data files can only be a member of one filegroup.
For most users, though, the use of filegroups and multiple data and transaction log files will
not be necessary to support their performance and administration requirements. They will use
one data file and one transaction log file. Though they will not use user-defined filegroups,
even in this simple case the database will contain a filegroup known as the primary filegroup.
This will contain the system tables and user tables. It will also be the default filegroup. The
default filegroup is the filegroup into which tables, indexes, and text/image data is placed
when no filegroup is specified as part of their definition. Any filegroup can be made the
default filegroup, and there is a school of thought that advocates always creating a single user-
defined filegroup and making this the default filegroup when the database is first created. This
ensures that the system tables alone reside in the primary filegroup and all user data resides in
the user-defined filegroup in a separate, secondary data file.
2.3 Creating databases
Databases can be created by means of the Create Database Wizard, the SQL Server Enterprise
Manager, or the Transact-SQL CREATE DATABASE statement. Since the Create Database
Wizard is merely a wrapper around the SQL Server Enterprise Manager database creation
dialog boxes, it will not be discussed further here. A database may also be created with the
SQL-DMO (Distributed Management Objects). Creating a database with the SQL Server
Enterprise Manager is accomplished as follows:
1. Expand the server group and expand the server.
2. Right-click Databases, then click New Database.
3. Enter the name of the database and collation on the General tab.
4. Enter the name, file, size, and attribute information for each data file on the Data Files
tab.
5. Enter the name, file, size, and attribute information for each transaction log file on the
Log Files tab.
6. Click OK.
Depending on how large the database will be, this may take a considerable length of time. In
this case using a Transact-SQL script running in the background may be a better bet. The SQL
Server Enterprise Manager Database Properties dialog box with the Data Files tab selected is
shown in Figure 2.3.
Figure 2.3: The Database Properties dialog box
As can be seen in Figure 2.3, various properties can be set for each data and transaction log
file. The Filename of the file is the name by which it is referred to within SQL Server—for
example, by various system stored procedures such as sp_helpfile. The location is the physical
storage location where the file will reside. A filegroup may also be entered for data files other
than the primary at this point, in which case the secondary data file will be placed in that
filegroup. Other attributes of the file relate to size and growth, which will be discussed
shortly.
An example of creating a database using the Transact-SQL CREATE DATABASE statement
is as follows:
CREATE DATABASE BankingDB
ON PRIMARY
( NAME = BankingData,
FILENAME = 'd:\data\BankingData.mdf',
SIZE = 200MB,
MAXSIZE = 800MB,
FILEGROWTH = 40MB )
LOG ON
( NAME = 'BankingLog',
FILENAME = 'e:\data\BankingLog.ldf',
SIZE = 100MB,
MAXSIZE = 500MB,
FILEGROWTH = 50MB )
As with SQL Server Enterprise Manager, a name is specified for the file—this time with the
NAME option—and a physical location is specified with the FILENAME option. The ON
keyword introduces a list containing one or more data file definitions, and the LOG ON
keyword introduces a list containing one or more transaction log file definitions.
The PRIMARY keyword identifies the list of files following it as files that belong to the
primary filegroup. The first file definition in the primary filegroup becomes the primary file,
which is the file containing the database system tables. The PRIMARY keyword can be
omitted, in which case the first file specified in the CREATE DATABASE statement is the
primary file.
Regardless of the mechanism by which a database is created, size and growth information
may be specified. The Initial size (MB) in the SQL Server Enterprise Manager and the SIZE
keyword in the CREATE DATABASE statement specify the initial size of the file. In
Transact-SQL, the units are, by default, megabytes, although this can be specified explicitly
by using the suffix MB. If desired, the file size can be specified in kilobytes using the KB
suffix, gigabytes using the GB suffix, and terabytes using the TB suffix.
In SQL Server 2000, when a data file or transaction log file fills it can automatically grow. In
the SQL Server Enterprise Manager, a file is allowed to automatically grow by checking the
Automatically grow file check box. This is, in fact, checked by default. In Transact-SQL, the
file, by default, will be allowed to grow unless the FILEGROWTH keyword is set to 0. When
a file grows, the size of the growth increment is controlled by the Filegrowth property in the
SQL Server Enterprise Manager and the FILEGROWTH keyword in Transact-SQL. The
growth increment can be specified as a fixed value, such as 10 megabytes, or as a percentage.
This is the percentage of the size of the file at the time the increment takes place. Therefore,
the size increment will increase over time. In Transact-SQL, the FILEGROWTH value can be
specified using the suffix MB, KB, GB, TB, or %, with MB being the default. If the
FILEGROWTH keyword is not specified in Transact-SQL, the default is 10 percent.
The file may be allowed to grow until it takes up all the available space in the physical storage
device on which it resides, at which point an error will be returned when it tries to grow again.
Alternatively, a limit can be set using the Restrict filegrowth (MB) text box in the SQL Server
Enterprise Manager or the MAXSIZE keyword in Transact-SQL. The MAXSIZE value can
be specified using the suffix MB, which is the default, KB, GB, or TB. The keyword
UNLIMITED can also be specified—this is the default.
N
ote Every time a file extends, the applications using the database during the file extension
operation may experience performance degradation. Also, extending a file multiple
times may result in fragmented disk space. It is advisable, therefore, to try to create the
file with an initial size estimated to be close to the size that will ultimately be required
by the file.
The following example shows a CREATE DATABASE statement, which will create a
database consisting of multiple data and transaction log files:
CREATE DATABASE BankingDB
ON PRIMARY
( NAME = BankingData1,
FILENAME = 'd:\data\BankingData1.mdf',
SIZE = 50MB,
MAXSIZE = 200MB,
FILEGROWTH = 25MB),
( NAME = BankingData2,
FILENAME = 'e:\data\BankingData2.ndf',
SIZE = 50MB,
MAXSIZE = 200MB,
FILEGROWTH = 25MB)
LOG ON
( NAME = BankingLog1,
FILENAME = 'f:\data\BankingLog1.ldf',
SIZE = 50MB,
MAXSIZE = 200MB,
FILEGROWTH = 25MB),
( NAME = BankingLog2,
FILENAME = 'g:\data\BankingLog2.ldf',
SIZE = 50MB,
MAXSIZE = 200MB,
FILEGROWTH = 25MB)
The following example re-creates the multiple file BankingDB database created in the
previous example, but this time a user-defined filegroup, Filegroup1, is created. Since the file
named BankingData2 follows the filegroup definition, it is placed in this filegroup. This
means that tables, indexes, and text/image data can be explicitly placed in this filegroup if
required. If no filegroup is specified on the object definition, the object will be created in the
DEFAULT filegroup, which, unless it is changed, is the primary filegroup.
CREATE DATABASE BankingDB
ON PRIMARY
( NAME = BankingData1,
FILENAME = 'd:\data\BankingData1.mdf',
SIZE = 50MB,
MAXSIZE = 200MB,
FILEGROWTH = 25MB),
FILEGROUP Filegroup1
( NAME = BankingData2,
FILENAME = 'e:\data\BankingData2.ndf',
SIZE = 50MB,
MAXSIZE = 200MB,
FILEGROWTH = 25MB)
LOG ON
( NAME = BankingLog1,
FILENAME = 'f:\data\BankingLog1.ldf',
SIZE = 50MB,
MAXSIZE = 200MB,
FILEGROWTH = 25MB),
( NAME = BankingLog2,
FILENAME = 'g:\data\BankingLog2.ldf',
SIZE = 50MB,
MAXSIZE = 200MB,
FILEGROWTH = 25MB)
Various attributes of a database can be modified after it has been created. These include
increasing and reducing the size of data and transaction log files, adding and removing
database and transaction log files, creating filegroups, changing the DEFAULT filegroup, and
changing database options.
These operations are achieved by using the ALTER DATABASE statement, DBCC
SHRINKFILE, and DBCC SHRINKDATABASE. These operations can also be changed
through the SQL Server Enterprise Manager. Let us first look at increasing the size of a
database.
2.4 Increasing the size of a database
To increase the size of a database, data and transaction log files may be expanded by using the
SQL Server Enterprise Manager or the Transact-SQL ALTER DATABASE statement.
Increasing the size of a file in the SQL Server Enterprise Manager is merely a case of entering
a new value in the Space allocated (MB) text box, as shown in Figure 2.4.
Figure 2.4: Increasing the size of a database file
In Transact-SQL, the ALTER DATABASE statement is used, as follows:
ALTER DATABASE BankingDB
MODIFY FILE
(NAME = BankingData2,
SIZE = 100MB)
Note that file attributes such as MAXSIZE and FILEGROWTH may also be modified with an
ALTER DATABASE statement.
Another way of increasing the size of a database is to add data and transaction log files, as
follows:
ALTER DATABASE BankingDB
ADD FILE
(NAME = BankingData3,
FILENAME = 'h:\data\BankingData3.ndf',
SIZE = 50MB,
MAXSIZE = 200MB,
FILEGROWTH = 25MB)
Note that to add a transaction log file the ADD LOG clause is used.
To add a file to an existing user-defined filegroup, the ADD FILE … TO FILEGROUP
syntax is used, as follows:
ALTER DATABASE BankingDB
ADD FILE
(NAME = BankingData3,
FILENAME = 'd:\data\BankingData3.ndf',
SIZE = 50MB,
MAXSIZE = 200MB,
FILEGROWTH = 25MB)
TO FILEGROUP FileGroup1
In the SQL Server Enterprise Manager, adding a new file to an existing filegroup is achieved
by selecting the appropriate filegroup from the drop-down File group list, as shown in Figure
2.5.
Figure 2.5: Adding a new file to an existing filegroup
N
ote A file that already exists in the database cannot be subsequently added to another
filegroup.
2.5 Decreasing the size of a database
There are a number of mechanisms that can be used to decrease the size of a database. On one
hand, a database can be flagged to allow automatic database shrinkage to occur at periodic
intervals. This requires no effort on the part of the database administrator, but it also allows
no control. On the other hand, DBCC statements can be used to manually shrink a database or
individual database files. These DBCC statements provide the database administrator with the
greatest control over how the shrinkage takes place. The SQL Server Enterprise Manager also
provides a means to shrink a database or file, and this operation can be scheduled under the
control of the database administrator.
Before we look at shrinking a database, it is worth considering why we might want to do so.
Obviously, shrinking a database in a way that physically releases space back to the operating
system is an attractive proposition if space is limited on the server and disk space must be
shared among applications. However, if space is taken away from a database and used by
another application, it is no longer available for use by that database. If the database is likely
to grow and need the space in the short term, it is pointless releasing the space. Also, the
process of expanding the database files in increments, as previously discussed, is not
necessarily efficient, since the act of extending the file may impact the performance of
applications, and the file extents may end up being fragmented around the disk drive.
However, if a database has grown in an uncharacteristic fashion because a large amount of
data has been added and then removed, it makes sense to release the space that is not likely to
be needed again. With these thoughts in mind, let us look at how a database and its files can
be shrunk.
2.5.1 The autoshrink database option
A database option can be set that makes a database a candidate for automatically being
shrunk. Database options and how to set them will be discussed shortly. At periodic intervals
a database with this option set may be shrunk if there is sufficient free space in the database to
warrant it. Note that the database administrator has no control over exactly what happens and
when.
2.5.2 Shrinking a database in the SQL Server Enterprise Manager
A database can be shrunk using the SQL Server Enterprise Manager, as follows:
1. Expand the server group and expand the server.
2. Expand Databases, then right-click the database to be shrunk.
3. Select All Tasks and Shrink Database.
4. Select the desired options.
5. Click OK.
The SQL Server Enterprise Manager Shrink Database dialog box is shown in Figure 2.6.
Figure 2.6: Shrinking a database using the SQL Server Enterprise Manager
The dialog box offers the database administrator some options concerning database shrinkage.
By choosing to move the pages to the beginning of the file before shrinking, SQL Server will
reorganize the data in the database files by relocating pages at the end of the file to the
beginning of the file.
This will typically result in empty pages at the end of the file. Whether this option is chosen
or not, SQL Server will truncate the files, releasing the free space at the end of the files back
to the operating system. How much free space is not released but kept at the end of the file
can be controlled by the option to specify the maximum free space after shrinking. The option
to shrink the database on a scheduled basis is also provided.
This dialog box pretty much maps onto the DBCC SHRINKDATABASE statement, which
will be described shortly. There are two restrictions to bear in mind when using a shrink
database operation. First, a database cannot be shrunk in such a way that user data is lost.
Second, the files that comprise the database cannot be shrunk past their initial size—that is,
the size at which they were initially created. For greater control, the Files button may be
mouse-clicked. The Shrink File dialog box is displayed in Figure 2.7.
Figure 2.7: Shrinking a database file using the SQL Server Enterprise Manager
When a file is shrunk using this dialog box, it can be shrunk below its initial creation size as
long as user data would not be lost. Various options allow a finer level of control. The file can
be reorganized (compressed) and the free space truncated from the end or the free space
truncated from the end without the compression taking place first. The target file size can be
set—this option will compress and truncate. There is also an option to migrate data from the
file to other files in its filegroup so it can be emptied and then removed from the database.
The option to shrink the database file on a scheduled basis is also provided. This dialog box
pretty much maps onto the DBCC SHRINKFILE statement described in the following
section.
2.5.3 Shrinking a database Using DBCC statements
The greatest control over database shrinkage is provided by two DBCC statements—DBCC
SHRINKDATABASE and DBCC SHRINKFILE. The first statement considers all the files in
the database when attempting to shrink it. The second statement only considers the named
file.
The SQL Server Enterprise Manager actually executes a DBCC SHRINKDATABASE
statement when it is used to shrink a database and a DBCC SHRINKFILE statement when it
is used to shrink a database file.
Let us first consider DBCC SHRINKDATABASE. The syntax diagram for this statement is
as follows:
DBCC SHRINKDATABASE
( database_name [, target_percent]
[, {NOTRUNCATE | TRUNCATEONLY}]
)
The target percent parameter is the desired percentage of free space left in the database file
after the database has been shrunk. If this parameter is omitted, SQL Server will attempt to
shrink the database as much as possible.
The NOTRUNCATE option ensures that any free file space produced by relocating data is
kept within the database files and not given back to the operating system. If the database files
were examined with Windows Explorer before and after the shrink operation, no change in
file size would be observed.
The TRUNCATEONLY option ensures that any free space at the end of the data files is
returned to the operating system but no data is relocated within the files. If the database files
were examined with Windows Explorer before and after the shrink operation, a change in file
size may be observed. The target_percent parameter is disregarded when the
TRUNCATEONLY option is used.
If neither of these is specified, data is relocated in the files, and the free space at the end of the
files is released to the operating system.
The operation of shrinking a database is not quite as straightforward as it first appears.
Various restrictions come into play, and you may not always see shrinkage as large as you
may expect. For example, as we have said, a database file cannot be shrunk, using DBCC
SHRINKDATABASE, smaller than the size at which it was first created. Also, a database
cannot be shrunk smaller than the model database (a DBCC SHRINKFILE can shrink a file
smaller than its initial size). Data files and transaction log files are also treated differently. In
the case of data files, each file is considered individually. In the case of transaction log files,
all the files are treated as if they were one contiguous lump of transaction log.
Of course, a database can never be shrunk smaller than the amount of data it currently holds.
Let us now consider DBCC SHRINKFILE. The syntax diagram for this statement is as
follows:
DBCC SHRINKFILE
( {file_name | file_id }
{ [, target_size]
| [, {EMPTYFILE | NOTRUNCATE | TRUNCATEONLY}]
}
)
The target size parameter is the desired size to which the database file should be shrunk. If
this parameter is omitted, SQL Server will attempt to shrink the file as much as possible.
The NOTRUNCATE and TRUNCATEONLY options have the same meaning as DBCC
SHRINKDATABASE. The EMPTYFILE option moves the data contained in the file to other
files that reside in the same filegroup and stops the file being used to hold new data. This
option is most often used to prepare a file for removal from the database. It could not
otherwise be removed if it contained data.
2.5.4 Removing database files
Files can be removed from the database by using the ALTER DATBASE statement. Neither
data files nor transaction log files can be removed from a database if they contain data or
transaction log records. In the case of data files, the DBCC SHRINKFILE statement with the
EMPTYFILE option can be used to move data out of the file that is to be removed to other
files in the same filegroup. This is not possible in the case of transaction log files. The
transaction log will have to be truncated to remove transaction log records before the removal
of a transaction log file is possible.
The following example removes a file from the BankingDB database created earlier:
ALTER DATABASE BankingDB
REMOVE FILE BankingData2
Remove a file using the SQL Server Enterprise Manager is merely a case of selecting the file
to remove and mouse-clicking the Delete button, as shown in Figure 2.8.
Figure 2.8: Removing a file with the SQL Server Enterprise Manager
A filegroup can also be removed, as follows:
ALTER DATABASE BankingDB
REMOVE FILEGROUP FileGroup1
However, a filegroup cannot be removed if it contains files.
2.6 Modifying filegroup properties
The properties of a filegroup can be changed. Filegroup properties can be READWRITE,
READONLY, and DEFAULT. The READWRITE property is typically the property that is
set for most filegroups. This means that objects such as tables and indexes in the filegroup can
be both retrieved and changed. The READONLY property is the opposite of the
READWRITE property in that those objects in a filegroup with the READONLY property set
cannot be changed; they can only be retrieved. The primary filegroup cannot have this
property set.
The DEFAULT property is by default set on the primary filegroup. A filegroup with this
property set is used to store objects whose definition does not include a target filegroup
specification. The DEFAULT property can be set on a filegroup other than the primary
filegroup, but only one filegroup in a database can have this property set. The following
example sets the READONLY attribute on the filegroup FileGroup1:
ALTER DATABASE BankingDB
MODIFY FILEGROUP FileGroup1 READONLY
N
ote Setting the properties READONLY or READWRITE requires exclusive use of the
database.
2.7 Setting database options
Database options are the attributes of a database and control the way it behaves and its
capabilities. The database options are listed in Table 2.1.
Table 2.1: Database Options
Settable
Database
Options
Meaning
ANSI null
default
This option controls the database default nullability. If a table column is
created without specifying NULL or NOT NULL, the default behavior is to
create the column with NOT NULL. However, the ANSI standard specifies
that the column should be created with NULL. Set this option to follow the
ANSI standard. It is recommended that NULL or NOT NULL always be
explicitly specified to avoid confusion.
ANSI nulls This option controls the result of comparing NULL values. If it is set,
comparisons with a NULL value evaluate to NULL, not TRUE or FALSE.
When not set, comparisons of non-Unicode values with a NULL value
evaluate to TRUE if both values are NULL.
ANSI padding If ON, strings are padded to the same length before comparison or insert. If
OFF, strings are not padded.
ANSI warnings This option controls whether warnings are issued if, for example, NULL
values appear in aggregate functions.
arithabort If ON, a query is terminated when an overflow or divide-by-zero error
occurs during the execution of the query.
auto create
statistics
This option controls whether statistics are automatically created on columns
used in the search conditions in WHERE clauses.
auto update
statistics
This option controls whether existing statistics are automatically updated
when the statistics become inaccurate because the data in the tables have
changed.
autoclose This option controls whether a database is shut down and its resources