Real World Adobe InDesign CS4- P3 ppsx
Bạn đang xem bản rút gọn của tài liệu. Xem và tải ngay bản đầy đủ của tài liệu tại đây (1.32 MB, 30 trang )
Point/Pica Size. is option changes the denition of the size of a
point (and, therefore, the size of a pica). e modern (i.e., post-desk-
top publishing) standard for the size of a point is 72 points per inch.
If using your old Compugraphic E-scale is more important to you
than anything else in life, feel free to set this option to something
other than PostScript (72 pts/inch). Just don’t tell us about it, or insist
that we should do the same.
Keyboard Increments. What happens when you push an arrow key?
at depends on the settings you’ve entered in the following elds.
Cursor Key. When you have an object selected using the Selec-
tion or Direct Select tool, you can move it by pressing the arrow
keys. How far do you want it to move with each key press? Enter
that value in this eld.
Size/Leading. When you have text selected, you can increase or
decrease the size and/or leading of the text by pressing keyboard
shortcuts (by default, you press Command-Shi->/Ctrl-Shi->
to increase the size of the text; Command-Shi-</Ctrl-Shi-< to
decrease the size; Option-Up arrow/Alt-Up arrow to increase the
leading; or Option-Down arrow to decrease the leading). How
much larger or smaller should the point size or leading get with
each key press? Enter the amount you want in this eld.
Baseline Shi. When you have selected text using the Type tool,
you can increase baseline shi by pressing (by default) Option-
Shi-Up Arrow/Alt-Shi-Up Arrow, or decrease baseline shi
by pressing Option-Shi-Down Arrow/Alt-Shi-Down Arrow.
How much baseline shi should each key press apply? Enter the
amount you want in this eld.
Kerning. When the text cursor is between two characters, you
can apply kerning by pressing Option-Le Arrow/Alt-Le
Arrow or Option-Right Arrow/Alt-Right Arrow. When a range
of text is selected with the text tool, pressing this shortcut
applies tracking. Enter the kerning amount you want to apply
(in thousandths of an em) in this eld.
InDesign can display two dierent types of grid: baseline and docu-
ment. You control various aspects of their appearance using the
options in this pane (see Figure 1-41). Both grids are very similar to
the guides (ruler guides, margin guides, and column guides), and
have a similar eect on items on your pages.
Grids Preferences
Real_World_Adobe_InDesign_CS4b.pdf 61Real_World_Adobe_InDesign_CS4b.pdf 61 08/04/2009 05:54:08 p.m.08/04/2009 05:54:08 p.m.
.
Baseline Grid. e baseline grid is an array of horizontal guides that
mark o the page in units equal to a specied leading amount (note
that the baseline grid isn’t really a “grid,” as it has no vertical lines).
Color. Choose a color for the baseline grid using the Color
pop-up menu.
Start. Enter a value in the Start eld to set the distance from the
top of the page at which you want the baseline grid to begin.
Increment Every. Enter a distance—in general, the leading value
of your publication’s body text—in the Increment Every eld.
View reshold. Set the magnication at which the grid
becomes visible in the View reshold eld.
Document Grid. e document grid is a network of horizontal and
vertical guidelines—something like graph paper.
Color. Choose a color for the grid using the Color pop-up menu.
Gridline Every. Enter the distance you want between grid lines
in this eld.
Subdivisions. Just as the document grid divides the page, sub-
divisions divide the grid into smaller sections. e number you
enter in this eld sets the number of subdivisions between each
grid line. If you don’t want to subdivide the document grid, enter
1 in this eld. InDesign displays the grid subdivision lines using
a tint of the color you specied for the document grid.
Grids in Back. Turn on the Grids in Back option to make both grids
appear at the bottom of the stacking order rather than on top of your
page objects.
-
Grids Preferences
Real_World_Adobe_InDesign_CS4b.pdf 62Real_World_Adobe_InDesign_CS4b.pdf 62 08/04/2009 05:54:08 p.m.08/04/2009 05:54:08 p.m.
Use the Guides and Pasteboard pane of the Preferences dialog box
(see Figure 1-42) to set the color for displaying margin, column, bleed,
and slug guides, as well as the preview color of the pasteboard. Why
isn’t there an option for setting the color of ruler guides? Because
you don’t have to use the same color for all of your ruler guides—you
specify the color using the Ruler Guides dialog box. (Tip: Chang-
ing your pasteboard color to black before showing a client boosts the
apparent contrast and looks cool. You could also change the preview
color for each stage of a job—rst dra could be pink, second dra
green, and so on. But remember that any color other than neutral
gray may make your page or images look like they have a slight color
cast on screen; that’s just the way the human eye works.)
Guides and Pasteboard
Preferences
-
Guides & Pasteboard
Preferences
Snap to Zone. Use the Snap to Zone option to set the distance, in
screen pixels, at which guides begin to exert their mysterious pull on
objects you’re drawing or dragging.
Guides in Back. Turn on Guides in Back to position the guides at
the bottom of the stacking order of the layer they’re on. We’ve never
gured out a good reason to turn this feature o.
Smart Guide Options. InDesign’s Smart Guides feature displays
information about objects as you move, resize, or create them, and
gives you a way to snap to other object locations on the page (see
Figure 1-43). is is a terric feature, but bear in mind that it can
interfere with snapping to the grid or guides.
Real_World_Adobe_InDesign_CS4b.pdf 63Real_World_Adobe_InDesign_CS4b.pdf 63 08/04/2009 05:54:09 p.m.08/04/2009 05:54:09 p.m.
.
-
Smart Guides
Minimum Vertical Oset. e Minimum Vertical Oset eld sets
the distance from the top or bottom of the page to the outside edge of
the pasteboard. To make your pasteboard taller, increase this value;
to make it shorter, decrease the value. is is the equivalent of the old
Pasteboard XTension for QuarkXPress (but without the associated
bugs and troubles).
e Dictionary pane of the Preferences dialog box controls the spell-
ing and hyphenation dictionaries used in the document (see Figure
1-44). is looks like it would set the default dictionary for a docu-
ment, but it does not. It’s very rare that you would need to change
these, unless you were using a third-party plug-in oering dierent
hyphenation and spelling dictionaries. Choose a dictionary from the
Language pop-up menu to choose the vendor of your choice from
the Hyphenation and Spelling pop-up menus. You can add addi-
tional dictionaries for each language by clicking the New Dictionary
or Add Dictionary buttons.
Double Quotes. Enter the pair of characters you want to use for
double quotes, or select them from the pop-up menu.
Single Quotes. Enter the pair of characters you want to use for single
quotes, or select them from the pop-up menu.
Compose Using. When you add a word to your user dictionary
(including changes you make to hyphenation points), InDesign
Dictionary Preferences
When you turn on Smart
Guides, InDesign displays
guides as you move
objects. In this example,
it’s showing us that the
center of the square
we’re moving aligns with
the center of the larger
square.
When your turn on
the Smart Dimensions
option, InDesign displays
guides when nearby
objects are the same size.
In this example, InDesign
shows us that the height
of the two rectangles is the
same.
Real_World_Adobe_InDesign_CS4b.pdf 64Real_World_Adobe_InDesign_CS4b.pdf 64 08/04/2009 05:54:09 p.m.08/04/2009 05:54:09 p.m.
adds the word to the user dictionary’s exceptions list. Choose User
Dictionary to use the exceptions list in the current user dictionary;
choose Document to use the hyphenation exceptions stored in the
document; or choose User Dictionary and Document to use both
exception lists.
User Dictionary Options. Choose Merge User Dictionary into Doc-
ument to copy the hyphenation and spelling exceptions list from the
user dictionary into each document you open. Clearly, this isn’t an
option you want to turn on if you frequently open documents cre-
ated by other people.
Choose Recompose All Stories When Modied to recompose all
stories in a document when the user dictionary changes (or when
you change the setting of the Compose Using pop-up menu). Recom-
posing all stories in a document can be a time-consuming process;
most of the time, we think you should leave this option turned o.
e options in the Spelling pane of the Preferences dialog box give
you control over InDesign’s spelling checker and dynamic spelling
feature (see Figure 1-45).
Spelling. ere’s not much to the options in the Spelling section.
Turn on Misspelled Words to check for spelling errors. Turn on
Repeated Words to check for “the the” and other repetitions. Turn
on Uncapitalized Words to check for common capitalization errors,
and turn on Uncapitalized Sentences to nd sentences that do not
start with a capital letter.
Spelling Preferences
-
Dictionary Preferences
Real_World_Adobe_InDesign_CS4b.pdf 65Real_World_Adobe_InDesign_CS4b.pdf 65 08/04/2009 05:54:09 p.m.08/04/2009 05:54:09 p.m.
.
Dynamic Spelling. Turn on the Enable Dynamic Spelling option to
have InDesign mark possible spelling errors in text (this feature is
very similar to the dynamic spelling features in Word or other word
processors). You can specify the colors InDesign uses to mark mis-
spelled words, repeated words, uncapitalized words, and uncapital-
ized sentences using the pop-up menu associated with each type of
spelling error. For more on dynamic spelling, see Chapter 3, “Text.”
InDesign’s Autocorrect feature can x misspelled words as you type.
To turn the Autocorrect feature on or o, and to add or remove
words from the list of misspellings and their corresponding correc-
tions (see Figure 1-46). For more on using the Autocorrect feature,
see Chapter 3, “Text.”
Autocorrect
Preferences
-
Spelling Preferences
-
Autocorrect Preferences
Real_World_Adobe_InDesign_CS4b.pdf 66Real_World_Adobe_InDesign_CS4b.pdf 66 08/04/2009 05:54:09 p.m.08/04/2009 05:54:09 p.m.
e option in the Notes pane of the Preferences dialog box control
the appearance of notes in your documents (see Figure 1-47). For
more on using the Autocorrect feature, see Chapter 3, “Text.”
Note Color. Choose the color you want to use for notes. You can
select either a xed color or the User Color (which you can dene by
choosing User from the File menu).
Show Note Tool Tips. When this option is on, you can position the
cursor over a note and see a tool tip that includes user information
and a short excerpt of the note. With this option turned o, you’ll
have to open the note in the Notes panel to see this text.
Include Note Content When Checking Spelling. Do you want to
check the spelling of the text in notes? If so, turn this option on.
Include Note Content in Find/Change Operations. Do you want to
include notes when you nd and change text? If you do, turn this
option on.
Inline Background Color. Sets the background color for the notes
displayed in the Story Editor.
Notes Preferences
-
Notes Preferences
e options in the Story Editor Display pane of the Preferences
dialog box control the appearance of Story windows in the docu-
ment (see Figure 1-48). e idea of the Story Editor is to make text
editing easier on your eyes, but it’s up to you to decide what that
means. ey’re your eyes, aer all. We have more to say about the
Story Editor and story windows, as you’ll see in Chapter 3, “Text.”
Text Display Options. e options in the Text Display Options sec-
tion set the font, font size, spacing, and background and foreground
Story Editor Display
Preferences
Real_World_Adobe_InDesign_CS4b.pdf 67Real_World_Adobe_InDesign_CS4b.pdf 67 08/04/2009 05:54:09 p.m.08/04/2009 05:54:09 p.m.
.
-
Story Editor Display
Preferences Dialog Box
colors displayed in story windows. e eme pop-up menu con-
tains several preset color combinations. e Enable Anti-Aliasing
option smooths the edges of text in story windows.
Cursor Options. e options in the Cursor Options section con-
trol the appearance of the cursor as it moves through text in a story
window. Turn the Blink option on to make the cursor blink, or turn
it o to prevent the cursor from blinking. We had actually nally
expunged the memory of the 1980s Block cursor from our minds
when Story Editor brought it all back for us.
e options in the Display Performance pane of the Preferences
dialog box control the way that InDesign draws text and graphics
on your screen. e choices you make in this pane can dramatically
speed up—or slow down—drawing and redrawing the screen (see
Figure 1-49).
Default View Settings. Choose an option on the Default View pop-up
menu to set the default view setting for the document. Perhaps we’re
just middle-of-the-road guys, but we like to choose Typical.
Preserve Object-Level View Settings. e Preserve Object-Level
View Settings option tells InDesign to save any display settings you’ve
applied to images when you save the document and then reopen it.
When it’s turned o, InDesign forgets all the display settings. While
it seems like a good idea to turn this on, it can increase the time it
takes to open your documents, so we usually leave it o.
Adjust View Settings. You can apply one of three display settings—
which are named “Optimized,” “Typical,” and “High Quality”—to
Display Performance
Preferences
Real_World_Adobe_InDesign_CS4b.pdf 68Real_World_Adobe_InDesign_CS4b.pdf 68 08/04/2009 05:54:09 p.m.08/04/2009 05:54:09 p.m.
any InDesign window or object, and you can dene the parameters
of each setting. Note that the names of these settings do not neces-
sarily apply to the quality of the display; “High Quality” can be rede-
ned to produce a lower quality display than “Optimized.”
To edit the parameters of a view setting, choose the setting and
then adjust the values of the options.
Raster Images. is slider denes the method InDesign uses
to draw imported bitmap images (TIFF, JPEG, GIF). Note that
images saved in the EPS (including DCS) and PDF formats are
considered “vector graphics.” See Figure 1-50.
Choose Gray Out to draw every image as a gray box. Choose
Proxy to have InDesign construct a low-resolution screen ver-
sion of the imported graphic and use that image for display at all
magnication levels. When you choose High Resolution from
the Raster Images slider, InDesign gets its information about
how to render an image from the original le that’s linked to
your publication, which means that InDesign renders the best
possible display of the image for the current magnication.
is setting has no eect on the way the images print.
Vector Graphics. Choose an option from the slider to dene the
method InDesign uses to display vector graphics (EPS and PDF).
See Figure 1-51.
Choose Gray Out to draw every graphic as a gray box.
Choose Proxy to have InDesign construct a low-resolution
screen version of the imported graphic and use that image
for display at all magnication levels. When you choose High
-
Display Performance
Preferences
is text changes to Gray
Out or High Resolution,
depending on the slider
setting.
Real_World_Adobe_InDesign_CS4b.pdf 69Real_World_Adobe_InDesign_CS4b.pdf 69 08/04/2009 05:54:10 p.m.08/04/2009 05:54:10 p.m.
.
-
Raster Images
View Settings
Proxy
High resolution
Gray out
-
Vector Graphics
View Settings
High Resolution
Proxy
Resolution from the Vector Graphics slider, InDesign gets its
information about how to render the graphic by reinterpreting
PostScript/PDF instructions in the graphic le. InDesign then
renders the best possible view of the graphic for the current
screen resolution. Note, however that this process can be very
time consuming.
is setting has no eect on the way the images print to a
PostScript printer.
Transparency. e Transparency slider controls the appearance
of transparency on your screen—it has nothing to do with the
way that transparency prints. Choose O to omit previews for
Real_World_Adobe_InDesign_CS4b.pdf 70Real_World_Adobe_InDesign_CS4b.pdf 70 08/04/2009 05:54:10 p.m.08/04/2009 05:54:10 p.m.
-
Transparency
View Settings
O Low Quality
Medium Quality High Quality
-
Anti-Aliasing
Anti-aliasing o (enlarged) Anti-aliasing on (enlarged)
transparency altogether, or choose Low Quality, Medium Qual-
ity, or High Quality to control the accuracy of the preview (see
Figure 1-52).
Enable Anti-Aliasing. Anti-aliasing smooths the edges of InDe-
sign objects by adding pixels around the edges of the object. See
Figure 1-53.
Greek Type Below. It takes time to draw text characters, and,
frankly, it’s not always worth doing. You might have noticed that
when you zoom out to the 12.5% page view, InDesign doggedly
attempts to give the best preview it can of the (now very tiny)
text on your pages. To tell InDesign not to bother, and to speed
up your screen redraw, use greeking.
When you enter a value in the Greek Type Below eld that’s
greater than zero, InDesign displays text characters that are equal to
or smaller than that value as a gray bar (see Figure 1-54).
e value shown in the eld is in points, but it doesn’t refer to
the point size of the text. Instead, it refers to the size of the text
as it appears on your screen at the current magnication. e
advantage of using this option is that the gray bar draws much
faster than the actual characters. Greeking has no eect on text
composition.
Real_World_Adobe_InDesign_CS4b.pdf 71Real_World_Adobe_InDesign_CS4b.pdf 71 08/04/2009 05:54:10 p.m.08/04/2009 05:54:10 p.m.
.
Use Defaults. Click this button to return the options for the
selected display setting to their default value.
What is the color “black” in your documents? Is it always 100 per-
cent black ink (or “100K black”)? Or is it sometimes a “rich black,” a
color made up of large percentages of other inks? e options in the
Appearance of Black pane of the Preferences dialog box control the
on-screen, exported, and printed appearance of both 100K black and
rich black colors. e best way to understand what the settings in the
Appearance of Black panel of the Preferences dialog box (see Figure
1-55) is to look at the example graphics in the dialog box.
On Screen. When you choose Display All Blacks Accurately, InDe-
sign will display 100K black as a dark gray and rich black(s) as RGB
black (the darkest color your monitor can represent). When you
choose Display All Blacks As Rich Black, both 100K black and rich
black(s) will appear as RGB black.
Appearance of Black
Preferences
-
Greeking
Greeking o Greeking on
-
Appearance of
Black Preferences
Real_World_Adobe_InDesign_CS4b.pdf 72Real_World_Adobe_InDesign_CS4b.pdf 72 08/04/2009 05:54:10 p.m.08/04/2009 05:54:10 p.m.
Printing/Exporting. When you choose Output All Blacks Accurately
and print to a non-Postscript printer or export to an RGB le format,
InDesign will print (or save) 100K black as gray and rich black(s) as
RGB black. Choose Output All Blacks As Rich Black, and InDesign
will print (or save) both 100K black and rich black(s) as RGB black.
Overprint [Black] Swatch at 100%. If you always want objects col-
ored with the [Black] swatch to overprint, turn this option on. is
setting overrides any changes you might make in the Print dialog
box. Note that this setting only aects that swatch; it has no eect
on any other black swatch (even solid black!), which will print solid
black and still knock out whatever is behind it even if this option is
on (see Chapter 10, “Color”).
e File Handling pane (see Figure 1-56) contains options for set-
ting the location of InDesign’s temporary les and for Version Cue,
(Adobe’s workow management program).
Document Recovery Data. As you work with InDesign, the program
saves information about your preference settings and keeps a record
of changes you make to your document. While this makes for a lot of
disk-writing activity, it also gives you InDesign’s multiple undo and
document recovery features.
To change the folder InDesign uses to store its temporary les,
click the Choose button. InDesign displays a dialog box. Locate and
select the folder you want to use and click the OK button.
File Handling
Preferences
-
File Handling
Preferences
Real_World_Adobe_InDesign_CS4b.pdf 73Real_World_Adobe_InDesign_CS4b.pdf 73 08/04/2009 05:54:10 p.m.08/04/2009 05:54:10 p.m.
.
Why would you want to change the location? InDesign’s tempo-
rary les—in particular the le recovery information, can get quite
large. You might want to move them to a larger drive to free disk space
on your system drive, or to a faster drive to improve performance.
Number of Recent Items to Display. Enter the number of recent les
you want to display on the Open Recent submenu of the File menu.
Always Save Preview Images with Documents. Turn this option on
to save a preview image of the document with the document le. e
preview slightly increases the le size. We leave this turned o.
Snippet Import Options. When you import an InDesign snippet
(see Chapter 7, “Importing and Exporting”), you can choose to have
the snippet appear at its original location (that is, the position it
occupied in its document of origin), or at the current cursor location.
To do the former, turn on Position at Original Location; to do the
latter, turn on Position at Cursor Location.
Check Links Before Opening Document. Turn this option on to
have InDesign check the link status of the imported les in the docu-
ment as you open the document; turn it o to manage links youself
using the Links panel (see Chapter 6, “Importing and Exporting”).
Find Missing Links Before Opening Document. If you have turned
on the Check Links Before Opening Document option, you can
also choose to have InDesign look for missing links as it opens the
document.
Create Links When Placing Text and Spreadsheet Files. When you
imported text or Excel les into InDesign 1.x and 2, InDesign always
maintained a link to the original le on disk (unless you manually
unlinked it in the Links panel). is caused all sorts of confusion, so
Adobe made it a preference. Now, by default, imported non-picture
les are not linked. If you want them to be linked, then turn on the
Create Links When Placing Text and Spreadsheet Files option. We
discuss this in more depth in Chapter 3, “Text.”
Preserves Image Dimensions When Relinking. When you use the
Links panel to update or relink a the linked graphic, should the new
or updated graphic be scaled to match the dimensions of the existing
graphic, or should it take on the same scaling as the existing graphic?
Real_World_Adobe_InDesign_CS4b.pdf 74Real_World_Adobe_InDesign_CS4b.pdf 74 08/04/2009 05:54:11 p.m.08/04/2009 05:54:11 p.m.
To do the former, which can result in the replacement graphic being
distorted, turn this option on.
When you copy data out of an application and switch out of that
application, the program writes data to the system Clipboard so that
it can be pasted into other applications. Applications oen post mul-
tiple data formats to the Clipboard in the hope that at least one of
them will be readable by the application you want to paste the data
into. In InDesign, you use the Clipboard Handling pane of the Pref-
erences dialog box to control the way that InDesign works with the
Clipboard (see Figure 1-57).
Prefer PDF When Pasting. Some applications (notably Illustrator)
can put PDF format data on the system Clipboard. InDesign can
paste this data as an imported PDF graphic. Whether this is a good
thing is debatable—personally, if we want an Illustrator PDF le in
InDesign, we’d much rather save it to disk and import it using Place
(see Chapter 7, “Importing and Exporting”). However, sometimes
we want to paste Illustrator paths into InDesign as editable objects
(rather than as a non-editable graphic). If you want to paste paths
from Illustrator, turn o the Prefer PDF When Pasting option.
Copy PDF to Clipboard/Preserve PDF Data At Quit. InDesign can
put PDF data on the Clipboard, too. is lets you copy something
out of InDesign and paste it elsewhere, such as Illustrator (which
can convert the PDF into editable objects). If you want InDesign to
put PDF data on the Clipboard, turn on the Copy PDF to Clipboard
option. Turn on Preserve PDF Data at Quit to prevent InDesign from
clearing the Clipboard when you quit.
Clipboard Preferences
-
Clipboard Handling
Preferences
Real_World_Adobe_InDesign_CS4b.pdf 75Real_World_Adobe_InDesign_CS4b.pdf 75 08/04/2009 05:54:11 p.m.08/04/2009 05:54:11 p.m.
.
When Pasting Text and Tables from Other Applications. When you
switch from one application to another, copied text typically appears
on the Clipboard as both RTF and plain text. RTF carries format-
ting with it; plain text doesn’t. If you want to retain the RTF for-
matting when you paste text into InDesign from Microso Word or
some other program, turn on the All Information (Index Markers,
Swatches, Styles, etc.) option. To have pasted text take on the attri-
butes of the text or text frame you’re pasting it into, turn on the Text
Only option.
Setting Defaults
“Defaults” are the settings you begin with when you start InDe-
sign. InDesign’s defaults control page size, ll type and stroke color,
available styles, type specications, and other details. InDesign has
two kinds of defaults—application defaults and document defaults.
Application defaults determine the appearance and behavior of all
new publications; document defaults control the specications of
objects you create in a particular publication.
Neither document defaults nor application defaults change any
existing objects or publications—you can change the defaults at any
time without harming publications you’ve already laid out.
When you create a new InDesign publication, do you immedi-
ately add a set of colors to the Colors panel, change the default line
weight, display the rulers, and add styles to the Style panel? If you do,
you probably get tired of making those changes over and over again.
Wouldn’t it be great if you could tell InDesign to create new docu-
ments using those settings?
You can. To set InDesign’s application defaults, close all publi-
cations (without closing InDesign), then, with no publication open
(what we like to call the “no pub state,” or, as our good friend Steve
Broback would say, “Utah”), add or remove styles and colors, set type
specications, and otherwise make the changes you’ve been making
in each new publication.
e next time you create a new InDesign publication, it’ll appear
with the settings you specied.
Some document properties cannot be set as application defaults—
you cannot, for example, create a new layer or add master pages.
You may occasionally want to delete your preferences and start from
scratch. To do this, hold down Command-Option-Shi-Control (on
the Mac OS) or Ctrl-Alt-Shi (in Windows) as you start InDesign.
Reverting to InDesign’s
Original Defaults
Real_World_Adobe_InDesign_CS4b.pdf 76Real_World_Adobe_InDesign_CS4b.pdf 76 08/04/2009 05:54:11 p.m.08/04/2009 05:54:11 p.m.
Publication Navigation
InDesign oers three ways to change your view of the publica-
tion: zooming, scrolling, and moving from page to page. Zooming
changes the magnication of the area inside the publication window.
Scrolling changes the view of the publication in the publication
window without changing the magnication.
When you zoom in and out on a page, you are using an electronic
magnifying glass, rst enlarging a particular area of a page and then
reducing your screen view so that you are seeing the entire page or
pages at once. InDesign lets you magnify or reduce your screen view
from 5 percent to 4,000 percent.
Zooming with the View menu. e View menu oers InDesign’s
“standard” magnications, or views, and provides keyboard short-
cuts for most of them (see Table 1-3). In fact, some of the keyboard
shortcuts in the table should probably just be committed to memory,
as they don’t appear in the View menu—such as Command-2/Ctrl-2
to zoom to 200-percent view, and Command-Option-2/Ctrl-Alt-2 to
zoom back to the last magnication you used.
All of these commands except Fit Page in Window and Fit Spread
in Window center the object you’ve selected in the publication
window. If you don’t have an object selected, these shortcuts zoom
in or out based on the center of the current view. Fit Page In Window
centers the current page in a publication window. is makes Fit
Page In Window the perfect “zoom-out” shortcut.
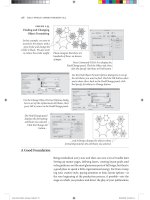
Fit Selection In Window. Another view command we use all of the
time is Fit Selection In Window. Don’t bother looking for it on the
View menu—it’s not there. Instead, it appears on the context menu
when you have an object selected. It does just what it says—zooms
(in or out) on the current selection and centers it in the publication
window (see Figure 1-58). Press Command-Option-=/Ctrl-Alt-= to
zoom to the Fit Selection In Window view. When text is selected, this
shortcut ts the text frame containing the text in the window.
Zooming with the Zoom tool. Another method: choose the Zoom
tool, point at an area in your publication, and click. InDesign zooms
to the next larger view size (based on your current view—from 100%
to 200%, for example), centering the area you clicked on. Hold down
Option/Alt and the plus (“+”) in the Zoom tool changes to a minus
(“-”). Click the Zoom tool to zoom out.
Zooming
Real_World_Adobe_InDesign_CS4b.pdf 77Real_World_Adobe_InDesign_CS4b.pdf 77 08/04/2009 05:54:11 p.m.08/04/2009 05:54:11 p.m.
.
To zoom to this view: Press:
Actual size (100%) Command-1/Ctrl-1
200% Command-2/Ctrl-2
400% Command-4/Ctrl-4
50% Command-5/Ctrl-5
Fit Page in Window Command-0/Ctrl-0
Fit Spread in Window Command-Option-0/Ctrl-Alt-0
Zoom in Command-+/Ctrl-+
Zoom out Command (minus)/Ctrl (minus)
Last zoom Command-Option-2/Ctrl-Alt-2
-
View Shortcuts
It doesn’t really matter where
the selection is hiding. Press
Command-Option-=/Ctrl-
Alt-= (or choose Fit Selection
in Window from the Context
menu)…
…and InDesign will nd it and
display it front and center.
-
Fit Selection in Window
Switching to the Zoom Tool. Press Command-Spacebar/Ctrl-Space-
bar to temporarily switch from any tool to the Zoom tool to zoom
in; or hold down Command-Option-Spacebar/Ctrl-Alt-Spacebar to
zoom out.
Zooming with “Power Zoom.” We’re not kidding—that’s what it’s
called. To use this feature, switch to the Hand tool, then hold down
the (le) mouse button. Aer a second, InDesign displays a red
frame in the window. You can move the mouse to change the area
selected, and you can make the frame larger or smaller using the
mouse scroll wheel. When you release the mouse button, InDesign
zooms in or out to t the area in the window (see Figure 1-59).
e Best Way to Zoom. To zoom in, press Command/Ctrl and hold
down Spacebar to turn the current tool (whatever it is) into the Zoom
Real_World_Adobe_InDesign_CS4b.pdf 78Real_World_Adobe_InDesign_CS4b.pdf 78 08/04/2009 05:54:11 p.m.08/04/2009 05:54:11 p.m.
-
Power Zoom
tool, then drag the Zoom tool in the publication window. As you
drag, a rectangle (like a selection rectangle) appears. Drag the rect-
angle around the area you want to zoom in on, and release the mouse
button. InDesign zooms in on the area, magnifying it to the magni-
cation that ts in the publication window (see Figure 1-60).
To zoom out, use one of the keyboard shortcuts—Command-0/
Ctrl-0 (for Fit Page In Window) is especially handy. It’s even better if
you redene the shortcut to make it easier to reach with one hand—
why take your hand o of the mouse if you don’t need to?
Entering a magnication percentage. To zoom to a specic magni-
cation percentage, enter the percentage in the Magnication eld
and press Return/Enter. To “jump” into the Magnication eld,
press Command-Option-5/Ctrl-Alt-5. InDesign zooms to the per-
centage you specied (centering the selection, if any, as it does so).
As we said earlier in this chapter, we rarely use the scroll bars to scroll.
So how do we change our view of our publications? We use the Hand
tool (also known as the “Grabber Hand”), or we let InDesign do the
scrolling for us as we move objects.
Scrolling with the Hand tool. So how do you use the Hand tool? As
usual, there are several ways. Sure, you can always click on the Hand
tool in the Tools panel, or press H to switch to the Hand tool. But
it’s better to use the keyboard shortcut that always works, no matter
Scrolling
Switch to the Hand tool, then
hold down the le mouse
button. InDesign displays
a red frame in the window
(you’ll just have to imagine
that this is red).
Use the scroll wheel to enlarge or
reduce the frame, and move the
mouse to change its posion.
Release the mouse button,
and InDesign ts the
framed area in the window.
Real_World_Adobe_InDesign_CS4b.pdf 79Real_World_Adobe_InDesign_CS4b.pdf 79 08/04/2009 05:54:11 p.m.08/04/2009 05:54:11 p.m.
.
Drag the Zoom tool around the area
you want to magnify.
InDesign zooms in on the area you
dened by dragging.
Hold down Command-
Spacebar/Ctrl-Spacebar to
switch to the Zoom tool.
-
Drag Magnication
Hold down Option-Spacebar/Alt-
Spacebar to switch to the Hand tool,
then drag the Hand tool to scroll.
When the publication window looks
the way you want it to, stop dragging.
-
Using the Hand Tool
what tool you have selected: Option/Alt-spacebar (see Figure 1-62).
is shortcut is temporary—release it, and you’ll go back to whatever
tool you had selected.
e Hand tool even works inside the Pages panel (though you
don’t need to hold anything down or choose a tool to use it there).
Scrolling as you drag objects. Don’t forget that you can change your
view by dragging objects o the screen. If you know an object should
be moved to some point outside your current view, select the object
and do one of the following things:
To scroll down, drag the cursor into the scroll bar at the bottom
of the publication window. Don’t drag the cursor o the bottom
of the screen—InDesign won’t scroll if you do this (for some
unknown reason).
Real_World_Adobe_InDesign_CS4b.pdf 80Real_World_Adobe_InDesign_CS4b.pdf 80 08/04/2009 05:54:12 p.m.08/04/2009 05:54:12 p.m.
To scroll to the right, move the cursor into the vertical scroll bar,
or drag the cursor o of the le edge of the screen.
To scroll to a point above your current view, drag the cursor into
the horizontal ruler.
To scroll to the le, drag the cursor into the vertical ruler (or o
the screen, if the ruler is not visible).
e window scrolls as long as the mouse button is down. Some-
times it’s the best way to get something into position.
InDesign won’t let you drag objects to an area in the publication
window that is behind a panel. If you drag the cursor into any panel
other than the Library panel, InDesign displays the “prohibited”
symbol. When you drop objects you’re dragging into an area cov-
ered by a panel, InDesign bounces the objects back to their original
locations. You can’t hide panels while you’re dragging objects, so you
might want to hide the panels before you begin dragging.
Scrolling with a Scroll Wheel. If your mouse has a scroll wheel,
InDesign probably supports it (no promises—there are lots of dier-
ent mice). Move the scroll wheel to scroll the window up and down,
or hold down Option/Alt as you move the scroll wheel zoom.
e scroll wheel even works inside panels—this is especially
useful in the Pages panel panel, but it also comes in handy when, or
when you need to scroll through long lists of styles in the Paragraph
Styles pane.
One of the best navigation shortcuts doesn’t appear in the menu:
Command-J/Ctrl-J, for Go To Page (it displays the Go to Page dialog
box—where you can enter the page you want to jump to).
Because two of the page-navigation features in the Layout menu
have odd names (Go Back and Go Forward) and are set apart in the
menu, most people don’t know what they do. at’s a pity, because
these are two of the coolest ways to navigate your document. InDe-
sign is forever watching what pages you’re working on and lets you
return to them quickly. For example, let’s say you’re working on page
9 when you jump to page 25 to make a quick change and then jump
to page 81 to see how the change aected the end of the story. Now
you can press Command-Up Arrow/Ctrl-Up Arrow (Go Back) to
jump back to page 25, and press it again to return to page 9. Want
to return to page 25? Press Command-Down Arrow (Go Forward).
Jump to Page
Real_World_Adobe_InDesign_CS4b.pdf 81Real_World_Adobe_InDesign_CS4b.pdf 81 08/04/2009 05:54:12 p.m.08/04/2009 05:54:12 p.m.
.
Text place icon (manual ow)
Text place icon (semi-automatic ow)
Text place icon (autoow)
Graphic place icon
Image place icon
Text place icon (in frame)
Text place icon (autoow, in frame)
Image place icon (in frame)
Graphic place icon (in frame)
PDF place icon
Multi-le place icon
-
Place Icons
Place Icons
When you place (that is, import) a le, InDesign changes the cursor
into an icon called a “place icon,” or “place gun” (see Figure 1-62).
You can click the place icon to specify the position of the upper-le
corner of the incoming le, or you can drag the place icon to dene
the width and height of the le.
We’ll talk more about place icons in the next chapter, again in
Chapter 3, “Text,” and in Chapter 7, “Importing and Exporting.”
Managing InDesign’s Plug-Ins
Everything you see in InDesign is provided by a plug-in. e “appli-
cation” itself is little more than a plug-in manager. e functions we
traditionally think of as being central to a page layout application—
things like text composition, text editing, or basic drawing tools—
they’re all plug-ins. We’re not kidding.
is means that you can turn plug-ins on and o to customize
InDesign to the way that you work and the publications you work
with. Specically, you can turn o the plug-ins you don’t use.
To dene the plug-ins InDesign will load the next time you start
the program, choose Congure Plug-ins from the InDesign menu
(on the Macintosh), or from the Help menu (in Windows). InDesign
displays the Congure Plug-ins dialog box (see Figure 1-63).
Why would you want to turn plug-ins o? Simple—to reduce the
amount of memory taken up by InDesign and to increase the speed
of the application (slightly).
Some plug-ins are required by InDesign—they’re the ones with
the little padlock next to them. But all of the other plug-ins are fair
game. Never use the Info panel? Turn it o!
Real_World_Adobe_InDesign_CS4b.pdf 82Real_World_Adobe_InDesign_CS4b.pdf 82 08/04/2009 05:54:12 p.m.08/04/2009 05:54:12 p.m.
On with the Tour
At this point in the InDesign tour, we’ve seen most of the sights. Don’t
worry if you’re a little confused—it’s hard to take it all in at once. In
the following chapters, we’ll help you put the tools in context—so
far, we’ve just talked about what the tools are. In the rest of the book,
we’ll talk about what you can do with them.
-
Congure Plug-ins
Dialog Box
Before you add a new
plug-in or set of plug-
ins, save your current
plug-in set. is way,
if you decide you don’t
want to use the new
plug-in, you can easily
revert to the “snapshot”
you’ve taken of your
plug-in conguration.
We’ve used this tip
several times in the
making of this book.
Real_World_Adobe_InDesign_CS4b.pdf 83Real_World_Adobe_InDesign_CS4b.pdf 83 08/04/2009 05:54:12 p.m.08/04/2009 05:54:12 p.m.
Now that you know what’s what, and what’s where, in InDesign, it’s
time to create an InDesign publication and set up some pages. As
you work your way through the process of dening the page size,
margins, column layout, and master pages for your new publication,
think ahead. How will the publication be printed? How will it be
bound? Will you need to create a dierent version of the publication
for a dierent paper size (such as switching from US Letter to A4 for
an international edition)? Will you need to create a dierent version
of the publication for online distribution?
We know that having to think about these things and make design
decisions early in the process can be boring. And InDesign makes it
relatively easy to make changes to your layout late in the produc-
tion process. Easy, but not without a certain amount of trouble. How
high is your threshold of pain? Will it decrease as your deadline
approaches? You decide.
Page Layout
2
Real_World_Adobe_InDesign_CS4b.pdf 84Real_World_Adobe_InDesign_CS4b.pdf 84 08/04/2009 05:54:12 p.m.08/04/2009 05:54:12 p.m.
Creating a New Publication
When you choose New from the File menu, InDesign displays the
New Document dialog box (see Figure 2-1). You use the controls in
this dialog box to set up the basic layout of the pages in your publica-
tion. Don’t worry—you’re not locked into anything; you can change
these settings at any time, or override any of them for any page or
page spread in your publication. Getting them right at this point,
however, might save you a little time and trouble later on.
Number of Pages. How many pages do you want? We tend to
start with one page and add pages as we go along, but you might
want to think ahead and add a bunch at once.
Note: To enter the starting page number of the document, you
use section options (in the Pages panel; see “Dening Sections,”
later in this chapter).
…or enter a custom page
size using these elds.
Choose a page size from
this pop-up menu…
Enter the number
of columns and
the width of the
gutter between
columns. is
setting can be
overridden on
document pages
or master pages.
Enter page margin settings
in the elds in this section.
Note that the margin settings
of individual pages override
these settings.
Inside margin
Outside margin
If you turn o the Facing
Pages option, the “Inside”
and “Outside” elds change
to read “Right” and “Le.”
To show Bleed
and Slug, click
the More Options
button. To hide
them, click Fewer
Options.
You can add or
remove page sizes
from the Page Size
pop-up menu
by editing the New
Doc Sizes.txt le
(in the Presets
folder inside your
InDesign folder).
-
e New Document
Dialog Box
Real_World_Adobe_InDesign_CS4b.pdf 85Real_World_Adobe_InDesign_CS4b.pdf 85 08/04/2009 05:54:12 p.m.08/04/2009 05:54:12 p.m.