Adobe Dreamweaver CS3 Unleashed- P7 ppsx
Bạn đang xem bản rút gọn của tài liệu. Xem và tải ngay bản đầy đủ của tài liệu tại đây (868.44 KB, 50 trang )
Part II: Static Web Page Development
CHAPTER 5 Web Page Structuring Using Tables
CHAPTER 6 Page Formatting Using Cascading Style Sheets
CHAPTER 7 Page Structuring Using Cascading Style Sheets
CHAPTER 8 Working with Frames and Framesets
CHAPTER 9 Working with HTML Forms
CHAPTER 10 Using Dreamweaver Behaviors
Chapter 5. Web Page Structuring Using Tables
IN THIS CHAPTER
Inserting and Working with Tables
Selecting Table Elements
Modifying Table Properties Using the Property Inspector
Modifying Cell Properties Using the Property Inspector
Working with Tables in Expanded Tables Mode
Inserting and Working with Tables in Layout Mode
Drawing Tables
Drawing Cells
Importing Tabular Data
One of the biggest complaints print designers have, when moving from print design to web design, is the
fact that HTML is so finicky. More specifically, the placement of elements within your web pages is limited
because of the lack of tools available to control the organization of text, images, and media within the page.
Although this may be true to a certain extent, HTML is, in fact, extremely flexible and offers many rich
elements that can be used to control the organization of components. As the book unfolds, you'll learn about
various elements and technologies Dreamweaver offers to control the pinpoint accurate placement of
elements on your page. Technologies such as CSS and options such as AP Elements and tables can be used
by web developers who strive for the fluid look print design programs have offered for years. The trick is
learning the intricacies of the elements and how Dreamweaver allows you to work with them within its
framework.
In this chapter, we'll begin to move from the simplicities of inserting and modifying elements on the page to
a richer topic that involves structuring and placing elements on the page using HTML tables. As you'll begin
to see, tables offer a flexible and simple alternative to the basic formatting techniques we've covered thus
far for controlling the placement of elements within your web pages.
To work with the examples in this chapter, visit www.dreamweaverunleashed.com to download the exercises
files used in this and other chapters. Place the files located in Chapter
05\Exercises\Beginning\VectaCorp, into a folder on your computer so that they're easy to reference. I'll
place mine in C:\VectaCorp\Chapter05. You may need to update the site definition so that it points to the
newest (more recent) path.
Inserting and Working with Tables
If you remember, in Chapter 2, "Building a Web Page," the development of our Vecta Corp web page was
severely limited to inserting text and images in a vertical, linear fashion. Elements on the page were
organized so that we inserted text and images, followed by a line break, then either more text or another
image, and then repeated the process until the page looked somewhat presentable. Although this process
may work for simple web pages, it reveals drawbacks that become immediately obvious when large amounts
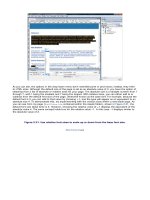
of text are added to the page. As you can see from Figure 5.1, the background image that we added to the
page begins to repeat itself near the bottom of the companydirectory.html page.
Figure 5.1. The background image begins to repeat itself near the bottom when there's too much
text on the page.
[View full size image]
The reason for this flaw may not seem immediately clear, but it begins to reveal itself with some
explanation. The image we used for the background (header_bg.gif) is 1 pixel wide by 2000 pixels high.
The positive side is that the image always tiles horizontally no matter how wide we make the page. The
downside is that the image is 2000 pixels high, and because the natural viewing of pages is such that users
navigate up and down, if the page exceeds that 2000 pixel height, the image will tile vertically as it does
horizontally. Another problem, visible in Figure 5.2, is that no definitive break exists between paragraphs.
Depending on how the page's width is resized, the text and images may run together.
Figure 5.2. Because there's no definitive break between paragraphs, text and images may run
together.
[View full size image]
Although these design flaws are minor, they begin to demonstrate the complexity that our designs could
potentially hold. As your web pages become more intricate and complex, structuring your web pages using
elements such as tables becomes a viable alternative.
Working with tables in Dreamweaver can be a complex process depending on how intricate your design
becomes. To walk you through all the table-based features exposed by Dreamweaver, we'll rebuild our
Vecta Corp website from scratch. Not only will this help you understand all the features available for working
with tables in Dreamweaver, it will also show you how the small design flaws mentioned previously can be
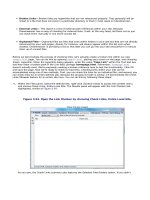
avoided by using tables to structure your pages instead. To insert a new table, create a new blank HTML
page and then choose Insert, Table. The Table dialog appears; set it up so it appears the way it does in
Figure 5.3.
Figure 5.3. Insert and format basic properties for a table from the Table dialog.
The features outlined within the Table dialog should start looking relatively familiar. If you've used word-
processing, database, or spreadsheet programs, the concept of rows, columns, and headers should be
recognizable.
Note
Tables were never meant to be a way to structure HTML elements on the page; they were meant to
be a means of structuring large amounts of tabular data in a well-formed and ordered format. Over
time, web designers realized that the concept of rows and columns could easily structure images,
text, and media elements within a page. Although this method has stood the test of time and still
remains the most consistent and backward compatible format, newer methods in CSS have become
more prominent and are slowly becoming the new standard for structuring elements within your web
pages. We'll cover using CSS to structure web pages in the next chapter.
The features provided for working with tables in HTML go far beyond the simplicities of rows and columns.
The Table dialog displays a few options, separated into three parts: Table Size, Header, and Accessibility. A
detailed list of the features outlined within these three parts is given next:
Rows— Enter a number within this text box to set the number of rows the table will contain.
Columns— Enter a number within this text box to set the number of columns (cells within a row) the
table will have.
Table width— Enter a number within this text box to set the width, in either pixels or a percentage, a
table will have.
Border thickness— Enter a number within this text box to set the thickness of the border in pixels
that the borders will have. If you don't enter a value here, browsers will interpret the border thickness
as 1. To avoid this problem, either enter a numeric value greater than 0, or if you don't want a border,
enter 0.
Cell padding— Enter a number within this text box to set the padding value between the contents of
a cell and the cell border. If you don't enter a value here, browsers will interpret the cell padding as 1.
To avoid this problem, either enter a numeric value greater than 0, or if you don't want cell padding,
enter 0.
Cell spacing— Enter a number within this text box to set the spacing between cells. If you don't enter
a value here, browsers will interpret the cell spacing as 2. To avoid this problem, either enter a
numeric value greater than 0, or if you don't want cell spacing, enter 0.
Header— Headers are a quick way of formatting rows within a table so that the contents within the
header are centered and boldface. Four options exist when working with Headers. Choose None (the
default) if you don't want a header within your table. Choose Left if you'd like to have the left column
of the table designated as a header, choose Top if you'd like to designate the top row of the table as a
header, and choose Both if you'd like to designate both the top and left portions of the table as
headers.
Caption— As an accessibility option, enter a value within this text box to have text appear outside of
the table describing contents within it. More on this feature can be found in Appendix A, "Accessibility."
Align caption— Choose an option from this menu to set the alignment of the caption in relation to the
table. Five options exist within this list, including Default (Center), Top, Bottom, Left, and Right. More
on this feature can be found in Appendix A.
Summary— An important accessibility option is the summary attribute of the table. Because screen
readers cannot decipher the contents within a table accurately, entering a brief description here
ensures that users with screen readers can get a clear portrayal of the contents of your table. More on
this feature can be found in Appendix A.
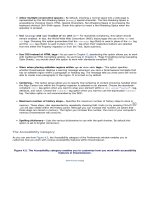
After you've formatted the Table dialog appropriately, click OK to insert the new table into the page. The
new table should resemble Figure 5.4.
Figure 5.4. The new table is inserted into the page.
[View full size image]
Part II: Static Web Page Development
CHAPTER 5 Web Page Structuring Using Tables
CHAPTER 6 Page Formatting Using Cascading Style Sheets
CHAPTER 7 Page Structuring Using Cascading Style Sheets
CHAPTER 8 Working with Frames and Framesets
CHAPTER 9 Working with HTML Forms
CHAPTER 10 Using Dreamweaver Behaviors
Chapter 5. Web Page Structuring Using Tables
IN THIS CHAPTER
Inserting and Working with Tables
Selecting Table Elements
Modifying Table Properties Using the Property Inspector
Modifying Cell Properties Using the Property Inspector
Working with Tables in Expanded Tables Mode
Inserting and Working with Tables in Layout Mode
Drawing Tables
Drawing Cells
Importing Tabular Data
One of the biggest complaints print designers have, when moving from print design to web design, is the
fact that HTML is so finicky. More specifically, the placement of elements within your web pages is limited
because of the lack of tools available to control the organization of text, images, and media within the page.
Although this may be true to a certain extent, HTML is, in fact, extremely flexible and offers many rich
elements that can be used to control the organization of components. As the book unfolds, you'll learn about
various elements and technologies Dreamweaver offers to control the pinpoint accurate placement of
elements on your page. Technologies such as CSS and options such as AP Elements and tables can be used
by web developers who strive for the fluid look print design programs have offered for years. The trick is
learning the intricacies of the elements and how Dreamweaver allows you to work with them within its
framework.
In this chapter, we'll begin to move from the simplicities of inserting and modifying elements on the page to
a richer topic that involves structuring and placing elements on the page using HTML tables. As you'll begin
to see, tables offer a flexible and simple alternative to the basic formatting techniques we've covered thus
far for controlling the placement of elements within your web pages.
To work with the examples in this chapter, visit www.dreamweaverunleashed.com to download the exercises
files used in this and other chapters. Place the files located in Chapter
05\Exercises\Beginning\VectaCorp, into a folder on your computer so that they're easy to reference. I'll
place mine in C:\VectaCorp\Chapter05. You may need to update the site definition so that it points to the
newest (more recent) path.
Inserting and Working with Tables
If you remember, in Chapter 2, "Building a Web Page," the development of our Vecta Corp web page was
severely limited to inserting text and images in a vertical, linear fashion. Elements on the page were
organized so that we inserted text and images, followed by a line break, then either more text or another
image, and then repeated the process until the page looked somewhat presentable. Although this process
may work for simple web pages, it reveals drawbacks that become immediately obvious when large amounts
of text are added to the page. As you can see from Figure 5.1, the background image that we added to the
page begins to repeat itself near the bottom of the companydirectory.html page.
Figure 5.1. The background image begins to repeat itself near the bottom when there's too much
text on the page.
[View full size image]
The reason for this flaw may not seem immediately clear, but it begins to reveal itself with some
explanation. The image we used for the background (header_bg.gif) is 1 pixel wide by 2000 pixels high.
The positive side is that the image always tiles horizontally no matter how wide we make the page. The
downside is that the image is 2000 pixels high, and because the natural viewing of pages is such that users
navigate up and down, if the page exceeds that 2000 pixel height, the image will tile vertically as it does
horizontally. Another problem, visible in Figure 5.2, is that no definitive break exists between paragraphs.
Depending on how the page's width is resized, the text and images may run together.
Figure 5.2. Because there's no definitive break between paragraphs, text and images may run
together.
[View full size image]
Although these design flaws are minor, they begin to demonstrate the complexity that our designs could
potentially hold. As your web pages become more intricate and complex, structuring your web pages using
elements such as tables becomes a viable alternative.
Working with tables in Dreamweaver can be a complex process depending on how intricate your design
becomes. To walk you through all the table-based features exposed by Dreamweaver, we'll rebuild our
Vecta Corp website from scratch. Not only will this help you understand all the features available for working
with tables in Dreamweaver, it will also show you how the small design flaws mentioned previously can be
avoided by using tables to structure your pages instead. To insert a new table, create a new blank HTML
page and then choose Insert, Table. The Table dialog appears; set it up so it appears the way it does in
Figure 5.3.
Figure 5.3. Insert and format basic properties for a table from the Table dialog.
The features outlined within the Table dialog should start looking relatively familiar. If you've used word-
processing, database, or spreadsheet programs, the concept of rows, columns, and headers should be
recognizable.
Note
Tables were never meant to be a way to structure HTML elements on the page; they were meant to
be a means of structuring large amounts of tabular data in a well-formed and ordered format. Over
time, web designers realized that the concept of rows and columns could easily structure images,
text, and media elements within a page. Although this method has stood the test of time and still
remains the most consistent and backward compatible format, newer methods in CSS have become
more prominent and are slowly becoming the new standard for structuring elements within your web
pages. We'll cover using CSS to structure web pages in the next chapter.
The features provided for working with tables in HTML go far beyond the simplicities of rows and columns.
The Table dialog displays a few options, separated into three parts: Table Size, Header, and Accessibility. A
detailed list of the features outlined within these three parts is given next:
Rows— Enter a number within this text box to set the number of rows the table will contain.
Columns— Enter a number within this text box to set the number of columns (cells within a row) the
table will have.
Table width— Enter a number within this text box to set the width, in either pixels or a percentage, a
table will have.
Border thickness— Enter a number within this text box to set the thickness of the border in pixels
that the borders will have. If you don't enter a value here, browsers will interpret the border thickness
as 1. To avoid this problem, either enter a numeric value greater than 0, or if you don't want a border,
enter 0.
Cell padding— Enter a number within this text box to set the padding value between the contents of
a cell and the cell border. If you don't enter a value here, browsers will interpret the cell padding as 1.
To avoid this problem, either enter a numeric value greater than 0, or if you don't want cell padding,
enter 0.
Cell spacing— Enter a number within this text box to set the spacing between cells. If you don't enter
a value here, browsers will interpret the cell spacing as 2. To avoid this problem, either enter a
numeric value greater than 0, or if you don't want cell spacing, enter 0.
Header— Headers are a quick way of formatting rows within a table so that the contents within the
header are centered and boldface. Four options exist when working with Headers. Choose None (the
default) if you don't want a header within your table. Choose Left if you'd like to have the left column
of the table designated as a header, choose Top if you'd like to designate the top row of the table as a
header, and choose Both if you'd like to designate both the top and left portions of the table as
headers.
Caption— As an accessibility option, enter a value within this text box to have text appear outside of
the table describing contents within it. More on this feature can be found in Appendix A, "Accessibility."
Align caption— Choose an option from this menu to set the alignment of the caption in relation to the
table. Five options exist within this list, including Default (Center), Top, Bottom, Left, and Right. More
on this feature can be found in Appendix A.
Summary— An important accessibility option is the summary attribute of the table. Because screen
readers cannot decipher the contents within a table accurately, entering a brief description here
ensures that users with screen readers can get a clear portrayal of the contents of your table. More on
this feature can be found in Appendix A.
After you've formatted the Table dialog appropriately, click OK to insert the new table into the page. The
new table should resemble Figure 5.4.
Figure 5.4. The new table is inserted into the page.
[View full size image]
Selecting Table Elements
Before we begin formatting the page using a table, it's important to touch on some important concepts,
including a topic as simple as selecting the table and elements such as rows and cells within the table. As
your designs become more and more complex, you'll begin to work with numerous tables within a page,
including tables within table cells, also known as nested tables. When that time comes, the skills you learn
within this section will become invaluable.
There are numerous ways to select a table. These methods are outlined next:
You can select the table by clicking, holding the cursor on the page, and then dragging it into the
table.
You can place your cursor into any cell within the table, at which point the Table Widths Visual Aid
appears. From the Table Widths Visual Aid's menu, you can choose the Select Table as shown in Figure
5.5.
Figure 5.5. Choose the Select Table option from the Table Widths Visual Aid's list.
[View full size image]
Tip
You can hide the Table Widths Visual Aid by selecting View, Visual Aids, Table Widths or by
clicking Visual Aids on the Document toolbar and selecting the Table Widths option from the
list.
You can place your cursor within a cell and choose the <table> tag from the Tag Selector within the
Document window's status bar.
You can right-click (Control+click) within a cell to access the context menu and then choose the Select
Table option from the Table submenu shown in Figure 5.6.
Figure 5.6. You can select a table by choosing Table, Select Table option from the contextual
menu.
[View full size image]
You can choose Modify, Table, Select Table.
You can hold down the Ctrl ( ) key and select the outer border of the table. You'll notice that as you
roll over the outer border of the table, it highlights red. Clicking after you've rolled over it will select
the table.
Whatever method you choose from the preceding list, the result is the same—the table is selected. This is
obvious because of the black border that is placed around the table. You can also select individual rows and
columns by choosing from one of the methods listed next:
By placing your cursor either just to the left of the table row or just above the table column, you can
select a row or column, respectively. Doing so changes the cursor to a black arrow and also highlights
the row or column in red. A column has been selected in Figure 5.7. Clicking the mouse will select the
row or column and highlight the element(s) with the same black border you saw when you selected
the table.
Figure 5.7. Place your cursor just to the left of the row to select a row or just above the
column to select a column. The cursor will change to an arrow and the row or column will be
highlighted.
[View full size image]
By placing your cursor within any cell and choosing the <tr> tag from the Tag Selector, you can select
that cell. You can also select an individual cell by placing your cursor within the cell and choosing the
<td> tag from the Tag Selector.
Holding down the Ctrl ( ) key and selecting an individual cell. You'll notice that as you roll over a
cell, it highlights red. Clicking the cell after you've rolled over it will select it.
Modifying Table Properties Using the Property Inspector
For precise formatting of tables, it's essential that you become familiar with the options exposed by the
Table Property inspector. Shown in Figure 5.8, this Property inspector becomes available when the table is
selected (for more on selecting tables, see the previous section).
Figure 5.8. Format table attributes from within the Table Property inspector.
[View full size image]
The Table Property inspector allows you to customize the following attributes (moving from left to right):
ID
Rows and Columns
Width
Cell Padding and Cell Spacing
Alignment
Border
CSS Class
Clear Column Widths or Heights
Convert Table Widths to Pixels
Convert Table Widths to Percent
Background Color
Background Image
Border Color
To demonstrate the use and functionality of these attributes and formatting options, let's rebuild the main
page (index.html) of the Vecta Corp site.
If you open the index.html file for this chapter, it'll appear to be a blank document, but a couple of minor
changes have been made. First, the title, margin widths, and margin heights have all been set for you.
Second, the header_bg.gif image isn't included. As a matter of fact, this clunky (1 pixel by 2,000 pixel)
image is no longer needed; it's being replaced by a smaller, faster downloading version. You'll see why and
how a bit later.
To begin this exercise, insert a new table into the Document window by selecting Insert, Table. When the
Table dialog opens, format the options in the table dialog so that it contains 1 row, 1 column, has a width of
100 percent, contains no border, no cell padding, and no cell spacing. The configured Table dialog box will
look like Figure 5.9.
Figure 5.9. Format the new table so that it contains 1 row, 1 column, has a width of 100 percent,
contains no border, no cell padding, and no cell spacing.
Click OK to insert the new table into the Document window. With the table now in the Document Window,
you'll notice a few details. First, and the most obvious, is that the table spans the entire width of the
Document window. Remember, this table is set to 100 percent. What that means is that no matter how I
stretch the Files panel group on the right, the table will always automatically adjust to accommodate the
width of the Document window—as it will do in the browser window as well. Second, you'll notice that the
Table Widths Visual Aid displays the width of the table as a percentage, but just to the right of that figure
displays the current width in pixels within parentheses. This value is simply for your information and is
useful to reference in case you ever need to convert the table's percentage to a pixel value instead. Finally,
you'll notice that even though we didn't specify a border, the table appears to contain a dotted border
surrounding the perimeter of the table. This is actually a visual aid and not a border. This visual aid, which
can be disabled by clicking the Visual Aids button on the Document toolbar and un-checking the Table
Borders option, won't show in the browser.
With the table selected, you can now begin modifying various attributes within the Property inspector. Let's
begin.
The Table ID
An attribute seldom used, the Table ID attribute allows you to uniquely identify the table so that it can be
referenced from client-side and server-side programming languages. This attribute is entirely optional and
will have no effect on the table if left empty. We'll use the Table ID as a simple way of identifying the tables
throughout the chapter. If I say select the content table, you'll know what table to select. If I indicate select
the header table, again, you'll know what table to select. With our existing table selected, enter the value
Header into the Table ID text box and press Enter (Return).
Adding and Removing Rows and Columns
As you might expect, there are numerous ways for adding and removing rows and columns after you've
inserted a table. You could delete the table and reinsert it if you really wanted to, but there are simpler
methods. For instance, to add a row, you could place your cursor within the cell and press the Tab key on
your keyboard. Doing this adds a new row. Alternatively, you could use the Insert Row option (press Ctrl+M/
+M) available from the Table submenu within both the context menu, invoked by right-clicking
(Control+clicking) the table, and the Modify menu. After the new row has been inserted, you can easily
remove it by accessing the Delete Row option (press Ctrl+Shift+M/ +Shift+M) from the Table submenu
within either the context menu or the Modify menu. Another, more flexible, alternative for inserting rows is
to use the Insert Rows or Columns dialog available from the Table submenu in both the context menu and
the Modify menu. Choosing this option opens the Insert Rows or Columns dialog (see Figure 5.10).
Figure 5.10. Use the Insert Rows or Columns dialog as an alternative method to inserting rows or
columns within your table.
With the dialog box open, you'll immediately notice that you are able to not only insert a new row below the
existing row, but also insert a new row above the existing row. Even better, you have the option of inserting
new columns before or after the column where your cursor is currently focused. Try entering the number 5
within the Number of Rows text box and click OK. As you can see from Figure 5.11, the rows are added to
the table.
Figure 5.11. New rows are added to the table using the Insert Rows or Columns dialog.
[View full size image]
It's important to note that the previous methods work only when your cursor is focused within a cell. You
can change the overall count of rows and columns for the table from the Property inspector by selecting the
table and changing the text box values for Rows and Cols. To return my table back to its original state, I'll
enter 1 within the Rows text box and press Enter (Return). The table will return back to its original state.
Changing Table Sizes
Aside from adding and removing rows and columns, you also have the capability to change the width and
height of the table directly from the Property inspector. You already saw how you can use the Table dialog
to initially set the width of the table (we set it to 100 percent); alternatively, you can set the width and
height of the table directly within the Property inspector. Because I know that the image header.gif will
reside within this table, and I know that the width of the image is 697 pixels, I'll change the width of the
table now to this number by placing my cursor within the W text box, typing 697, making sure pixels is
selected from the menu, and pressing Enter. As you can see from Figure 5.12, the width of the table is
affected.
Figure 5.12. Change the width of the table to 697 pixels from within the Property inspector.
[View full size image]
Note
You'll notice that there isn't an option for setting the height of the table. Whereas previous versions
of Dreamweaver supported a height text box just underneath the width text box, Dreamweaver CS3
opts to exclude it. The height attribute is considered a deprecated property and is no longer
supported in browsers other than Internet Explorer.
So that you really get a taste of the Property inspector's flexibility, remove the current 697 pixel width and
set it back to normal (100 percent). To do this, replace the 697 value from the W text box with the 100
value, select the percent option from the menu, and the table would automatically adjust itself back to its
original form.
Note
Even though you're not able to set the height of the table, you'll notice that the table's height never
fully collapses to nothing. By default, Dreamweaver inserts a nonbreaking space ( ) (visible
only in Code view or the Code inspector) character into each cell to make it easier for you to place
your cursor into the cell and begin working. If that nonbreaking space wasn't there, the table's height
would collapse and make it impossible for you to place your cursor within the cell to work.
As your web pages become increasingly complex, you'll begin to realize that keeping track of your table's
dimensions can get out of hand. If you ever feel like starting over, you can clear all widths and heights from
both the table and cells within the table using the Clear All Widths and Clear All Heights options. You can
access these options in one of three ways: First, you can choose these options from the Table Widths Visual
Aid's list as shown in Figure 5.13.
Figure 5.13. Select the Clear All Widths or Clear All Heights options to clear table or cell widths,
respectively.
[View full size image]
Second, you can clear column widths and column heights by clicking the Clear Column Widths and Clear
Column Heights buttons located just below and right of the Table ID field on the Property inspector. Finally,
you can perform the same operation by choosing the Clear Cell Heights and Clear Cell Widths options
located in Modify, Table submenu. Whichever method you choose results in the same action: either the
height (for cells) or width is removed.
Note
Unlike other table options such as cell padding, cell spacing, and border, leaving the W text box
empty in the Property inspector results in the browser interpreting the values as 0.
Setting a Background Color or Background Image
In Chapter 2, we discussed adding a background image to the page. The drawback to this method was
twofold. First, if the text within the page exceeded the background image's height, the background image
ended up tiling. To prevent the image from tiling, we could increase the height of the image within an image
editing program. The trade-off to this, however, is that the image size is increased, causing the size of the
page—and ultimately the download time—to go up as well. Fortunately, we can fix this dilemma with the use
of tables.
Up to this point, we've added a table to the page that is 100% wide. By adding the image that we would
normally use as the page background (header_bg.gif) as the background of the table instead, we keep the
horizontal tiling while eliminating the vertical tiling. This is possible thanks in part to the fixed 227 pixel
height of the header.gif image that we'll insert. Even better, because we're working with a fixed height of
227 pixels, we can crop the background image (header_bg.gif) from 2000 pixels tall down to 227 pixels
using an image editing program. That cropping spares us the extra bandwidth.
Before we add our background image, let's quickly add a background color so you can see how that works.
To set the background color for the table, select the table and choose a background color from the Bg Color
Picker in the Property inspector (see Figure 5.14).
Figure 5.14. Set the background color for the table by choosing a color (#2477AA) from the Bg
Color Picker in the Property inspector.
[View full size image]
As you can see, adding a background color is fairly simple. Now to add a background image, I'll undo the
addition of the background color, then use the point-to-file icon located just to the right of the Bg Image
text box to select the header_bg.gif image from within the Images directory, also shown in Figure 5.15.
Figure 5.15. Use the point-to-file icon to select the header_bg.gif image from the Images
directory.
[View full size image]
With our background image now firmly in place, we can insert our header image within the cell to finish off
this portion of the design. You can do this by dragging the header_withnav.gif image into the table's only
cell, similar to Figure 5.16.
Figure 5.16. Drag the header image into the table's only cell.
[View full size image]
Immediately, you'll notice that the table's height is automatically adjusted to compensate for the height of
the image (227 pixels).
Modifying Cell Padding and Cell Spacing
Now that you have the header of the page squared away, it's time to build the bottom portion of the site.
We could insert the contents of home.txt (located within the Assets folder) directly underneath the existing
table; unfortunately, doing this causes the text to align flush against the edge of the Document window and
ultimately the browser window (see Figure 5.17).
Figure 5.17. Inserting text below the existing table causes the text to align flush against the
Document window and ultimately the browser window.
[View full size image]
This happens because the page has its margin widths set to 0. Although we could fix this by adding a margin
width, doing that would cause our table at the top of the page to shift to the right to compensate. Instead,
we could create a table below our existing table and adjust its cell spacing or cell padding to make up for
the necessary spacing. To do this, we'll begin by adding a new table. Begin the process by following these
steps:
1.
Select the Header table using one of the methods outlined at the beginning of the chapter.
2.
With the Header table selected, choose Insert, Table. The Table dialog appears.
3.
Give your new table 4 rows, 2 columns, a width of 697 pixels, a border thickness of 0, a cell padding of
0, and a cell spacing of 5.
4.
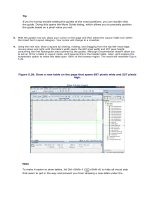
Click OK. Your new table will be inserted into the Document window and will look similar to Figure 5.18.
Figure 5.18. The new table is inserted and includes cell spacing to protect the content
from the left edge of the page.
[View full size image]