Adobe Dreamweaver CS3 Unleashed- P28 pps
Bạn đang xem bản rút gọn của tài liệu. Xem và tải ngay bản đầy đủ của tài liệu tại đây (592.28 KB, 50 trang )
and better yet, how can we use those credentials on other pages in the site to prevent users from trying to
access pages without logging in first? The great thing about the Log In User server behavior is that a session
variable (which we briefly mentioned in the previous chapter) is automatically created for the user, as
follows:
Session("MM_Username")
This session variable can be used in other pages (as you'll see in the next section) using server behaviors,
code, or a combination of both to determine whether the user is logged in.
Note
The measure of activity that a user spends on a website during a specified period of time is known as
a user session. The user session begins when the user accesses the application and ends when the
user quits the application (by either logging out or closing the browser). Because the user session is
typically stored in a browser cookie, developers can take advantage of sessions in an effort to store
and persist specific data about the user. The Login User server behavior, for instance, uses user
sessions to store a key authorizing the user to browse through a site that is protected by a user
authentication system like the one we're creating here.
Restricting Access Based on Username, Password, and Access Level
Your next step in securing your web application is to restrict those users who do not meet criteria specified
by you. You can specify that criteria by setting an access level that will eventually be used to track users as
they navigate through your site. The reason for establishing access criteria is simple—you want to make
sure that your users do not accidentally navigate onto a page that they are not supposed to see, such as the
admin page. The last thing you want is for ordinary users to delete products from the EmployeeStore table.
You can create access levels for your users by following these steps:
1.
Open the database management system for the type of database you are using. The following
examples and subsequent screenshots assume that you are using Access. However, you can follow all
these examples using Management Studio Express (for SQL Server 2005 Express) or MySQL
Administrator (MySQL) as well.
2.
With the database open, open the Employees table in Design view. The Employees table appears in
Design view similar to Figure 28.3.
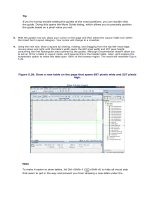
Figure 28.3. Open the Employees table in Design view.
[View full size image]
3.
Right-click the email field and select Insert Rows, as shown in Figure 28.4.
Figure 28.4. Insert a new row for the access level field.
[View full size image]
4.
Call the new field AccessLevel and give it a numeric (Number) data type.
5.
Save the table by choosing File, Save. Switch to the Datasheet view by clicking the View icon just
below the File menu.
6.
In the AccessLevel column, assign a value of 2 to all the users except for Wally the Webmaster. Assign
him a value of 1. The result is shown in Figure 28.5.
Figure 28.5. Give Wally an access level of 2. This makes Wally the administrator of
the site.
[View full size image]
The following table describes the levels of users and how they will be tracked within the application:
Level
Type
Description
2
Admin
Rights to the entire site
1
User
Rights to all excluding
admin.asp
7.
You're done making changes to the database. Save your work and close out of your database.
8.
Switch back to the login.asp, login.cfm, or login.php page in Dreamweaver and reopen the Log In
User server behavior by double-clicking it in the Server Behaviors panel. The Log In User dialog opens.
9.
At the bottom of the dialog, you'll see the Restrict Access Based On option button group. This time,
select the Username, Password, and Access Level option button. Choose the AccessLevel option from
the Get Level From menu that becomes enabled, as shown in Figure 28.6.
Figure 28.6. Change the login criteria to Username, Password, and Access Level.
[View full size image]
10.
Click OK.
11.
Save your work.
Although you will not see any changes when you log in, rest assured that a session variable has been set for
the access level, named
Session("MM_UserAuthorization")
As was the case with the session variable MM_Username that was created in the previous section, the session
variable MM_UserAuthorization can also be checked against the Login User server behavior dialog to check
whether a user has the appropriate access level to access a particular page.
Custom Error Messages
Although many error messages exist that you can present to the user, one that must be taken care of right
away is the failed login error message. Currently, if a user logs in with an inappropriate username and
password, the browser redirects to the same login page and does nothing. Ideally, what you want is a
custom error message that alerts the user of a failed login attempt. Knowing this, the user can try to log in
again. You can create a simple error message by following these steps:
1.
Open the login page if it is not currently open. Add two new rows to the login table just below the
button form object that you created previously.
2.
Add the text That is not a valid login. in the second row. Change the font to a red color so that it
appears as if it is an error message.
3.
The next step is to somehow capture an error response from the login failure. You can accomplish this
by setting a URL parameter in the Log In User dialog. Open the Log In User server behavior by double-
clicking it in the Server Behaviors panel. When the dialog opens, add the string ?valid=false just after
login.asp in the If Login Fails, Go To text box, as shown in Figure 28.7.
Figure 28.7. Add a parameter to the URL string for the failure response.
[View full size image]
4.
Click OK to close the Log In User dialog.
5.
You'll now want to write some code to capture that parameter if it exists and display the message
accordingly. To do this, highlight the error message you created in step 2 and switch to Code view.
Replace your selection with the following code (shown in ASP):
<% If (Request.QueryString("valid") = "false") Then %>
<span style="color:Red">
That is not a valid login.
</span>
<% End If %>
If you're using ColdFusion, replace it with the following code:
<CFIF ISDEFINED("URL.valid")>
<CFIF URL.valid IS "false">
<span style="color:Red">
That is not a valid login.
</span>
</CFIF>
</CFIF>
If you're using PHP, replace it with the following code:
<?php
if (isset($_GET['valid'])=="false") {
echo "<span style=color:Red>That is not a valid login.</span>";
}
?>
As you can probably make out from the code snippet you just added, the idea is to check whether a
parameter is being sent across the query string named valid. If there is, and that parameter has a value of
false, it will display the message That is not a valid login.
Save your work and test the result in the browser by pressing F12 (Option+F12). Enter some bogus
information into the username and password text boxes and click Login. This time, you should be presented
with an error message.
Check to See Whether the User Is Logged In
Although you might think your application is completely secure, it is, in fact, still completely vulnerable.
What's to stop a user from typing in the URL to your application plus index.asp, index.cfm, or index.php,
completely bypassing your login page? You should never expect your users to use the login page simply
because it's there. Most browsers even try to guess the URL you are typing by autofilling the complete URL.
If users accidentally select the index page, they can easily bypass the login page and jump directly into the
site, thus failing to create a session for the user and ultimately causing errors. You can avoid this problem
by detecting whether the user's session exists. Because the user session is created at login, if the user tries
to bypass the login screen, the application can detect that and redirect the user back to the login page
automatically. To add this functionality to your site, follow these steps:
1.
Open the admin.asp, admin.cfm, or admin.php page, depending on the server model you're using.
We're opening this page because this is one of the only pages in the site that we want to restrict user
access to.
2.
Select the Restrict Access to Page server behavior from the User Authentication submenu by clicking
the Add (+) button in the Server Behaviors panel. The Restrict Access to Page dialog appears.
3.
The Restrict Access to Page dialog enables you to set user levels that are allowed to enter this page, as
well as a redirect URL for the failure. Select the Username, Password, Access Level option button.
4.
Click the Define button. The Define Access Levels dialog appears.
5.
From this dialog, you can customize and configure access levels that are allowed to view your page.
Click the Add (+) button and add the value 1 (normal users' access level) as shown in Figure 28.8.
Figure 28.8. The Define Access Levels dialog enables you to set access restrictions for
a particular page.
6.
Click OK to close the Define Access Levels dialog.
7.
Back in the Restrict Access to Page dialog, make sure that you select the access level 1 option from the
Select Level(s) list box.
8.
Type the following value into the If Access Denied, Go To text box:
login.asp?login=false
Obviously, if you're using ColdFusion, the extension for the login file is .cfm, and if you're using PHP,
the extension is .php. Similar to how we defined the custom error message for the failed login attempt,
we'll create a custom error message that displays an error to users, alerting them that they'll need to
log in before proceeding to any of the pages in the site. The completely formatted dialog is shown in
Figure 28.9.
Figure 28.9. Add a parameter to the end of the URL so that you can eventually create
a custom error message on the login page.
[View full size image]
Tip
If you're using ColdFusion, there's one other modification you need to make in code. In
the login.cfm page, switch to Code view and change the scope="Session" attribute
and value to scope="Server". This line appears as the eighth or ninth line of code in the
page.
9.
Reopen the login page if it's not open already. Place your cursor below the existing error message and
type the text You must be logged in.
10.
Again switch to Code view and type the following code (shown in ASP), just under the code you entered
in step 5 of the previous section:
<% If (Request.QueryString("login") = "false") Then %>
<span style="color:Red">
You must be logged in.
</span>
<% End If %>
If you're using ColdFusion, type the following code:
<CFIF ISDEFINED("URL.login")>
<CFIF URL.login IS "false">
<span style="color:Red">
You must be logged in.
</span>
</CFIF>
</CFIF>
If you're using PHP, type the following code:
<?php
if (isset($_GET['login'])=="false") {
echo "<span style=color:Red>You must be logged in.</span>";
}
?>
As you can probably make out from the code snippet you just added, the plan is to check that a
parameter is being sent across the query string named login. If there is, and that parameter has a
value of false, the browser displays the message You must be logged in.
Save your work. This time, make sure that all the browsers are closed. This action effectively terminates all
sessions. Reopen the browser and try to go straight to the admin.asp, admin.cfm, or admin.php page
without logging in first. You are automatically redirected back to the login page, and the custom error
message is displayed.
Now that you know how to add it to the admin page, you'll want to add this functionality to all the pages in
the Vecta Corp application that you want to restrict user access to. I'll leave that decision to you.
Logging Out Users
Just as you require your users to log in, you will want them to log out as well. Logging out guarantees that
the users' session variables are instantly terminated, forcing them to log in again whenever they return to
the site. For the most part, users will simply close the browser, terminating the session, but if users
continue to browse online, it may be a good idea to alert them to log out first. Session variables, by default,
remain active for 20 minutes, so if users fail to log out, their sessions would remain active even though
they're navigating another website. To create the logout functionality for the Vecta Corp site, follow the
steps outlined next:
1.
Open the Vecta Corp template for the site you're working with. The template.dwt.asp,
template.dwt.cfm, and template.dwt.php files are located in the Templates folder in the Site Files
panel regardless of server model you're using.
2.
Place your cursor just after the Search text field and button and press Enter (Return).
3.
Type the text Log Out.
4.
With the text highlighted, select the Log Out User server behavior in the User Authentication submenu
by clicking the Add (+) button in the Server Behaviors panel. The Log Out User dialog appears.
5.
The Log Out User dialog box enables you to specify criteria for the logout, including whether the logout
will take place when the user clicks a button, a link, or when the page loads. You can also specify a
page to redirect the user to after the log out button/link has been clicked. For our project, select the
Selection: "Log Out" option from the Link Clicked menu and enter the value /login.asp,
/login.cfm, or /login.php (depending on the server technology you're using) in the When Done,
Go To text box.
6.
Click OK to close the Log Out User dialog.
7.
Save the page and update all pages that share the template.
Test the result in the browser by opening the login.asp, login.cfm, or login.php page and pressing F12
(Option+F12). Log in and navigate through the site. Try clicking the Log Out link. You are immediately
redirected to the login page. Try typing admin.asp, admin.cfm, or admin.php (essentially a page that
restricts access based on the session) into the address bar, and you should be redirected back to the login
page with the error message displayed. The reason for this redirection is simple: Your session doesn't exist
anymore. Clicking the Log Out button does two important things: It completely removes the session
variables MM_Username and MM_UserAuthorization, and it redirects you to the login page. The important
thing to remember is that the two session variables are removed. And because they don't exist, the
application treats you as if you've never logged in before.
Revamping the New User Registration Page
Now that most of the site has some sort of security integration, the last order of business is to make the
New User Registration Page available only to new users. If a user has already registered, that user won't
visit the page, but for users who have never been to the site, the New User Registration page must be made
available and easy to find. You've added a link from the login page that jumps directly to the New User
Registration page; the problem is that you still have buttons to the left of that page that link to the other
Vecta Corp pages. A new user should not be given the opportunity to navigate to any portions of the site.
You can change this by following these steps:
1.
Open the register.asp, register.cfm, or register.php page.
2.
Select Modify, Templates, Detach from Template.
3.
Select the navigation table to the left of the page.
4.
Delete the navigation table.
5.
Save your work.
6.
Open the x_newusercreated.asp, x_newusercreated.cfm, or x_newusercreated.php page. Select
Modify, Templates, Detach from Template. Select the navigation table in the new page and delete it as
well.
7.
Place your cursor after the text in the Content editable region and press Enter.
8.
Choose Insert, Hyperlink. The Hyperlink dialog appears. Type the text Log In. Enter the link
login.asp, login.cfm, or login.php (depending on the server model you're using). Click OK to close
the Hyperlink dialog and create the new link.
When a new user registers, the user is taken to the x_newusercreated.asp, x_newusercreated.cfm, or
x_newusercreated.php page. This time, however, the user will have the opportunity to click the Log In link
to be redirected to the Log In page.
Avoiding Duplicate Usernames
The last order of business is the Check New Username server behavior. The Check New Username server
behavior enables you to check the username of the person who is registering on your site to make sure that
a duplicate does not exist within the database. This is done to avoid confusion when people register within
your site. Have you ever tried obtaining a username with AOL? It's almost impossible because most of the
usernames are taken. Companies such as AOL employ these same methods to avoid conflicts between
users. You can check for duplicate usernames within your site by following these steps:
1.
Open register.asp, register.cfm, or register.php, depending on the server model you're using.
2.
With the page open, select the Check New Username server behavior available from the User
Authentication submenu by clicking the Add (+) button in the Server Behaviors panel. The Check New
Username dialog appears.
3.
The Check New Username dialog allows you to specify the field in the database to compare the value
to. Select the Username option from this menu.
4.
The dialog also enables you to specify a page to redirect to if a duplicate username exists. Enter the
following value into this text box:
register.asp?username=exists
If you're using ColdFusion, the extension for the register file is .cfm, and if you're using PHP, the
extension is .php. Figure 28.10 shows the formatted Check New Username dialog.
Figure 28.10. Specify the Username field in the database as well as a parameter so
that you can create a custom error message to the user if the proposed username
happens to be a duplicate.
[View full size image]
5.
Click OK to close the Check New Username dialog. The new server behavior appears in the Server
Behaviors panel.
6.
You'll now want to add the custom error message that the user will see should there be a duplicate
username. To add this message, place your cursor next to the username text field and type the text
Username already exists.
7.
You'll want to capture the parameter that will be sent across if a duplicate username exists. Remember
that the parameter is username and the value is exists. To handle this, select the Username already
exists text, switch to Code view, and wrap the text you wrote with the following code (shown here in
ASP):
<% If (Request.QueryString("username") = "exists") Then %>
<span style="color:Red">
Username already exists.
</span>
<% End If %>
If you're using ColdFusion, type the following code:
<CFIF ISDEFINED("URL.username")>
<CFIF URL.username IS "exists">
<span style="color:Red">
Username already exists
</span>
</CFIF>
</CFIF>
If you're using PHP, type the following code:
<?php
if (isset($_GET['username'])=="exists") {
echo "<span style=color:Red>Username already exists.</span>";
}
?>
Save your work and test the result in the browser by pressing F12 (Option+F12). Try entering a username
that you know already exists, such as ada or wally, into the Username text field. When you click the
Submit button, the error message is shown.
Setting Access Levels
Now that you are checking access levels on pages within the Vecta Corp site, you'll probably want to add
some functionality that sets the access level when the new user registers. There are two ways to accomplish
this task: First, you could modify the default value property for the field in the database to always be 1
when a new user is created. Second, you could add a hidden field in the New User Registration page and set
it equal to a certain number, in this case 1, and have that automatically insert the value into the AccessLevel
field in the Employees table along with the rest of the new user information. Because this second approach
is the simplest method to demonstrate, let's do that now:
1.
Open the register.asp, register.cfm, or register.php page if it's not open already.
2.
Somewhere on the page, insert a new hidden field by selecting Insert, Form, Hidden Field. The yellow
hidden field invisible element appears. Select it.
3.
Name the hidden field accesslevel and give it a default value of 1 (because 1 represents an ordinary
user). The result of the modifications in the Property inspector resemble Figure 28.11.
Figure 28.11. Add a hidden field, name it accesslevel, and assign it a default value of 1.
[View full size image]
4.
Modify the Insert Record server behavior so that it inserts this value into the Employees table. To do
this, double-click the Insert Record server behavior in the Server Behaviors panel. The Insert Record
dialog appears.
5.
Find the access level form object in the Form Elements selection box, select it, and then choose the
AccessLevel option from the Column menu similar to Figure 28.12.
Figure 28.12. Associate the access level hidden field with the AccessLevel field in the
Employees table.
[View full size image]
Click OK to close the Insert Record dialog. Save your work and test the results in the browser by pressing
F12 (Option+F12). Create a new user. When you are finished, check the database to make sure that all the
appropriate information was added, including the default access level of 1.
Chapter 28. Security and User Authentication
IN THIS CHAPTER
Securing the Vecta Corp Site with ASP, ColdFusion, or PHP
Securing the Vecta Corp Site with ASP.NET
One of the hottest topics today is security. So much so, in fact, that hundreds of websites, articles, ads, and
books exist related to the subject. Many companies, consultants, and organizations are dedicated to helping
protect you and/or your company's vital asset—data. It's not a downside by any stretch of the imagination;
in fact, major online news sites, portals, and even government agencies have been invaded in one form or
another, all the while employing some measure of security. Although this chapter cannot begin to cover all
there is to know regarding the subject, it can help you better understand the basic framework to securing
your web applications using a login page, restricting access to specific parts of your site, and more.
As you have done for the rest of the chapters in this book, you can work with the examples in this chapter
by downloading the files from www.dreamweaverunleashed.com. Remember, you'll want to save the files for
Chapter 28 (not the folder) in the C:\Inetpub\wwwroot\VectaCorp<technology> directory, where
<technology> represents the server technology (ASP, ASPX, CFM, PHP) you plan to use. Make sure that
your site is also properly defined in Dreamweaver, including setting the appropriate server-side technology
you plan to use in the Testing Server category.
Securing the Vecta Corp Site Using ASP, ColdFusion, or PHP
The security umbrella encompasses many facets of information technology, including web development.
Make sure that users go where they need to go and see what they're allowed to see in your application.
Make sure that everyone who visits your site logs in before they can view any pages, and if they're not
logged in, make sure that they don't just happen to type in the URL to a section of the application
specifically meant for an administrator. Although different solutions exist for various applications that you
can create—for instance, IIS could provide certain pages to users who have been authenticated by NT user
groups in an intranet environment—this chapter focuses on simple form-based and script-based
authentication.
If you're working in the ASP, ColdFusion, or PHP server models, Dreamweaver has a solution for securing
the Vecta Corp site in its User Authentication suite of server behaviors.
Note
Out of the box, Dreamweaver includes a suite of server behaviors for authenticating users under the
ASP, ColdFusion, and PHP server models only. If you're using ASP.NET, you'll either have to purchase
third-party extensions from the Adobe Exchange or you'll have to write the necessary code by hand.
The second half of this chapter walks you through the process of working with forms authentication
in ASP.NET. We'll write the necessary code for authenticating users under the ASP.NET model by
hand.
In combination with some simple coding techniques, this chapter enables you to accomplish the following
tasks using these server behaviors:
Log in users
Restrict users based on username, password, and access level
Log out users
Create custom error messages
Check for duplicate usernames
Creating a Login Page
The first step to securing any web application is to create a login page for your users. There'd be no point in
creating an admin page, for instance, if anyone could use it. Ideally what you want is an application that
allows your users to register and navigate through the site based on access rights that you specify. What
benefit does this provide? Assume that you would want everyone to come to your site and purchase items
without the tedious task of becoming a registered user. The question becomes whether your users are
repeat customers. If they are, they might have to type their personal information more than once,
essentially ending up with more work than registering once the first time around. Another benefit of
registering your users is that you can store all your users' shipping/billing information, giving them a
streamlined experience as they purchase items. As a developer, you might want to generate emails to your
registered users, alerting them of specials and bargains. There are many benefits and reasons for
maintaining a list of registered users. For the most part, the process is relatively straightforward. Users
register on your site. After they are registered, you will want them to access the site through a secure
location, typically through a login page.
You've seen login pages before; eBay, for instance, asks you to log in to its site before you can bid on an
item. You can see the correlation if you wanted to actually purchase something. How would the application
know which shopping cart to place the item into? A login page enables you not only to maintain a list of
registered users, but to create sessions (briefly highlighted in the previous chapter and discussed with more
detail later in this chapter) for the users' experience while they're on your site. That way, if a customer
wants to purchase something, that item is stored within the logged-in user's cart. You can create a login
page for the Vecta Corp site by following these steps:
1.
Create a new page by selecting File, New. Choose the Page from Template option, select your defined
site, select the template titled login (this is included for you in the chapter downloads) from the
defined site, and click Create.
Note
Throughout the book, we've been working with the template titled template. The
problem with using that template is that it contains the navigation menu. Users logging
in for the first time shouldn't be able to see that menu until they've logged in. Because
the login template has the navigation menu completely removed, it's the perfect
alternative for the Login page.
2.
Select the text Content Goes Here from the Content editable region and delete it.
3.
With your cursor still in the editable region, create a new form by choosing Insert, Form, Form.
4.
With your cursor in the form, create a new table by choosing Insert, Table. The Table dialog appears.
Assign the table 4 rows, 2 columns, a width of 300 pixels, and a border, cell padding, and cell spacing
of 0 pixels. Click OK to create the table within the form.
5.
Below the new table, add a link to the New User Registration page. You can do this by placing your
cursor next to the table and pressing Enter. Now choose Insert, Hyperlink. The Hyperlink dialog
appears. Enter the text New User? into the Text text box and enter the path to register.asp,
register.cfm, or register.php (depending on the server model you're using) in the Link text box.
Click OK when you're finished. The new link is created below the table.
6.
Place your cursor in the first cell of the first column of the new table and add the text Username:.
Move your cursor to the second cell of the first column of the same table and add the text Password:.
7.
Place your cursor in the first cell of the second column and add a new text field form object by choosing
Insert, Form, Text Field. Name the field username in the Property inspector.
8.
Place your cursor in the second cell of the second column and add a new text field form object by
choosing Insert, Form, Text Field. Name the field password in the Property inspector. Also, change the
Type value to Password in the Property inspector because this field will accommodate password entries.
9.
Place your cursor in the fourth cell of the second column and add a Submit button form object by
choosing Insert, Form, Button. Immediately change the label to read Log In in the Property inspector.
The result is shown in Figure 28.1.
Figure 28.1. Add the Log In button form object to the page.
[View full size image]
10.
Save your work as login.asp, login.cfm, or login.php, depending on the server model you're working
with.
Now test the results within the browser by pressing F12 (Option+F12). As you'll notice, the page in the
browser resembles a typical login page.
Logging In the User
Now that the basic structure of the login page has been created, you're ready to add the server behavior
that facilitates the user login. If you're using ASP, ColdFusion, or PHP, you have an advantage in that
Dreamweaver includes a server behavior that facilitates this process. To add this functionality, follow these
steps:
1.
With the login page still open, select the Log In User behavior from the User Authentication submenu
by clicking the Add (+) button in the Server Behaviors panel. The Log In User dialog appears.
2.
Select the form1 option from the Get Input from Form menu.
3.
Choose the username option from the Username Field menu. Also choose the password option from the
Password Field menu. These are the fields within the form (form1) that the server behavior will
compare when validation is performed.
4.
Choose the connVectaCorp option from the Validate Using Connection menu.
5.
Select the Employees option from the Table menu.
6.
Choose the Username option from the Username Column menu. Also, choose the Password (or Pass)
option from the Password Column menu. These are the fields in the database table that the form
values (specified in step 3) will be compared against.
7.
Type the value index.asp, index.cfm, or index.php (depending on the server model you are using)
into the If Login Succeeds, Go To text box. Also type the value login.asp, login.cfm, or login.php
into the If Login Fails, Go To text box. Later, you'll see how to customize this value to create custom
error messages for the user.
8.
Make sure that the Username and Password option button is selected in the Restrict Access Based On
option button group. The result of the completely formatted Log In User dialog box resembles Figure
28.2.
Figure 28.2. Format the Log In User dialog box accordingly.
[View full size image]
9.
Click OK. The new Log In User server behavior appears in the Server Behaviors list, and the form on
the page highlights in blue (because it is an invisible element).
Tip
If you have not done so already, you can configure IIS to accept login.asp, login.cfm, or
login.php as the default page. You'd want to perform this step so that when your users type in your
website address, they're automatically redirected to the login page. To set the login page as the
default document within IIS, start by right-clicking the website in IIS, selecting Properties, and
choosing the Documents tab. In the Default Documents list, add the page login.asp, login.cfm, or
login.php (depending on the server model you're using).
Save your work. Before you test the login page, you'll need to perform two more steps. First, check the
Employees table in the database to make sure that you have a valid username and password to test against.
This way when you log in, you'll be prepared with a set of valid login credentials. Second, create the
index.asp, index.cfm, or index.php page so that you'll redirect to a valid document after a successful
login. I'll assume that by now, you're armed with enough knowledge from previous chapters in the book to
be able to create that page on your own if it's not created already.
After those two steps are complete, you're ready to test the functionality. To do this, press F12
(Option+F12). When the Login page appears, enter the username and password into the appropriate fields
and click the Log In button. If you entered the username and password correctly, you are redirected to
index.asp, index.cfm, or index.php, depending on the server model you're working with. If you entered
the login information incorrectly, however, the Login page simply appears to refresh itself (we'll address this
later).
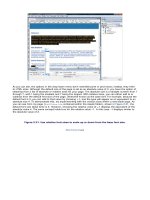
You now have a working Login page. But what exactly is going on? How are the user's credentials tracked,
and better yet, how can we use those credentials on other pages in the site to prevent users from trying to
access pages without logging in first? The great thing about the Log In User server behavior is that a session
variable (which we briefly mentioned in the previous chapter) is automatically created for the user, as
follows:
Session("MM_Username")
This session variable can be used in other pages (as you'll see in the next section) using server behaviors,
code, or a combination of both to determine whether the user is logged in.
Note
The measure of activity that a user spends on a website during a specified period of time is known as
a user session. The user session begins when the user accesses the application and ends when the
user quits the application (by either logging out or closing the browser). Because the user session is
typically stored in a browser cookie, developers can take advantage of sessions in an effort to store
and persist specific data about the user. The Login User server behavior, for instance, uses user
sessions to store a key authorizing the user to browse through a site that is protected by a user
authentication system like the one we're creating here.
Restricting Access Based on Username, Password, and Access Level
Your next step in securing your web application is to restrict those users who do not meet criteria specified
by you. You can specify that criteria by setting an access level that will eventually be used to track users as
they navigate through your site. The reason for establishing access criteria is simple—you want to make
sure that your users do not accidentally navigate onto a page that they are not supposed to see, such as the
admin page. The last thing you want is for ordinary users to delete products from the EmployeeStore table.
You can create access levels for your users by following these steps:
1.
Open the database management system for the type of database you are using. The following
examples and subsequent screenshots assume that you are using Access. However, you can follow all
these examples using Management Studio Express (for SQL Server 2005 Express) or MySQL
Administrator (MySQL) as well.
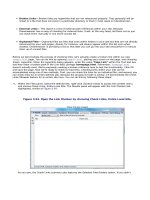
2.
With the database open, open the Employees table in Design view. The Employees table appears in
Design view similar to Figure 28.3.
Figure 28.3. Open the Employees table in Design view.
[View full size image]
3.
Right-click the email field and select Insert Rows, as shown in Figure 28.4.
Figure 28.4. Insert a new row for the access level field.
[View full size image]
4.
Call the new field AccessLevel and give it a numeric (Number) data type.
5.
Save the table by choosing File, Save. Switch to the Datasheet view by clicking the View icon just
below the File menu.
6.
In the AccessLevel column, assign a value of 2 to all the users except for Wally the Webmaster. Assign
him a value of 1. The result is shown in Figure 28.5.
Figure 28.5. Give Wally an access level of 2. This makes Wally the administrator of
the site.
[View full size image]
The following table describes the levels of users and how they will be tracked within the application:
Level
Type
Description
2
Admin
Rights to the entire site
1
User
Rights to all excluding
admin.asp
7.
You're done making changes to the database. Save your work and close out of your database.
8.
Switch back to the login.asp, login.cfm, or login.php page in Dreamweaver and reopen the Log In
User server behavior by double-clicking it in the Server Behaviors panel. The Log In User dialog opens.
9.
At the bottom of the dialog, you'll see the Restrict Access Based On option button group. This time,
select the Username, Password, and Access Level option button. Choose the AccessLevel option from
the Get Level From menu that becomes enabled, as shown in Figure 28.6.
Figure 28.6. Change the login criteria to Username, Password, and Access Level.
[View full size image]
10.
Click OK.
11.
Save your work.
Although you will not see any changes when you log in, rest assured that a session variable has been set for
the access level, named
Session("MM_UserAuthorization")
As was the case with the session variable MM_Username that was created in the previous section, the session
variable MM_UserAuthorization can also be checked against the Login User server behavior dialog to check
whether a user has the appropriate access level to access a particular page.
Custom Error Messages
Although many error messages exist that you can present to the user, one that must be taken care of right
away is the failed login error message. Currently, if a user logs in with an inappropriate username and
password, the browser redirects to the same login page and does nothing. Ideally, what you want is a
custom error message that alerts the user of a failed login attempt. Knowing this, the user can try to log in
again. You can create a simple error message by following these steps:
1.
Open the login page if it is not currently open. Add two new rows to the login table just below the
button form object that you created previously.
2.
Add the text That is not a valid login. in the second row. Change the font to a red color so that it
appears as if it is an error message.
3.
The next step is to somehow capture an error response from the login failure. You can accomplish this
by setting a URL parameter in the Log In User dialog. Open the Log In User server behavior by double-
clicking it in the Server Behaviors panel. When the dialog opens, add the string ?valid=false just after
login.asp in the If Login Fails, Go To text box, as shown in Figure 28.7.
Figure 28.7. Add a parameter to the URL string for the failure response.
[View full size image]
4.
Click OK to close the Log In User dialog.
5.
You'll now want to write some code to capture that parameter if it exists and display the message
accordingly. To do this, highlight the error message you created in step 2 and switch to Code view.
Replace your selection with the following code (shown in ASP):
<% If (Request.QueryString("valid") = "false") Then %>
<span style="color:Red">
That is not a valid login.
</span>
<% End If %>
If you're using ColdFusion, replace it with the following code:
<CFIF ISDEFINED("URL.valid")>
<CFIF URL.valid IS "false">
<span style="color:Red">
That is not a valid login.
</span>
</CFIF>
</CFIF>
If you're using PHP, replace it with the following code:
<?php
if (isset($_GET['valid'])=="false") {
echo "<span style=color:Red>That is not a valid login.</span>";
}
?>
As you can probably make out from the code snippet you just added, the idea is to check whether a
parameter is being sent across the query string named valid. If there is, and that parameter has a value of
false, it will display the message That is not a valid login.
Save your work and test the result in the browser by pressing F12 (Option+F12). Enter some bogus
information into the username and password text boxes and click Login. This time, you should be presented
with an error message.
Check to See Whether the User Is Logged In
Although you might think your application is completely secure, it is, in fact, still completely vulnerable.
What's to stop a user from typing in the URL to your application plus index.asp, index.cfm, or index.php,
completely bypassing your login page? You should never expect your users to use the login page simply
because it's there. Most browsers even try to guess the URL you are typing by autofilling the complete URL.
If users accidentally select the index page, they can easily bypass the login page and jump directly into the
site, thus failing to create a session for the user and ultimately causing errors. You can avoid this problem
by detecting whether the user's session exists. Because the user session is created at login, if the user tries
to bypass the login screen, the application can detect that and redirect the user back to the login page
automatically. To add this functionality to your site, follow these steps:
1.
Open the admin.asp, admin.cfm, or admin.php page, depending on the server model you're using.
We're opening this page because this is one of the only pages in the site that we want to restrict user
access to.
2.
Select the Restrict Access to Page server behavior from the User Authentication submenu by clicking
the Add (+) button in the Server Behaviors panel. The Restrict Access to Page dialog appears.
3.
The Restrict Access to Page dialog enables you to set user levels that are allowed to enter this page, as
well as a redirect URL for the failure. Select the Username, Password, Access Level option button.
4.
Click the Define button. The Define Access Levels dialog appears.
5.
From this dialog, you can customize and configure access levels that are allowed to view your page.
Click the Add (+) button and add the value 1 (normal users' access level) as shown in Figure 28.8.
Figure 28.8. The Define Access Levels dialog enables you to set access restrictions for
a particular page.
6.
Click OK to close the Define Access Levels dialog.
7.
Back in the Restrict Access to Page dialog, make sure that you select the access level 1 option from the
Select Level(s) list box.
8.
Type the following value into the If Access Denied, Go To text box:
login.asp?login=false
Obviously, if you're using ColdFusion, the extension for the login file is .cfm, and if you're using PHP,
the extension is .php. Similar to how we defined the custom error message for the failed login attempt,
we'll create a custom error message that displays an error to users, alerting them that they'll need to
log in before proceeding to any of the pages in the site. The completely formatted dialog is shown in
Figure 28.9.
Figure 28.9. Add a parameter to the end of the URL so that you can eventually create
a custom error message on the login page.
[View full size image]
Tip