Lập trình Androi part 30 pps
Bạn đang xem bản rút gọn của tài liệu. Xem và tải ngay bản đầy đủ của tài liệu tại đây (219.74 KB, 6 trang )
CHAPTER 20: Working with Resources
204
TextUtils.htmlEncode(name.getText().toString()));
result.setText(Html.fromHtml(simpleResult));
}
}
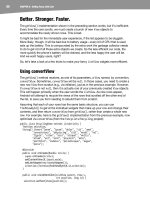
Now, our button has the desired icon, as shown in Figure 20–3.
Figure 20–3. The ImagesDemo sample application
XML: The Resource Way
If you wish to package static XML with your application, you can use an XML resource.
Simply put the XML file in res/xml/. Then you can access it by getXml() on a Resources
object, supplying it a resource ID of R.xml. plus the base name of your XML file. For
example, in an activity, with an XML file of words.xml, you could call
getResources().getXml(R.xml.words).
This returns an instance of an XmlPullParser, found in the org.xmlpull.v1 Java
namespace. An XML pull parser is event-driven: you keep calling next() on the parser to
get the next event, which could be START_TAG, END_TAG, END_DOCUMENT, and so on. On a
START_TAG event, you can access the tag’s name and attributes; a single TEXT event
represents the concatenation of all text nodes that are direct children of this element. By
looping, testing, and invoking per-element logic, you parse the file.
To see this in action, let’s rewrite the Java code for the Files/Static sample project to
use an XML resource. This new project, Resources/XML, requires that you place the
words.xml file from Static not in res/raw/, but in res/xml/. The layout stays the same,
so all that needs to be replaced is the Java source:
CHAPTER 20: Working with Resources
205
package com.commonsware.android.resources;
import android.app.Activity;
import android.os.Bundle;
import android.app.ListActivity;
import android.view.View;
import android.widget.AdapterView;
import android.widget.ArrayAdapter;
import android.widget.ListView;
import android.widget.TextView;
import android.widget.Toast;
import java.io.InputStream;
import java.util.ArrayList;
import org.xmlpull.v1.XmlPullParser;
import org.xmlpull.v1.XmlPullParserException;
public class XMLResourceDemo extends ListActivity {
TextView selection;
ArrayList<String> items=new ArrayList<String>();
@Override
public void onCreate(Bundle icicle) {
super.onCreate(icicle);
setContentView(R.layout.main);
selection=(TextView)findViewById(R.id.selection);
try {
XmlPullParser xpp=getResources().getXml(R.xml.words);
while (xpp.getEventType()!=XmlPullParser.END_DOCUMENT) {
if (xpp.getEventType()==XmlPullParser.START_TAG) {
if (xpp.getName().equals("word")) {
items.add(xpp.getAttributeValue(0));
}
}
xpp.next();
}
}
catch (Throwable t) {
Toast
.makeText(this, "Request failed: "+t.toString(), 4000)
.show();
}
setListAdapter(new ArrayAdapter<String>(this,
android.R.layout.simple_list_item_1,
items));
}
public void onListItemClick(ListView parent, View v, int position,
long id) {
selection.setText(items.get(position).toString());
}
}
CHAPTER 20: Working with Resources
206
Now, inside our try catch block, we get our XmlPullParser and loop until the end of
the document. If the current event is START_TAG and the name of the element is word
(xpp.getName().equals("word")), then we get the one and only attribute, and pop that
into our list of items for the selection widget. Since we have complete control over the
XML file, it is safe enough to assume there is exactly one attribute. If you are not sure
that the XML is properly defined, you might consider checking the attribute count
(getAttributeCount()) and the name of the attribute (getAttributeName()) before blindly
assuming the 0-index attribute is what you think it is.
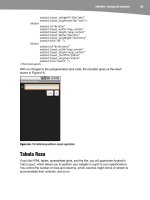
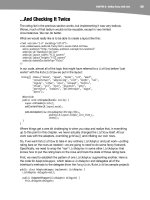
The result looks the same as before, albeit with a different name in the title bar, as
shown in Figure 20–4.
Figure 20–4. The XMLResourceDemo sample application
Miscellaneous Values
In the res/values/ directory, in addition to string resources, you can place one (or more)
XML files describing other simple resources, such as dimensions, colors, and arrays.
You have already seen uses of dimensions and colors in previous examples, where they
were passed as simple strings (e.g., "10px") as parameters to calls. You could set these
up as Java static final objects and use their symbolic names, but that works only inside
Java source, not in layout XML files. By putting these values in resource XML files, you
can reference them from both Java and layouts, plus have them centrally located for
easy editing.
Resource XML files have a root element of resources; everything else is a child of that root.
CHAPTER 20: Working with Resources
207
Dimensions
Dimensions are used in several places in Android to describe distances, such a widget’s
padding. Most of this book’s examples use pixels (e.g., 10px for 10 pixels). Several
different units of measurement are also available:
in and mm for inches and millimeters, respectively. These are based on
the actual size of the screen.
pt for points. In publishing terms, a point is 1/72 inch (again, based on
the actual physical size of the screen).
dip and sp for device-independent pixels and scale-independent
pixels, respectively. One pixel equals one dip for a 160-dpi resolution
screen, with the ratio scaling based on the actual screen pixel density.
Scale-independent pixels also take into account the user’s preferred
font size.
To encode a dimension as a resource, add a dimen element, with a name attribute for
your unique name for this resource, and a single child text element representing the
value:
<resources>
<dimen name="thin">10px</dimen>
<dimen name="fat">1in</dimen>
</resources>
In a layout, you can reference dimensions as @dimen/ , where the ellipsis is a
placeholder for your unique name for the resource (e.g., thin and fat from the
preceding sample). In Java, you reference dimension resources by the unique name
prefixed with R.dimen. (e.g., Resources.getDimen(R.dimen.thin)).
Colors
Colors in Android are hexadecimal RGB values, also optionally specifying an alpha
channel. You have your choice of single-character hex values or double-character hex
values, providing four styles:
#RGB
#ARGB
#RRGGBB
#AARRGGBB
These work similarly to their counterparts in Cascading Style Sheets (CSS).
You can, of course, put these RGB values as string literals in Java source or layout
resources. If you wish to turn them into resources, though, all you need to do is add
color elements to the resource file, with a name attribute for your unique name for this
color, and a single text element containing the RGB value itself:
<resources>
CHAPTER 20: Working with Resources
208
<color name="yellow_orange">#FFD555</color>
<color name="forest_green">#005500</color>
<color name="burnt_umber">#8A3324</color>
</resources>
In a layout, you can reference colors as @color/ , replacing the ellipsis with your
unique name for the color (e.g., burnt_umber). In Java, you reference color resources by
the unique name prefixed with R.color. (e.g.,
Resources.getColor(R.color.forest_green)).
Arrays
Array resources are designed to hold lists of simple strings, such as a list of honorifics
(Mr., Mrs., Ms., Dr., etc.).
In the resource file, you need one string-array element per array, with a name attribute
for the unique name you are giving the array. Then add one or more child item elements,
each with a single text element containing the value for that entry in the array:
<?xml version="1.0" encoding="utf-8"?>
<resources>
<string-array name="cities">
<item>Philadelphia</item>
<item>Pittsburgh</item>
<item>Allentown/Bethlehem</item>
<item>Erie</item>
<item>Reading</item>
<item>Scranton</item>
<item>Lancaster</item>
<item>Altoona</item>
<item>Harrisburg</item>
</string-array>
<string-array name="airport_codes">
<item>PHL</item>
<item>PIT</item>
<item>ABE</item>
<item>ERI</item>
<item>RDG</item>
<item>AVP</item>
<item>LNS</item>
<item>AOO</item>
<item>MDT</item>
</string-array>
</resources>
From your Java code, you can then use Resources.getStringArray() to get a String[]
of the items in the list. The parameter to getStringArray() is your unique name for the
array, prefixed with R.array. (e.g., Resources.getStringArray(R.array.honorifics)).
Different Strokes for Different Folks
One set of resources may not fit all situations where your application may be used. One
obvious area comes with string resources and dealing with internationalization (I18N)
CHAPTER 20: Working with Resources
209
and localization (L10N). Putting strings all in one language works fine—at least, for the
developer—but covers only one language.
That is not the only scenario where resources might need to differ, though. Here are others:
Screen orientation: Is the screen in a portrait or landscape orientation?
Or is the screen square and, therefore, without an orientation?
Screen size: How many pixels does the screen have, so you can size
your resources accordingly (e.g., large versus small icons)?
Touchscreen: does the device have a touchscreen? If so, is the
touchscreen set up to be used with a stylus or a finger?
Keyboard: Which keyboard does the user have (QWERTY, numeric,
neither), either now or as an option?
Other input: Does the device have some other form of input, like a D-
pad or click-wheel?
The way Android currently handles this is by having multiple resource directories, with
the criteria for each embedded in their names.
Suppose, for example, you want to support strings in both English and Spanish.
Normally, for a single-language setup, you would put your strings in a file named
res/values/strings.xml. To support both English and Spanish, you would create two
folders, named res/values-en/ and res/values-es/, where the value after the hyphen is
the ISO 639-1 two-letter code for the language. Your English strings would go in
res/values-en/strings.xml, and the Spanish ones would go in res/values-
es/strings.xml. Android will choose the proper file based on the user’s device settings.
An even better approach is for you to consider some language to be your default, and
put those strings in res/values/strings.xml. Then create other resource directories for
your translations (e.g., res/values-es/strings.xml for Spanish). Android will try to
match a specific language set of resources; failing that, it will fall back to the default of
res/values/strings.xml.
Seems easy, right?
Where things start to get complicated is when you need to use multiple disparate criteria
for your resources. For example, suppose you want to develop both for the T-Mobile G1
and two currently fictitious devices. One device (Fictional One) has a VGA (“large”)
screen normally in a landscape orientation, an always-open QWERTY keyboard, a D-
pad, but no touchscreen. The other device (Fictional Two) has a G1-sized screen
(normal), a numeric keyboard but no QWERTY, a D-pad, and no touchscreen.
You may want to have somewhat different layouts for these devices, to take advantage
of different screen real estate and different input options, as follows:
For each combination of resolution and orientation
For touchscreen devices versus ones without touchscreens
For QWERTY versus non-QWERTY devices