Building XNA 2.0 Games- P2 potx
Bạn đang xem bản rút gọn của tài liệu. Xem và tải ngay bản đầy đủ của tài liệu tại đây (1.59 MB, 30 trang )
CHAPTER 1 ■ A .NET SNAPSHOT
15
There is one major flaw with how we have been creating our arrays so far: they aren’t easy
to modify. There is no simple way to add new elements or remove old ones. The next section
describes how to use generics to create modifiable lists of a certain type.
Using Generics and Events
Generics, or template classes, are a way of defining a type such as a class based on another type.
This relationship is known as the of a relationship, because you can say that you are declaring
a variable as a “List of Box objects,” where List is the generic class and Box is the class you are
using.
Let’s define our own little box collection using generics. First we need to create a class to
handle items in a collection. Start up a new console application in Visual Studio and add a class
called ListBase. Now we need to add the necessary namespaces and declare the class type. We
use the letter T to signify the generic type, but you can use any other letter. In fact, it is possible
to declare multiple generic types for a class.
using System;
using System.Collections.Generic;
namespace Generics
{
class ListBase<T> : List<T>
{
}
}
Note that we do not do much with the generic parameter; we simply pass it on up to the
base class. Now we need to create some functionality in this class.
One problem with the built-in generic collection types (List, Dictionary, Queue, Stack, and
so on) is that they do not have events for when an item is added or removed. An event is a way
of notifying code outside the class that something has happened. For example, in a Windows
application, the window fires a MouseDown event whenever the user clicks the mouse on the
window. This allows us to know about and handle events as they happen. To create an event,
we use what is known as a delegate, which is nothing more than a function turned into a type.
Here is the delegate we will be using (defined in System.dll):
public delegate void EventHandler(object sender, EventArgs e);
You should notice right away that much of this looks like a normal function. It has scope
(public), a return type (void), a name (EventHandler), and two parameters (sender, e). The
main difference is the addition of an extra keyword: delegate. This tells the compiler that this
function is to be used as a type.
Let’s use this delegate in our ListBase class to declare some events. We do this using
another new keyword: event.
class ListBase<T> : List<T>
{
public event EventHandler ItemAdded;
public event EventHandler ItemRemoved;
16
CHAPTER 1
■ A .NET SNAPSHOT
public ListBase()
{
ItemAdded += OnItemAdded;
ItemRemoved += OnItemRemoved;
}
~ListBase()
{
ItemAdded -= OnItemAdded;
ItemRemoved -= OnItemRemoved;
}
protected virtual void OnItemAdded(object sender, EventArgs e)
{
}
protected virtual void OnItemRemoved(object sender, EventArgs e)
{
}
}
A lot of things are going on here. First, we have declared our events with the new keyword.
Next, in our constructor, we add our methods (event listeners) to the events using the += oper-
ator. After this, we declare the deconstructor for the class, which is called when the memory is
being freed. It is good practice to always remove listeners from events when you are finished
with them to make sure there are no lingering references. Last, but certainly not least, we declare
the bodies of our event listeners. Do you notice anything familiar? The parameters and return
type match that of the delegate definition. Also note that we have set the scope to protected
and that it is possible to change the name of the parameters.
Now that we have events, we need to use them. Despite the ListBox class having many
more methods for adding and removing items, we are going to rewrite only two of them. You
can rewrite functionality provided by a base class by using the new operator.
public new void Add(T item)
{
base.Add(item);
if (ItemAdded != null)
ItemAdded.Invoke(item, EventArgs.Empty);
}
public new bool Remove(T item)
{
bool returnValue = base.Remove(item);
CHAPTER 1 ■ A .NET SNAPSHOT
17
if (ItemRemoved != null)
ItemRemoved.Invoke(item, EventArgs.Empty);
return returnValue;
}
Here, we have a method, Add, that uses the generic type as a parameter. Notice how it is
used as a type (like int, bool, and so on). This is the meat and bones of using generics. After
calling the base class’s methods, we invoke the event and pass in the item as the first parameter
and empty arguments as the second.
Now let’s see how to use this class! In Program.cs, we will add some code to declare and use
a list:
static void Main(string[] args)
{
ListBase<int> myIntegers = new ListBase<int>();
myIntegers.ItemAdded += OnItemAdded;
myIntegers.Add(3);
}
static void OnItemAdded(object sender, EventArgs args)
{
Console.WriteLine("Item added: {0}", sender);
}
We declare a variable of a generic type in much the same way as we declare any other vari-
able, except for the addition of the extra type inside the carets. After coding this, the output
should be pretty clear. It should say Item added: 3.
As an exercise, we suggest playing around with events and the ListBase class to add func-
tionality for the other Add and Remove methods. You can test these by adding event handlers and
trying to add and remove items in different ways.
Conclusion
This chapter was intended to give you a little taste of what .NET and C# can do. In the coming
chapters, we will be applying the ideas we have discussed here to game development. As you
progress through this book, the core concepts you have read about here will become increas-
ingly important. Thankfully, we will not need to introduce many more core concepts and can
get right down and dirty with creating a game with the XNA Framework. Now let’s make some
games!
19
■ ■ ■
CHAPTER 2
A Crash Course in XNA
Pong: The Hello World of
Game Development
Programming primers often start with some derivative of “Hello World”—a terrifically simple
program whose sole purpose in this world is to greet it. For example, a Hello World program in
BASIC would read something like this:
10 PRINT "HELLO WORLD."
20 END
The point of Hello World is to illustrate some language or medium as simply as possible.
Because the medium we’re using here is a game development tool set, we might as well use the
first popular video game to be created as a simple introduction. We’re speaking, of course, of
Pong. Before we start developing though, you need to get XNA Game Studio 2.0 up and running,
so we’ll begin by installing it.
Installing XNA Game Studio 2.0
XNA Game Studio 2.0 is essentially a bunch of tools that we’ll be using with Microsoft Visual C#
2005 Express Edition. As of the second version of XNA Game Studio, you can choose to develop
games in any version of Visual Studio 2005, including Express, Standard, and Professional. We
have chosen to write the source code in Visual Studio Express because it is free, but the steps
are similar, if not the same, for any other version.
To get up and running, first install Visual C# 2005 Express Edition. The installer can be
downloaded from Once the
installer is downloaded, run it to install Visual C# 2005 Express.
Next, install XNA Game Studio 2.0. You can download the installer from http://
www.microsoft.com/downloads/details.aspx?FamilyId=DF80D533-BA87-40B4-ABE2- ➥
1EF12EA506B7&displaylang=en.
Now that you have everything installed, you can get started by running Visual C# 2005
Express Edition.
20
CHAPTER 2
■ A CRASH COURSE IN XNA
Building XNAPong
Creating XNAPong should be fairly simple and straightforward. The procedure will go some-
thing like this:
1. Create the project.
2. Create some graphics.
3. Load the graphics in the project.
4. Set up the program structure.
5. Handle joystick input, update the ball’s movement, check for collisions, and detect
scoring.
6. Set up rendering.
7. Add force feedback (rumble).
8. Implement audio.
Although it will end up being a bit longer than the BASIC incarnation of Hello World, it will
also be slightly more impressive (slightly is a relative term). When all is said and done, you
should be familiar enough with XNA and the XNA Game Studio 2.0 environment to create your
own projects.
Creating a New Game Project
With a new instance of Visual Studio opened, select File ➤ New Project. In the New Project
dialog, select Windows Game. Enter a name—we’ll use XNAPong for this example, as shown in
Figure 2-1. For your own games, you will also probably want to specify a location close to root
(we prefer d:\dev\). Click OK, wait a few seconds, and you’re ready to go!
■Note If you do not see the project templates for XNA Game Studio 2.0 in the New Project dialog, make
sure you have installed both XNA Game Studio 2.0 and Service Pack 1 for Visual Studio 2005.
Congratulations, you’ve just completed what could have constituted a few hours of ugly
work before the advent of XNA Game Studio. XNA Game Studio has set you up with a standard
game framework, including a render loop, content loaders, input handling, and a lot more. You
will be dropped into the Visual Studio integrated development environment (IDE) with the
XNAPong solution opened to class Game1.cs. Your brand-new solution should look like Figure 2-2.
CHAPTER 2 ■ A CRASH COURSE IN XNA
21
Figure 2-1. Unleashing a new imagining of Pong on the world
Figure 2-2. A nice, fresh solution in the Visual Studio IDE
22
CHAPTER 2
■ A CRASH COURSE IN XNA
We’ll cover some of the functionality that has been created for your game project, but bear
in mind that you don’t really need to understand a substantial amount of what’s going on. This
is where XNA really shines—the framework exposes functionality that we really like, so we can
focus on game building, not tedium.
One of the biggest concerns beginning developers have is how to create the actual game
window. Countless articles have been written about this issue—many of them longer than this
book. Fortunately, creating a window with XNA Game Studio is as simple as creating a project.
As you will soon find out, the framework does all the work necessary for creating and maintaining
a window for your game. Furthermore, the same method for creating a game for Windows can
be applied for the Xbox 360. Again, the framework knows how to set everything up for you. For
the uninitiated, learning how to do this and writing the pages of code necessary to open a window
correctly could take hours.
Instead of diving into exactly how all of this is handled, we’ll just run our bare-bones project.
Click Start Debugging to run it. Behold, our amazing cornflower blue game, as shown in Figure 2-3.
Figure 2-3. Cornflower blue: the game
Here’s our game in action. It doesn’t look like much, but there is a lot going on here. The
graphics device and content manager are initialized, and a frame loop is working, furiously
rendering a cornflower-blue background 60 times per second. If you have an Xbox 360 controller
plugged in, XNAPong will also be polling to make sure you haven’t pressed Back, which will exit
the application.
A game works quite differently from a desktop application such as Notepad or Internet
Explorer. Desktop applications are generally developed to be event-based; they will sit forever,
doing nothing except waiting for the user to press a key or click the mouse. In a game applica-
tion, this tends not to work, since characters are always moving and new stuff is always happening.
CHAPTER 2 ■ A CRASH COURSE IN XNA
23
Because of this, games employ a loop structure to continuously handle input while drawing
items on the screen.
Loading Textures
Loading textures, and content in general, used to be a time-consuming task made even harder
by nonstandard texture formats, which often required third-party libraries to load and use.
XNA helps to fix this issue by introducing the Content Pipeline, a set of libraries devoted to
loading, saving, and consuming content. As of XNA Game Studio 2.0, all of a game’s content,
including textures, is maintained by what is called the Content project. This project, a child of
a game or library project, is responsible for holding related content and compiling it. This
greatly reduces the work needed to add and use textures such as paddles for a Pong clone.
Since we’re creatures of habit, we tend to put graphics on sprite sheets. A sprite sheet is a
large graphic consisting of smaller images that are typically, but not always, contained in a grid.
Using a sprite sheet, rather than separate textures, should provide some improvement in loading
and rendering, but under typical levels of complexity, the performance improvement will
probably be negligible. Also, sprite sheets have their own problems, such as the wasted space
and the temptation to fit everything on one sprite sheet. That said, since we’re making a very
simple game here, let’s put everything on a single sprite sheet.
In order to draw only the parts of a sprite sheet we want, we need to create an alpha channel.
An alpha channel determines the opacity of the RGB (Red Green Blue) color to draw: a value of
0 is clear; a value of 255 is opaque. Our source images are shown in Figure 2-4.
■Note All of the source images for the examples in this book, as well as the source code, are available from
the Source Code/Download section of the Apress web site ().
Figure 2-4. Original image with alpha channel (left) and RGBA (right) in DirectX texture editor
24
CHAPTER 2
■ A CRASH COURSE IN XNA
Figure 2-4 shows our original image as created in Paint Shop Pro and our composited final
product in DirectX Texture Tool (DxTex). In the original image, all translucency is depicted as
a gray-and-white checkerboard. The image on the right side of the figure shows what happens
when we import the alpha-enabled PNG into DxTex. Because XNA is built on DirectX, this is
exactly how it will look in the game. While we tend to be Paint Shop Pro fans, if you want to
create graphics on the cheap, you just can’t go wrong with the 100% free, plug-in enabled
Paint.Net. You can download Paint.Net from .
■Note To get a fine, if somewhat meticulous degree of control on your alpha channels, you can save alpha
and RGB images separately, and then composite them in DxTex. Using one image editor for creating bitmaps
and alpha channels and then compositing them in DxTex is a somewhat cumbersome solution, but if you use
it, here’s a tip: save alpha bitmaps as file_a.bmp and save RGB bitmaps as file.bmp (replace file with
your file name), then drag file.bmp into DxTex. DxTex will automatically composite the images into one
RGBA image.
Back in XNAPong, you’ll need to create a folder for graphics. Right-click the Content project in
Solution Explorer and select Add ➤ New Folder. Name the folder gfx.
From our image editor, save the image as sprites.png in the folder you just created from
within Visual Studio. If you are working with DxTex, save the image as sprites.dds. We used a
DDS file, but you can use DDS and PNG interchangeably.
In Visual Studio, add the image you just saved to the project. With the Content project selected
in Solution Explorer, ensure that Show All Files is enabled (through the Solution Explorer toolbar
or Project menu) and open the gfx folder. Right-click sprites.dds and select Include In Project.
In the Properties window, Build Action is now set to Compile, as shown in Figure 2-5. This
means that when the project is built, sprites.dds will be sent to the Content Pipeline for
preprocessing.
Figure 2-5. The sprites.dds file ready for the Content Pipeline
Now we’re ready for some coding!
Loading and Rendering
Before we get to anything Pong-like, let’s get the rendering set up. We’ll need a Texture2D
object to store our image file. Game Studio 2.0 already sets us up with a SpriteBatch to handle
sprite drawing. We’ll also need to load our image in LoadContent() and draw it in Draw().
CHAPTER 2 ■ A CRASH COURSE IN XNA
25
At the class-level declarations in the Game1.cs file, add the following:
SpriteBatch sprite;
Texture2D spritesTexture;
For 2D development, SpriteBatch is one of the most useful classes in the XNA Framework.
When you draw anything on modern graphics hardware, it is done in 3D. Essentially, SpriteBatch
takes some 2D drawing calls you give it, converts them into optimized, complicated calls that
the 3D-geared hardware likes, and sends them along. For all things 2D, this is a huge time-saver.
SpriteBatch is not without its problems, however, and knowing how to efficiently use the
SpriteBatch object can save you from spending a lot of time later on performance issues. The
guiding rule behind using a SpriteBatch is to bunch as many Draw() calls together as possible.
Consider it similar to building a five-lane highway but sending only one car down it at a time.
This is highly inefficient, since four lanes are going unused; sending many cars at once will
ensure that the highway is running efficiently.
Note that in the Game1 class constructor, two objects are instantiated:
public Game1()
{
graphics = new GraphicsDeviceManager(this);
Content.RootDirectory = "Content";
}
graphics is a bit of an all-inclusive graphics device management object. All things that
have anything to do with graphics will have something to do with graphics or the actual device
it manages, GraphicsDevice. When we discuss the GraphicsDevice object, we are talking about
an object that provides an interface between our code and the graphics card on a user’s PC.
Moving along through our new project, we have the following:
protected override void Initialize()
{
// TODO: Add your initialization logic here
base.Initialize();
}
Initialize() is where we’ll be adding any game-initialization logic. We can leave it empty
for now. Later, we’ll be using it to initialize audio stuff.
Next up is LoadContent(), where we’ll be loading content. Let’s add a line to load our sprites
texture:
protected override void LoadContent()
{
// Create a new SpriteBatch, which can be used to draw textures.
spriteBatch = new SpriteBatch(GraphicsDevice);
spritesTexture = content.Load<Texture2D>(@"gfx/sprites");
}
When content is loaded through a content manager, you signify which type of object you
want returned using what is called a generic method. In this example, we are passing in the
26
CHAPTER 2
■ A CRASH COURSE IN XNA
Texture2D type, since that is what we want to load. We then pass in the path to the content file,
using the @ symbol to tell the compiler to ignore any escape sequences in the string.
Now that the texture file has been loaded into an object, we can use it to render the paddles.
For now, we’ll just render the entire image to show that it works. In Draw(), add the following:
protected override void Draw(GameTime gameTime)
{
graphics.GraphicsDevice.Clear(Color.CornflowerBlue);
spriteBatch.Begin(SpriteBlendMode.AlphaBlend);
spriteBatch.Draw(spritesTexture, new Rectangle(0, 0, 256, 256),
Color.White);
spriteBatch.End();
base.Draw(gameTime);
}
All the Game1.Draw() method did before we added these few lines was to clear the graphics
device to a nice shade of cornflower blue, and then render the image to screen. We’ve added
some lines to draw spritesTexture, entirely as is, onto the screen. Our initial success with
graphics is shown in Figure 2-6.
Figure 2-6. Loading and rendering success!
CHAPTER 2 ■ A CRASH COURSE IN XNA
27
This is exactly what we wanted: the images from our sprites The texture are rendering
properly. If we had failed to set up the alpha channel correctly, a big, black box would have
appeared behind our image.
SpriteBatch.Draw() is a fairly robust method for drawing 2D sprites in whatever way you
desire. We’re using the minimal overload here: indicating which Texture2D to use; which
Rectangle, or size, to draw on the screen (x, y, width, height); and what Color to apply to the
texture. The Color parameter will become increasingly important because it allows you to
shade a texture a certain color as well as increase or decrease the transparency. Surrounding
the SpriteBatch.Draw() method are two calls: spriteBatch.Begin() and spriteBatch.End().
This is the essence of the SpriteBatch: we use Begin() to set up the SpriteBatch for a certain
type of rendering (more on this in Chapter 7), throw it as many Draw() operations as desired,
and then use End() to finalize the deal and send it off to be drawn. Not only is this a great system
for efficient sprite rendering on 3D hardware, but it’s absolutely necessary—calling Draw()
outside a Begin() End() block will result in a nasty crash.
■Caution Be careful to finish what you start. Every spriteBatch.Begin() must lead to
a spriteBatch.End() before base.Draw() is called. Calling spriteBatch.Begin() and
then spriteBatch.Begin() again without ending the first batch will kill your game; calling
spriteBatch.End() when no spriteBatch.Begin() has been called will do the same.
The Begin()/Draw()/End() requirement is due to how drawing any sort of graphic on the
screen works with DirectX. When a developer calls SpriteBatch.Begin(), the object sets up the
GraphicsDevice in a specific way and gets your graphics card ready to be used. Without doing
this, both the GraphicsDevice and the SpriteBatch will not know how to draw sprites on the
screen. When the call to SpriteBatch.End() is made, the object finishes any drawing that still
needs to be done and either resets the GraphicsDevice to how it was before Begin() was called
or just cleans up a bit. How, when, and exactly what is done at this point is highly dependent
on the parameters used in the call to Begin(), but for now, you do not need to be concerned
with that.
So far, we’ve created a project, created an image, loaded that image, and rendered it in a
render loop. Granted, we’ve glossed over a bit, but we’ll get to more details when we start doing
some substantial game development in upcoming chapters. For example, you’ll see more
versatile SpriteBatch rendering in Chapter 4, and learn how to organize game entities using
objects in Chapter 6.
Adding the Game Logic
Now we can start on the actual game logic. Game logic includes any code that actually makes the
game play happen. It can be composed of physics, artificial intelligence, or gathering user input.
Because this is an extremely small project, we think it’s safe to put everything in Game1. As
a general rule, putting too much functionality in Game1 is a terrible idea, but for really small
projects, it’s forgivable. If we were making a larger game, or a game we might extend, we would
want to put this logic in separate classes: one class for the ball and one class for the paddle.
The task list for the game logic goes something like this:
28
CHAPTER 2
■ A CRASH COURSE IN XNA
1. Create class-level variables to keep track of paddle locations, ball location and trajectory,
and game state.
2. Handle gamepad input, update paddle locations, and handle game state.
3. Update ball location, check for paddle collisions, and check whether a point has
been scored.
4. Draw!
We’ll start with the class-level variables. At the class level (Game1.cs), add the following:
float[] paddleLoc = new float[] { 300.0f, 300.0f };
Vector2 ballLoc = new Vector2(400.0f, 300.0f);
Vector2 ballTraj = new Vector2();
bool playing = false;
Because we have two paddles, we might as well use a two-dimensional array for paddle
location, paddleLoc[]. Both paddles will start at location 300.0f, which is vertically centered on
our 800 × 600 screen. BallLoc, the ball location, is initialized as 400.0f, 300.0f, or dead center,
and ballTraj, the ball’s trajectory, is set to zeros. playing determines whether or not the ball is
in play, and is set to false.
Paddles and Gamepad Logic
We’ll just get the paddles moving around for now, and set up the collision and score-detection
logic in the next iteration. We tend to work iteratively (that is, code, then run, then code, then
run), because it’s nice to have some visual confirmation that we’re on the right track.
In Update(), add the following:
for (int i = 0; i < paddleLoc.Length; i++)
{
GamePadState state = GamePad.GetState((PlayerIndex)i);
paddleLoc[i] -= state.ThumbSticks.Left.Y *
(float)gameTime.ElapsedGameTime.Milliseconds * 0.5f;
if (paddleLoc[i] < 100.0f) paddleLoc[i] = 100.0f;
if (paddleLoc[i] > 500.0f) paddleLoc[i] = 500.0f;
if (!playing)
{
if (state.Buttons.A == ButtonState.Pressed)
{
playing = true;
ballLoc.X = 400.0f;
ballLoc.Y = 300.0f;
ballTraj.X = ((float)i - 0.5f) * -0.5f;
ballTraj.Y = ((float)i - 0.5f) * 0.5f;
}
}
}
base.Update(gameTime);
CHAPTER 2 ■ A CRASH COURSE IN XNA
29
Here, we are iterating through paddleLoc[], updating each paddle location based on the
associated gamepad. First, we’ll grab the state of the gamepad with GamePad.GetState. Notice
how we can cast index i to a PlayerIndex. GamePadState holds everything we need to know
about the gamepad: analog stick positions, buttons pressed, the directional pad (D-pad), and
so on.
The next few lines of code move our paddles around. The Update() method is set up with
one parameter: gameTime. We use gameTime to determine how much time has elapsed since the
last update. If we base all movements on gameTime, objects in the game will move at speeds
independent from the frame rate. If we did not use gameTime while updating objects, we would
end up with slowdowns reminiscent of old Nintendo days.
Because we’re using time-based movement, we update the paddle location by decrementing
its value by half the number of elapsed milliseconds multiplied by the left thumbstick’s Y value.
With GamePadState, up on the left thumbstick is 1, down is -1, and resting is 0. This is the oppo-
site of how screen coordinates work (0 is top; 600 is bottom), so we use the inverse in updating
paddle position. The left thumbstick’s Y value is multiplied by half of gameTime’s elapsed milli-
seconds to give us a good speed for time-based paddle movement.
The next two lines prevent the paddle from flying off the top or bottom of the screen.
The if clause that follows is the bit of code we’ll use to control the game state. Basically, if
the game state is playing = false, it checks if the current player has pressed the A button. If A
has been pressed, the ball location is reset to dead center, and the ball trajectory is set to be
diagonally away from the player who pressed A. The game state is switched to true.
This takes care of our first iteration in the logic department. Now let’s do some rendering.
In Draw(), add the following:
graphics.GraphicsDevice.Clear(Color.CornflowerBlue);
spriteBatch.Begin(SpriteBlendMode.AlphaBlend);
for (int i = 0; i < paddleLoc.Length; i++)
{
Rectangle destRect = new Rectangle(
(i * 736),
(int)paddleLoc[i] - 64,
64, 128);
spriteBatch.Draw(spritesTexture, destRect,
new Rectangle(i * 64, 0, 64, 128), Color.White);
}
spriteBatch.Draw(spritesTexture,
new Rectangle((int)ballLoc.X - 16, (int)ballLoc.Y - 16, 32, 32),
new Rectangle(128, 0, 64, 64),
Color.White);
spriteBatch.End();
base.Draw(gameTime);
30
CHAPTER 2
■ A CRASH COURSE IN XNA
We’re not doing anything much different here from our first iteration. The only real differ-
ence is that the spriteBatch.Draw() method is using a different overload to allow us to specify
a source rectangle. Remember how when we drew it the first way we ended up with the whole
image? Specifying a source rectangle allows us to render just one area of the source image at a time.
We’re defining the destination rectangle, destRect, to be relative to the location of each
paddle. The (i * 736) will cause paddle 2 to appear on the right side of the screen, because for
player 2, i will be 1, whereas for player 1, i will be 0. Pretty clever, right? We didn’t think so either.
The top Y value of destRect is (int)paddleLoc[i] - 64, which means that since the paddle will
be 128 pixels tall, it will end up drawn perfectly centered at paddleLoc[i]. The overload we’re
using for spriteBatch.Draw() here is as follows:
spriteBatch.Draw(Texture2D texture,
Rectangle destination,
Rectangle source,
Color color)
After the paddles are drawn, we draw the ball. The Draw() call does a similar thing
here—offsetting the top-left location of the destination rectangle by half of the rectangle’s
width and height.
Run it and see our moving paddles in action. Figure 2-7 shows an example.
Figure 2-7. Your paddles should now move.
CHAPTER 2 ■ A CRASH COURSE IN XNA
31
This is good progress, and all in a couple dozen lines of code. Now we can add the ball
update logic.
The Ball Logic
To update the ball, we need to do a few things:
• Update ball location by trajectory.
• Let the ball go out of bounds; set the game state to not playing if it does. (We’re not going
to record scoring.)
• Let the ball bounce off walls.
• Let the ball bounce off paddles.
First and foremost, we’ll check if playing == true. Here’s the rest:
if (playing)
{
float pX = ballLoc.X;
ballLoc += ballTraj *
(float)gameTime.ElapsedGameTime.Milliseconds;
if (ballLoc.X > 800.0f) playing = false;
if (ballLoc.X < 0.0f) playing = false;
if (ballLoc.Y < 50.0f)
{
ballLoc.Y = 50.0f;
ballTraj.Y = -ballTraj.Y;
}
if (ballLoc.Y > 550.0f)
{
ballLoc.Y = 550.0f;
ballTraj.Y = -ballTraj.Y;
}
if (ballLoc.X < 64.0f) TestBallCollision(0,
(pX >= 64.0f));
if (ballLoc.X > 736.0f) TestBallCollision(1,
(pX <= 736.0f));
}
base.Update(gameTime);
We’ll use the variable pX to store the previous x coordinate of the ball’s location. This will
come in handy for telling whether the ball has hit a paddle dead-on or on the side. If it hits on
the side, we won’t want to return it.
After updating the ball’s location by ballTraj, we check to see if the ball has gone out of the left
bounds (ballLoc.X < 0.0f) or the right bounds (ballLoc.X > 800.0f), and set playing to false if
32
CHAPTER 2
■ A CRASH COURSE IN XNA
this has happened. If the ball hits the upper (ballLoc.Y < 50.0f) or lower (ballLoc.Y > 550.0f)
boundaries, we move the ball to the location of that boundary and reverse vertical speed.
The next section contains a function, testBallCollision(), which we define as follows:
private void TestBallCollision(int i, bool reverse)
{
if (ballLoc.Y < paddleLoc[i] + 64.0f &&
ballLoc.Y > paddleLoc[i] - 64.0f)
{
if (reverse)
ballTraj.X = -ballTraj.X;
ballTraj.Y = (ballLoc.Y - paddleLoc[i]) * 0.01f;
}
}
This is a nifty little function. The parameter i refers to the index of the paddle being tested
(0 = left; 1 = right), and reverse indicates whether a collision will result in the ball’s horizontal
trajectory being reversed. Basically, if reverse is false, the ball’s most recent update did not
cross over the paddle’s leading edge, meaning that the ball has glanced off the side of the paddle. If
the ball’s most recent update did cross over the paddle’s leading edge, this means we just had
a direct hit, and the paddle should return the ball.
To test whether the ball crossed over, we call testBallCollision() with the following:
if (ballLoc.X < 64.0f) TestBallCollision(0,
(pX >= 64.0f));
Here, we’re testing if the ball’s X location is less than the left paddle’s leading edge, and
testing for collision while considering whether or not the ball has just crossed over this leading
edge. If ballLoc.X < 64.0f is true, TestBallCollision() is called with the reverse parameter
true if the ball’s previous location is >= 64.0f. The next line of code basically does the same
thing for the right paddle.
We have our fully functional, slightly Spartan XNAPong now, as shown in Figure 2-8.
And that’s it! Run it, and be enthralled by what we have called XNAPong.
We’re missing a few things, so we might as well continue our crash course, briefly touching
a few other XNA features. XNAPong 2.0, here we come!
CHAPTER 2 ■ A CRASH COURSE IN XNA
33
Figure 2-8. XNAPong 1.0 in all its glory
Adding a Background Image
XNAPong looks like it’s begging for a background image that is something other than corn-
flower blue, so let’s give it what it wants. We’re not going to introduce anything novel and new
here. We just want to illustrate one of the fun cases where a game can be made to look several
times better in no time.
Create an 800 × 600 image to fit snugly as our background. For our image, we added white
lines on the top and bottom as the “walls,” as shown in Figure 2-9.
34
CHAPTER 2
■ A CRASH COURSE IN XNA
Figure 2-9. Source image for the background
You won’t need an alpha channel for this image—we can draw the whole rectangle—so it’s
safe to save it as a bitmap in your gfx folder. Within Visual Studio, make sure you include the
background image by right-clicking in Solution Explorer and choosing Include In Project. We’ve
saved it as background.bmp.
Ready to add a background image in three lines of code? At the class level (again, every-
thing is going in Game1.cs), add the following:
Texture2D spritesTexture;
Texture2D backgroundTexture;
SpriteBatch spriteBatch;
In LoadGraphicsContent(), add this:
spritesTexture = content.Load<Texture2D>(@"gfx/sprites");
backgroundTexture = content.Load<Texture2D>(@"gfx/background");
Finally, in Draw(), add this:
spriteBatch.Begin(SpriteBlendMode.AlphaBlend);
spriteBatch.Draw(backgroundTexture, new Rectangle(0, 0, 800, 600),
Color.White);
CHAPTER 2 ■ A CRASH COURSE IN XNA
35
for (int i = 0; i < paddleLoc.Length; i++)
That’s it! We’ve done a real commendable job of making XNAPong less ugly and are well
on our way to making XNAPong 2.0. XNAPong in all its glory is shown in Figure 2-10.
Figure 2-10. Less-ugly XNAPong
Adding Rumble
As we continue tearing through the simpler features of the XNA Framework, force feedback
(rumble) is one we shouldn’t pass up. We can take care of it in a few lines, and it’s one of those
neat things that was either impossible or a horrendous hassle before XNA Game Studio 2.0.
We’ll go into more details about rumble input in Chapter 8. For now, we’ll just get it working.
Rumble is state-based, so if we set the gamepad rumble to 1 and forget about it, the thing
will never stop vibrating. We’ll create a class-level variable (in Game1.cs again) to track rumble:
float[] force = new float[] { 0.0f, 0.0f };
float[] paddleLoc = new float[] { 300.0f, 300.0f };
Now we’re getting into territory where it would be a better idea to keep all of these fields in
a Player class or something, but trust us, we’re not going to go much further. In Update(), add
the following:
36
CHAPTER 2
■ A CRASH COURSE IN XNA
for (int i = 0; i < paddleLoc.Length; i++)
{
GamePadState state = GamePad.GetState((PlayerIndex)i);
.
.
.
if (force[i] > 0.0f)
force[i] -= (float)gameTime.ElapsedGameTime.Milliseconds;
float t = (force[i] / 50.0f);
if (t > 1.0f) t = 1.0f;
if (t < 0.0f) t = 0.0f;
GamePad.SetVibration((PlayerIndex)i, t, t);
}
This is straightforward. First, we decrement force[i] by gameTime. We calculate t to be a
number between 0 and 1, and then set the GamePad vibration to t for both the left motor and the
right motor. The function setVibration() looks like this:
GamePad.SetVibration(PlayerIndex playerIndex,
float leftMotor,
float rightMotor)
An Xbox 360 gamepad has two motors, which are weighted differently. Off-brand game-
pads may yield slightly different results.
Finally, we’ll have ball collisions cause force feedback. In TestBallCollision(), add this:
if (reverse)
ballTraj.X = -ballTraj.X;
ballTraj.Y = (ballLoc.Y - paddleLoc[i]) * 0.01f;
force[i] = 100.0f;
This will cause force[i] to be at 100% for both motors at impact and reduce to zero over
one-tenth of a second. Actually, the gamepad’s motors won’t hit 100% speed, because that
takes a bit of time—much longer than one-tenth of a second. We’ll still get a nice bit of tactile
feedback, and you can always tweak it to your liking.
Run it, and enjoy a mainstay of modern console gaming on your Windows box!
Last But Not Least: Audio with XACT
Love it or hate it, the way to go for XNA audio is the Cross-Platform Audio Creation Tool (XACT).
Essentially, an XACT project organizes wave files and a healthy amount of metadata, allowing
users to model game audio—specifying things like volume and pitch variation, digital signal
processing (DSP) effects, and more—outside the game codebase. It’s as if Microsoft decided
what an excellent audio engine should look like, built it for you, and isn’t charging for it. On the
downside, if you’re used to making your own audio engine, you initially probably won’t like
having to do things the XACT way, but we think that overall the benefits of XACT far outweigh
any negatives.
CHAPTER 2 ■ A CRASH COURSE IN XNA
37
Creating Wave Banks and Sound Banks
Open XACT by selecting Start ➤ MS XNA GS 2.0 ➤ Tools TRA Microsoft Cross-Platform Audio
Creation Tool (XACT). XACT organizes sounds through wave banks and sound banks. Wave
banks consist of raw audio files with minimal metadata. Sound banks reference waves and
contain a lot of metadata—wave variations, pitch variation, and more. (We’ll cover XACT in
detail in Chapter 8.)
To create a new wave bank, right-click Wave Banks and select New Wave Bank. Open the
new wave bank, and from the Wave Bank window, right-click and select Insert Wave File(s).
Navigate to an audio file to use. We used zap.wav, which we put in a directory named sfx. As
you may have guessed, sfx sits next to gfx in the project directory. The Wave Bank window,
with our new zap wave added, is shown in Figure 2-11.
Figure 2-11. Wave Bank window in XACT
The zap wave is red, which means that the wave is not used in the sound bank. Let’s
remedy this! Right-click Sound Banks and select New Sound Bank. Open your new sound bank.
Here, you can define sounds and cues. There’s a bit of hierarchy here that we’ll explain more
fully in Chapter 8. For now, we’ll just create a new cue. Drag zap from the Wave Bank window
to the Cue pane in the Sound Bank window to create a new cue with associated sound, as shown
in Figure 2-12.
Figure 2-12. Sound Bank window in XACT
38
CHAPTER 2
■ A CRASH COURSE IN XNA
Now we have a zap cue. This is the object we’ll be playing from XNAPong. Essentially, we’ll
tell the audio engine to play the zap cue, which will play the zap sound, which will play the zap
wave with associated metadata. Notice that back in the Wave Bank window, zap is no longer red.
You’ll need to set the build paths for the wave bank and sound bank, but before that, you
need to save the project. Select File ➤ Save Project As and save the file in your sfx directory.
Next, in the Properties window, select Wave Bank, and set the values for Windows Build
Path and Xbox 360 Build Path to snd.xwb. Then select Sound Bank and set the values for Windows
Build Path and Xbox 360 Build Path to snd.xsb. The paths are shown in Figure 2-13.
Figure 2-13. Properties set for the sound bank
Save the project again. Now, in the Content project in XNAPong, add an sfx folder. The
sfx.xap XACT project file should show up, and its Build Action in the Properties window should be
Compile. If everything checks out, we’re ready to start coding!
Coding the Audio
At the class level (yes, still in Game1.cs), declare the three objects we’ll need for audio: AudioEngine,
WaveBank, and SoundBank. When the Content Pipeline processes our XACT project, it spits out
three files: the project file, wave file, and sound file with the paths that we specified from XACT:
AudioEngine engine;
WaveBank wave;
SoundBank sound;
To initialize the engine, wave bank, and sound bank, add some constructors in Initialize():
engine = new AudioEngine(@"sfx/sfx.xgs");
wave = new WaveBank(engine, @"sfx/snd.xwb");
sound = new SoundBank(engine, @"sfx/snd.xsb");
base.Initialize();
CHAPTER 2 ■ A CRASH COURSE IN XNA
39
Sound is now locked and loaded! We’ll have the sound play whenever the ball hits a paddle, so
we’ll add a line to play the cue in testBallCollision():
force[i] = 100.0f;
sound.PlayCue("zap");
There’s one more minor detail that we almost forgot, and have forgotten in the past, much
to our chagrin. If you do not give engine some frequent attention, bad things will happen: sounds
will start sounding choppy, refuse to play, and worse. Calling Update() allows the audio engine
a chance to breathe—that is, to dispose of old sounds, manage streaming audio, and the like.
In Update(), add the following:
engine.Update();
base.Update(gameTime);
XNAPong now has audio capabilities! Run it and see (or hear) for yourself. Shall we call this
XNAPong 2.0?
Conclusion
In this short chapter, we’ve gone over loading and drawing imagery, gamepad input, force
feedback, and audio. We’ve created a game that blows away every single video game from
before 1985 or so. Granted, the game is missing a lot of polish, but that’s not the point. Our
intentions were to briefly touch on all of the concepts and features of XNA we will be using
further down the road, in the upcoming chapters.
41
■ ■ ■
CHAPTER 3
Planning Your Game
A Nonscientific Take on the
Science of Game Planning
The goal of this book is to teach you, the aspiring independent game developer, how to create
a sweet game from start to finish. Seeing as we’re a bit closer to “start” than we are to “finish,”
we should dwell a bit on a debatably important, often unpleasant aspect: planning.
In large development projects, planning is crucial; projects fail because of ill-conceived
plans. Loose or incomplete design documentation leads to rambling development and mush-
rooming budgets, outright failure, and far worse. Can a project do worse than failing? There are
some games on the market that suggest the answer is “yes.”
Depending on your experience with software development, you may know that the
industry places a heavy emphasis on planning and design methodologies. The theory is that
when a project spirals out of control (no, not those spirals—we’re talking about the bad kind of
spiraling), bad planning and inappropriate methodologies are to blame. We believe that the
truth lies somewhere between incompetent planning and incompetent management. Thank-
fully, all of this discussion is moot, as we are not discussing a large development project, by-
the-books design methodologies, or any sort of extensive planning.
Because the topic at hand here is indie game design, we’re looking at a slightly different
beast. Planning is important, but if you’re a hobbyist or one-man team, development can be so
agile that it’s often more conducive to the quality of the overall game experience to create a
loose plan and let it evolve naturally than it is to employ a rigid design document. In the case of
an independent game developer, it becomes much more important to not go beyond what can
conceivably be done. Starting with a small and loose design document allows for a game to
grow past anyone’s expectations. Of course, these things have their limits.
Because we don’t have any hard numbers to back any of this up, we’re going to use one of
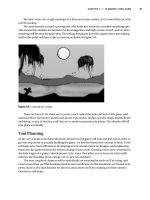
James’s games, The Dishwasher: Dead Samurai, as a case study.