ADOBE PHOTOSHOP FOR UNDERWATER PHOTOGRAPHERS- P3 ppt
Bạn đang xem bản rút gọn của tài liệu. Xem và tải ngay bản đầy đủ của tài liệu tại đây (946.82 KB, 30 trang )
BLOOMING EFFECT WITH SUBJECT IN FOREGROUND
Subject Selection. More times than not, you’ll find that your blooming effect
is situated behind a diver, part of a wreck, or coral extension. Since you cannot
use the Elliptical Marquee to select the affected area, you’ll have to use a new
approach. The first part of your task is to protect the subject and any nearby
objects from your editing attempts. Since most subjects will be much darker
than the blooming, you can use the Magic Wand to select the areas that you
want to protect. If you find you can’t select it all, or select too much, you can
fine-tune your selection with the Polygonal Lasso using add (+) or subtract (–)
icons. Inverse your selection, go to Select>Feather, and set the Feather Radius
at 1–2 pixels. You will generally find too many tonal variables in the scene, so
the Blur filters will rarely work.
Healing Brush. Go to the toolbox, select the Healing Brush, and be sure
to set it to the Replace mode. Drag and drop data from just outside the bloom-
ing area to inside. Work your way back and forth until you have the area inside
150 ADOBE
®
PHOTOSHOP
®
FOR UNDERWATER PHOTOGRAPHERS
Left—A more difficult blooming problem is when the effect is behind a subject as in this wreck
from the Solomon Islands. Right—Using the Magic Wand and the Polygonal Lasso tools, the
mast and dark foreground were selected away from the water and blooming effect. An inverse
selection was used to choose the blooming effect and surrounding water.
the bloom filled with data. It doesn’t have to look pretty, or be exact, as your
editing errors will actually help the effect later.
Go to the top of the editing screen and set the Healing Brush back to the
Normal mode, then go over the same areas again. This pass will smooth out
some of the rough edges. It still does not have to be perfect. For the final
touch, go to Filter>Render>Lens Flare and apply a lens flare effect to your
selection. If you find that it doesn’t totally cover the editing effects, use the
Undo or Step Backward command and set the Brightness slider at a higher
level.
In addition, there are several plug-ins that help solve complex problems such
as this one. For more information on underwater plug-ins, check out chapter
15.
EDITING BLOOMING EFFECTS 151
Left—The Clone and Healing Brush tools were then used to fill in the light density of the bloom-
ing effect with darker surrounding colors. When using this method, don’t worry about uneven
editing, as it will all be covered up using the next step in the process. Right—The Filter>
Render>Lens Flare filter was then selected and the pointer was placed in the middle of the
blooming effect. The selection mask will keep the effect from spilling into the mast and darker
foreground areas.
152 ADOBE
®
PHOTOSHOP
®
FOR UNDERWATER PHOTOGRAPHERS
Move the Brightness slider to the left or right until you have the desired effect.
T
here are times when you have achieved correct exposure, accurate
focus, and proper framing—but you still haven’t captured the essence
of the animal. In most cases this is due to problems with the back-
ground. Either the background is too busy or it is the same color as the ani-
mal, causing the animal to blend in. Often you can improve the quality of your
results by opening your f/stop and reducing the depth of field, but you may
also sacrifice important detail in the animal.
S
ELECTION TOOLS
The solution falls on Photoshop’s capability to separate the animal from the
background, and then adjust the back-
ground’s visibility. This two-step
process requires extensive knowledge
of the selection tools. The tools of
choice are the Polygonal Lasso tool,
the Magnetic Lasso tool, and the Magic Wand. To maximize your editing capa-
bility, it’s best to combine the strength of all three tools.
Before you even consider using one of the selection tools, it is important
that you look closely at the contrast and color differences between the subject
and the background.
Magic Wand. Creating a selection with the Magic Wand is an excellent
solution when there is considerable tonal difference between the subject and
the background. For example, a green nudibranch on a brown background will
easily separate with the Magic Wand, even if the background is busy.
Magnetic Lasso. If the tonality of the subject and background are similar,
your best bet is to activate the Magnetic Lasso. Set the tool to a size slightly
larger than the edge that needs to be detected. Dragging the Magnetic Lasso
along the edge will automatically drop selection points. (If it jumps to an area
you don’t want to select, use the Delete key to back up. Then manually click
the mouse as though it was a Polygonal Lasso tool, and it will add points to
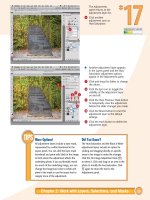
CHANGING BACKGROUNDS 153
14. CHANGING BACKGROUNDS
DRAGGING THE MAGNETIC LASSO ALONG
THE EDGE WILL AUTOMATICALLY DROP
SELECTION POINTS.
keep you in line. When you get to areas with more tonal difference, continue
dragging the cursor along the edge, and it will automatically drop points along
the line.)
Polygonal Lasso. Once you have made the selection with the Magnetic
Lasso, you can go back with the Polygonal Lasso and fine-tune the selection by
choosing the Add to Selection or Subtract from Selection icon in the upper-left
corner of the editing screen. Now go to Select>Feather and set the Feather
Radius to 1–2 pixels to blend the edge with the soon-to-be-modified back-
ground. To finalize your selection, go to Select>Inverse, or hit Shift+Ctrl/
Cmd+I to inverse your selection.
B
ACKGROUND IMAGE ADJUSTMENTS
Levels Editor. With only the background area of your image selected, you can
now open the Levels editor and reduce the midtone detail to separate the sub-
ject from the background. You can also use the right-hand wedge under the
grayscale in the Levels editor to reduce the exposure in the highlights, which
will also help the separation process.
Saturation. Another solution is to press
Ctrl/Cmd+U keys and open the Hue/
Saturation menu. You can change the hue,
brightness, and even lower the saturation of
the background so that it appears flatter
Above—This is a good example of a subject that blends into the background. The fish will be
difficult to separate from the background because of its fine detail and the fact that the focus
falls off toward the tail. Left—The Magnetic Lasso tool is the tool of choice for this selection, and
it can be accessed by clicking on the small black arrow in the Lasso tool field.
154 ADOBE
®
PHOTOSHOP
®
FOR UNDERWATER PHOTOGRAPHERS
than the subject. Care must be taken not to overdo the effect; otherwise, it will
look like the animal was plucked out and pasted on a different background.
With any of these solutions, you will find a few light spots in the background
that still detract from the main subject. You can use either the Clone tool or
the Healing Brush to easily blend these bright objects into the background.
CHANGING BACKGROUNDS 155
Top—When you select the Magnetic Lasso tool, the Options menu bar appears at the top of the
editing screen. You can make a single selection, add to or subtract from the selection, or use the
intersection of selections. You will find the Feather setting and also the Anti-alias box, which is
usually checked to keep the edges of your selection smoother. The Width box determines the size
of the work area, and the Edge Contrast determines what contrast is needed to make a selec-
tion. The Frequency box determines how often points are dropped as you move along with the
Magnetic Lasso. The higher the number, the closer together the selection points. Above—This
enlarged section shows how the Magnetic Lasso tool works as it moves along the edge of the fish.
156 ADOBE
®
PHOTOSHOP
®
FOR UNDERWATER PHOTOGRAPHERS
EXTRACT FILTER
If you want an even more sophisticated method for selecting image areas away
from backgrounds, you can try your hand at using the Extract command.
When you open this plug-in from the Filter pull-down menu, your first task is
to zoom in on an edge that you want to separate. You then select the High-
lighter Pen from the Extract “toolbox” and mark all the edges you want to
keep. Once you go completely around your selection, you can use the paint
bucket to fill in the rest. Check the Smart Highlighting box to help speed up
the process along areas with well-defined light edges.
CHANGING BACKGROUNDS 157
Facing Page—(Top) The bottom layer (Background) is the original image. The Background
Copy layer was used to adjust the focus, brightness, saturation, and/or contrast. The selection
of the fish was copied to the top layer using the Ctrl/Cmd+J keystroke. A layer mask was added
after right clicking on the thumbnail and using the Select Layer Transparency command.
(Bottom) This image shows the effect of the Blur filter. Above—This is the final image after
contrast, brightness, and saturation changes were made to the Background Copy layer.
rate mask of the subject. You can then move the selected subject from back-
ground to background or paste it back into the original image. If you find that
the Extract function has captured more data than you want, you can use the
Eraser tool to remove sections from the layer. If you set the Eraser tool to
10–20%, you can drag it across small fish fins to make them transparent. This
Facing Page—The extremely complicated
features of this Fijian lionfish make it diffi-
cult to create selections using the Lasso and
Magic Wand tools. Top Left—When you go to
Filter>Extract, this toolbox will be displayed
along with your image. Moving your mouse
over the tools will display the lines of text
shown. The Edge Highlighter is used to draw
along the selection edges and the Fill tool will fill in any closed areas. The Eraser tool erases
unwanted areas of the selection, while the Eyedropper tool selects the colors you want to keep. The
Cleanup tool and the Edge Touchup tool are used to fine-tune your extraction. The Zoom and
Hand tools allow you to navigate around your image as you extract an edge. Top Right—This
enlarged section shows how the Edge Highlighter is used to find the selection edges. Bottom
Right—This is the lionfish image with the completed Edge Highlighting.
160 ADOBE
®
PHOTOSHOP
®
FOR UNDERWATER PHOTOGRAPHERS
CHANGING BACKGROUNDS 161
is a very powerful selection tool, but becoming proficient in its use takes some
practice, so be patient.
L
ENS BLUR
Probably the most effective method for separating subjects from the back-
ground is to modify the depth of field in the image. Normally, it is best to
attempt this as you are shooting the image, but we’ll show you how you can
accomplish the effect after the image is taken.
One way this can be accomplished is via Filter>Blur>Lens Blur. The quality
of the Lens Blur filter is outstanding, but its complexity makes it difficult to
Facing Page—(Top) The Fill tool was then used to fill inside the selected area. (Bottom) this
image shows the lionfish selection on a transparent background after the Extract filter was used.
Above—The extracted Lionfish was copied and pasted onto a black background.
162 ADOBE
®
PHOTOSHOP
®
FOR UNDERWATER PHOTOGRAPHERS
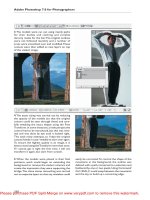
Top—The background in the digital camera image is slightly out of focus. Above—The fish was
selected using the Polygonal and Magnetic Lasso tools.
use. Even that won’t stand in your
way once you see its potential, so here
goes.
Save the Selection as an Alpha
Channel. The first step in using the
Lens Blur filter is to save the portion
of the image that you have selected
away from the background. When
you save this selection (Select>Save
Selection), you create what is called an
Alpha channel in the Channels palette.
Make sure that the selection marquee
is visible. If it isn’t, go to Select>Load
Selection and reload the saved selec-
tion. Then reverse the selection with
the Select>Inverse command so that
you have the background selected.
CHANGING BACKGROUNDS 163
When the selection is saved, it will appear as a
black & white channel.
164 ADOBE
®
PHOTOSHOP
®
FOR UNDERWATER PHOTOGRAPHERS
Top—The Alpha channel was selected from the bottom of the Channels palette, then filled with
a Gradient Fill from top to bottom. Above—When you click the RGB channels back on, you
will be presented with an image that shows the original and the gradient mask.
Gradient Fill. Now go to the toolbox and set
the foreground to black and the background to
white. Look at the Channels palette and make
sure that you have the Alpha channel selected.
The RGB channel may be turned off, so turn it
back on by clicking on the eye icon. Move to the
Gradient Fill and click on a point at the top of the
screen, then drag to the bottom. A graduated
mask should now appear from top to bottom. In
the Channels palette, select the RGB layer
(instead of the Alpha Channel).
Apply Lens Blur. Now go to Filter>Blur>
Lens Blur, and don’t be afraid if your image
opens up with everything out of focus. This is
CHANGING BACKGROUNDS 165
Above—The Filter>Blur>Lens Blur filter can be accessed
from the top of the editing screen. Right—When the Lens
Blur menu opens, you are presented with several options for
creating a Lens Blur effect. The critical settings are the
Source (Alpha 1), Blur Focal Distance (255), Invert (un-
checked), and the Radius (100).
because you haven’t ever used this command before (or it has reverted to the
last settings you used). To properly set the menu options, set the Source to the
Alpha channel and the Blur Distance at 255. This should put the focus point
at the bottom of the image. If you find the foreground is out of focus, uncheck
the Invert box or set the Blur Distance to 0. The Radius slider determines the
degree of blur, and it will provide full lens blur when set at 255 and none if set
to 0.
You will note that there are dozens of other controls in this very complex
filter. Play with them one at a time to see what each does. Keep in mind that it
takes a long time for this filter to do its job, so you might want to take a cof-
fee break. We recommend that when you first try this filter, you practice on an
image scaled down to 1024 pixels on the longest side. Once you get it work-
ing, you can tackle larger files. Since it is so complex, we also recommend that
you make an Action to automatically complete these steps with other images.
166 ADOBE
®
PHOTOSHOP
®
FOR UNDERWATER PHOTOGRAPHERS
Here is the final image after the Lens Blur filter was applied.
CHANGING BACKGROUNDS 167
Top—This ghost pipefish has very fine detail that blends into the background. Bottom—The fish
was selected with the Polygonal Lasso tool and copied to a new layer. Next, the background was
blurred with the Lens Blur filter. The Eraser tool was used on the selected layer to allow the
transparent fins to show through.
T
o get the most power out of Photoshop, you should consider installing
several third-party plug-in filters. These specialized filters offer image
correction and manipulation options to help your editing process. At
last count there were more than 10,000 of these filters on the market, and they
enable you to do just about everything you can imagine! The bulk of these fil-
ters are simple to use and cost very little or come as a free download. There are
about 300–500 commercial-grade plug-ins that cost a bit more but offer some
of the best imaging effects ever.
168 ADOBE
®
PHOTOSHOP
®
FOR UNDERWATER PHOTOGRAPHERS
15. UNDERWATER PLUG-IN APPLICATIONS
The Focus Magic plug-in is very popular with underwater photographers because it is easier to
understand than Adobe’s Unsharp Mask. It asks you to select the type of image (film, digital,
etc.), automatic blur width, amount, and the type of noise reduction needed. A large naviga-
tor window is in the upper-left corner of the menu, and there are before-and-after thumbnails
in the upper-right corner of the menu.
The plug-in world is so big that we have devoted an entire book to the sub-
ject called Plug-ins for Adobe
®
Photoshop
®
, also from Amherst Media. If you are
really serious about editing your underwater images, you should add this book
to your editing resources. The plug-ins listed below are some that we consider
essential for underwater image editors.
F
OCUS MAGIC
www.focusmagic.com
If you are having trouble understanding and working with the Radius, Thresh-
old, and Amount sliders used in Photoshop’s Unsharp Mask or Smart Sharpen
functions, you might want to consider trying the Focus Magic plug-in. When
UNDERWATER PLUG-IN APPLICATIONS 169
Right—A close-up section
of this clown fish shows that
the image is soft in focus.
Below—The final image
shows a marked increase in
sharpness.
170 ADOBE
®
PHOTOSHOP
®
FOR UNDERWATER PHOTOGRAPHERS
Top—To protect itself from
predators, the ghost pipe
fish carefully camouflages
itself against the back-
ground, but this makes
viewing an image of it very
difficult. Center—Andro-
meda’s VariFocus plug-in
filter works much like the
Lens Blur filter, except that
many of its features are
automated, which makes it
easier to use. First select the
fish away from the back-
ground and then inverse
the selection. Open the
Filter>Andromeda>Vari
Focus filter, and select the
desired gradation from the
lower-right box. Rotate the
effect if necessary before you
move the slider on the lower
left to increase or decrease
the amount of defocus. A
big advantage to this filter
is that you can select the
center point of the focus
and, as you move it to a
different position, the re-
sults are updated in the
large preview screen. Bot-
tom—This final VariFocus
image gives the appearance
of a
rotated depth of field,
which allows the fish to more
easily separate from the
background.
you start this program, it guides you through the sharpening process with sim-
ple and easy to understand questions. It asks about the type of image you are
sharpening and just how much you want to sharpen it. The plug-in takes a con-
siderable time to sharpen the image, which makes us assume that it is working
hard and doing a superior job. In all of the images where we have used Focus
Magic, we have found that this plug-in beats all the Photoshop sharpening
tools hands down.
A
NDROMEDA VARIFOCUS
www.andromeda.com
In chapter 14, we showed you a complex method for changing the depth of
field in an image. Now you can take that same image with its selected subject
and create an effect similar to Photoshop’s Blur filters. The difference is that
Andromeda’s filter is much easier to use, features more control over the depth-
of-field settings, and renders the image in a fraction of the time. If you take
photos of fish and other
critters in open water, this
plug-in is a must.
A
UTOFX MYSTICAL
LIGHTING
www.autofx.com
This is one of our favorite
plug-in filters. With this
plug-in, you can add light
beams to any type of light
source. The best part of all
is that this filter duplicates
real-world lighting so well
that you would be hard
pressed to tell that the
effect isn’t real. The beam
UNDERWATER PLUG-IN APPLICATIONS 171
This film image was taken of a
diver with his flash set to slave.
The image looks good but could
be further enhanced.
itself can be rotated and/or extended, and its angle can be changed. The filter
even follows the laws of physics, producing light falloff and soft edges as its
light projects out from the source. This filter is a must for images with a cam-
era flash or flashlights in the scene.
D
IGITAL ELEMENTS AURORA
www.digitalelements.com
If you like to put on digital slide presentations for your local dive club, there is
a special plug-in that creates real-world backgrounds. We use this for all our
lecture titles. This plug-in takes a blank image and creates skies, clouds, water,
172 ADOBE
®
PHOTOSHOP
®
FOR UNDERWATER PHOTOGRAPHERS
Above—The Light Caster plug-in from AutoFX allows you to add Hollywood-style beams of
light. After the plug-in is loaded, click on the screen and a T-shaped icon will appear. Stretch
the top of the T to match the width of the exit point of the light and assign the bottom of the T
to a beam direction. Slider controls in the plug-in allow you to change the beam angle, adjust
light falloff, or alter the softness and color of the beam. Facing Page—The Light Caster plug-
in can be applied directly to your image, but if you want even more control, apply it to a sepa-
rate layer.
UNDERWATER PLUG-IN APPLICATIONS 173
or sunset imagery. Most importantly, it has a full section for creating under-
water background scenes, complete with sun rays filtering down through the
waves. Once you have your scene picked, you can use a Variations command to
slightly alter the background for even more options.
C
OREL KPT LENS FLARE
www.corel.com
In chapter 13, we used the Photoshop Lens Flare filter to remove the bloom-
ing effect in a photo. Corel’s KPT version of the Lens Flare filter is much more
powerful and has dozens of preset flare controls. You can even save each of
174 ADOBE
®
PHOTOSHOP
®
FOR UNDERWATER PHOTOGRAPHERS
Top—A variety of creative
underwater backgrounds
can be produced with the
Digital Elements Aurora
plug-in filter. This plug-in
creates backgrounds for sky,
sun, clouds, and land-
scapes, but the underwater
options are unique. There
are dozens of controls for
camera angle, distance
underwater, sun brightness,
refraction, water color,
and clarity of the water.
Once you have an image
you like, you can create sev-
eral variations that can be
saved and recalled later.
Bottom—This plug-in can
be used on a blank image
or applied to any of the lay-
ers in a nondestructive
editing environment.