ADOBE PHOTOSHOP FOR UNDERWATER PHOTOGRAPHERS- P6 pptx
Bạn đang xem bản rút gọn của tài liệu. Xem và tải ngay bản đầy đủ của tài liệu tại đây (844.83 KB, 30 trang )
Selectively Sharpen. If you want to selectively control the sharpening
effects, you can add a mask from the Layers palette and use the black brush to
remove—or reduce—sharpening in particular areas. This is often handy if the
overall image needs no sharpening but an animal’s eye could use a bit.
Going Back. If you sharpen the background image after you have made sev-
eral adjustments to the image using Adjustment Layers, the result is virtually
permanent. It can be reversed but you will find it very difficult to remove the
sharpening effect and still maintain the adjustment. If you find yourself in this
bind, load the original file, copy it to the clipboard, and then paste it into the
layer version just above where the background was sharpened. This layer will
cover up the sharpened background and still allow the effects of the Adjust-
ment Layer above it. The previously mentioned method of duplicating the
Background layer and then sharpening the duplicate is still the best choice.
B
URNING AND DODGING TECHNIQUES
If you want to burn and dodge areas of an image and would like to be able
to go back and edit the photo later, then you should copy the Background layer
using the Ctrl/Cmd+J shortcut and use the Burn and Dodge tools on that
duplicate layer. If you want to remove or reduce the effect on the layer, you can
add a Layer Mask, and then use the black brush to create the desired effect.
60 ADOBE
®
PHOTOSHOP
®
FOR UNDERWATER PHOTOGRAPHERS
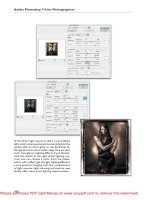
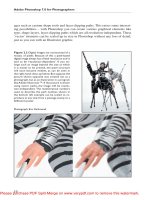
The burning and dodging was
done by adding a new layer
and mask, and setting the
blending mode to Soft Light.
The black brush was then used
to burn in several areas around
the fish. A Levels Adjustment
Layer was also added to correct
the exposure of the fish, and a
Clone/Healing Brush layer was
added to remove some bright
spots.
Top Left—The tones in the background make it difficult to see the fish. Top Right—The Levels
Adjustment Layer was added to tweak the color and brightness of the fish. Bottom Left—The
Clone tool was then used to remove hot spots. This is the screen image when you turn off all lay-
ers except the clone layer. Sometimes this is helpful to fine-tune your cloning, or find areas to
remove. Bottom Right—A new layer and mask were added, and the Blending mode was set to
Soft Light. A black brush was then used to burn the area around the fish. This is the screen
image when you turn off all layers except the Burn & Dodge layer.
dodging, especially when working in large areas, make an area selection, and
then add an Adjustment Layer. Photo-
shop will not only add the Adjustment
Layer but will also add a special mask
that restricts the adjustment to just
the selected area. With the mask sel-
ected, you can then use the Brush tool set to black to reduce or remove the
affected area. If you notice a slight line along the selection edge, you can use a
Gaussian Blur filter on the mask to slightly diffuse the edges between the edit-
ed and non-edited area.
Blending Modes. Another nondestructive editing approach requires that
you first add a new layer (using the Create a New Layer icon at the bottom of
the Layers palette) and then set the blending mode (found at the top of
the Layers palette) to Soft Light. You can try some of the other blending
modes, but we find that this one seems to work the best. You can select a black
brush with a low opacity setting of 10–30% to stroke the areas you want to
burn.
Use Separate Layers. If you want to dodge your image, you could set the
brush to white and dodge on the same Adjustment Layer. Since these layers
don’t require much storage space, it might be better to make another new layer
and use it just to dodge specific areas. This way you have one layer for dodg-
ing and a separate one for burning for maximum control. In order to keep the
layers straight, double click on the name of the layer in the Layers palette and
give it the proper label. If you want to remove portions of the burned or
dodged areas from either layer, you can switch to the Eraser tool and use it to
remove the editing.
A
DVANCED LAYERING TECHNIQUES
When working with layers, you will have the most control when you combine
the selection tools, Layers, and Layer Masks. Before you attempt this type of
complex layer editing, you should have a good understanding of how to select
portions of an image. We devoted an entire chapter to the subject in our book,
Digital Imaging for the Underwater Photographer.
ADJUSTMENT LAYERS 63
Facing Page—This image shows the final fish portrait after several layer adjustments have
been added.
IF YOU WANT TO DODGE YOUR IMAGE, YOU
COULD SET THE BRUSH TO WHITE AND DODGE
ON THE SAME ADJUSTMENT LAYER.
The tools you will be using for selection layers are the Lasso, Polygonal
Lasso, Magnetic Lasso, and Magic Wand. You can also use the Select>Color
Range pull-down menu option. If you are not familiar with this tool, you need
to improve your expertise before attempting layer selections.
When working with selections, the key is to first select the area you want to
adjust or modify. Feather the selection if you want, but keep in mind that you
can blur the layer mask in the layer, which in effect accomplishes the same
thing. Next, go to the Layers palette and make sure you have selected the
Background layer or layer you are selecting from. Press the Ctrl/Cmd+J short-
cut command to copy the selection to a new layer.
In the Layers palette, move your cursor over your new layer selection and
right click on the thumbnail. Move down to Select Layer Transparency in the
drop-down menu and click on it to add the selection marquee to that layer. Go
to the bottom of the Layers palette and click on Add Layer Mask icon to add
a mask to this new layer. With this mask in place, you can select a brush, set
your foreground color to black, and paint away any portion of the layer that
you don’t want to use in your adjustments.
64 ADOBE
®
PHOTOSHOP
®
FOR UNDERWATER PHOTOGRAPHERS
This image is off-color, and the foreground and the background blend together.
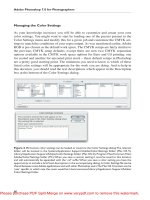
ADJUSTMENT LAYERS 65
This screen shot shows the Layers palette with all the layer selections used in this exercise. The bot-
tom thumbnail is the original image. Two groups were created to hold the foreground and back-
ground separately. The eel was selected using the Polygonal lasso and copied via the Ctrl+J
shortcut so that it is the bottom image in the first group. We right clicked on the thumbnail and
used the Select Layer Transparency command to load the selection back in. We selected the new
mask to add a mask to this layer. We then activated the Select Layer Transparency command
again, and added a new Levels Adjustment Layer from the bottom of the Layers palette. We
adjusted the eel until it was the right brightness and color. We loaded the selection again,
inversed the selection, selected the Background layer, and used the Ctrl+J shortcut to make a
new Background layer. A second new group was created and the Background layer was
dragged to that group. We right clicked on the new thumbnail and loaded the selection for that
layer, then added a new mask to that layer. Loading the selection one last time, we added a
Hue/Saturation layer from the bottom of the Layers palette. The lightness and saturation were
modified so that the background was darker and more neutral, making the eel more visible.
66 ADOBE
®
PHOTOSHOP
®
FOR UNDERWATER PHOTOGRAPHERS
Top—This is the screen preview of the eel layer with the background image turned off. Above—
This is a composite of the corrected eel on the background image.
Top—Preview image of background selection and mask with the eel image turned off. Above—
Final composite image with all layers turned on.
Choose the Select Layer Transparency option again, then go back down
to the bottom of the Layers palette and click on the type of adjustment you
want to make to the new layer. A new Adjustment Layer will then appear above
the new layer with its own mask. You can now select this mask and use one
of the Blur filters to blur the edges of the adjustment with the background
image.
This same layer selection technique can be used with new layers created for
the Clone tool, Healing Brush, or the Burn and Dodge tool adjustments dis-
cussed earlier in this chapter. Con-
ducting this type of selective layer
editing can make for a rather cluttered
Layers palette, so we recommend that
you create groups within the Layers
palette and separate the different parts of the image into these group folders.
This grouping concept works much like the tree and folder system found in
Windows Explorer.
68 ADOBE
®
PHOTOSHOP
®
FOR UNDERWATER PHOTOGRAPHERS
CREATE GROUPS WITHIN THE LAYERS PALETTE
AND SEPARATE THE DIFFERENT PARTS OF THE
IMAGE INTO THESE GROUP FOLDERS.
W
hether you shoot film or digital, color and exposure are the two
biggest problems you will encounter. This is due to the nature of
the underwater environment and how it affects photography. Light
refraction, time of day, water column, extreme flash falloff, and the angle of the
sun all contribute to the problem. The
good news is that Photoshop has sev-
eral very powerful tools that can be
used to combat these issues. Your tool
selection depends strictly on personal
preference and your editing skill level. There is no best solution, as they all
work fine.
L
EVELS EDITOR
The most popular tool for making exposure corrections is the Levels editor. It
can be accessed multiple ways: from the Image>Adjustments>Levels menu at
the top of the screen, the keyboard command Ctrl/Cmd+L, by pressing F7,
and via the Create New Fill or Adjustment Layer icon at the bottom of the
Layers palette. Once the Levels editor opens, a histogram displays the data for
your image showing the shadows on the left, highlights on the right, and mid-
tones in between.
Usually the first step in editing underwater images is to move both the right
and left sliders to readjust any exposure problems in the highlights and shad-
ows. You can then slowly move the middle slider to the left to increase the mid-
tone detail in the image. You will notice that both the image on the screen and
the histogram will reflect this new data arrangement.
The Levels editor can also be used to correct severe color shifts such as those
found in available light images. Instead of using the RGB (default) composite
setting at the top, you should access each individual channel and adjust the
highlight, midtone, and shadow sliders until you have good exposure and color
balance. Start with the red channel, and move the left (shadow) slider until the
ADVANCED COLOR AND EXPOSURE CORRECTIONS 69
7. ADVANCED COLOR AND
EXPOSURE CORRECTIONS
WHETHER YOU SHOOT FILM OR DIGITAL,
COLOR AND EXPOSURE ARE THE TWO BIGGEST
PROBLEMS YOU WILL ENCOUNTER.
small wedge is positioned directly under the data. Then do the same with the
right (highlight) slider and repeat the process with the other two channels. Go
back to the red channel and move the middle (midtone) slider until you have
corrected the blue shift that is a common problem with underwater images.
You then may have to go to the other two channels and move the middle slid-
er a bit to achieve the best color balance.
Eyedroppers. Another approach to using the Levels editor is with the three
eyedroppers found in the lower-right corner of the Levels menu. If you know
an area in your photo should be pure white, you can select the white eyedrop-
per (located on the right) and click on that area. The entire image will then
shift colors and Photoshop will create a new histogram that reflects this data
change. The same goes for a black area if you use the black eyedropper (locat-
ed on the left). If there is a neutral point in the scene, such as a scuba tank, you
can try the middle eyedropper on that specific area to see if it will correct the
color balance.
70 ADOBE
®
PHOTOSHOP
®
FOR UNDERWATER PHOTOGRAPHERS
The Options box at the bottom of the Levels editor opens the Auto Color Correction menu. The
three boxes at the top of the menu allow you to quickly move through Auto Contrast, Auto
Levels, and Auto Color, without having to open and close each one to see the effect.
It should be noted that the eyedroppers work best on images with only a
slight color shift. If you try them on images with severe color shifts, such as
available light images, you may end up with an unacceptable posterized image.
A
UTO FUNCTIONS
The fastest way to balance your image for color, contrast, and exposure is via
the auto functions. You can access each option through two avenues. When
you select any of these functions from the Image>Adjustments function at the
top of the main editing screen, your image automatically adjusts the levels, con-
trast, and color, depending on your selection. If you are dissatisfied with your
results, you must use the Undo or Step Backward command before trying one
of the other auto functions. Remember that the Undo command allows you to
go back one step at a time, and the Step Backward command works its way
back through the history states.
ADVANCED COLOR AND EXPOSURE CORRECTIONS 71
Quick and easy color correction can be accomplished by going to Image>Adjustments>Auto
Levels. If it doesn’t work, you can Undo or Step Backward and try more advanced color cor-
rection methods.
Options. An even faster way to use the automatic functions is to click
on the Options button in the Levels palette. When you press this button,
Photoshop opens an Auto Color Correction palette with three algorithms:
Enhance Monochromatic Contrast, Enhance Per Channel Contrast, and Find
Dark & Light Colors. The main dif-
ference you will find in using the
Options selection method is that you
can choose any of the three options
and, if dissatisfied with the results, you
can simply select the next one. You do not have to use the Undo or Step
Backward commands, making this a time-saving feature.
The Enhance Monochromatic Contrast function is the same as the Image>
Adjustments>Auto Contrast command found at the top of the main editing
screen. This button adjusts contrast and provides little or no change to the
color and gamma.
The middle algorithm in the list, Enhance Per Channel Contrast, is really
Auto Levels in disguise. When selected, it will readjust the white and black
points and midtone detail. There is also a box at the bottom of the palette that
allows you to select this or any of the algorithms as the default correction that
is applied when you select the Options function.
Find Dark & Light Colors accesses the same function as selecting Image>
Adjustments>Auto Color. With this option, Photoshop will attempt to color
balance both highlight and shadow, and then spread the remaining data in
between those points.
C
URVES EDITOR
If you find that the three algorithms accessed through the Levels editor’s
Options button don’t provide adequate control for increasing the midtone lev-
els, you can open the Curves editor. This can be done from the Image>
Adjustments pull-down menu, via the keyboard command Ctrl/Cmd+M, or
by pressing the F7 key, and then clicking on the Create New Fill or Adjustment
Layer icon at the bottom of the Layers palette and accessing Curves.
Add Control Points. When this advanced menu opens, you are presented
with a straight line that plots the photo’s density versus exposure for RGB plus
the individual color channels. To start your editing, click on the three areas
where the vertical and horizontal grid lines and the curve line intersect. You can
add more points later if necessary, but these three points will provide the most
72 ADOBE
®
PHOTOSHOP
®
FOR UNDERWATER PHOTOGRAPHERS
AN EVEN FASTER WAY TO USE THE AUTOMATIC
FUNCTIONS IS TO CLICK ON THE OPTIONS
BUTTON IN THE LEVELS PALETTE.
midtone control. To increase the midtone detail, slowly move the bottom
point up and to the left. You will note that the midtone detail will increase dra-
matically. Be careful not to go too far as you could get unnatural tonal values
in the shadows.
Now move the top point down and to the right a little to protect and main-
tain the highlight detail. In most cases, you will move this highlight point less
than the lower shadow point. The middle point generally is not moved as it is
used as a pivot point.
Adjusting Specific Areas. Sometimes you will want to adjust a specific area
in the image but won’t know where that data falls on the curve. Hold down
the Crtl/Cmd key and click on the area of the image that you wish to adjust.
ADVANCED COLOR AND EXPOSURE CORRECTIONS 73
In the Curves editor, you can add points to the curve (which starts out as a straight line) and
bend the line upward to increase brightness and detail or pull down to darken or decrease
detail. You can also hold down the Ctrl/Cmd key and click on a specific point in the image to
add its corresponding point to the curve.
Its position on the curve will show up so you can move and adjust that point.
To give yourself added control when adjusting this area, place a control point
above and below your selection point. The rest of the curve will remain intact
as you make your adjustment.
Multiple Problems. When you have both exposure and color shift prob-
lems, you should first set the black and white points of the photo. It is very
important that you select the most-black and most-white points; otherwise,
the entire gamma range will be amiss. If the intended black and white areas are
clear cut, then use the black and white eyedroppers to set each point. Some-
times it may be difficult to find the black and white points, so we’ll show you
another selection method.
Finding White and Black Points. Select the Eyedropper tool from the
toolbox (located just above the Zoom tool). Now click on the Create New Fill
or Adjustment Layer icon at the bottom of the Layers palette and select
Threshold to add a Threshold adjustment layer. As you move the slider in the
Threshold menu to the far left, you will see the deepest shadow area in the
image. Hold down the Shift key, click on that point, and Photoshop will cre-
ate a small crosshair with a number beside it.
Move the Threshold slider to the right, and hit Shift and click again to set
the highlight point. When you exit the Threshold menu, your numbered cross-
hair points will show on the original even if you delete the Threshold layer.
This makes it easy for you to use the
black and white eyedroppers on these
points to adjust the full tonal range on
the photographic curve. If there are
no color shifts, you can click a point in
the middle of the curve, and raise it or
lower it to adjust midtone detail.
Available light images may respond
dramatically and produce unnatural
colors with the use of eyedroppers. If
that’s the case, then ignore the eye-
droppers and use points on the curve
to adjust both the exposure and color.
Color Shifts. If you have a color
shift, you should go to the top of the
Curves editor and select the affected
74 ADOBE
®
PHOTOSHOP
®
FOR UNDERWATER PHOTOGRAPHERS
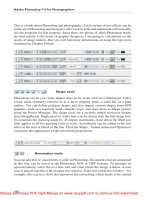
The Threshold layer is added to serve as an
informational layer where you can find your
white and black points in the image. When
you have located the black and white points,
turn the layer off by unchecking the eye icon to
the left of the Threshold layer.
channel. Click on the middle or lower end of the curve and move it up or down
in an effort to correct the color shift. For example, you might have an available
light image that is flat and has a bluish shift. To eliminate the problem, you
would first set the black and white points as described above, and then select
the blue channel. Place a point in the mid-lower section of the curve and drag
it downward. You will be able to see an immediate change.
S
HADOW/HIGHLIGHT
More recent versions of Photoshop have a new tonal control called Shadow/
Highlight, which is found in the Image>Adjustments pull-down menu. When
this menu opens, you are presented with Shadow and Highlight sliders. You
will note that the shadow adjustment is automatically set to provide 50% more
midtone detail. This default setting can be adjusted; a higher percentage will
increase the midtone detail, and a lower percentage will decrease the amount
of midtone detail.
ADVANCED COLOR AND EXPOSURE CORRECTIONS 75
Top—With the Threshold layer
turned on, move the slider to the
right until a small amount of
data remains. To show how it
works, we pasted an onionskin
of the original image over the
Threshold layer. When you find
the best highlight, select the Eye-
dropper tool, press Shift, and
click the mouse to set its loca-
tion. Bottom—To find the black
point, move the slider to the left
until a small amount of data
shows on the screen. We placed
an onionskin overlay so that you
can see the relationship of the
shadows to the original image.
When you find the shadow area,
select the Eyedropper tool from
the toolbox, press Shift, and click
to set the black point.
The Highlight slider is set to 0%, but the setting can be increased or de-
creased to adjust the exposure in the highlights. If you have specific levels that
you use on a regular basis, you can save them as a preset and load them any
time you have a new image with a similar problem.
More advanced image editors can click on the Show More Options box to
make additional adjustments for the Tonal Width and Radius of both the shad-
ows and highlights. Adjustments for Color Control and Midtone Contrast are
found here as well.
76 ADOBE
®
PHOTOSHOP
®
FOR UNDERWATER PHOTOGRAPHERS
The default settings in the Shadow/Highlight menu will generally get you very close. Tweak the
Shadows with the sliders at the top of the menu, and adjust the Highlights from the middle of
the menu. The bottom two sliders provide additional control over color correction and midtone
contrast. You may need to experiment with each of the sliders to see how they affect the differ-
ent aspects of the image.
EXPOSURE
New to CS2 is the Image>Adjustments>Exposure menu. This small and sim-
ple menu can be a very powerful tool for correcting midtone detail problems.
The Exposure (top) slider works much like the exposure controls on your cam-
era. Both shadow and highlights increase in Exposure Values (EV) so that +1
equals a 1-stop exposure increase and -2 reflects a 2-stop underexposure.
The bottom slider adjusts the Gamma of the image and has a default setting
of 1, indicating no change to the image. A Gamma setting of less than 1
increases shadow detail, while a value above 1 decreases shadow detail.
The Offset slider (middle) causes both the Exposure and Gamma to be
biased darker (left) or lighter (right).
S
ELECTIVE MIDTONE ADJUSTMENTS
Some images have a nice midtone range except in one or two areas. In this case,
the Dodge tool offers the best solution. The key to effectively using this tool
is to set the Exposure to 50% or less and use several strokes to slowly increase
ADVANCED COLOR AND EXPOSURE CORRECTIONS 77
Move the slider for the Exposure, and you will immediately see the overall effect on the image.
The Gamma slider is used to adjust the gamma of the image, either up or down. The middle
slider effectively offsets the contrast problems that may arise when you adjust the top and bot-
tom sliders.
detail in the desired area. You will also note that next to the Exposure setting,
there is a drop-down box that allows you to limit the effect of the Dodge tool
to the highlights, midtones, or shadows. If you are trying to increase shadow
detail, you should probably use the midtone or shadow setting. Try both to see
which works best for your image, and Step Backward or use the history palette
if you need to try another option.
B
RUSH TOOL AND LAYERS MASK
Another way to fine-tune Adjustment Layers is with the Brush tool. Make your
initial image corrections with the Levels editor, then select the mask assigned
to the Levels Adjustment Layer. Set your foreground color to black and the
78 ADOBE
®
PHOTOSHOP
®
FOR UNDERWATER PHOTOGRAPHERS
The original scan of two nudibranchs (bottom) has high gamma and contrast problems. When
you add a Curves Adjustment Layer (middle) the highlights in the nudibranchs are still blown
out. If you select the Curves editor mask, you can use the Brush tool, set to black, to block the
effects of the Curves editor on the center of the nudibranch and allow the background detail to
show through.
background to white. Slowly brush those areas in the Adjustment Layer where
you don’t want the effect applied. You can vary the brush size to minimize (or
maximize) the scope of your adjustments. Minor adjustments can be made by
setting the Opacity (top of screen) to 10–30%. If you make a mistake and need
to reverse the effect of the Brush, switch the background and foreground col-
ors and brush away the error.
H
IGH DYNAMIC RANGE
Another new feature in Photoshop CS2 is the High Dynamic Range function.
Found under the File>Automate>Merge to HDR pull-down menu, this pow-
erful feature takes the same scene at different exposure levels and combines
them into one image offering a very broad exposure range with increased mid-
tone detail. It’s very hard to get a registered exposure bracket underwater, but
the HDR function has an Auto Register feature, so it might be worth a try if
your subject and camera are steady.
This feature works extremely well topside with a tripod or fast bracket
speeds. This is a great tool if you have an extreme lighting situation—for
instance, when you want detail inside
a building and still want to maintain
good exposure in the sunlit windows.
Once the images are combined,
you will have 32-bit images that can
be converted to 8- or 16-bit images. You will then be presented with a second
menu allowing further corrections of the highlight and midtone detail.
C
ROSSOVER COLOR SHIFTS
When you shoot in shallow water, the combination of available light and flash
cause a common color problem called a crossover. This is especially a problem
with digital cameras, as they try to overcome the color shifts, creating more
problems (warm colors fall in the shadows in front of the subject, and cool col-
ors fall behind the subject). No matter how hard you try, it is almost impossi-
ble to balance both areas.
Hue/Saturation. You noticed that we said “almost impossible.” The first
step to balancing the two opposite colors is to select the warm color shift in the
foreground. This can be done with the Magic Wand, Lasso tool, or the Select>
Color Range function. Once you have the area selected, use the Select>Feather
function to blend the edges of your adjustment with the rest of the image.
ADVANCED COLOR AND EXPOSURE CORRECTIONS 79
THIS POWERFUL FEATURE TAKES THE SAME
SCENE AT DIFFERENT EXPOSURE LEVELS AND
COMBINES THEM INTO ONE IMAGE. .
Open the Image>Adjustments>Hue/Saturation menu (Ctrl/Cmd+U) and
move the Saturation slider to the left until most of the warm color has been
neutralized. Now move the Hue slider slightly to the left or right to match the
adjoining colors. Move the Lightness slider to match the surrounding areas.
Replace Color. Another approach to solving the problem is to use the
Image>Adjustments>Replace Color command. When you use this feature, you
don’t need to select the area to be adjusted in advance. When the menu opens,
you can use the eyedropper to select your work area and tweak your selection
using the Fuzziness slider. You can then use the same slider adjustment that
you used with the Hue/Saturation solution mentioned above.
80 ADOBE
®
PHOTOSHOP
®
FOR UNDERWATER PHOTOGRAPHERS
The color crossover in this image can be reduced by opening the Select>Color Range menu and
touching the shadow area under the head of the flounder. Click OK, and open the Hue/
Saturation menu with the Ctrl+U shortcut. Move the Saturation, Hue, and Lightness sliders
until the color crossover is eliminated.
GREEN WATER TO BLUE
When diving in shallow water or in poor visibility as when wreck diving, there
will be times when the water turns green. Since divers find the water color of
choice to be blue, there needs to be quick solution to shift colors without alter-
ing the subject. There are several solutions, so we’ll look at the top two.
Replace Color. The first method uses the Image>Adjustments>Replace
Color command. When this menu opens, you will be presented with a black &
white thumbnail of the colors to be selected. Using the Eyedropper, work on
selecting your colors on either the thumbnail or the original photo. If you find
you haven’t selected the entire color, you can use the “+” eyedropper, or hold
down the Shift key to add to your selection. You can further tweak your selec-
ADVANCED COLOR AND EXPOSURE CORRECTIONS 81
The Image>Adjustments>Color Replace menu works much the same way except that the entire
process can be done within one menu. Select the area under the flounder’s head, then use the
adjustment controls until you are satisfied with the results.
tion amount with the Fuzziness slider at the top of the menu. Move the Hue
slider slightly to the right and you will see the water change from green to blue.
You can then adjust the brightness and saturation of the selected color using
the other sliders.
Channel Mixer. A second, more accurate method for background changes
is made by accessing the Image>Adjustments>Channel Mixer menu. At the top
of the menu you’ll see the Output channel listed, with sliders for the Source
Channels—Red, Green, and Blue. To start the process, select the Green Out-
put channel, then move the Green Source slider to the left until the green
water turns blue.
Other neutral and opposite-color objects will shift toward magenta. To solve
this problem, move the Red Source slider to the right until the shift is fixed.
82 ADOBE
®
PHOTOSHOP
®
FOR UNDERWATER PHOTOGRAPHERS
The Image>Adjustments>Color Replace menu is a great way to change green water to blue.
Simply use the eyedropper to select the green water, and move the Hue slider until the water
changes to a color you like. If you find that you have not selected enough of the green water, you
can move the Fuzziness slider to the right, or use the “+” eyedropper to add more green to your
selection.
BLACK & WHITE CONVERSIONS
There will be times when no amount of color correction will repair a mono-
chrome blue or green image. If you have no other uses for this image, consid-
er converting it to black & white.
Grayscale. The fastest method is
to go to Image>Mode>Grayscale and
discard all the colors. If you decide to
go this route, you should use the Auto
Contrast feature to readjust the con-
trast range, taking it back to normal.
You will be amazed how this function
allows you to salvage some images
that were destined for the trash can.
Split Channels. There may be
times when a straight black & white
conversion doesn’t solve the problem.
Your next solution is to go to the
Channels palette and
select the small black tri-
angle in the upper-right
corner of the menu.
Drop down and select
the Split Channels. Each
of the three color chan-
nels will be converted to
a black & white image
and displayed on your
editing screen. Pick the
black & white channel
image you like best, and
throw the rest away. Be
aware that if you are
working with multiple
layers, you will need to
flatten your image before
splitting channels.
ADVANCED COLOR AND EXPOSURE CORRECTIONS 83
The easiest way to change your color images
to black & white is via the Image>Mode>
Grayscale command found at the top of your
editing screen.
If you have some dramatic colors in an image you want to
convert to black & white, you might try opening the Channels
palette. When you expand this menu, you can select Split
Channels, and Photoshop will create black & white images
from each individual channel.
Channel Mixer. If you have an image with considerable color variations but
you still want to convert it to black & white, you should consider using the
Channel Mixer like we did to change green water to blue. At the bottom of the
Channel Mixer menu, you will see a monochrome box. Checking this box con-
verts the image to black & white. The difference is that you can still vary the
red, green, and blue values of the original image to provide just the exact tonal
balance you desire. This function is much like the Channel Splitter, except that
you can mix channel colors to achieve hundreds of variations.
84 ADOBE
®
PHOTOSHOP
®
FOR UNDERWATER PHOTOGRAPHERS
To achieve maximum control over your color to black & white conversions, open the Image>
Adjustments>Channel Mixer menu. It works much like the Image>Mode command, except
that you can change the tonal percentage in each channel before it creates a black & white
image.