Bees And Honey - Part 6 pot
Bạn đang xem bản rút gọn của tài liệu. Xem và tải ngay bản đầy đủ của tài liệu tại đây (639.83 KB, 18 trang )
Handling the bees
Before opening a colony for examination, collect together all the things
you are likely to need for the manipulation, such as hive tool, queen
excluders, supers, etc. Light the smoker. The fuel used may be any
solid material that lights easily and burns, or rather smoulders,
producing plenty of cool smoke for a reasonably long time, so that
refuelling is not a constant need. The usual fuels are corrugated paper,
sacking, dried grass and rotten wood. Quite a lot of corrugated paper
appears to be fireproof these days, but if it will smoulder easily it
should be rolled into a cylinder to fit the firebox of the smoker. Sacking
lasts longer but care should be taken that it has not been used to contain
anything poisonous to the bee, such as dressed grain. I prefer grass
which has been cut with a rotary grass cutter and left to dry. This can
be picked up and stored in a sack, and two of these will last me a season.
It has the advantage that it burns nicely and with little residue in the
smoker, and if the smoke does blow back into your face when lighting it
is not as vicious as sacking or paper smoke. I usually start the smoker
by setting light to a small ball of newspaper. Ensure the smoker is
going well; put on your veil and gloves. Make your way to the colony
quietly. Do not cause disturbance by stomping around the hives, nor
drop your extra equipment on to the ground: put it down quietly, as
bees readily detect vibration.
Gently smoke the entrance of the hive. Do not puff smoke in until
the bees come out crying; let the smoke drift in. The smell of smoke
causes the bees to fill themselves up with honey from the honey store,
and this renders them much more amenable to handling. A full bee,
like a well-fed human, is much less likely to want to start a fight. It
takes about two minutes for the bees to fill up and for the full effect of
the smoking to be obtained. Beginners are therefore advised to take
things steadily and to wait this amount of time, giving the bees a
reminder in smoke two or three times. The beekeeper, as he becomes
Handling a large colony with assurance comes with practice.
at the entrance can be cut out entirely, smoke being applied under the
crown board as this is removed. This saves time, and it is usually just as
effective, but the beekeeper should learn to keep one eye on the
entrance because every now and then a colony may start to flood out
from here and a puff at the entrance as well as at the top will stop that
nonsense immediately.
When the beginner has smoked the bees and waited a while, he
should remove the roof gently and lay it on the ground, with the
bottom upwards, just behind the hive. If the colony has not yet got
supers on, the next job is to remove the crown board. This is done by
gently inserting the flat blade of the hive tool between the crown board
and brood chamber at a corner of the hive and gently levering
upwards. As this is done smoke should be puffed into the enlarging
crack between crown board and brood chamber so that it drives the
bees back, and prevents them coming out to see what is there. The
crown board may lever up quite easily, particularly when the
equipment is new, but as the bees propolise the joint, and where the
propolis is old, the crown board will be well fastened on. In this case
too hard a leverage from one corner will cause it to suddenly crack
away, jarring the hive and the bees. This should be avoided by gently
levering at each corner one after the other until the board is completely
released.
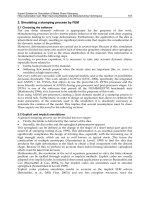
Left When lighting the
smoker, make sure it is
going well and producing
cool smoke before you
take it to the hive.
Right Let the cool smoke
drift into the hive under
the crownboard. Do not
pump it in.
The loose crown board can now be raised, puffing smoke under it as
this is done. With the crown board now completely removed in one
hand the beekeeper should drift smoke across the top bars of the
frames until all the bees have gone down into the beeways between the
combs. He should now take a quick look at the underside of the crown
board to make sure the queen is not on it, and place it down below the
hive entrance so that the bees still on it can make their way back
indoors.
By the time he has done this the bees will be coming back up from
the face of the combs on to the top bars again. The ones that just walk
around on the top bars are usually quite inoffensive but it will be
noticed that some stick half out from the beeway between the frames
and that these, with their front legs in the air, will swivel to follow the
movements of the beekeeper. These are the bees who may try to defend
the colony, but a puff of smoke will send them below again out of the
way. Repetition of this smoking down procedure should give the
beekeeper control of the colony for the whole manipulation.
The first frame or the dummy board, if one is used, should now be
released from its fellows with the crook of the hive tool and gently
withdrawn. When using short-lugged frames they should be picked up
by the top bar and as they are raised clear of the brood chamber wall the
fingers crooked under the lugs. The use of a little smoke may be
necessary just to clear the bees away from under the fingers. Frames
should be raised slowly and carefully. Bees on the face of the comb
should not be rubbed against either the side wall or bees on the face of
the next comb; they get a bit annoyed at being rolled over one another.
Nor should the side bar of the frame be allowed to touch the side wall of
the brood chamber as there are likely to be bees there which would be
crushed. Crushing bees, of course, releases the smell of venom and the
pheromone which excites bees to sting. The old beekeeping saying that
'the first sting is the most expensive one' has quite a lot of meaning.
Once the first comb has been removed and examined it can be stood
down in front of the hive near the crown board or, if you prefer, placed
in a box carried for the purpose. It should certainly be left out of the
hive until the examination is at an end because this will give more room
for the removal of subsequent frames without 'rolling' the bees. Smoke
should only be needed at times just to clear the bees away from the hive
tool and the fingers or if they begin to get a little excited.
If the colony being examined has supers on it then the hive tool
should be inserted between the bottom of the supers and the queen
excluder, the supers levered up and smoke puffed into the opening.
The supers should then be picked up and placed on the upturned roof
behind the hive. Normally the bees will stay in the supers and not
bother the beekeeper but sometimes, particularly in July and August,
they may need another puff of smoke to keep them quiet. The queen
excluder should now be given a gentle puff of smoke—do not use much
because it sometimes annoys bees who are trying to struggle through
the slots down out of the way. Loosen the excluder from the brood
chamber and gently raise, puffing smoke under it, as you do so. Look to
see if the queen is on it, and if she is not, place the excluder down in
front of the hive by the crown board. If the queen is found on the
excluder or crown board, run her back into the hive, or better still run
her into a match box with a couple of workers and then when you have
a frame containing brood out during the examination release the queen
on to it. It is always safer to place a queen on to brood where the bees
expect to see her than to run her in from the top bars or the entrance.
Once the examination is completed, the hive should be quietly and
gently reassembled, using smoke to clear the bees away from places
where they may be crushed. Care should be taken to align the boxes
one above the other, as this will prevent escape of bees from places
other than the entrance, and will not encourage excessive propolisation
of the parts nor provide ledges which will cause rain to get in between
the boxes.
Always work steadily and methodically. Avoid rapid, jerky
movements and jar the hive as little as possible. Never crush a bee if it
can be avoided. Use as little smoke as possible consistent with good
control of the bees.
Colonies can be opened for examination at any time when the
temperature is over I7°C (62°F). If examination is essential below this
temperature it should be performed as swiftly as possible, and only the
bare essentials dealt with. Below 10°C (50°F) I do not advise the
beekeeper to open up at all, and if he does he must be aware that he is
putting the colony at risk. Brood may be chilled and the colony will
need to eat more stores to bring their environment back to normal. It
would be better left alone.
What to look for
Every time you open a colony you should ask the five questions. They
are vital and should be memorized.
1 Has the colony sufficient room ?
2 Is the queen present and laying the expected quantity of
eggs?
3 a (early in season) Is the colony building up in size as fast as
other colonies in the apiary?
b (mid season) Are there any queen cells present in the colony ?
4 Are there any signs of disease or abnormality?
5 Has the colony sufficient stores to last until the next
inspection?
These have been mentioned already and will be examined in more
detail in this chapter. In addition, you should keep an eye on certain
practical matters. Hives should be sound and waterproof; any holes,
either those which allow the bees passage at places other than the
entrance, or those which allow water in, particularly in the roof, should
be repaired. Stands should be examined to see that they are strong and
stable. Brood combs should be watched for any increase of drone
comb, and this replaced wherever it exceeds about 6 per cent of the
area of the comb. Research has shown that colonies do not make more
drone comb when they already have a fair amount in the hive. It is
therefore good practice to leave at least one comb with more than 6 per
cent—say up to 12 or 15 per cent—and place this at the edge of the
brood to help reduce the amount made by the bees. The bees make the
drone comb by tearing down a patch of worker cells, usually in the
corners of the comb, and rebuilding in the larger 'drone' size. It will be
found that, using this criterion, about two brood combs will need
replacing each year. Combs which contain mouldy pollen will also
need replacing (see page 210). Such pollen turns into a hard mass which
cannot be broken up by the bees—the only way the bees can remove it
is by tearing the cells down to the septum and removing the pollen in
cell-sized lumps.
The presence of too much drone comb or of mouldy pollen are the
only reasons why combs need replacing, providing the standard of
beekeeping is adequate and the colonies good. Combs which have
dried out and partly mouldered away, or which have large holes in
them, should also be replaced, but these will not occur if large well-fed
colonies are kept in sound hives.
Assessing the queen
In order to answer question 2, the beginner must quickly learn to
assess the queen, not as a representative of a particular strain of
honeybees as compared with queens from other strains, but as a
productive unit, either worth leaving in the hive or past her
usefulness and due to be replaced.
First we must look at her egg laying and discover whether she is
increasing the size of her broodnest, holding it static, or reducing its
size. During the early part of the season when the colony is still
building up she should be re-laying cells almost as soon as they become
empty on the emergence of the occupants. She should also be
expanding her broodnest area both on combs within the broodnest and
extending on to adjacent ones. If a queen is laying the same number of
eggs each day, the ratio of the brood will be the same as the length of
the stages of the life cycle: 1 egg to 2 unsealed larvae to 4 sealed brood.
In other words, one seventh of the area of the broodnest should contain
eggs. Where a queen is increasing her egg-laying rate this ratio will be
reduced, I would suggest to about 1 1/2:21/2:4, and thus one fifth of the
area should contain eggs.
The next thing to look at is the pattern of her brood. Sealed brood
areas should be completely sealed over, with very few empty cells or
cells containing young larvae. A lot of empty cells means that a lot of
the larvae are dying off, which may be due to the age of the queen or
her quality. I would not want to see more than about 5 per cent
unsealed cells, that is about five in any 2 inch square of sealed brood.
Poor or old queens may produce up to 50 per cent non-viable larvae.
Examination of open cell areas may show great disparity of larval
age in adjoining cells, indicating that larvae are dying at an earlier age.
The queen may lay up every cell in an area of comb, but deaths
occurring in the larval stage will spoil the pattern.
Providing the egg-laying rate and the open and sealed brood
patterns are acceptable, and the queen is expanding her laying in
spring then she is worth leaving to continue the good work. When the
colony is fully built up and the queen is using most of the brood
chamber comb area she will no longer be able to increase her egg-
laying rate, but she should continue to re-lay cells as soon as they are
empty. This means that she is not reducing the size of her broodnest
and can be assessed upon her ability to keep going and on the pattern of
brood. Not until mid July, certainly in the south of England, should
she begin to allow her broodnest to start to retract, and even then the
rate at which she reduces the size of it should be fairly slow.
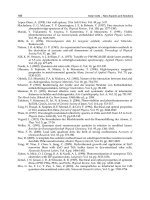
A good comb of sealed brood with very few empty cells, showing highly viable brood.
Queens can fail and become uneconomical at any age and at any time
of the year. The speed at which queens fail can vary very considerably.
Some will fail very rapidly, going from first class egg production to
laying not more than a few dozen eggs a day in the period between two
inspections. On the other hand, many queens will begin to fail very
slowly and the reduction will not be noticed for several examinations.
This, if it happens early in the season, will reduce the value of the
colony as a honey production unit, and will require special effort to
bring it back to first class condition. The skilful beekeeper will
recognize a failing queen early and replace her before too much
damage is sustained.
Reduction in egg laying can also indicate that the colony is
producing queen cells and has made up its mind to swarm. This
possibility should always be checked and the appropriate action for
dealing with swarming colonies set in motion (see Chapter 7).
Many queens reduce their laying because one of their back legs
becomes stiff and paralysed. This always seems to hinder them very
considerably and they never, in my experience, recover. A defective
queen should therefore be replaced immediately, as should queens
who have a paralysed front leg, which causes them to be superseded.
Replacement saves time and the mishaps which can occur if
supersedure is allowed to take its course in mid season. Queens which
have a paralysed mid leg do not appear to be incommoded in the
slightest. The leg dries out and becomes 'polished' in appearance. I
always feel it must be a nuisance and a possible entry point for
infection and therefore would snip it off close to the body. This
operation does not appear to be noticed by the queen, nor does it, as far
as I can see, affect her length of life.
Assessment of the colony
The queen is the mother of the colony and therefore all its
characteristics come from her. It is possible to have a queen laying the
right proportion of eggs and with a perfect brood pattern, but
producing a colony less than half the size of the rest of the colonies in
the apiary. If left to its own devices this colony would probably have
little honey at the end of the year, while the others are producing a
reasonable crop.
The two main reasons for small colonies in the spring and mid
season are infection with nosema and a poor queen. A poor queen may
be young and laying consistently, but incapable of laying in sufficient
quantity to produce a productive colony. This lack of quality may be
due to her being of a poor breed or a non-productive strain, but more
probably she was not fed adequately as a larva or was converted from a
worker larva to a queen larva too late in her developmental period. A
little colony led by a failing queen will be observably different from a
nosemic colony. In the 'poor queen' colony the worker bees are living
their full length of life and it is the queen who is holding the colony
back. The picture one gets in the broodnest is that there are plenty of
bees, the brood is well covered with workers and many of these are
standing about or working on the empty and store combs. In the
nosemic colony, on the other hand, the workers are dying early, and if
the queen is not affected with nosema herself, she is laying as large a
broodnest as the number of workers can look after. The picture here,
therefore, is one of a broodnest very sparsely covered with bees and
few, if any, on the empty and store frames. Few queens themselves
suffer from nosema and if they are infected they fail and die very
quickly so that the problem is made more obvious.
If you correctly diagnose one of these causes for small colonies, you
must act. Poor queens should be requeened and nosemic colonies
treated as described in Chapter 9. Other reasons for small colonies in
the spring are usually, by the time you see them, past history.
Weakness may result from their having been put into winter in leaky
hives or short of stores, sited in wet or very exposed positions, perhaps
because hedges have been removed, or may be the result of an early
shut down of queens the previous autumn owing to wet, miserable
weather. Infection with some of the virus diseases could be
a contributory cause. In all such cases you can only learn from your
mistakes where you are at fault and resolve not to make the same
mistakes again. Sometimes it is beyond the beekeeper to foresee the
problems, and even if he could there would be nothing he could do to
stop them. He must return to the building-up process and get the
colonies back to size as rapidly as possible.
Building up small colonies
Once the cause of the smallness has been removed the colony wants
one basic thing: more population, more worker bees. These can be
taken from a colony which is doing well—the big colony that can lose a
bit of brood or a few bees and hardly feel the loss. Care should of course
be taken that you are not moving disease around but the big colony will
usually be a healthy one.
Look at the small colony and see how many bees it has surplus to
those looking after brood. If there are plenty, then a comb with a small
patch of sealed brood could be given to it. If on the other hand it has
few surplus bees then what it urgently needs is extra workers, adult
bees which can look after themselves, not brood which still needs
keeping warm within the cluster. How would bees be added to a
colony ? I use the following method. Go to the small colony and open
up, remove one or two of the empty or store frames to give a space at
the side in the brood chamber. Put the crown board back on and go to
the large colony, smoke and open up. Go through rapidly and find the
queen. Put the frame with the queen on it in a nucleus box, or put the
queen in a match box with one or two workers. The match box could,
incidentally, be put in the hive entrance so that, should you forget
about her, the bees would release her. Go swiftly through the large
colony and find a comb on which worker bees are emerging, hatching
from the cells. Give this comb a moderate shake. You will learn with
experience that as you shake with increasing power so progressively
younger bees drop from the comb, so a gentle shake removes the oldest
bees, a moderate shake removes the old bees and a lot of the house bees,
a very heavy shake will remove all the bees except those just hatched.
These will have to be picked off individually if you want to get rid of
them, but in the current manipulation we want young bees so a
moderate shake will do. The frame is then carried across to the small
colony and the bees are all shaken from the comb onto the floor of the
hive. These bees will submit when challenged and will become
members of the colony within a couple of hours. The comb is then
returned to its own colony and the queen released. In this way a small
colony can rapidly be given extra population which will bring it to a
strength where it has bees in excess of those needed in the broodnest.
From then on the colony can be given small areas of brood and then
larger ones as the population begins to reach a normal size for the time
of the year. When these colonies reach normal size future build-up can
be assisted by the method of spreading the brood as described in
Chapter 5.
Supering
Colonies requiring extra room are usually given shallow 'supers'
although some people work with boxes all of the brood chamber size.
The disadvantage of this is that a brood chamber full of honey is a very
considerable weight and more than one would wish to lift about.
Beginners may be confused because beekeepers often call the deep
boxes 'brood chambers', and the shallow ones 'supers', irrespective of
the job they are actually doing at the time.
The general rule for supering is that the bees should never be using
all the comb available to them. As soon as they get near this state a
super should be put on, but remember that the aim is to draw bees
from the brood chamber into the super fairly quickly. The beginner
will only have foundation in his supers, and bees will often not go
quickly through a queen excluder to get to a super of foundation. Thus
I would put the super on without an excluder. At the next inspection
the bees should be established in the super, and be drawing out the wax
into comb. The queen can then be found and if she is in the super be
put down into the brood chamber and the excluder put in place
beneath the super.
Foundation in a super should be spaced at 1 1/2 inch centre to centre
by using narrow metal ends or castellated runners (see page 73). As
soon as the combs are drawn out to the usual7/8 inch thickness a couple
of combs can be removed and the spacing increased to 2 inches, now
using large metal ends or appropriate castellated spacing. This of
course cuts down the number and cost of the frames in the super for the
same amount of honey. The bees will continue drawing out the comb
until there is a single bee space between the faces of two adjoining
combs. These fat combs of honey are much easier to decap (see
page 242) when extracting. Two stages of spacing are needed because if
large spacers are used with foundation, the bees are likely to build
their own comb inconveniently in between the foundation rather than
to draw this out. The whole problem is avoided by using 'Manley'
super frames (see page 72), which are self-spaced at 1 5/8 inches and can
be used at this spacing both with foundation or drawn comb.
After the first year the beginner should have some drawn comb and
should mix this in with foundation in the supers. The drawn combs
should be placed on the outside against the box wall, while the
foundation is kept in the middle of the box where the heat from the
brood chamber is greatest. This arrangement encourages the bees to
enter the super and the warmth gives those pulling foundation
considerable help. In fact it is worthwhile taking advantage of this
distribution of heat in the box when the bees are dealing with the first
boxes full of foundation. They will usually start to pull the foundation
in the warmest part of the box, over the top of the broodnest. As they
pull the combs out to a full 7/8 inch depth of cell these drawn combs can
be moved to the outside and the foundation moved in to the centre.
Even when you have all fully-drawn supers it is probably worth
putting all first supers on without a queen excluder to get the bees
quickly established in them, the excluder being put in as soon as this
happens. By this method surplus bees will move quickly from the
broodnest into the supers, thus relieving any incipient crowding in the
former. This should help to prevent some colonies and to delay others
from embarking on queen cell production. The disadvantage is that
some of the queens will nip up and lay eggs in the supers, which will
not matter at the time if the combs are all worker size but can be
disastrous if the supers contain drone comb, which is why I never
recommend the use of drone foundation in supers. In addition, combs
which have been used for breeding provide much better food for wax
moths than plain beeswax. The careful beekeeper will thus mark the
'first' super as such and keep it for this purpose each year. I think there
is an even more rapid movement of the bees into these supers because
they have been bred in in the past.
Winter storage of supers is dealt with in Chapter 9, on page 208.
Method of storage will affect the way the supers are put on the next
year. If supers are put away wet from the extractor, and stored over
winter in this state, they will be sticky with honey at the time they are
put on in the spring. The reaction of bees who find honey which has
suddenly arrived in the hive is to dance and stimulate others to rush
out of the hive, causing quite a commotion and possible robbing. If,
therefore, you put wet supers on as you manipulate the colonies you
will be quickly surrounded by excited bees. It is better to mark the
colonies requiring supers and to put all of these on at the end when
routine examinations are finished. My method is to leave the roofs off
the colonies needing supers and then, when everything else has been
finished, to put a super by the side of each. The crownboard is then
removed from each hive and put straight on to the top of the super,
which is picked up and put on the hive, and adjusted carefully into
place. The roof can be put on when everything is finished.
Feeding
Bees should be fed with white granulated sugar mixed with water to
make a syrup. Brown sugars or raw sugars should not be used as these
are harmful to the bee, particularly as winter stores. The strength of
the syrup should be 2 lb. of sugar to every 1 pint of water. Sugar syrup
need not be boiled but may be made with hot water from the usual
household system, stirred until the crystals have dissolved. An easy
way to arrive at the correct strength of syrup without having to weigh
the sugar is as follows: take any container, half fill it with water and
then add sugar to fill. You will need 16 lb. of sugar to make 2 gallons of
syrup which will weigh approximately 26 lb.; when fed to the bees this
will produce about 23-24 lb. of stores equivalent to 20 lb. of honey.
When feeding at any time I would give the syrup to the bees as
rapidly as possible so that they can take it down and store it where they
want it, sealing it over as they would do with honey. Syrup should be
fed to bees in one of the many types of feeder sold for the purpose. My
own preference is for the Miller-type feeder, and particularly the design
used by Mr David Rowse in Hampshire. This feeder is shown in
fig. 31. Its advantage over the more usual type is that the place where
the bees come up to feed is on one side; this means that should the hive
be slightly out of level the feeder can be placed so that the feeding side
is at the lowest level to avoid waste. When the bees have removed most
of the syrup they can enter the main body of the feeder and clean it up
completely, thus preventing the problem of taking off and packing
away sticky feeders. Made about 3 1/2\ inches deep, these feeders will
hold about 2 1/2 gallons of syrup, and autumn feeding can therefore
usually be accomplished with one feed.
Round aluminium feeders as shown on p. 93 are quite efficient, the
only objection being that their small size necessitates several fillings
for autumn feeding. This is probably no disadvantage for the
beekeeper whose colonies are near at hand, but they are useless when
dealing with out-apiaries.
Where Miller or aluminium feeders are used a small amount of
syrup should be poured down the holes on to the bees after putting
the feeder on to tell them there is sugar available above. Otherwise a
colony may fail to find the syrup for several days, as sugar does not
appear to have any smell which they recognize as food.
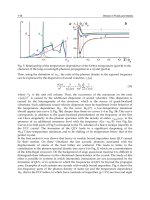
Plastic bucket feeders as shown above are useful and efficient for con-
tact feeding in winter but have the disadvantage that a box is needed to
The plastic bucket feeder is very good
for contact feeding. The bucket can
be half filled with water, and filled to
the top with sugar. It can then be
inverted without any mixing.
surround them, for if the roof is balanced on the feeder without
support it can easily be blown off. The feeder, filled with normal syrup
made from 2 lb. of sugar to 1 pint of water, is put directly on the top
bars of the frames, upside down (they have metal gauze in the lid),
inside an extra brood chamber and with a sack packed around it to help
keep the syrup warm.
Watertight tins with a dozen or so holes about 1/16 inch in diameter
punched in the lid are easy to adapt and often used. They are used in
the same way as the plastic contact feeders, upside down on the frames.
They have disadvantages, however, because if there is a large
temperature change between night and day, with a very rapid warm-
up in the morning, the air above the syrup in the tin expands so quickly
that the syrup is expelled at the bottom faster than the bees can cope
with it, and the result is sugar syrup running from the hive
entrance—both a waste of sugar and likely to set up robbing by other
colonies in the apiary.
Only pure syrup should be used, and in most years without
additions. It should not be combined with a treatment or a
preventative for disease, except for nosema.
Should you be making syrup which is to contain Fumidil 'B' in order
to treat nosema (see Chapter 9), it will be found that the Fumidil
powder is very fine and it is almost impossible to stir it into ready-made
syrup. My method of mixing this substance is to take a large container
and put 8 lb. of dry sugar into it. The bottle of Fumidil is now emptied
into the container and the powder mixed into the dry sugar until it can
no longer be seen. Four pints of warm water are now added and the
whole stirred. It will be found that the Fumidil will be automatically
dissolved with the sugar and will not float to the top. The usual small
bottle of Fumidil powder contains 0.5 g. which is enough for three
colonies, and should be fed to them in a total of 42 lb. of sugar. It will
thus be necessary to reduce the concentration of Fumidil for the above
mixing to the right strength by adding a further 34 lb. of sugar and 17
pints of water. You will end up with 42 pints of syrup which can be
split up into three containers, each Containing 14 pints of syrup and a
third of a bottle of Fumidil. Each of these containers will constitute a
dose for one colony. More will be said about this under the heading of
disease.
I would not feed Fumidil every year, but try to monitor the
incidence of nosema in the apiary and treat accordingly. I would
certainly not use a treatment for any other disease, particularly AFB
and EFB. In my view this is unnecessary except in very special cases
and under special circumstances in which the effect of any treatment
will be very carefully monitored by people competent to do so. Routine
treatment for these diseases could, particularly in areas where pockets
of high incidence of these diseases occur, cause considerable harm in
the long run by masking the disease and by selecting out resistant
strains of the causative bacteria.
Autumn feeding has been dealt with on page 99. Stimulative spring
feeding of large colonies is rarely practised today as it has been shown
to be a waste of time, having practically no effect. It is still used on
small overwintering nuclei which are often in need of extra food by the
beginning of March. These may also be helped by the water content of
the syrup which reduces the amount they need to fetch in from outside.
Summer feeding should only be practised where the colony would
starve without it: dead colonies get you no honey. Therefore if at any
time during the year starvation of a colony is possible, or should the
weather prevent any flight for ten days, then the colony must be fed. I
would give them a gallon (8 lbs sugar) and hope that the weather
would change before they had eaten it all up.
Moving colonies of bees
The old rule governing the movement of honeybee colonies is as valid
today as it ever was: 'colonies may be moved under 3 feet or over 3
miles.' It is mandatory during the active season, when bees are flying
most days. The reason for the rule is fairly easy to find: bees learn the
district over which they fly and home on to their hive with complete
accuracy, providing the picture of the surrounding area is not altered,
as explained on page 37. The shift of over three miles is always
necessary in the active season. If a move of, say, two miles is made,
then as soon as the bees fly out half a mile they come across their old
known flight pictures and fly home to their former site. A distance
greater than three miles may be preferable where the colonies are being
moved up or down a narrow, high-sided valley, as their normal flight
patterns may extend over greater distances in situations of this sort.
Winter moves can be very much smaller, and after a week of frost
when no flying has occurred colonies may be shifted about in the same
apiary without much fear of their getting lost when flying begins.
Colonies which are to be transported must be shut in when all the bees
have stopped flying for the day. However, they will overheat and die if
the entrance is closed without giving added ventilation, and therefore
colonies for transporting are given a ventilated screen over the whole
top of the hive, from which heat can readily escape. Large colonies
shut in without a screen will very rapidly build up sufficient heat to
reduce the tensile strength of the beeswax to a point where the combs
will collapse, and honey will be released over everything. The bees
themselves are turned dark in colour, and those that remain alive are
unable to fly, so the colony soon dies. It is a very sorry sight and always
happens to the big, prosperous and vigorous colonies first.
As the normal beehive is made up of separate boxes standing one
above the other, these must be fastened together for transport in a way
that is secure. Various patent clips are available but these need careful
fixing to the boxes with a jig so that everything is interchangeable.
Various strappings have been used, using steel or nylon bands, but I
have never really trusted them as a box has only to twist about \ inch to
let bees out. Bees escaping from hives on the move is part of
beekeeping and provides many a tale and many a laugh afterwards, but
I can manage without the excitement at the time. I therefore like hives
well stapled up with little chance of falling apart, and I still prefer the
double pointed nail or large box staple as shown in fig. 32.
The procedure for getting colonies ready for transport is as follows.
During the day the colonies should be examined in the usual way,
making sure the frames are well packed together so that there is no
possibility of movement. The ventilated screen is put on and screwed
down, and the entrance prepared for shutting in. I normally use one of
two methods, both of which are easy and efficient, to close hives and
shut the bees in. One is to use entrance blocks which have an entrance
on one side only (see page 68). These can then be turned over and
pushed into place to shut up the door. The other method is to use 18
inch long by 1/1/4 inch square plastic foam strips. These can be pushed
into the entrance and do not work their way out when travelling. The
entrance block is removed, and the foam strip pushed in about three
quarters of the way across the hive—the end will kink and stand out at
right angles and can easily be pushed in later, at the time of loading
when the bees have finished flying. The roof should be put back on, on
top of the screen, until the time comes to load up.
When flying for the day has ceased the entrances are closed and the
roofs removed to allow heat to escape. The hive is then nailed up with
staples or banded. When using staples they must be put in at an angle,
as shown in fig. 32—the boxes can twist on each other if the staples are
put in at right angles across the joint between boxes.
Once the colonies are prepared in this way they are loaded up on to a
truck or whatever vehicle is used, with as little fuss as possible, and
always with combs running fore-and-aft of the direction of travel, to
prevent comb-slap.
Where long journeys are necessary and the bees have to remain shut
in for considerable periods, they should be examined every hour or so.
If the colonies are producing a loud roaring buzz a couple of cupfuls of
water should be poured through the screens; the bees will suck this up
and become much quieter and more contented. A little consideration
of the colonies in this way will reduce the damage done by subjecting
bees to the unnatural and stressful conditions of moving.
On arrival at the out-apiary, the hives should be set up and the bees
released as quickly as possible. They will sometimes pour out with
vengeance in their minds, while at others not a bee will move and no
bad temper will be shown. It is as well, therefore, for the beekeeper to
prepare for the former reaction and get everything ready for a rapid
withdrawal. Roofs and crown boards should be laid out, one to each
hive. The beekeeper then pulls the entrance block out and immediately
puts the crown board in place on top of the screen and the roof on, and
proceeds to the next hive. It is always done in this way because it is said
that colonies have been known to die if the crown board is put on first
and the hive opened afterwards. The crown board needs to be put on
quickly, however, for if the bees rush out a lot of them may be attracted
on to the screen board where they can smell their colony. They are then
very difficult to get rid of and considerable time can be wasted trying to
put the crown board in place and the roof on. The screen is left to be
removed when the next examination is due, by which time the bees will
have forgotten all about their journey.
Hive closure at the entrance should always be total. If it is done with
perforated zinc or something else that the bees can see through many
will kill themselves trying to get out. I used perforated zinc for some
years and when it was in position antennae protruded from every hole
as bees struggled to get out, and there was always a handful of dead
bees on the floor afterwards. This does not occur if light is totally
excluded.
If colonies are being moved from an apiary and returned within a
fortnight it is best to number the colonies and sites so that each can be
returned to its former place. Bees remember their old sites over this
length of time, and quite a bit of drifting and fighting occurs on their
old sites if the colonies are mixed up. After ten to fourteen days this
ceases to happen, probably because most of the original foragers will
have died during the stay at the out-apiary.