Adobe illustrator cs4- P16 docx
Bạn đang xem bản rút gọn của tài liệu. Xem và tải ngay bản đầy đủ của tài liệu tại đây (1.04 MB, 30 trang )
CHAPTER 13: WEB AND MOBILE DESIGN
424
5. Using the Rectangle tool, draw a rectangle on the artboard. Specify a
fi ll of red and a stroke of none. You can clearly see that the boundary of
the rectangle aligns precisely with the pixels on the grid (Figure 13.7).
Use the Selection tool to move the rectangle around, and you’ll fi nd the
shape snaps directly to the grid.
6. Apply a 1-pt black stroke to the rectangle. Instead of a nice 1-pixel black
border, the rectangle now appears with an odd 2-pixel border that con-
sists of a variety of shades of gray (Figure 13.8).
Figure 13.7 With the grid
visible, you can clearly see
where the path edge lines
up with the pixels.
Figure 13.8 Because of the
pixel grid and the antialias-
ing, a 1-pixel black stroke
appears as a fat gray stroke.
CREATING PERFECT WEB GRAPHICS
425
When you add the 1-pt stroke, Illustrator paints that stroke along the center
of the path. But since the path is aligned perfectly to the grid, the stroke
weight is distributed a half pixel on both sides of the path. Since you already
know that pixels can contain only one solid color, the antialiasing that
Illustrator applies to the art results in a 2-pixel fat gray line (Figure 13.9).
When you hear web designers talk, many say they use Photoshop or Adobe
Fireworks CS4 to create their web graphics, not Illustrator. More often than
not, the reason behind their decision is because of the antialiasing issues we
have covered here. But it’s not all bad—Illustrator offers tremendous value
to web designers, and in my humble opinion, it’s foolish to overlook some
of the great benefi ts of using Illustrator for web design work. After all, we
still have plenty of chapter left. With that in mind, there are workarounds
to everything; sometimes you just need a little more effort and attention
to detail.
Taking Charge of Antialiasing—and Your Art
Now that you’re aware of the problems with antialiasing, what can you do
about them? Although there’s no single answer (each workfl ow will have its
own solutions), you might fi nd this list of solutions helpful:
• Avoid using strokes. As you’ve clearly seen, adding strokes really
exposes the antialiasing shortcomings of Illustrator. Although you can
certainly use the settings in the Stroke panel to align a stroke to the
inside or outside of a path, odd antialiasing artifacts occur even with
those settings. Instead, it’s better to use the Object > Path > Outline
Stroke command to convert stroked objects to fi lled paths that you can
then easily align to the pixel grid.
Figure 13.9 This is a perfect
example of how valuable
the Pixel Preview feature
is in Illustrator. On the
left, in Preview mode, the
stroke around the rectangle
appears normal. On the
right, in Pixel Preview mode,
you can clearly see the
e ect of the antialiasing.
CHAPTER 13: WEB AND MOBILE DESIGN
426
• Disable antialiasing for specifi c objects. You may fi nd that for some
artwork it is benefi cial to turn off antialiasing altogether. Although you
can’t disable antialiasing as a general document setting, you can disable
antialiasing on an object-by-object basis. To do so, make a selection, and
choose Effect > Rasterize. Choose 72 ppi for the Resolution setting,
choose None for the Anti-aliasing setting, and click OK. With Pixel
Preview turned on, you will clearly see the difference between objects
that do and do not have antialiasing applied.
• Set text in Photoshop. Where possible, you might consider bringing
artwork into Photoshop, specifi cally where type is concerned (you can
even copy and paste text directly from Illustrator into Photoshop). While
Illustrator features just a single antialiasing algorithm for text, Photoshop
offers fi ve settings (None, Sharp, Crisp, Strong, and Smooth). Depend-
ing on the chosen font, the size, and the application of the text, you
might fi nd that one of the antialiasing settings produces the best result.
• Think about Fireworks. Okay, so this is less of a solution and more
of general advice: If you fi nd yourself doing a lot of web graphics and if
you’re having diffi culty getting your art to play nice with antialiasing,
Fireworks might be a great application for you to use. If you purchased
Illustrator as part of Adobe Creative Suite 4, you already own a copy of
Fireworks, which was built from the ground up to produce web graph-
ics. As an added bonus, Fireworks can easily import Illustrator artwork,
preserving layers, editable text, and more.
SLICING UPTHE WEB
The process of preparing graphics for display on the web is called
optimization. This process entails choosing how artwork is exported from
Illustrator, what fi le formats are being used, and what settings are being
used for each fi le type. One way to optimize web graphics is to use a
technique called web slicing. In simple terms, web slicing is the process of
cutting a large image into several smaller images, which is desirable for
various reasons.
First, there’s user perception. If you try to load a web page that has a single
large image on it, the user sits there impatiently waiting for it to download
SLICING UP THE WEB
427
and appear on the page. But when an image is sliced into smaller parts, each
smaller image loads faster, and as a result, it seems like the image itself is
loading faster.
Second, you can use different fi le formats for each image slice, which can
save some valuable fi le size space, resulting in a faster-loading graphic over-
all. As you’ll see in the section “Exporting Pixel-Based Images with Save
for Web & Devices,” these settings directly impact the fi nal fi le size of your
total image.
Slicing is also helpful if parts of a graphic need to be updated often. Instead
of always creating larger images, you can update just part of the image.
Swapping out a slice or two can be more effi cient than having to work with
one large, bulky fi le all the time.
Finally, because each slice is its own image, you can assign a link (a URL)
to it, effectively making it a button. When someone clicks a sliced part of
an image, they are linked to another web page. Of course, you can specify
other functionality for such a button (or slice) as well.
Any Way You Slice It…
Illustrator offers two ways to create web slices. The more traditional way
is to draw them yourself, but Illustrator can also create slices from objects
automatically using a feature called object-based slicing. Let’s explore both
methods.
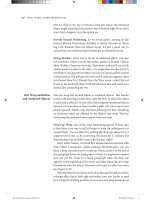
Once your artwork is created, you can choose the Slice tool from the
Tools panel and click and drag in your document window. When you do,
Illustrator draws rectangular regions—slices—and each appears with a
number that identifi es it (Figure 13.10 on the next page). As you create
slices, other dimmed slices might appear automatically in the document.
These are called auto slices. Slices that you create are called user slices.
Because the overall image has to be rectangular (for an explanation, see the
sidebar “Web Slices = HTML Tables”) and all the slices must be rectangles
as well, Illustrator creates slices as necessary (Figure 13.11, also on the
next page). As you continue to create slices, Illustrator updates the auto
slices accordingly.
CHAPTER 13: WEB AND MOBILE DESIGN
428
Figure 13.10 Create slices
where it makes sense to do
so to allow for interactivity
or future editing.
Figure 13.11 As you draw
slices with the Slice tool,
Illustrator creates other
slices to ll out the rest of
the document.
User Slices
Auto Slices
SLICING UP THE WEB
429
Web Slices = HTML Tables
So, what exactly happens when you create a slice? Illustrator splits a single
graphic into multiple images. It creates an HTML table, with each cell of
the table containing one of these slices, or pieces of the image. In this way,
when you display the web page in a browser, all the sliced-up images appear
together, almost like a puzzle. This is an important concept to keep in mind
because you can create only rectangular slices.
Another thing to keep in mind is that when an Illustrator document contains
multiple artboards, each artboard maintains its own set of slices by default. In
essence, this means each artboard results in a separate HTML table.
When you draw a slice with the Slice tool, Illustrator is really drawing a
rectangle with no fi ll and no stroke and making it a slice (Figure 13.12).
When you want to edit the slice, you can use the Slice Select tool to change
the boundaries of the slice.
Figure 13.12 Slices you
create with the Slice tool
appear listed in the Layers
panel. They are special
rectangles that have their
Fill and Stroke attributes
set to None.
However, Illustrator also has a different kind of slice. Instead of creating
graphics and drawing slices over them, you can apply a slice as an attribute
to a selection—something Illustrator calls an object-based slice. To apply this
kind of slice, make a selection, and then choose Object > Slice > Make.
Illustrator uses the bounds of your selected artwork as the area for the
object-based slice. Using this method, if you make an edit to your graphic,
the slice updates automatically along with it.
If you want to hide all the little squares and numbers that indicate slices on
your screen, you can do so by choosing View > Hide Slices.
CHAPTER 13: WEB AND MOBILE DESIGN
430
Editing Slice Attributes
You can specify certain attributes for a slice. Remember that a slice is really a
cell in an HTML table. So, for example, a slice can have its own background
color or URL link. Once a slice has been defi ned using either of the two
methods described earlier, you can select it with the Slice Select tool. To
edit the attributes of a slice, select a slice, and choose Object > Slice > Slice
Options to specify a URL and alternative (Alt) text, which is used for acces-
sibility (Figure 13.13). When you specify text as an object-based slice, you
can also set the slice to be an HTML slice (rather than an image slice). In that
case, Illustrator exports the text as editable HTML instead of as a graphic.
HTML text slices might not show up in a browser exactly as you see them
in Illustrator. Although bold or character attributes are preserved, exact
fonts and sizing depend on the browser used. The browser ignores other
text features, such as kerning and baseline shift.
Once you have created all your slices, you can choose individual fi le formats
and additional settings by using the Save for Web & Devices feature, which
we discuss in detail right about…now.
EXPORTING PIXEL-BASED IMAGES
WITH
SAVE FOR WEB & DEVICES
At one time, saving a graphic for use on the web was a diffi cult task that
involved saving an image, opening it in a web browser, and then repeating
that process again and again. The Save for Web & Devices feature in
Figure 13.13 The Slice
Options dialog box gives
you the ability to assign
speci c URLs and additional
information for each slice in
your document.
NOTE When exporting
les in the Photoshop
le format, you can preserve
slices de ned in Illustrator.
Refer to Chapter 14, “Saving
and Exporting Files,” for more
details.
EXPORTING PIXELBASED IMAGES WITH SAVE FOR WEB & DEVICES
431
Illustrator—which is also found in Photoshop—lets you speed up the process
of optimizing and saving web graphics.
Once you’re ready to export a fi nal version of your web graphic, choose
File > Save for Web & Devices to open the Save for Web & Devices dialog
box. The dialog box, which fi lls up most of your screen, is split into sev-
eral sections (Figure 13.14). Along the far left are several tools you can use
within the Save for Web & Devices dialog box. In the center, a preview pane
lets you view up to four versions of your art. The upper-right side offers a
variety of export formats and their settings, and the lower-right side offers
a trio of panels that control color, image size, and layer settings. Along the
bottom of the dialog box are zoom controls, color information, and a
Preview in Browser button.
Figure 13.14 The Save for Web & Devices dialog box is almost an entire application within itself.
Zoom Color Information
Preview in Browser
Color, Image Size, and Layers Panels
Preview Pane Export Formats and Settings
Save for Web &
Devices tools
CHAPTER 13: WEB AND MOBILE DESIGN
432
Let’s take a closer look at each of the sections of the Save for Web & Devices
dialog box:
• Save for Web & Devices tools. The Save for Web & Devices dialog
box has its own set of tools, which is the fi rst indication that this feature
is above and beyond just a simple dialog box. The Hand tool lets you
pan the view of your artwork; it is especially useful when you are view-
ing your art at higher zoom levels. The Slice Select tool enables you to
select a particular slice with which to work. The Zoom tool allows you
to change the zoom setting of your artwork, and the Eyedropper tool
allows you to sample color from an image that appears in the preview
pane. In addition to the icon that indicates the eyedropper color (you
can click it to open the Color Picker), there’s also a button that toggles
slice visibility on and off.
• Preview pane. The preview pane is the main feature of the Save for
Web & Devices dialog box. By clicking any of the four tabs, you can
choose to view your original art (as it appears on the Illustrator art-
board), an optimized version of your art (based on the current fi le set-
tings chosen), and 2-up and 4-up versions of your art. Using the 2-Up
and 4-Up tabs, you can easily compare different fi le settings or how an
optimized fi le looks compared to its original version. Illustrator displays
useful information below each preview, including fi le size and estimated
download times, making it easy to fi nd just the right fi le type for your
image (Figure 13.15).
Figure 13.15 Besides being
able to preview the results
of di erent le and
compression settings, you
can also view le size and
estimated download times.
EXPORTING PIXELBASED IMAGES WITH SAVE FOR WEB & DEVICES
433
• Zoom control. The zoom control allows you to easily choose from a
preset zoom level to view your artwork. Alternatively, you can enter any
number in the Zoom fi eld.
• Color information. As you move your pointer over artwork in the
preview pane, the Save for Web & Devices dialog box provides feed-
back for colors in real time. This is helpful if you want to confi rm color
information or if you want to sample a specifi c color from an image.
• Preview in Browser icon. The Preview in Browser icon is a huge
time-saver. Although you get a beautiful preview of your artwork in
the preview pane of the Save for Web & Devices dialog box, it can
be useful at times to see what your artwork looks like in an actual
web browser. This is especially useful for when you want to preview
SWF animations, because those do not preview in the Save for Web &
Devices dialog box. Clicking the icon previews the selected artwork in
your computer’s default web browser. Clicking the arrow opens a list of
installed browsers that you can choose from, or you can edit the list of
browsers to customize it to your needs.
The two remaining sections feature the group of three panels and the ability
to choose from different fi le types.
Choosing the Right Image File Type
Overall, the main benefi t of using the Save for Web & Devices feature is the
ability to compare the fi nal results of multiple fi le formats and choose the
one that fi ts best for a particular use. To make the right decision, you have
to understand the differences between each of these fi le formats and what
their strengths and weaknesses are. Here we’ll discuss the pixel-based GIF,
JPEG, PNG, and WBMP formats. We’ll discuss the vector-based SWF and
SVG formats later in the chapter.
Choosing the GIF File Format
A common image fi le format used on the web is the Graphics Interchange
Format (GIF). The format was developed by the people at CompuServe,
one of the pioneers of the Internet and the web, though you hardly hear that
name mentioned today (it’s amazing how fast things change). Recognizing
the need to send graphics fi les across modem connections (which in those
CHAPTER 13: WEB AND MOBILE DESIGN
434
days were quite slow), they developed the GIF fi le format that can contain a
maximum of 256 colors and uses a lossless method of compression. A GIF
tries to save space by looking for large areas of contiguous solid color; this
makes the format perfect for logos, backgrounds, text headlines, and the like.
However, the 256-color limit and the limited compression for images with a
lot of detail make the GIF fi le format a bad choice for photographic content.
The GIF fi le format supports other features, including the ability to control
the exact number of colors present in the fi le and the ability to specify trans-
parency for a single color of the fi le.
When you choose the GIF fi le format in the Save for Web & Devices dialog
box, you have the following settings available:
• Color settings. The Color Table settings enable to you to specify
exactly how many colors the GIF will contain. Lower numbers of colors
result in smaller fi le sizes but could also result in lower-quality images.
Because a GIF can contain a maximum of 256 colors, you can choose
from several color-reduction algorithms, including the Restrictive
option that chooses only web-safe colors.
• Dithering. The Dither settings control what method of dithering is
used when the image calls for a color that isn’t available in the reduced
set of colors or when the image is displayed on a computer screen that
doesn’t support enough colors to display the image.
• Transparency. The Transparency setting enables to you to defi ne
colors that will display as transparent in a browser. For example, if you
want to place a logo on a colored background, you can specify the back-
ground color of the GIF to be transparent; doing so causes the back-
ground color in the browser to show through those transparent areas.
The edges where color meets the transparent edge are usually white
when displayed in a browser, and specifying a matte color that matches
the background ensures that the edges of your art blend seamlessly into
the background (Figure 13.16).
• Interlacing. An interlaced image loads gradually in a web browser,
fi rst in a low resolution and then in a higher resolution in a second and
third pass. This allows the image to appear in the browser immediately
so that viewers can get an idea of what the page will look like, and then
after a few seconds, the higher-quality image appears. Turning interlac-
ing off means the image won’t display on a web page until the entire
image has downloaded.
NOTE GIF les can
also contain multiple
images or frames for creating
an animation, although
Illustrator doesn’t support the
creation of animated GIF les.
EXPORTING PIXELBASED IMAGES WITH SAVE FOR WEB & DEVICES
435
• Web Snap. By specifying a value in the Web Snap fi eld, you can have
Illustrator ensure that a certain percentage of the colors used in the
graphic are actually web-safe colors.
Choosing the JPEG File Format
JPEG (pronounced “jay-peg”) stands for Joint Photographic Experts Group,
and it was created to allow photographers to share images using a standard
fi le format. JPEG fi les can contain millions of colors and use a lossy com-
pression method. Digital images usually contain more color information
than the human eye can see or detect, and by throwing out some of that
extra information, JPEG images can achieve amazing fi le size savings. For
example, a 10 MB photograph can easily be compressed into a JPEG that’s
less than 1 MB.
Because the JPEG format supports millions of colors (as opposed to only
256 in a GIF), it’s the perfect format to use for photographs or images with
complex colors and gradient fi lls. However, JPEG fi les do not support trans-
parency as GIF fi les do.
When you choose the JPEG fi le format in the Save for Web & Devices
dialog box, you can choose from the following settings:
• Compression/Quality. The Quality settings enable you to specify how
much information is thrown out of a fi le when the fi le is compressed.
The settings are actually a bit confusing in the way they are presented
Figure 13.16 The image
on the left was saved with a
matte setting that matched
the background on which
the art would eventually
appear. The image on the
right used the default matte
setting of white.
CHAPTER 13: WEB AND MOBILE DESIGN
436
in the dialog box. You might think that a setting of Maximum would
mean the highest compression with a smaller resulting fi le size, but
that’s incorrect. To prevent confusion, it’s best to think of these settings
as quality settings. A setting of Maximum means the best quality of an
image, meaning less information is being tossed from the image. The
result is a better-looking image that is larger in fi le size. Alternatively,
you can specify numerical values in the Quality fi eld. A setting of 100
is the same as choosing the Maximum setting.
• Blur. One of the most noticeable side effects of compression in a JPEG
fi le is artifacts or stray pixels that appear in the image. Specifying a blur
amount can help cover up those artifacts.
• Matte. The Matte setting enables you to specify a color for the
edge of the graphic, thus allowing it to blend smoothly into colored
backgrounds.
• Progressive. The Progressive setting allows a JPEG image to load
gradually in a browser, similar to the interlacing setting that is available
for GIF images.
Choosing the PNG File Format
The PNG (pronounced “ping”) format was developed mainly as an alterna-
tive to GIF. Shortly after GIF became popular on the web, the Unisys cor-
poration, which developed the compression algorithm used in GIF, tried to
collect royalties on its technology from those who used GIF. To get around
the legal issues, an open standard called Portable Network Graphic (PNG)
was developed. The PNG format uses lossless compression and can support
millions of colors. Instead of allowing you to specify a single color as being
transparent, the PNG format also supports 256 levels of transparency, simi-
lar to alpha channels in Photoshop.
Older web browsers require a special plug-in to view PNG fi les, although
most newer browsers can display them natively. PNG fi les also might not
be compatible with some handheld devices and cell phones. PNG fi les come
in two varieties, 8-bit and 24-bit. The different optimization settings for
PNG-8 are identical to those found for GIF, mentioned previously.
EXPORTING PIXELBASED IMAGES WITH SAVE FOR WEB & DEVICES
437
Choosing the WBMP File Format
The Wireless Bitmap (WBMP) fi le format is a format that is optimized for
wireless devices that have slow connections and limited display capabilities.
These devices are quickly fading because newer phones are being introduced
constantly, and cell phones are the largest-selling consumer electronic devices
worldwide. WBMP fi les are black-and-white images (color isn’t supported)
and are optimized via a dithering setting.
Specifying Additional Image Settings
In addition to choosing a fi le format, the Save for Web & Devices feature
in Illustrator lets you control how colors, image sizes, and layers are treated
when saving your fi les. You can fi nd these settings within the three panels
that appear at the lower-right side of the Save for Web & Devices dialog box.
Color Table
The Color Table panel lists all the colors contained within the selected
slice. Colors that appear with little diamond icons are web-safe colors
(Figure 13.17). Using the Eyedropper tool to sample colors, you can click
the Maps Selected Colors to Transparent icon beneath the panel to specify
a color that will appear as transparent (when saving to fi le formats that
support transparency).
Figure 13.17 Illustrator
indicates web-safe colors
in a color table with tiny
diamond-shaped icons.
CHAPTER 13: WEB AND MOBILE DESIGN
438
Image Size
The Image Size panel gives you feedback on the actual size of the selected
slice, and it also lets you specify new sizes, although it’s always better to
make changes to image size on the Illustrator artboard before launching
the Save for Web & Devices dialog box. Of importance are the Anti-Alias
button and Clip to Artboard check box. By default, Illustrator antialiases
artwork that is exported from the Save for Web & Devices dialog box and
exports artwork based on the art’s bounding box or your artboard setting.
To have the Save for Web & Devices dialog box honor the artboard size,
you can select the Clip to Artboard setting.
Layers
If you specifi ed layers in your Illustrator document, you have the option of
exporting those layers as CSS layers by selecting the Export as CSS Layers
option in the Layers panel in the Save for Web & Devices dialog box.
Cascading Style Sheets (CSS) lets you take advantage of absolute positioning
and overlapping objects within a web page. Although the technical aspects
of CSS are beyond the scope of this book, it’s important to realize that CSS
has become a standard, especially when you’re generating content that will
be displayed on a wide range of devices.
If you choose to export Illustrator layers as CSS layers, you can choose
whether each top-level layer in your document should be exported as visible
or hidden (Figure 13.18). Alternatively, you can specify that certain layers
aren’t exported at all.
Figure 13.18 CSS layers
that are exported as hid-
den can be activated via
JavaScript on the server
using Dynamic HTML.
ADDING INTERACTIVITY AND CREATING ANIMATIONS
439
ADDING INTERACTIVITY AND
CREATING ANIMATIONS
Although it’s nice to admire graphics on a web page, nothing is quite like a
graphic that invokes action on the viewer’s part. It is those images that move
with animation or that contain clickable hotspots that can take a viewer to
additional content that make the web such an exciting medium. Although
Illustrator isn’t a replacement for an application such as Flash, you can still
create web graphics that come to life using your favorite vector graphics
application.
Creating Image Maps
On the web, a designer’s job is far more than just creating a pretty graphic.
Rather, a graphic must draw a viewer to action. The action could be as
simple as switching to a different page or as signifi cant as generating a sale.
In Illustrator, you can assign a URL to an object, which results in an image
map. An image map is a region or portion of a graphic on which a viewer
can click.
To create an image map, follow these steps:
1. Select an object on your artboard, and choose Window > Attributes to
open your Attributes panel.
2. Once the panel is open, choose Rectangle or Polygon from the Image
Map pop-up menu (Figure 13.19). For objects that are rectangular,
choose the Rectangle option. For images that fi t any other shape, choose
the Polygon option.
3. Once you’ve chosen an image map type, enter a URL in the fi eld below
the pop-up menu. For the best results, enter the complete URL, includ-
ing the http://.
Figure 13.19 Older
browsers supported only
rectangular image maps,
but just about all of today’s
browsers support polygonal
image maps.
CHAPTER 13: WEB AND MOBILE DESIGN
440
Illustrator keeps track of all the URLs you enter, so if you’re applying
the same URL to multiple objects in your document, you can choose
the correct URL from the URL pop-up (Figure 13.20). To test a URL
to see whether it is correct, click the Browser button; when you do,
Illustrator launches your system’s default browser and navigates to the
chosen URL.
Animation: Making It Move
There’s no question that adding motion to web graphics enhances their
appearance and ability to garner the attention of viewers. Illustrator can
build frame-based animations quite easily, although if you’re looking for a
high-end animation tool, you’d best look elsewhere. The techniques we dis-
cuss here are indicative of the simple animations you can create quickly and
easily with Illustrator. You might still want to look to Flash and Adobe After
Effects CS4 for more complex work.
The key to creating great animations in Illustrator is to use layers carefully.
Illustrator doesn’t have an animation panel or a timeline. Rather, Illustrator
treats each top-level layer in your document as a frame in your animation.
As you build your animation with each new layer, keep in mind the advice
you’ve learned, especially with regard to using symbols (Figure 13.21).
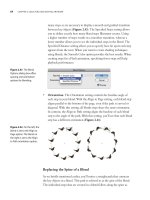
Illustrator allows you to create blends between symbols and even create
objects with live effects applied. Refer to Chapter 2, “Selecting and Editing
Artwork,” for detailed information on creating blends.
Once you’ve created the art for your animation, choose File > Export, and
choose the Flash (SWF) fi le format. When you select the AI Layers to Flash
Frames setting, your resulting SWF fi le plays through each layer sequen-
tially. Setting the animation to loop causes the animation to repeat endlessly
(always fun!). Refer to Chapter 14 for information on the settings found in
the Flash (SWF) Export dialog box.
Figure 13.20 Once you’ve
entered a URL in the
Attributes panel, Illustrator
remembers it so you can
easily apply it to other
objects in your document.
NOTE Animation in
SVG is not directly sup-
ported in Illustrator. To add
animation to SVG les, you
can add the code by hand
once you’ve exported the SVG
from Illustrator, or you can
use an SVG animation appli-
cation, such as Ikivo Animator
(www.ikivo.com).
DESIGNING SPECIFICALLY FOR FLASH
441
Figure 13.21 In this illustra-
tion, the heart shape was
de ned as a symbol and
then used in a blend with a
custom spine. The symbol
on the top was then set to
0% opacity, resulting in a
blend that makes the heart
appear to fade out as it
moves toward the top.
DESIGNING SPECIFICALLY FOR FLASH
After reading this chapter, you’ve undoubtedly realized that you can use
Illustrator to create interactive SWF fi les. However, if you’re looking to
develop truly interactive websites, interfaces, and experiences, you’ll soon
fi nd that the Illustrator capabilities top out rather quickly. Flash is the appli-
cation you want to use to create truly interactive and engaging content.
However, many Flash professionals use Illustrator to design their artwork
and then bring that artwork into Flash, where they add the interactivity. Both
Illustrator and Flash are vector-based applications, and many designers are
familiar with the design environment and powerful design features found in
Illustrator. In addition, it’s easy to create mock-ups and PDF fi les to submit
to clients for approval from Illustrator. The challenge, however, is fi nding a
way to bring rich Illustrator content into Flash while keeping features such as
artwork, text, gradients, masks, and symbols in an editable state.
CHAPTER 13: WEB AND MOBILE DESIGN
442
The good news is that if you’re using Illustrator and Flash, you can easily
move your artwork between the two—all while keeping the fi delity of your
content. In fact, if you know that your artwork will end up in Flash, you can
save valuable time by taking advantage of certain features in Illustrator. Let’s
take a look at some of these features.
Working with Symbols
In Chapter 9, “Designing with Effi ciency,” you learned how to both defi ne
and edit symbols. When working with Flash, creating symbols is extremely
important because they allow you to easily add interactivity and make global
changes, all while keeping fi les sizes small and manageable.
When you defi ne a new symbol in Illustrator (F8), you’re presented with
the Symbol Options dialog box (Figure 13.22), which offers three settings.
These settings don’t have any effect on the symbol within Illustrator and are
useful only when you bring the symbol into Flash.
• Ty pe. Flash uses several types of symbols for different tasks. You can
wait until you bring your symbol from Illustrator into Flash to deter-
mine what kind of symbol it should be, or to save time, you can specify
the symbol type at the time you fi rst defi ne the symbol in Illustrator. A
Graphic symbol is used for static artwork, while a Movie Clip symbol
can contain interactivity within it.
• Flash Registration. The Flash Registration setting lets you defi ne an
origin point for the symbol. This origin point is used when you apply
transformations in Flash or when ActionScript commands are applied
to the symbol. This setting is similar to what you learned in Chapter 2
with the Transform panel.
Figure 13.22 The Symbol
Options dialog box gives
you the ability to name the
symbol and to apply certain
Flash-speci c settings.
DESIGNING SPECIFICALLY FOR FLASH
443
• Enable Guides for 9-slice scaling. Flash has the ability to scale sym-
bols in a special way to prevent distortion. For example, you can specify
that only parts of a symbol scale, while other parts don’t. To control
exactly how symbols scale, select the “Enable Guide for 9-slice scaling”
option in the Symbol Options dialog box, and then click OK. Then,
double-click the symbol to edit it, at which time you’ll see a series of
guides appear (Figure 13.23). Use the Selection tool to position the
guides as desired, and the symbol will scale appropriately when trans-
forms are applied to it in Flash.
In addition, you can name each symbol instance that you place on your
artboard. Giving an instance a name lets you reference that instance from
within ActionScript code in Flash. When any symbol instance is selected on
your artboard, you can give it a name in the fi eld that appears in the Control
panel (Figure 13.24).
Figure 13.23 The “Enable
Guide for 9-slice scaling”
option lets you control
which parts of a symbol
scale and which don’t. If you
think about the artwork as
being divided up by a tic-
tac-toe board, the corner
and center areas don’t scale,
while the center-top and
center-side areas do.
Figure 13.24 Applying
instance names in Illustrator
can save plenty of time
later in your work ow, after
bringing your art into Flash.
CHAPTER 13: WEB AND MOBILE DESIGN
444
Working with Text
As you learned in Chapter 8, “Working with Typography,” Illustrator
has sophisticated type controls and features. However, when developing
Flash content, text can also be interactive. Rather than waiting to add that
interactivity in Flash, you can specify interactive text for Flash right in
Illustrator. Choose Window > Type > Flash Text to defi ne text destined
for Flash as either static, dynamic, or input text (Figure 13.25). Static text
doesn’t change within the Flash fi le, while you can change dynamic text
using ActionScript. Input text is used when building things such as Flash
forms, where a user would be asked to enter custom information.
Bringing Your Artwork into Flash
Once you’ve created your artwork in Illustrator, you need a reliable way to
bring your graphics into Flash. In previous versions of both Illustrator and
Flash, this was anything but easy. However, in the CS4 versions of these
components, it’s actually quite easy.
To quickly move individual pieces of art, you can simply copy and paste from
Illustrator into Flash. Any defi ned symbols will be retained, as well as text and
other settings. However, you may want to bring an entire Illustrator fi le into
Flash, preserving layers and document structure as well. To do so, save your
fi le as a native Illustrator document (.ai), because Flash CS4 Professional
is able to read native Illustrator fi les. From Flash, choose File > Import to
Stage, and choose the Illustrator fi le you saved. An import dialog box will
appear listing each object in your fi le. The import dialog box offers many
options, including the ability to choose from multiple artboards, to keep text
editable, and to convert objects to movie clip symbols on the fl y.
Figure 13.25 The Flash
Text panel gives you control
over how text objects in
Illustrator will behave when
brought into Flash.
EXPORTING VECTORBASED IMAGES WITH SAVE FOR WEB & DEVICES
445
EXPORTING VECTOR-BASED IMAGES
WITH
SAVE FOR WEB & DEVICES
Earlier in the chapter, we covered the pixel-based fi le formats that are avail-
able for export in the Save for Web & Devices dialog box. Here, we present
the two vector-based formats: SWF and SVG.
Choosing the SWF File Format
Shockwave Flash (SWF) is a popular web-based fi le format that supports
both vectors and rasters. This Flash fi le format has become extremely popu-
lar because of its capability to contain interactive or animated content. You
can use Illustrator to generate a SWF fi le that you want to upload directly
to a website or to create art for import into the Adobe Flash application for
further editing.
When you choose the SWF fi le format in the Save for Web & Devices dialog
box, you can choose from the following settings:
• File options. You can create SWF fi les in one of two ways: AI File to
SWF File that creates a single SWF fi le that contains all your Illustrator
artwork and AI Layers to SWF Frames where each layer is converted
into a keyframe, resulting in a single animated SWF fi le. Additionally,
you can choose the Protect File option to prevent others from opening
the resulting SWF fi le. The Text as Outlines option converts all text to
outlines (so no font fi les are necessary), and you can make the fi le size
smaller by choosing the Compressed option. The Curve Quality setting
controls the fi delity of curved paths.
• Appearance. When using transparency or other special effects in
Illustrator, you can choose Preserve Appearance, which fl attens any
effects as necessary, or you can choose the Preserve Editability Where
Possible option if you plan on opening the fi le in Flash to edit it. This
way, you can make additional tweaks to the artwork if you need to do so.
• Animation settings. If you choose the AI Layers to SWF Frames
option, all layers in your Illustrator fi le become keyframes and play
as an animation when the SWF fi le is viewed in a web browser. The
Frame Rate setting controls the speed at which the animation plays
(you can’t control the timing of individual frames like you can in a GIF
TIP The Flash (SWF)
Export dialog box
o ers additional options for
creating SWF les that are not
present in the Save for Web &
Devices dialog box. For
detailed information about
the Flash format and these
additional settings, see
Chapter 14.
CHAPTER 13: WEB AND MOBILE DESIGN
446
animation), and the Looping option forces the animation to repeat con-
tinuously. You can fi nd more information about creating animated SWF
fi les in the earlier “Animation: Making It Move” section).
Choosing the SVG File Format
Scalable Vector Graphics (SVG) is an XML-based fi le format that is used
primarily on the web and has recently become more popular in creating
content for cell phones and handheld wireless devices.
Most web browsers require a special plug-in to view SVG fi les. Because
SVG fi les are text-based, they can be edited easily, even after they have been
exported and uploaded to a web server. Because of this ability, SVG fi les
are used in data-driven, server-based workfl ows where customized content
is a necessity.
When you choose the SVG fi le format in the Save for Web & Devices dialog
box, you can choose from the following settings:
• DTD. The DTD setting (which stands for document type defi nition) is
akin to the version of SVG with which your fi le is compatible. Because
SVG is an open standard, additional specifi cations are revised and
approved. If you save an SVG fi le with a particular DTD, it means your
fi le will be compatible with any device that supports that DTD. Newer
specifi cations usually support more functionality than the older ones
did. SVG Tiny (also referred to as SVG-t) is a subset of SVG used for
displaying content on SVG-enabled cell phones. SVG Basic is another
subset used for displaying content on PDAs.
• Fonts. When text is present in your fi le, you can specify the Adobe
CEF type, which results in better-looking text when your fi le is viewed
with the Adobe SVG Viewer, but which may not be supported with
other SVG viewers. SVG creates more compatible text, but this text may
not be as readable at smaller font sizes. Alternatively, you can convert all
text to outlines, which increases fi le size.
• Images. When you save a fi le in SVG, you have the ability to embed
any images within the SVG fi le (making for larger but self-suffi cient
fi les), or you can choose to create smaller SVG fi les by using the
Link option.
TIP You can nd more
information on SVG at
www.svg.org and www.adobe.
com/svg.
USING ADOBE DEVICE CENTRAL
447
• CSS Properties. You can format SVG code in a variety of ways, and
the CSS Properties setting lets you determine how object attributes are
coded in the fi le. For the most part, this setting affects the performance
of your fi le when viewed.
• Decimal Places. Illustrator allows you to specify how precisely vec-
tor paths are drawn. You may choose a value from 1 to 7, where higher
numbers result in better-looking paths at the expense of fi le size and
performance.
• Encoding. When you save an SVG fi le that contains text, you can
specify a character encoding, including ISO-8859-1 (suitable for Euro-
pean languages) and 8- or 16-bit Unicode (suitable for more complex
languages).
• Optimize for Adobe SVG Viewer. If people will be using the Adobe
SVG Viewer to view your SVG fi les, you can select this option that
takes advantage of proprietary optimizations that exist in the Adobe
SVG Viewer, including faster rendering of SVG fi lter effects.
USING ADOBE DEVICE CENTR AL
Although most web graphics today are viewed on computer screens, it is
becoming more and more popular to view web content on web-capable cell
phones. Especially with the release of devices such as the Apple iPhone, you
can be sure that any graphics you create for the web will also be viewed on
handheld devices. So although the Save for Web & Devices feature is nice
on its own, it really doesn’t give you a good idea what your artwork will
look like when viewed on a mobile phone.
Included with Adobe Illustrator CS4 (or any of the myriad of Adobe
Creative Suite 4 choices) is a component called Adobe Device Central CS4,
which enables you to preview and test your artwork as it would appear and
run on a mobile device.
Adobe Device Central is really a full-blown application on its own and
therefore is beyond the scope of this book. With regard to Illustrator, you
can perform two specifi c functions with the assistance of Adobe Device
Central: You can create a new document at the proper size for a specifi c
mobile devices or a group of devices, and you can preview or test content
on a mobile device or a group of devices.
CHAPTER 13: WEB AND MOBILE DESIGN
448
• Creating a Mobile and Devices document. From the Illustrator
welcome screen, you can click the Mobile and Devices document pro-
fi le. This launches Adobe Device Central where you can choose which
devices you want to design content for. Upon choosing a single device
profi le (or a range of device profi les), you can click the Create button,
found at the lower-right corner of the Adobe Device Central window
(Figure 13.26). A new Illustrator document will then automatically be
created at the correct size.
• Testing mobile content. To see what your web graphics will look like
on a mobile device, click the Device Central button that appears in the
lower-right corner of the Save for Web & Devices dialog box in Illustrator.
Adobe Device Central launches, and you can preview and test your con-
tent on the devices that you specify (Figure 13.27).
One important thing to keep in mind is that Adobe Device Central is
geared specifi cally for previewing and testing Flash Lite content. Flash Lite
isn’t a plug-in that runs in a web browser (like Adobe Flash Player does).
Rather, Flash Lite is a runtime that runs directly on the phone (almost like
an operating system). As such, Adobe Device Central provides information
Figure 13.26 Once you’ve
selected a device pro le in
Adobe Device Central, you
can choose to create a new
Illustrator document.
NOTE Flash Lite 3,
which is the latest
available version at the time
of the printing of this book,
supports Flash Player 7 (and
ActionScript 2.0), so when
you export content from
Illustrator, make sure you
don’t specify a later version
of Flash Player compatibility.