Photoshop Elements 3 Solutions: The Art of Digital Photography- P3 ppsx
Bạn đang xem bản rút gọn của tài liệu. Xem và tải ngay bản đầy đủ của tài liệu tại đây (17.43 MB, 30 trang )
44
CHAPTER
2:
YOUR IMAGES
:
GLOBAL SOLUTIONS
■
Tinting Images
I like grayscale images. I really do. But sometimes they benefit from a color tint. The
tint need not be overwhelming. In fact, sometimes a subtle shade of yellow or red is all
it takes to give a grayscale image an added pop so it jumps from a page.
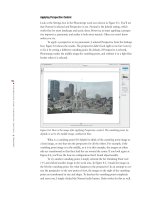
Take, for example, the 1761 engraving from a Russian bath shown in Figure 2.16.
The image was published in black-and-white in a book I wrote on bathing. It looked
fine. However, when I went to place the image on my website, it was lacking. It needed
to stand out more.
Figure 2.16: The original grayscale image.
This is what I did:
1. I opened the Hue/Saturation dialog box (Enhance Adjust Color Adjust
Hue/Saturation), shown in Figure 2.17.
Note: This will not work if you are in Grayscale or Bitmap modeit works only if you are
in RGB or Indexed Color mode. If you need to, choose Image
Mode RGB or Image
Mode Indexed Color to convert the image.
2. I selected Colorize. The image was converted to the hue of the current fore-
ground color—in this case, red.
3. I then slid the Hue and Saturation sliders to select variations of color.
4. When I got the tint I wanted, I clicked OK. The tinted image is shown in
Figure 2.17.
4363_ch02_p5.qxd 10/11/04 7:24 PM Page 44
45
■ CORRECTING COLOR
Figure 2.17: To tint, make sure the Colorize option is selected in the Hue/Saturation dialog
box (left). The tinted image (right).
You can tint an image using the Hue/Saturation dialog box (Enhance Adjust
Color
Adjust Hue/Saturation) from within Quick Fix as well. You can also use the
Quick Fix Color group. Start by sliding the Saturation slider completely to the left.
Then adjust the Tint slider to introduce a tint. You can then use the Hue slider to
introduce new tints. (When you adjust the Saturation, Hue, Temperature, and Tint
sliders, Commit and Cancel icons appear next to the word
Color. Select Commit when
you are satisfied with the image. Select Cancel if you are not. Until you select either the
Commit or Cancel icon, the Reset button located above the After version of your
image is dimmed and inoperable.)
Eliminating or Diminishing Dust, Scratches, and Electronic Noise
Most digital images suffer from dust, scratches or other marks, or electronic “noise.”
Even high JPEG compression can cause unwanted artifacts, which show up as
“blocks” and are especially obvious in areas of continuous tone such as a vast blue sky
or skin, and can appear as chunky blocks of pixels. Any of these flaws can detract
from the look of a digital image. With smaller prints, or when viewed on a monitor,
these artifacts are not as noticeable, but as prints get larger—or if an image is magni-
fied over 100 percent—these artifacts can be quite visible. Fortunately, Photoshop
Elements offers several tools for getting rid of them.
Note: Low-cost, third-party solutions to reducing noise are available. Check out Dfine, a
Photoshop plug-in from nik multimedia that offers more options than Photoshop’s new
Reduce Noise filter. (A trial version of Dfine is included on the CD.)
4363_ch02_p5.qxd 10/11/04 7:25 PM Page 45
46
CHAPTER
2:
YOUR IMAGES
:
GLOBAL SOLUTIONS
■
Reduce Noise Filter
The newest and most useful tool in the Photoshop Elements arsenal is the Reduce
Noise filter. The filter can be applied from either Quick Fix or Standard Edit. Look at
Figure 2.18 (left) and you’ll see a shot I took in extremely low light. I managed to get
the shot without using a flash by boosting my digital camera’s ISO setting to 1600. I
got the shot, but increasing the ISO introduced a lot of “noise” or “grain” into the
image. Figure 2.18 (right) shows a magnified view and reveals the noise more clearly.
Figure 2.18: I shot this in low light without a flash by boosting my digital camera’s ISO to
1600 (left). The magnified view shows the noise clearly (right).
To reduce the noise, I used the Reduce Noise filter (Filters Noise Reduce
Noise). The filter is available in both Standard Edit and Quick Fix. Figure 2.19 shows
my settings and the results.
Figure 2.19: My Reduce Noise filter settings and the results.
How did I come up with my settings? I just used trial and error until I got
something that looked less “noisy” but still maintained edge detail as well.
4363_ch02_p5.qxd 10/11/04 7:25 PM Page 46
47
■ ELIMINATING OR DIMINISHING
DUST
,
SCRATCHES
,
AND ELECTRONIC NOISE
Spot Healing
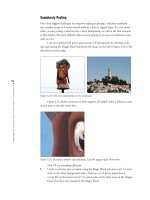
Sometimes flaws are not global but specific. The flaws you see in Figure 2.20, for
example, were caused by dust accumulating on the electronic sensor of my Nikon
D100. Similar artifacts can be caused by a smudge or speck of dust on the lens. A dirty
scanner glass will also produce similar results.
Figure 2.20: The flaws on this image were caused by dust on the electronic sensor.
The Spot Healing Brush is especially effective in removing these kinds of image
flaws. To use this new Photoshop Elements brush, you’ll need to be in Standard Edit.
The Spot Healing Brush tool is found in the same spot on the toolbar as the
Healing Brush tool (use the keyboard command J and repeatedly press J to cycle
between tools). Why use it rather than the Healing Brush tool? The Spot Healing
Brush tool is easy to use. You don’t need to establish a sample area by holding the
Alt/Option key and clicking, as you need to do with the Healing Brush and Clone
Stamp tools. You only need to select a brush, position your cursor, and click over an
area you wish to heal. You can also click and hold the mouse and drag to “paint” over
a complex shape. After you stop painting and release the mouse, the Spot Healing
Brush tool goes to work. Like the Healing Brush tool, it automatically samples the
areas outside the selection and blends the results with the area within the selection.
In the example shown in Figure 2.20, the Spot Healing Brush worked great.
This what I did:
1. I selected the Spot Healing Brush tool from the toolbar.
2. I chose a Hard Round 30 pixels from the options bar. I chose this size because it
was about 20 percent larger than the area I wished to remove. Using a brush
10–30 percent larger than the area you wish to remove is a good rule of thumb
to follow. (You can play around with a soft or hard-edged brush. In most cases,
hard is the way to go, but sometimes a soft brush produces a smoother edge
transition.)
3. I set the Type to Proximity Match. (Pattern generates an obvious pattern, which
isn’t appropriate if you are trying to seamlessly remove a flaw.)
4363_ch02_p5.qxd 10/11/04 7:25 PM Page 47
48
CHAPTER
2:
YOUR IMAGES
:
GLOBAL SOLUTIONS
■
4. I placed my cursor over the large flaw in the middle and clicked. I then selected
a smaller, Hard Round 20 pixels brush and clicked the smaller flaws sprinkled
throughout the image. Done.
The result is shown in Figure 2.21.
Figure 2.21: Flaw fixed with the Spot Healing Brush.
If you try the Spot Healing Brush on large flaws, say over 300 pixels, you’ll
quickly see why it is called a “spot” healing brush. The tool seems to get confused, and
produces unpredictable and often unsatisfactory results. You’ll also find it works best
when the area around the objects you are trying to remove is surrounded by uniform
color or texture.
Combining Tools and Techniques
Sometimes you’ll want to use a combination of tools to fix a particularly challenging
job. For this example, I used a combination of the Dust & Scratches filter, a selection
tool, and the Clone Stamp tool to fix the 50-year-old photo shown in Figure 2.22.
Figure 2.22: This 50-year-old photo is full of scratches and other artifacts of age.
4363_ch02_p5.qxd 10/11/04 7:25 PM Page 48
49
■ ELIMINATING OR DIMINISHING
DUST
,
SCRATCHES
,
AND ELECTRONIC NOISE
In Standard Edit, here’s what I did:
1. I cropped the edges of the scan by using the Crop command (
“Cropping to
the Essential Parts” later in this chapter).
2. I applied Auto Levels to optimize the colors and tone (
“Making Dull Images
Shine” earlier in this chapter).
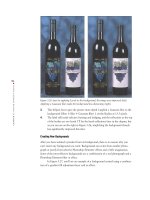
3. At a magnification level of 300 percent, I noticed the sky was filled with dust
and scratches and other artifacts of age (see Figure 2.23). As I scrolled around, I
saw there were also moiré patterns caused by the scanning process. Glass
against glass often causes a swirling pattern, called a moiré, to form. The old
transparency was sandwiched between two pieces of glass. I was tempted to use
the Dust & Scratches filter to clean up the entire image but I knew this wasn’t a
good idea because it would blur the image. Instead I selected the sky by using
the Lasso selection tool ( ) and applied the filter only to this selected area. I
set the Radius at 4 and the Threshold at 0 (see Figure 2.23). In general, higher
Radius values effectively remove more dust and scratches but blur other pixels
in the image as well. Depending on the image, you can still remove dust and
scratches but diminish the blur caused by higher Radius values by selecting
higher Threshold values.
Figure 2.23: A magnification of 300 percent reveals the details of the problem (left).
Applying the Dust & Scratches filter (right) to the selected background removed many of
the artifacts and left the foreground area sharp.
4. Although the filter got rid of most of the smaller artifacts, the larger ones
remained. To get rid of these, I selected the Clone Stamp tool ( ) from the
toolbox. In the options bar, I selected the following options for the Clone Stamp
tool:
Brush: Soft Round 100 pixels
Mode: Normal
Opacity: 100 percent
Aligned: selected
Use All Layers: selected
4363_ch02_p5.qxd 10/11/04 7:25 PM Page 49
50
CHAPTER
2:
YOUR IMAGES
:
GLOBAL SOLUTIONS
■
I positioned the cursor slightly to the side of a scratch or smudge, in an area of
the sky devoid of spots. While holding the Alt/Option key, I clicked and sam-
pled. Then I clicked and “stamped” over a flawed area, careful not to drag and
smear the pixels and cause an unnatural-looking blur.
5. After deselecting the sky, I turned to the foreground and to the woman on the
road (see the left side of Figure 2.24). This area wasn’t as bad as the sky but it
still needed some cleaning up. Again, I used the Clone Stamp tool to selectively
rid the woman’s arm and face of spots, this time using a smaller brush setting
for the smaller areas.
This was a particularly difficult image, and, frankly, I had to draw the line at
how much time I was going to put into it. I could have continued to use the Clone
Stamp tool to make each and every detail perfect. However, I was satisfied with clean-
ing up the sky and most of the woman. After all, it is a historical photo and I wanted
to keep some of its authenticity. The final image is shown on the right in Figure 2.24.
Figure 2.24: I used the Clone Stamp tool to selectively clean up the woman on the road
(left). The final image (right), after applying the Dust & Scratches filter and using the Clone
Stamp tool for extensive cloning.
Converting Color Images to Black-and-White
There are several reasons why you might convert a color image to black-and-white:
black-and-white images stand out in a world saturated with color images, they are
often more economical to print, and, if you save an image in Photoshop Elements’
Grayscale mode, they take up less file space.
The image in Figure 2.25 was shot by San Francisco, California, resident Julie
Christensen for a local newspaper. The newspaper prints only black-and-white photos,
and Julie gave me a color print to scan and convert.
4363_ch02_p5.qxd 10/11/04 7:25 PM Page 50
51
■ ELIMINATING OR DIMINISHING
DUST
,
SCRATCHES
,
AND ELECTRONIC NOISE
I scanned the print in color and converted it to black-and-white simply by
choosing Enhance
Adjust Color Remove Color (see Figure 2.25). This command
converted the colors in the image to gray values, assigning equal red, green, and blue
values to each pixel in the RGB image. The lightness value of each pixel did not
change and, because the image remained in RGB mode, the file size didn’t change
either.
Figure 2.25: The original image (left). Quickly convert to black-and-white (right) by choos-
ing Enhance
Adjust Color Remove Color. (Photo by Julie Christensen)
If you want to keep your file size down, I suggest you convert an image to
black-and-white by simply changing modes from RGB to Grayscale (Image
Mode
Grayscale). If you use this method, you won’t have access to many Photoshop
Elements filters and effects, which work only in RGB mode. But because grayscale
images are only 8 bits per pixel, versus 24 bits per pixel, your file size will be about 75
percent smaller.
Cropping to the Essential Parts
Cropping is one of the most important ways to improve your digital image. Not only
does cropping strengthen the composition of an image, it also reduces the overall size
with no degradation in quality. In Photoshop Elements, using the Crop tool or Crop
command is one of the easiest things you can do. This is a good time to emphasize the
value of working on a copy of your original digital image. I can’t tell you how many
times I’ve cropped an image to what I thought was an optimal composition but then
later decided I needed more sky or more foreground. I would have been in trouble if I
didn’t have the original to go back to.
In Figure 2.26 you’ll see how with a little cropping I emphasized the child and
her day care provider, and made a more compellling image.
4363_ch02_p5.qxd 10/11/04 7:25 PM Page 51
52
CHAPTER
2:
YOUR IMAGES
:
GLOBAL SOLUTIONS
■
Figure 2.26: Before cropping, the image is unnecessarily large and not as effective. The
shaded area outside the bounding box denotes the area that will be cropped.
This is what I did:
1. I selected the Crop tool ( ). In Quick Fix—shown here—it’s located to the far
left of the window. In Standard Edit, it’s in the toolbox.
2. I clicked and dragged over the part of the image I wanted to keep—in this case,
the child and day care provider. When I released the mouse button, the crop
marquee appeared as a bounding box with handles at the corners and sides.
3. The area to be cropped appears gray by default, which makes it easier to visual-
ize how my image will look after it is cropped.
Note: The Crop tool’s default shield color, grayor more precisely, black at 75 percent
opacityis fine for most images. However, if you are working with images that contain large
dark expanses, the gray shield may not be visible, In such cases, you can choose a lighter
color and opacity by using the color selection box and the opacity pop-up slider in the
options bar. This option appears only after you select the Crop tool and click and drag on
your image.
4. I then adjusted the size of the crop marquee by dragging the corner handle. You
can move the marquee to another position by clicking inside the bounding box
and dragging. To rotate the marquee, just position the pointer outside the
bounding box—the pointer turns into a curved arrow—and drag. You can con-
strain the proportions by holding down Shift as you drag a corner handle. If
you hold the Ctrl key while dragging the bounding box near the edge of an
image, you can avoid the “snap to edge” effect. Now when you drag, the transi-
4363_ch02_p5.qxd 10/11/04 7:25 PM Page 52
53
■ CONVERTING COLOR IMAGES
TO BLACK
-
AND
-
WHITE
tion will go smoothly. Holding the Alt/Option key while dragging any handle
causes the crop window to grow from the middle. If you use the Shift and
Alt/Option keys together, you can draw a symmetrical crop window from the
center. The center is where you first clicked.
5. After I finished, I clicked the Commit button ( ) in the options bar. I could
have double-clicked inside the crop marquee, selected a different tool, or pressed
Enter/Return. If I had decided not to crop, I could have clicked the Cancel but-
ton ( ) in the options bar or pressed the Esc key.
In Standard Edit, I also could have cropped this image by using the Crop com-
mand on the Image menu. In that case, I would have had to do the following:
1. Select the part of the image I wanted to keep by using any of the marquee selec-
tion tools (
“Selection Tools” in the appendix). Keep in mind that regardless
of the shape of your selection, the final cropped shape will always be rectangu-
lar, based on the outermost parameter of the selection.
2. Choose Image Crop from the menu bar.
In the Organizer (Windows only), you can also crop in the Auto Fix window.
(To open the Auto Fix window, choose Edit
Auto Fix Window from the Organizer
menu bar, or right-click on the image and choose Auto Fix Window from the pop-up
list.) The Crop tool is located at the top right of the Auto Fix window and is fairly
intuitive to use. It even has fixed aspect ratios to choose from with a variety of com-
monly used sizes such as 4
× 6 inches and 8 × 10 inches. When you are finished with
your crop, simply click the Apply button.
At times you’ll want to crop to a specific resolution and size. Figure 2.27 (top)
shows a series of thumbnail shots that I created for
Newsweek.com. I started with liter-
ally hundreds of screen-sized images, all of which required a smaller, thumbnail version
to be used as a navigation device. The job was so big that any extra steps added
unwanted time to the process. Instead of cropping and then resizing each cropped
image, I simply put the required size and resolution values of the thumbnail version
into the Width, Height, or Resolution text boxes in the options bar. (Clicking the Clear
button in the options bar resets the values to their defaults.) The options bar is shown
in Figure 2.27 (bottom). I then followed the preceding steps, used in the day care
example. After I finished making my cropping selection, I clicked Commit ( ) and
ended up with exactly the size and resolution I needed—in this case, 30
× 30 pixels at
72 dots per inch (dpi).
Figure 2.27: The Crop tool can be set to crop to a specific size and resolution (top).
(Photos by Peter Turnley, with permission from Newsweek, Inc.) The Crop tool options
bar (bottom).
4363_ch02_p5.qxd 10/11/04 7:25 PM Page 53
54
CHAPTER
2:
YOUR IMAGES
:
GLOBAL SOLUTIONS
■
Although this procedure saved time, there was a trade-off in quality. By resizing
so radically in one jump, I degraded the final image more than I would have if I had
taken it down slowly in increments (
“Resizing,” next).
Knowing Your File Size
Just as you wouldn’t lift something without knowing its weight for fear of injuring your back,
you shouldn’t begin working on a digital image without knowing its pixel size. Why? The
larger the image, the more the pixels, and the more “processing” power it takes to do even
the simplest tasks.
How do you determine file size?
Choose Window
Info from the menu bar. Look at the bottom of the Info window. Click the
triangle and choose Document Sizes from the pop-up menu. The number to the left is the
approximate size of the saved, flattened file in the Photoshop format. The number next to it
is the file’s approximate size, including layers. If an image contains only one layer, the num-
bers will be the same. (On a Mac you can also look at the bottom of the document window
and look at the middle section. Click the triangle in the status bar and choose Document
Sizes to get information on the amount of data in the selected image.) These numbers are
useful to know when working on an image within Photoshop Elements. However, the numbers
aren’t representative of the file size of the image if it is saved in other file formats such as
JPEG or GIF. For that, you’ll have to either leave the program and check the file size where it’s
stored, or open Photoshop Elements’ Save for Web plug-in and check the file size in the
lower-left corner. In Windows, just click File
Open from the menu bar and click on the icon
on the left of the “Open” dialog. Here you will get a choice of views, including “Details.” This
reveals more info about your files, including their size and date modified. This is handy for
determining JPEG file sizes without leaving Photoshop Elements.
Resizing
One of the secrets of success in digital imaging is matching the size of your digital
image to the requirements of your output. This means that if your digital image is des-
tined for print, you’ll need more resolution than you would if it were destined for a
monitor (
Chapter 12). Most likely, the original image that you are working with is
larger or smaller than needed, and you’ll have to resize. Keep in mind that resizing, up
or down, always involves some loss of image quality. It is also the next-to-last step that
you want to perform, just before sharpening.
Figure 2.28 shows a 720 × 480 at 72dpi video frame grab from filmmaker/pro-
ducer Micha X. Peled’s acclaimed PBS film, Store Wars: When Wal-Mart Comes to
Town
. Micha wanted to use the frame for a publicity shot, but it didn’t have enough
resolution for the higher demands of print.
4363_ch02_p5.qxd 10/11/04 7:25 PM Page 54
55
■ CROPPING TO THE ESSENTIAL
PARTS
Figure 2.28: A low-resolution frame from a video grab contains obvious scan lines.
Here is what I had him do to boost the resolution and make the image more
acceptable:
1. I had him apply the De-Interlace filter (Filter Video De-Interlace), keeping
the default settings: Odd Fields and Interpolation. This removed the odd inter-
laced lines and, by interpolation, replaced the lines with adjacent pixels, which
made the video grab appear smoother. Just from this simple move, the picture
quality greatly improved. See Figure 2.29.
Figure 2.29: The De-Interlace filter dialog box. With its scan lines removed and its resolu-
tion increased, the video grab is now a perfectly acceptable still image.
2. I had him choose Image Resize Image Size to open the Image Size dialog
box (see Figure 2.30). I made sure that the Constrain Proportions and Resample
Image options were selected. I had him change the resample image interpolation
method from Bicubic—the default setting—to Bicubic Smoother. (Bicubic
Smoother is the preferred interpolation method when enlarging images—Bicubic
Sharper is often preferred when reducing images, but more on that shortly.)
4363_ch02_p5.qxd 10/11/04 7:25 PM Page 55
56
CHAPTER
2:
YOUR IMAGES
:
GLOBAL SOLUTIONS
■
Figure 2.30: The Image Size dialog box.
3. I had Micha enter 300 pixels/inch in the Resolution box, and voila! He had a
digital image that would look great in a magazine as long as it wasn’t published
much larger than 4
× 6 inches.
What about going the other way—making a large image small? This is a com-
mon task when you are resizing digital images for the Web or for e-mail transmission
to many people. You’d think all you’d have to do is enter the values into the Image
Size dialog box and leave it at that. That’s fine if you are reducing the image to, say,
only 50 percent and you use the Bicubic Sharper resample image interpolation
method—but it’s a big mistake if you need to shrink it more than that.
Take the image shown in Figure 2.31. It is 2700 × 1932 pixels at 288
pixels/inch. Now look at the image on the left in Figure 2.32. I’ve reduced it to 675 ×
624 pixels at 72 pixels/inch in one swoop. The image looks mushy and soft. It’s best to
reduce your file size in increments of no more than 50 percent at a time and to apply
the Unsharp Mask after each step. It takes a little longer to resize this way, but the
results make it worthwhile, as you can see on the right in Figure 2.32.
Figure 2.31: The original image started at 2700 × 1932 pixels. (Photo by Monica Lee)
4363_ch02_p5.qxd 10/11/04 7:25 PM Page 56
57
■ RESIZING
Figure 2.32: Resizing in one step to 675 × 624 pixels at 72 pixels/inch creates this mushy
looking image (left). Resizing incrementally, with an Unsharp Mask filter applied between
each step, results in a sharper-looking resized image (right).
Sharpening
If you have a digital image that appears soft or blurry, Photoshop Elements gives you
several options for sharpening it. The Sharpen filter globally increases the contrast of
adjacent pixels, whereas the Sharpen Edges filter sharpens only the areas of a major
brightness change and leaves smooth areas untouched. The toolbox also has a Sharpen
tool, which sharpens specific areas of an image. Quick Fix’s Sharpen command has an
auto-sharpen feature plus amount controls.
But the tool I consistently use is the Unsharp Mask filter, which can be accessed
from either Standard Edit or Quick Fix. This filter is based on a traditional film com-
positing technique that creates a blurred negative version of the image. It then averages
this copy with the original, and through three controls—Amount (percentage),
Threshold, and Radius—gives you precise control over the amount of sharpening and
the way the sharpening is applied. (Quick Fix’s Sharpen command utilizes the Unsharp
Mask filter, albeit without Threshold and Radius controls. When you adjust the
Sharpen Amount slider, Commit and Cancel icons appear next to the word
Sharpen.
Select Commit when you are satisfied with the amount of sharpening. Select Cancel if
you are not. Until you select either the Commit or Cancel icon, the Reset button locat-
ed above the After version of your image is dimmed and inoperable.)
Here is how I used the Unsharp Mask filter to improve the photo (1700 × 1680
pixels, 72 pixels/inch) shown on the left in Figure 2.33.
4363_ch02_p5.qxd 10/11/04 7:25 PM Page 57
58
CHAPTER
2:
YOUR IMAGES
:
GLOBAL SOLUTIONS
■
Figure 2.33: The original image (left) is lacking sharpness. The Unsharp Mask dialog box
(right). Your settings will vary depending on the size and content of the image.
1. I chose Filter Sharpen Unsharp Mask and made sure the Preview check
box was selected.
2. I then dragged the Amount slider until it reached 100 percent.
3. I set the Threshold at 12. (Setting the Threshold slider at a higher value forces
the Unsharp Mask filter to leave the flesh tones, or other areas containing
contiguous pixels of similar tonal values, relatively alone. Leaving the Threshold
set at 0 forces the filter to sharpen all the pixels in the image equally and may
introduce unwanted artifacts in flat-colored areas such as the skin.)
4. I then slid the Radius slider until I was visually happy with the amount of
sharpening. In the case of this image, a value of 4.2 was just about right.
Note: If the Preview check box is selected, you can see the effects of the Unsharp Mask
on the image in the document window. Selecting and deselecting the Preview option gives
you a way to toggle back and forth between a sharpened and unsharpened version of your
image. You can also view the effect of the Unsharp Mask in the dialog box’s small preview
window. If you click the image in the preview window, you’ll see how the image looks without
the effect of the Unsharp Mask. In the preview window, you can also drag to see different
parts of the image and click the plus sign (+) or the minus sign (–) to zoom in or out. To see a
particular spot in your image in the preview, just click on it in the image window. You may
have to move the Unsharp Mask window out of the way to do this.
5. I then clicked OK. Figure 2.34 shows the resulting image.
4363_ch02_p5.qxd 10/11/04 7:25 PM Page 58
59
■ SHARPENING
Figure 2.34: Image sharpened with the Unsharp Mask filter.
The values that you use for your image will vary depending on such factors as
the image’s content, size, and final destination. For an average-sized image that con-
tains a lot of detail—say an architectural shot at 1600 × 1800 pixels—try setting your
percentage at 150 percent and your Radius at 2. For these kinds of images, I generally
leave the Threshold setting at 0, which forces the Unsharp Mask filter to sharpen all
the pixels equally.
For an image of the same size that contains expanses of color and tone, such as
a face, I recommend setting your Amount at 100 percent, your Radius between 0.5
and 1, and your Threshold between 2 and 15. Playing with your Threshold setting will
help you avoid introducing noise in the flat areas of color. Increase these numbers if
you are working with larger images. Decrease them for smaller images.
Note: On the enclosed CD is a trial version of nik Sharpener Pro, a Photoshop Elements
plug-in. Using the plug-in takes the guesswork out of using the Unsharp Mask filter. It also
automatically optimizes sharpening for different display outputs.
Grabbing Digital: Which File Format Should You Choose?
Many popular video frame grabbers give you the option of saving your image in various file
formats, such as JPEG, TIFF, PICT, or PSD. Which one should you select? For the best quality,
choose TIFF or PSD, which is Photoshop Elements’ native file format. If you do this, your file
won’t be as small as it would be if you saved it as a JPEG, but the TIFF and PSD file formats
are lossless, which means no data is thrown away during the conversion. PICT is a Mac-only
file format and is therefore inherently limited.
4363_ch02_p5.qxd 10/11/04 7:25 PM Page 59
60
CHAPTER
3:
BETTER FACES
■
4363_ch03_p4.qxd 10/9/04 10:03 PM Page 60
61
■ BETTER FACES
3
Chapter Contents
What Comes First
Working the Eyes
Working the Lips
Whitening and Fixing Teeth
Selectively Removing Wrinkles and
Blemishes with the Healing Brush
Diminishing and Straightening
the Nose
Making People Glow
Creating a Grainy 35mm
Black-and-White Look
Creating a Digital Fill Flash
Making Distorted Faces Normal
Fixing Hair
Getting Rid of Glasses Glare
Better Faces
How many times have you seen someone look
at a picture and heard them say, “That doesn’t
look like me!” You may even have said it as you
stared at a picture of yourself. Sometimes the
criticism is based entirely on vanity. But often
the fault lies with the photograph. Blame it on
the camera, the lens, the lighting—or even more
likely, the photographer. With the help of
Photoshop Elements—and especially with the
new Healing Brush tool—there are no more
excuses. You can make better faces. This chapter
shows you simple tips and techniques for using
Photoshop Elements to intensify eyes, eliminate
red eye, reduce wrinkles, and otherwise help
improve digital images of the human face.
4363_ch03_p4.qxd 10/9/04 10:03 PM Page 61
62
CHAPTER
3:
BETTER FACES
■
What Comes First
Before starting to work on a face or faces, I usually begin by cropping the image to its
essential parts and optimizing the tonal values (
“Cropping to the Essential Parts”
in Chapter 2). What I do next depends on the image, the person depicted in the image,
and where it is ultimately going to be shown or published.
Many times a face needs only a little tweaking to get it just right. Sometimes
this means removing red eye with the Red Eye Removal tool, whitening the white part
of the eyes and teeth, slightly increasing the color saturation of the eyes and lips, or
selectively diminishing wrinkles with Photoshop Elements 3’s amazing Healing Brush
tool. Other relatively easy tasks include selective burning and dodging, and applying a
digital fill flash.
Some faces are more challenging than others. For example, when a face is dis-
torted because of natural or unnatural causes, I use various Transform commands or
the Liquify filter to get it right. Although it is relatively easy to change the color of
hair, or to lighten or darken hair, removing or adding hair requires a little more work,
and for this I almost exclusively use the Clone Stamp tool. Blurring a distracting back-
ground can also improve a portrait, and for this I use a combination of selection tools
and the Gaussian Blur filter.
The last thing you’ll ever do to a digital image is resize and sharpen it to the
needs of your final destination (
“Resizing” and “Sharpening” sections in Chapter 2).
Be sure to keep an original, full-sized version of your image for future purposes.
Note: How far do you want to go? The possibilities for improving or changing a face by
using Photoshop Elements are almost unlimited. That’s why I suggest you ask yourself how
far you want to go and how much time you want to spend. There are no easy answers, and no
hard rules to follow. The answers to these questions invariably depend on the wishes of your
subject and the final destination of the image. If the picture is just for fun and the person in
the picture has a good sense of humor, well, anything goes. If you are preparing an image for
a corporate brochure or other serious purpose, tread lightly and make subtle changes.
Whatever you do, please keep in mind that it’s a special day when the subject of
your work actually likes their own portrait. Unless you’ve really messed up their face,
you can chalk up any complaints to vanity and human nature!
Working the Eyes
The first thing we usually notice about someone is their eyes. Are they bright, dull, or
shiny? Red? Bloodshot? Yellow? Sick? The eyes are the gateway to the soul, and that is
where I usually start.
Eliminating Red Eye
Red eye occurs when light from an on-camera flash reflects off the blood vessels in the
back of the eye, giving someone a demonic look (see Figure 3.1). Red eye is such a
common problem in color images that Photoshop Elements 3 includes an easy-to-use
4363_ch03_p4.qxd 10/9/04 10:03 PM Page 62
63
■ WORKING THE EYES
tool devoted to fixing the problem: the Red Eye Removal tool. This is not the red-eye
brush of previous versions of Photoshop Elements. (The earlier Red Eye Brush has
morphed into another useful Photoshop Elements tool, the Color Replacement tool,
which I’ll describe in more detail later in this chapter and in the appendix at the end of
the book.)
Figure 3.1: Before using the Red Eye Removal tool. Note the position of the cursor in the
middle of the pupil.
Here is what I did to get rid of the red eye shown in Figure 3.1:
1. I selected the Red Eye Removal tool ( ) from the toolbar.
2. I placed my cursor—which turned into a plus sign—on the center of the pupil
and clicked. Depending on the image, you need not be precise where you click.
Sometimes you can even get away with clicking anywhere in the vicinity of the
eye, and the tool automatically differentiates between the eye and other parts of
the face and applies the appropriate red eye removal. In one instance I acciden-
tally clicked a nose, and the red eye was removed!
3. When the red eye was removed from one eye, I turned to the other eye and
repeated step 2. (The tool is smart, but not smart enough to do both eyes
at once!)
Done. That’s all I did to get the results for both eyes shown in Figure 3.2.
Figure 3.2: After using the Red Eye Removal tool and the one-click-per-eye method.
4363_ch03_p4.qxd 10/9/04 10:03 PM Page 63
64
CHAPTER
3:
BETTER FACES
■
It’s remarkable how well the one-click method worked on this image.
Sometimes, however, the one-click method doesn’t do the trick. There is no hard-and-
fast rule to follow, but I’ve noticed problems with the one-click method when the edge
of the red is less defined and the color spills randomly across the iris. In any case, if it
doesn’t work, you can use another method. You use the same tool, just a different
method.
This is what I did to get rid of the red eye shown in Figure 3.3:
Figure 3.3: If the one-click method doesn’t work satisfactorily, try defining a parameter for
the Red Eye Removal tool by clicking and holding the mouse and dragging a selection
around the iris.
1. I selected the Red Eye Removal tool ( ) from the toolbar.
2. I clicked and held the mouse and dragged a rectangular selection with my cursor
just outside the parameter of the iris, as you can see in Figure 3.3. When I
released the cursor, the tool went to work and nearly instantly gave me the
results you see in Figure 3.4. Varying the size and position of the selection will
affect the outcome, and once again, you may need to experiment to get it right.
Figure 3.4: The results of clicking and holding while dragging a selection.
Although I used the Red Eye Removal tool for both the one-click and
click/hold/drag methods, these two methods employ fundamentally different mathe-
matical algorithms to do the job. You can tell they are different just by comparing the
4363_ch03_p4.qxd 10/9/04 10:03 PM Page 64
65
■ WORKING THE EYES
amount of time the methods take to remove red eye. The one-click method takes
longer because it first identifies the eye and then removes the red. The click/hold/drag
method is much faster because you define the work area with a selection. (There are
other, more technical reasons why the methods are different, but I’ll spare you the
details.) I suggest you try the one-click method and if that doesn’t work to your satis-
faction, try the click/hold/drag method. Experiment and figure out which is best for a
particular image.
Regardless of which method you use, you can fine-tune the results with two
options available in the Red Eye Removal tool options bar, shown in Figure 3.5(a).
Note the default setting for Pupil Size is 50 percent, and the default setting for Darken
Amount is also 50 percent. Using these settings, I got the results shown in Figure 3.5(b).
Figure 3.5(c) shows what happened when I increased the Pupil Size to 100 percent and
increased the Darken Amount to 100 percent: the pupil is larger, and the density of the
black is increased. Figure 3.5(d) shows what happened when I set the Pupil Size to 1
percent and the Darken Amount to 1 percent. I think you get the idea. Again, you’ll
have to experiment to find the right settings for your particular image.
a
bcd
Figure 3.5: (a) The Red Eye Removal tool options bar (b) Default settings: Pupil Size 50
percent and Darken Amount 50 percent. (c) Increasing Pupil Size and Darken Amount to
100 percent. (d) Setting both Pupil Size and Darken Amount to 1 percent.
Eliminating Dog Eye
Dog eye occurs when you use a flash to take a picture of a dog. Dog eye is similar to
red eye in people, but much worse. For better night vision, dogs, like cats and many
other animals, have extra cells behind the retina that act like a mirror. This mirror
reflects light back, giving the rods and cones a second chance to pick up the small
amount of light available at night. This is what makes cats’ and dogs’ eyes seem to
glow in the dark. It’s also what gives their eyes a hellish glow when photographed with
a flash.
Recently I received an e-mail from reader John Howell who attached a picture
of his dog Reuben displaying a classic case of dog eye (see Figure 3.6). He wanted to
know how to fix the shot.
4363_ch03_p4.qxd 10/9/04 10:03 PM Page 65
66
CHAPTER
3:
BETTER FACES
■
Figure 3.6: Dog eye can’t be fixed with the Red Eye Removal tool.
Photoshop Elements’ Red Eye Removal tool isn’t much use for this kind of
problem. No matter which method you use—one-click or click/hold/drag—the tool
looks only for variations of the color red. If the variations aren’t there the tool doesn’t
do anything.
I suggested John try two other methods, which I’ll share here.
Method 1 is the simplest way I can imagine to make Reuben appear less
threatening:
1. Magnify and zoom in on one of the eyes by using the Zoom tool found in the
toolbar.
2. Select the Paint Bucket tool ( ) from the toolbar.
3. Make sure the foreground color in the color swatch at the bottom of the toolbar
is set to black.
4. Position the Paint Bucket tool over the blown-out highlights of one eye and
click.
5. Repeat steps 1–4 for the other eye.
This fills the white area with black. It’s certainly not a perfect solution, but if
you zoom out or print the shot small, it doesn’t look too bad (see Figure 3.7).
Figure 3.7: Using the Paint Bucket tool is the simplest solution.
4363_ch03_p4.qxd 10/9/04 10:03 PM Page 66
67
■ WORKING THE EYES
Method 2 results in a more realistic-looking image, shown in Figure 3.8.
Figure 3.8: Adding a “Glass” eye is more realistic.
1. Magnify and zoom in on the dog’s eye by using the Zoom tool.
2. With the Magic Wand tool ( )—or selection tool of your choice—make a
selection of the blown-out areas of the eye. Slightly feather the selection
2–3 pixels (Select
Feather).
3. In the Layers palette, make a new layer (Layer New Layer).
4. With the new layer active, fill your two selections with black or another color
(Edit
Fill or use the Paint Bucket tool as described in method 1).
5. In the Styles and Effects palette located in the palette bin, select Layer Styles and
Glass Buttons from the pop-up menus.
6. Choose a “glass” color. (I chose Black Glass.) If you’re satisfied with black, you
can stop here; the remaining few steps show you how to change the color to
anything you want.
7. Flatten the layers (Layer Flatten Image).
8. Select the Color Replacement tool from the toolbar. (It shares the same spot on
the toolbar with the Brush tool, which uses keyboard shortcut B; repeatedly
hitting the B key cycles through the brushes.) In the options bar, choose the
following options:
Mode: Color
Sampling: Continuous.
For some images, Once also works fine. Background
Swatch is not appropriate for this example.
Limits: Contiguous. Discontiguous can work too if you paint carefully.
Tolerance: 30 percent. A higher percentage replaces adjacent pixels with a
broader range of color values. A lower percentage replaces only a few adja-
cent pixels with similar color values.
9. Select a color from the foreground color swatch at the bottom of the toolbar.
(Click the foreground color swatch, and the Color Picker will open.) I chose blue.
10. Click the area you want to change and then “paint” the replacement color over it.
4363_ch03_p4.qxd 10/9/04 10:03 PM Page 67
68
CHAPTER
3:
BETTER FACES
■
Figure 3.9 shows the results.
Figure 3.9: Change to any color by using the Color Replacement tool.
And you thought this chapter was only about people!
Whitening the Whites
Both of the methods I use to whiten the whites of the eyes use the Dodge tool. One
method is slightly quicker than the other but less precise.
Here’s method 1:
1. Select the Dodge tool ( ) from the toolbox; it shares the same place on the
toolbar as the Sponge and Burn tools. Press the letter O on your keyboard and
repeatedly hit the O key to cycle through the three tools.
2. In the options bar, select Midtones from the Range menu, and 50 percent from
the Exposure menu. (Remember that no one has perfectly white whites, and
at 100 percent exposure it’s easy to overdo the amount of whitening. I chose
50 percent exposure because it gives me more control over the amount
of dodging.)
3. Select an appropriate brush size. (To alter the image shown on the left in
Figure 3.10, I chose a Soft Round 35 pixels brush, which fit nicely in the space
between the eyelids and the pupils.) The brush size that works in your image
will depend on the size of your image and the white space itself.
Figure 3.10: Before dodging (left). After dodging (right).
4. Start by clicking and dragging carefully over the parts of the eye that you want
to whiten. If you need a better view of the area you are working on, magnify
the image by using one of the View tools. Dodge incrementally, dragging over a
small area and then releasing the mouse button. By doing this, you can undo
incrementally as well. If you do all your dodging in one click, the Undo com-
mand will undo all your work to the point of that first click.
4363_ch03_p4.qxd 10/9/04 10:03 PM Page 68