Photoshop Elements 3 Solutions: The Art of Digital Photography- P12 pot
Bạn đang xem bản rút gọn của tài liệu. Xem và tải ngay bản đầy đủ của tài liệu tại đây (17.43 MB, 30 trang )
314
CHAPTER
12:
SHARING AND AUTO
-
PROCESSING IMAGES
■
However, if you want to display really large images, you’ll want to select more
JPEG compression to make the image file size smaller. If you want to maintain
the original aspect ratio of your image, you can constrain it while resizing by
selecting an option from the Constrain drop-down list.
5. I left the Border Size set to 0 pixels and for Titles Use I deselected Filename. I
left the other options deselected. (If you use Filename, you may want to rename
your files by using descriptive words or phrases before you start the automated
Web Photo Gallery process; otherwise, you’ll likely get titles consisting of the
number sequences generated by your digital camera.)
Note: You can use Photoshop Elements to attach useful file information, such as copyright
notices and captions, to your PSD or JPG formatted images. Choose File
File Info from the
menu bar and type your information into the provided fields. The information you include will be
used, if you choose, by the Web Photo Gallery to generate captions and add other useful data.
6. I selected Thumbnails from the Options drop-down list, and I left all options set
to their defaults.
7. I selected Custom Colors from the Options drop-down list, and then changed
my background and banner to black and my text to white. Pick your colors
carefully. You don’t want a black text color and a black background; the type
won’t be readable. Again, even though this option appears to be functional, not
all gallery styles will recognize your color choices.
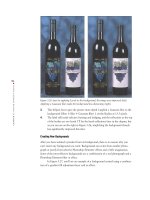
8. I selected Security from the Options drop-down list, and I left the Content set to
None. However, if I had selected Custom Text, I could have typed something
like “Photo by Mikkel Aaland” in the Custom Text field, and the words would
appear on every image in the font size, color, position, and rotation that I speci-
fied. Choosing any of the other Content options would generate type over my
image based on File Info information.
9. After I set the options and clicked OK, Photoshop Elements did the rest. It
opened each image and created both a thumbnail version and a gallery version
and, regardless of the original file format, saved the file as a JPEG. It created an
HTML index page and three folders containing the thumbnail images and navi-
gational GIFs, gallery images, and HTML pages.
Elements also generates a separate file called
UserSelections.txt that stores the
settings from the Web Photo Gallery dialog box. This way, if you change, delete, or
add only a single new file and don’t change any other options, Web Photo Gallery will
process only the files it needs to change to make the update.
The amount of time it takes for Photoshop Elements to process the images
varies depending on the number of images in the source folder and the speed of the
CPU. You can stop the process at any time by pressing Esc/ +period.
If you want to, you can always tweak the HTML later. Just go to the destina-
tion folder and you’ll find the index and other HTML files that can be opened and
edited by using appropriate web-editing software. It’s also likely that before you place
the gallery on a server, you’ll need to edit the links to reflect a proper directory path.
4363_ch12_p6.qxd 10/11/04 10:14 PM Page 314
315
■ CREATING AND PRINTING ON
THE MAC OS
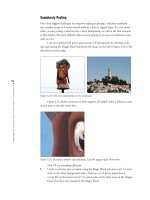
Creating a Contact Sheet (Mac)
Figure 12.19 shows a contact sheet that I created on a Mac.
Figure 12.19: A contact sheet (left) helps organize digital images. On the right is the
Contact Sheet (Mac) dialog box.
Here’s how I made the contact sheet:
1. I chose File Contact Sheet II. The Contact Sheet dialog box appeared.
2. I clicked the Choose button and selected a folder from my hard disk.
3. Under Document, I kept the default document dimensions. A resolution of 72dpi
is adequate for a sheet I’m just using for reference, so I kept that setting too.
4. Under Thumbnails, I kept the default settings for how the thumbnails would be
placed on the page. I also selected Use Filename As Caption; this labeled the
thumbnails by using the source image filenames.
5. I clicked OK and printed the result.
Remember to add any captions prior to bringing up the Contact Sheet dialog box.
4363_ch12_p6.qxd 10/11/04 10:14 PM Page 315
Appendix
4363_appendix_p4.qxd 10/11/04 3:37 PM Page 316
317
■ A REFERENCE TO THE TOOLS
AND FEATURES OF PHOTOSHOP
ELEMENTS
Chapter Contents
Setting Preferences
Customizing and Organizing the Work Area
Histograms
All about Layers
Effects
Selection Tools
Viewing and Navigation Tools
Brushes
Filters
A Reference to the
Tools and Features of
Photoshop Elements
Up to this point, this book has focused on giv-
ing you straightforward solutions to common
challenges associated with acquiring, organizing,
and processing digital images. This appendix is
more reference-oriented, zooming in on the
details of some of Photoshop Elements’ prefer-
ences, tools, and features. This is by no means a
definitive guide. For that, it’s best to refer to
Adobe’s excellent online help, where you’ll find
a massive hyperlinked and searchable document
with tons of information not found even in the
Adobe Photoshop Elements User Guide.
4363_appendix_p4.qxd 10/11/04 3:37 PM Page 317
318
APPENDIX
:
A REFERENCE TO THE TOOLS
AND FEATURES OF PHOTOSHOP
ELEMENTS
■
Setting Preferences
Adobe ships Photoshop Elements with preferences set in a way that may or may not
suit your particular needs. Through these settings, you can change how Photoshop
Elements handles a whole range of tasks, from color management to memory alloca-
tion to saving files. Let’s look at some of the more important choices you can make,
and see what you can do to customize the program so that it works better for you.
(Windows users please note that these preferences refer to the Photoshop Elements
Editor workspace, not the Organizer. I’ve covered many of the Organizer preferences
in Chapter 1.)
Resetting Preferences
If at any point you want to reset Photoshop Elements preferences to their original settings,
here’s how to do so:
Throw away the Photoshop Elements preferences file. Windows users will find the
Photoshop Elements 3.0 Prefs file here:
C:\Windows\Application Data\Adobe\Photoshop\Elements\Photoshop
Elements 3.0 Settings
In Windows 2000/XP, the preferences are located here:
C:\Documents and Settings\<username>\Application
Data\Adobe\Photoshop\Elements\Photoshop Elements 3.0 Settings
Mac OS X users will find the preferences file in this folder:
/Users/<username>/Library/Preferences/Photoshop Elements 3.0 Settings
Delete the file, and the next time you launch Photoshop Elements, all your settings will be
reset to their defaults. You can also hold down Ctrl+Alt+Shift / +Option+Shift while the pro-
gram launches to trash the preferences file and start up with the default settings.
Color Settings
Every scanner, every computer system, and every printer handles color differently. In
order to maintain some control over the way your digital images look in this chaotic
world, you need to know how Photoshop Elements handles color.
On the Edit menu at the top of the Photoshop Elements window, you’ll see an
option for Color Settings. (On the Mac, the Color Settings are found on the Photoshop
Elements application menu.) When you choose this, you are faced with three options:
No Color Management, Limited Color Management, and Full Color Management
(described briefly in the following sections). The default setting is No Color
Management, and even if you are tempted otherwise, I suggest you keep it this way.
You might be in for some surprises if you select either of the other two options.
4363_appendix_p4.qxd 10/11/04 3:37 PM Page 318
319
■ SETTING PREFERENCES
No Color Management
If you keep the default setting at No Color Management, you’ll work in the RGB color
mode, where there is a very slight possibility that some color banding will occur when
your work is viewed on some monitors. Banding is what happens when you create a
graphic in a color space and then view the same graphic on a device that displays a
smaller range of colors. (A range of colors is referred to as gamut. On a monitor with
a narrower gamut, colors are squished, or banded together.) Even though working in
RGB mode may result in some banding, I believe that the potential loss of quality on
some monitors is worth it, because you don’t have to deal with the issues associated
with Limited or Full Color Management.
Limited Color Management
If you choose Limited Color Management, you will find yourself working in a color
space called sRGB, instead of just plain RGB. The sRGB color space is a limited color
space that Adobe and others claim is good for Web work and some desktop printers. It
has a narrower gamut than the RGB color space and more faithfully represents the
color capabilities of most commonly used display systems. However, the difference
between the sRGB and RGB color space is slight, and many other applications that
you use may not support the sRGB color space. Sure, you’ll be able to open your files
in those programs, but you may find some maddening color shifts.
Full Color Management
If you choose Full Color Management, you’ll work in the Adobe RGB color space, and
Photoshop Elements will also assign an ICC color profile to your image file. A color
profile is a universally accepted point of reference developed by the International Color
Consortium (ICC). In theory, this means that when you open the file with another
computer and monitor, the image will be displayed exactly as it was on your monitor.
Also, in theory, if you have an ICC-compliant printer, you’ll get a printout that closely
matches the image on your monitor. This is fine in theory, but in reality it doesn’t
always work. All the devices need to understand your color profile, and if they don’t
you’ll have an even greater mess on your hands.
Preset Manager
When you use a brush, gradient, pattern, or swatch, you are presented with a default
set of corresponding brushes, gradients, patterns, or colors. Except for the swatches,
these options appear in the options bar at the top of the Photoshop Elements window.
The swatches are found in the Color Swatches palette. For most people, the default
sets provide enough options, but you can also add or customize sets by using the Preset
Manager, which is found on the Edit menu. Select the Preset Type to see the default
options. To load a set of custom libraries, as the custom sets are called, you can click
Load and select a saved library to open, or click the More icon at the top of the Preset
Manager dialog box. A pop-up menu will appear with a list of choices, including the
choice to reset back to the default set. You can also create your own set by Shift+clicking
various brushes and clicking Save Set.
4363_appendix_p4.qxd 10/11/04 3:37 PM Page 319
320
APPENDIX
:
A REFERENCE TO THE TOOLS
AND FEATURES OF PHOTOSHOP
ELEMENTS
■
Undo History States
Most of the time, when you work on the pixels of a digital image, Photoshop Elements
records each step of the process in the Undo History palette. You can go back to a pre-
vious step at any point, but only as long as that step remains in the Undo History
palette. Photoshop Elements records 50 steps by default, but if you have enough RAM
you can boost that number to as many as 1000. To change the default, choose Edit
Preferences General (in Mac OS X, Photoshop Elements Preferences General)
and then simply type in a new number.
Saving Files
When you save a file, Photoshop Elements by default creates an image preview
(Windows) or an icon and thumbnail (Mac). Although this makes it easy to identify an
image on the desktop or in a dialog box, and the saved thumbnail is used by the File
Browser, it adds size to your image. If restricting file size is important to you, consider
turning this option off and using only a descriptive name to identify your file. Do this
by choosing Edit Preferences Saving Files (in Mac OS X, Photoshop Elements
Preferences Saving Files).
Note: The File Browser (
Chapter 1) creates and displays its own temporary thumbnail
version of an image, regardless of whether the image file was saved with an image preview
or icon/thumbnail. However, if an image preview or icon/thumbnail is saved, the File Browser
displays quicker.
If you create a lot of JPEG images for the Web or for e-mail transmission, turn
off the image preview options (Windows) or icon and thumbnail options (Mac). This
will lessen the chance that your JPEG will become corrupted and unreadable.
In the Saving Files Preferences dialog box, you also have the choice of whether
to Always Maximize Compatibility for Photoshop (PSD) Files. To save up to a third of
your file size, I suggest you turn this option off. If you leave this option selected,
Photoshop Elements creates a second file, one with the layers (if you have any) flat-
tened. You need this option only if you are planning to use Photoshop version 2.5 or
earlier, which is unlikely. Keep in mind that turning off backward compatibility affects
only PSD files, not GIFs or JPEGs. However, according to Adobe, the File Browser will
create thumbnails more quickly if this option is left on. So your decision about
whether to enable this option depends on which is more important to you, file size or
performance.
You can also choose to turn off Ask Before Saving Layered TIFF Files. If you
leave this option selected (which is the default), you’ll have the choice of saving layered
TIFFs or applying JPEG compression to a TIFF. Unless you are absolutely sure you’ll
never want to do this, leave this option selected.
By default, the recent file list (found under File Open Recently Edited File)
includes 10 recent files. In the Saving Files Preferences dialog box, you can change this
to any value from 0 to 30.
4363_appendix_p4.qxd 10/11/04 3:37 PM Page 320
321
■ SETTING PREFERENCES
Units and Rulers
Photoshop Elements displays dimensions in inches by default (in the U.S.). You can
change that setting to centimeters, millimeters, or pixels in the Units & Rulers dialog
box (Edit Preferences Units & Rulers) (in Mac OS X, Photoshop Elements
Preferences Units & Rulers). You can also change these preferences in the Info
palette. When I am working on images destined for the Web, I always use pixels; oth-
erwise, I leave my setting at inches. (Picas, points, and percent will be useful for only a
select few users.)
Plug-Ins
When Photoshop Elements is launched, it automatically searches for a folder called
Plug-Ins in the application folder. Plug-ins are mini software programs developed by
Adobe or third-party vendors to add various functionalities to Photoshop Elements.
You also may be using another program that uses compatible Photoshop plug-ins. You
can tell Photoshop Elements where to find, and open those plug-ins as well, by going
to Edit Preferences Plug-Ins & Scratch Disks (in Mac OS X, Photoshop Elements
Preferences Plug-Ins & Scratch Disks). You can also hold down Ctrl+Shift /
+Shift while Photoshop is starting up, and then choose an alternate plug-in directory.
Memory
If you don’t have enough RAM, Photoshop automatically creates and uses a portion of
your startup hard drive as a scratch disk. It’s never as fast or as optimal as having
enough RAM, but if you have a large hard disk you’ll avoid the dreaded “out-of-mem-
ory” warning. If you have more hard drives, you can assign scratch disks to them by
choosing Edit Preferences Plug-Ins & Scratch Disks (in Mac OS X, Photoshop
Elements Preferences Plug-Ins & Scratch Disks). Choose the drive that is the
fastest and has the most contiguous free space to use as your primary scratch disk. You
can create up to 200GB of scratch disk space. To change your scratch disk, hold down
Ctrl+Alt / +Option while Photoshop Elements is starting up.
The Memory and Image Cache preferences settings allow you to specify how
much memory you want to use for Photoshop Elements. The cache levels affect the
speed of zooming and drawing, and the Use Cache for Histograms setting affects how
quickly histograms display. These settings are best left at the default levels for most
projects.
Note: Sometimes cameras and other devices that mount themselves on the desktop as
drives will show up as valid options in the Memory Preferences dialog box. It is important
that you do not choose them. They are usually small in size and are slow. You should choose
only devices that are real hard disks, and not removables.
4363_appendix_p4.qxd 10/11/04 3:37 PM Page 321
322
APPENDIX
:
A REFERENCE TO THE TOOLS
AND FEATURES OF PHOTOSHOP
ELEMENTS
■
Customizing and Organizing the Work Area
Look at anyone’s desk and you’ll see variations in the way people like to work. It’s the same
with the Photoshop Elements work area. One person might prefer a desktop tiled with
palettes, whereas someone else might find this cluttered look distracting. With Photoshop
Elements, palettes can be stacked and tiled and moved wherever you want. (Window users:
Again, I’m referring here to the Editor. I covered the Organizer in Chapter 1.)
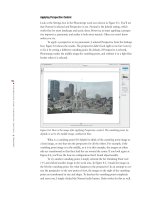
Look at Figure A.1. It shows the entire editing work area of Photoshop
Elements. The Windows version is shown at the top. The Mac version is shown below.
(As I’ve said all along, the two editing work areas are very similar. However, as you
can see, the Windows version has different icons in the shortcuts bar, three of which
take users to the Organizer work space, which is not available on the Mac platform.)
This is how your screen should look when you first open the program.
Figure A.1: The Photoshop Elements Windows Editor work area (left). The Macintosh
version (right).
At the top is the menu bar, which contains drop-down menus for performing
tasks. On the Enhance menu, for example, you’ll find ways to modify the contrast and
color of your digital image. Unlike most of the other components of the work area, the
menu bar can’t be moved or altered in any way. On Windows, you will find a search
field for using keywords to access the help database (this is located on the shortcuts
bar on Mac OS X). Additionally, you will find an option to automatically tile open
documents (on by default) or view them in a maximized mode (also on the shortcuts
bar on Mac OS X).
Below the menu bar is the shortcuts bar. You can position the pointer over any
icon in the shortcuts bar and its name will appear. Here you’ll find buttons for com-
mon commands such as Open, Print, Save, and Undo. In Windows you will also find
buttons that will jump you to the Organizer (denoted by a sweeping arrow, or
swoosh). On both the Windows and Mac versions are icons that allow you to switch
between the Quick Fix and Standard Edit workspace modes.
Below the shortcuts bar and palette well is the options bar, which contains vari-
ous options for using a selected tool. As you select a tool from the toolbox, different
options will appear in the options bar. Some settings are common to several tools, and
others are specific to one tool.
To the left of the work area is the toolbox. The icons in the toolbox give you
access to various tools for creating and editing images. When you position the pointer
4363_appendix_p4.qxd 10/11/04 3:37 PM Page 322
323
■ CUSTOMIZING AND ORGANIZING
THE WORK AREA
over an icon in the toolbox, the name of the tool appears. An icon with a small arrow
in its lower-right corner indicates a group of tools. When you select one of these icons,
the tools it provides appear on the options bar. You can also click and hold the mouse
on one of these icons to display a pop-up menu of the tools it provides. By default the
toolbox is docked, but it can be torn off into a floating palette by grabbing on to its
gripper and dragging.
To the right of the work area is the palette bin. Palettes help you modify and
monitor images. You open a palette by clicking its “twist down” arrow. A palette will
remain open until you click its arrow again. The palette bin can be easily closed by
clicking the Close button at the bottom of the bin, or by dragging the bin to the right
edge. You can also drag a palette’s tab to move the palette from the bin to any place
you want on the screen (
“Docking, Stacking, and Resizing Tool Palettes,” next).
At the bottom of the work area is the photo bin. This container displays the
currently opened files. For every open image you will see a live thumbnail representa-
tion. You can switch between files by clicking the thumbnails. You can also close, min-
imize, duplicate or rotate images via the photo bin by right/clicking (Windows) or
Ctrl/clicking (Mac) on a thumbnail.
Docking, Stacking, and Resizing Tool Palettes
When you open Photoshop Elements for the first time, the How To, Styles and Effects,
and Layers palettes are in the palette bin. You can move a palette to and from the
palette bin and the work area by dragging the palette’s tab in or out of the bin. You
can change the order of palettes in the bin by dragging the title bar above or below
other palettes found in the bin. You can resize a palette found in the palette bin by
grabbing the gripper at the bottom of the palette. You can also dock palettes together
on the work area by dragging one palette’s tab onto the body of the other palette (see
Figure A.2).
Figure A.2: For easy access, dock palettes together on the work area.
Personally, because I use them so much, I make both the Layers and Undo
History palettes visible in the palette bin.
Note: Choosing Window Reset Palette Locations will place all palettes back in their
default locations.
4363_appendix_p4.qxd 10/11/04 3:37 PM Page 323
324
APPENDIX
:
A REFERENCE TO THE TOOLS
AND FEATURES OF PHOTOSHOP
ELEMENTS
■
The Welcome Screen
When you open Photoshop Elements, you are greeted with a Welcome screen (Figure A.3).
On Windows you have seven options; you can get a brief overview of the product, and
you have access to the Organizer’s viewing and authoring capabilities, as well as the
Editor’s editing and Quick Fix workspace modes. On the Mac, you have the ability to
open an existing file from your disk, choose to open a recently edited file, or acquire one
from your camera or scanner. The Welcome screens on both platforms additionally give
you the ability to create a new file or have instant access to Adobe’s online tutorials. The
Welcome screen disappears when you select an option on it or start to work on an
image, but you can get it back at any time by choosing Window Welcome.
Figure A.3: The Windows Welcome screen (left). The Mac Welcome screen (right).
Histograms
A histogram shows the distribution of an image’s pixel value in a bar chart representa-
tion. The left side (level 0) shows the values of an image’s shadow, and the right side
(level 255) shows the image’s highlight values. For a properly exposed photo you will
want the entire spectrum to be covered, with the base high in the center.
You can view the current histogram of your frontmost document by choosing
Window Histogram from the main menu. You can change which channel you view
along with the source from the Histogram palette (Figure A.4).
Figure A.4: The Histogram.
4363_appendix_p4.qxd 10/11/04 3:37 PM Page 324
325
■ ALL ABOUT LAYERS
From the Channel pop-up menu you can select RGB, Red, Green, Blue,
Luminosity, or Colors. RGB displays a composite of individual color channels placed
on one another. Red, Green, and Blue display the histogram for the individual color
channel. Luminosity displays the luminance (or intensity) values of the composite
channel. And Colors displays the RGB composite. The Red, Green, and Blue colors
represent those individual channels; Cyan, Magenta, and Yellow colors represent an
overlap of channels, and Gray represents an overlap of all three channels.
From the Source pop-up menu you can select Entire Image, Selected Layer, or
Adjustment Composite. Entire Image does just that—it looks at the whole image to get
its values (including all layers). Selected Layer uses only the selected layer to base the
histogram on. And Adjustment Composite displays the histogram of the selected
adjustment layer in the Layers palette.
To view information about a range of values, you can click and drag in the his-
togram to select the range.
All about Layers
Following most of the examples in this book requires an understanding of layers and
the Layers palette. Layers are one of the most powerful features in Photoshop
Elements, and once you get used to using them, you will never understand how you
managed without. Some people use layers as a filing cabinet where they keep various
versions of their work, as well as commonly used templates. One such template is a
screen shot of a web browser window that is used for previewing web graphics and
type. Many users make changes on a duplicate layer while always keeping an original
version of their work handy on a separate layer, for comparison.
When you first open a digital image, Photoshop Elements places the image on a
layer that is by default called the
Background layer. Many Elements users may never
have a need to go beyond this point. As you saw earlier in the book, you can resize,
crop, or apply simple color and tonal corrections to a digital image, without going
beyond one layer (
Chapter 2). However, even if you never consciously create a new
layer, layers will creep into your document. For example, a new layer is added auto-
matically when you cut and paste a selection.
The minute you have more than one layer, the relationship between different
layers is controlled by the Mode and Opacity settings in the Layers palette. For exam-
ple, if the Mode is set to Normal and the Opacity set to 100 percent, pixels in the top
layer replace pixels in the layer underneath. This relationship changes when you select
another Mode, or you lower the Opacity. Several ways of using different Mode settings
for effects have been shown throughout the book.
Figure A.5 shows the Layers palette. Note the various states of the layers. Some
have their visibility turned on, as indicated by the eye icon in the leftmost side; others
are turned off, as indicated by the absence of the eye. Only a single layer can be
selected
at a time, as indicated by the blue shading. One of the most common mistakes people
make is not selecting the layer that they want to work on. The result is that a com-
mand, such as a blur filter, doesn’t affect the desired image at all, but in fact affects the
content of another layer instead.
4363_appendix_p4.qxd 10/11/04 3:37 PM Page 325
326
APPENDIX
:
A REFERENCE TO THE TOOLS
AND FEATURES OF PHOTOSHOP
ELEMENTS
■
Figure A.5: The Layers palette revealed.
Most of the time, when you add a layer, you increase the file size of your image—
how much depends on the contents of the layer. Adjustment and fill layers, which are dis-
cussed later, don’t add any appreciable file size. Also remember that you’ll need to save
your work in the PSD or advanced TIFF file formats in order to keep layers intact. The
JPEG file format, for example, doesn’t allow you to save layers, and if you save your file as
an animated GIF, layers are retained, but not in the same state as they were saved.
Here are some of the other things you need to know to create and otherwise
work with and manage multiple layers. Photoshop Elements offers many ways to
accomplish the same tasks:
Turn the visibility of layers on and off by toggling the eye icon in the leftmost
side of the Layers palette.
Select a layer by clicking its thumbnail or name in the Layers palette. Blue
highlighting and the paintbrush icon ( ) indicate the layer is active.
Selecting the Move tool ( ) from the toolbar and clicking an image in the
image window will select the layer containing that image. With the Move
tool selected, right-clicking (Windows) or Ctrl+clicking (Mac) will open a
pop-up menu listing the names of the various layers and indicating which
layer is active. To select a layer, click its name in the pop-up menu.
Link layers by clicking in the link box of an unselected layer. A link icon ( )
appears, indicating that these layers are treated as one.
Group layers by holding down Alt/Option and positioning the pointer over the
line dividing two layers in the Layers palette. Click when the pointer changes to
two overlapping circles ( ). When layers are grouped together, the bottommost
layer, called the base layer, becomes dominant and defines the subsequent layers.
Blending
modes
Create a
new layer
Layer lock
options
Opacity
settings
Trash Layer palette menu
Adjustment
and fill layers
Layer
visibility
Link
box
4363_appendix_p4.qxd 10/11/04 3:37 PM Page 326
327
■ ALL ABOUT LAYERS
Imagine a base layer consisting of type grouped with another layer containing
texture. The type would define the shape of the texture. You can also choose
Layer Group with Previous (Ctrl+G / +G) after selecting a layer. To
ungroup layers, choose Layer Ungroup, or hold down the Alt/Option key,
position the pointer over the line dividing the layers, and click.
Lock the properties of a layer by selecting it and clicking the Lock All button
( ). Note the appearance of a solid black lock icon to the right of the layer
name, indicating the layer is protected from any changes.
Lock a layer’s transparency by selecting it and clicking the Lock Transparent
Pixels button, just to the left of the checked square icon. Note the hollow
lock icon in the layer bar, which indicates that changes will be made in this
layer only on existing pixels. This is useful for modifying an image while
maintaining its exact shape and size.
Move a layer by selecting it and then dragging and dropping it into a new
position in the Layers palette. A background layer cannot be moved from
its background position without first changing its name. You can also
reorder layers by choosing Layer Arrange.
Add a layer by clicking the More button and choosing New Layer from the
palette menu, or by clicking the Create a New Layer icon ( ) at the top and
far left. Some actions, such as cut and paste, automatically create a new layer.
You can also choose Layer New Layer or press Ctrl+Shift+N / +Shift+N.
Duplicate a layer by clicking the More button and choosing Duplicate Layer
from the palette menu. Or in the Layers palette, select the layer you wish to
duplicate and drag it to the Create a New Layer icon ( ) at the top of the
Layers palette. Or choose Layer Duplicate Layer.
Delete a layer by dragging a selected layer to the trash icon ( ) at the top of the
Layers palette, or select a layer and click the trash icon. You can also choose
Layer Delete Layer, or choose Delete Layer from the More palette menu.
Rename a layer in the Layers palette by double-clicking the layer name, or
clicking the More button and choosing Rename Layer from the palette
menu. Or choose Layer Rename Layer.
Flatten linked layers into one layer by clicking the More button and choosing
Merge Linked from the palette menu. Or choose Layer Merge Linked
(Ctrl+E / +E).
Flatten visible layers by clicking the More button and choosing Merge
Visible from the palette menu. Or choose Layer Merge Visible, or press
Ctrl+Shift+E / +Shift+E.
Flatten all layers by clicking the More button and choosing Flatten Image from
the palette menu. All layers will become one. All layer information will be lost
after the image is flattened. You can also choose Layer Flatten Image.
Adjustment and Fill Layers
When Adobe first added layers to Photoshop many years ago, I was thrilled. When
they came up with adjustment and fill layers, I was amazed. As you’ve seen throughout
the book, adjustment layers enable you to affect a single layer or group of layers while
4363_appendix_p4.qxd 10/11/04 3:37 PM Page 327
328
APPENDIX
:
A REFERENCE TO THE TOOLS
AND FEATURES OF PHOTOSHOP
ELEMENTS
■
making it possible to remove the effect anytime later without changing the rest of the
image or greatly increasing your file size. Adjustment and fill layers retain the same
opacity, blending, and grouping properties.
Access adjustment and fill layers by clicking the black-and-white circle at the
top of the Layers palette ( ) or by choosing Layer New Adjustment Layer, or
Layer New Fill Layer.
You can choose from the following kinds of adjustment layers: Levels,
Brightness/Contrast, Hue/Saturation, Photo Filter, Gradient Map, Invert, Threshold,
and Posterize. In the book, I’ve mostly referred to the first four types. However, I
encourage you to try the others. Gradient Map, for example, is a great way to create
special color effects by mapping the equivalent grayscale range of your image to a col-
orful gradient fill. Invert makes your image look like a negative. Threshold converts
images into high-contrast, black-and-white images that look like lithographs. Posterize
gives you control over the number of tonal levels for each color channel; choosing
lower numbers radically changes the look and feel of your image.
Fill layers include fills based on a solid color, a gradient, or a pattern. I’ve used fill
layers throughout the book, especially when manipulating product shots (
Chapter 5).
To change an adjustment or fill layer, double-click the thumbnail in the Layers
palette or choose Layer Layer Content Options. To delete an adjustment or fill layer,
drag it to the trash icon at the bottom of the Layers palette, or with the adjustment
layer selected, choose Layer Delete Layer.
Layer Styles
Another amazing feature is layer styles. You most likely have no idea how long it used
to take to create a simple drop shadow before Photoshop introduced layer styles. Now
you can do it with a click of the mouse.
Layer styles provide a way to apply a predetermined look and feel to a layer
itself. These are removable and nondestructive, just like adjustment and fill layers. You
can choose the way layer styles are displayed—list or thumbnails—via the More button
at the top of the Styles and Effects palette. Thumbnails are the most useful in preview-
ing a style’s effect. Figure A.6 shows a few layer styles.
Figure A.6: Here are a few of the many layer styles.
4363_appendix_p4.qxd 10/11/04 3:37 PM Page 328
329
■ ALL ABOUT LAYERS
To apply a layer style, be sure the Layer Styles option is selected in the first pop-
up of the Styles and Effects palette, and then drag and drop a style from the palette
onto an image. You can also double-click a style to apply it to the active layer. Be care-
ful: clicking more than one style will apply all your choices additively. This is great if
this is what you want, but if not, make liberal use of the Undo History palette or the
Undo command.
The Styles and Effects palette offers 14 categories of styles as starting points.
However, with the power to customize style settings, the possibilities are endless. You
can manipulate layer styles in the following ways:
Customize a layer style by double-clicking the f symbol in the Layers palette,
which brings up a dialog box where you can specify the exact thickness,
angles, and other characteristics of the style you desire. Or choose Layer
Layer Style Style Settings from the menu.
Repeat a custom layer style on other layers by simply copying and pasting
styles from one layer to another. Choose Layer Layer Style Copy Layer
Style and then choose Layer Layer Style Paste Layer Style.
Clear a layer style by choosing Layer Layer Style Clear Layer Style or
by right-clicking (Windows) / Control+clicking (Mac) the layer in the Layers
palette and choosing Clear Layer Style.
Effects
Effects are like automatic cameras. They make you look good even if you don’t know
what you are doing. Built into most effects are a complex series of filters, layer styles,
and/or program functions. Figure A.7 shows all the effects in the Styles and Effects
palette window.
Figure A.7: Thumbnails provide a useful preview of an effect.
4363_appendix_p4.qxd 10/11/04 3:37 PM Page 329
330
APPENDIX
:
A REFERENCE TO THE TOOLS
AND FEATURES OF PHOTOSHOP
ELEMENTS
■
To apply an effect, first select Effects from the first pop-up in the Styles and
Effects palette. Then you can select an effect and drag it from that palette onto an
image, or simply double-click the effect. Remember that you don’t have to apply an
effect to an entire image. If you make a selection before applying an effect, the effect
will apply only to that selection.
It may seem that effects are similar to layer styles, but there are some huge dif-
ferences: effects are not changeable in the same way that layer styles are, and they
often require you to simplify a type layer before you apply an effect to it.
Selection Tools
Much of the power of Photoshop Elements lies in its capability to manipulate both entire
images and discrete portions of images. Selection tools enable you to target which pixels
to operate upon. As you’ve seen throughout the book, knowing which selection tool to
use when makes a big difference. Some selection tools, such as the Rectangular Marquee,
are straightforward to use; others, such as the Magic Wand and the Magnetic Lasso, are
more complex and require a little more skill to use. Most users will find that the Selection
Brush tool falls somewhere in between. Each selection tool has multiple options for its use,
which are accessed via the options bar found below the shortcuts bar.
Marquee Tools
The Marquee tools include the Rectangular ( ) and Elliptical ( ) selection tools.
They share the same spot on the toolbar. When you click the Marquee tool, buttons
for both tools appear on the options bar. Switch between the two by clicking one of
the buttons, or by clicking and holding the Marquee tool and then selecting
Rectangular or Elliptical from the flyout.
Press M at any time (except when you are in text edit mode) to select the
Marquee tool. Hold the Shift key while pressing M to toggle back and forth between
the Rectangular and Elliptical tools.
These tools are most appropriate for making selections in the general area of what
you want. Holding down the Shift key forces a Marquee tool into a circle or square
shape. You can also use either Marquee tool as a rectangular cropping tool. Just make
your selection and then choose Image Crop. If you are using the Elliptical Marquee
tool, the crop will go to the outermost points of the ellipse but still be rectangular.
Lasso Tools
Lasso tools include the Lasso, Magnetic Lasso, and Polygonal Lasso. All three tools are
at the same spot on the toolbar. When you click the Lasso tool, buttons for all three
tools appear on the options bar. Switch between the tools by clicking one of the but-
tons, or by clicking and holding the Lasso tool and then selecting Lasso, Magnetic
Lasso, or Polygonal Lasso from the pop-up menu.
Press L at any time (except when you are in text edit mode) to select the Lasso
tool. To toggle back and forth between the three Lasso tools, right-click (Windows) or
hold the Shift key while pressing L (Mac).
The Lasso tool ( ) is great for tracing areas with jagged edges. Hold down the
4363_appendix_p4.qxd 10/11/04 3:37 PM Page 330
331
■ SELECTION TOOLS
mouse button and freehand trace the desired selection shape. When you release the
mouse, Photoshop Elements will close the shape if you haven’t already done so. For
maximum accuracy, magnify the image to see border details.
The Magnetic Lasso tool ( ) is an enhanced version of the Lasso tool that snaps
to pixels of similar colors. Width, edge-contrast, and frequency parameters let you speci-
fy the range of pixel similarity to which the lasso is attracted. Double-click to finish mak-
ing your selection. Again, Photoshop Elements will close the shape if you haven’t already
done so. I explain the Magnetic Lasso in great detail elsewhere in the book (
“Separating
a Product from Its Background” and “Adding Motion Blur” in Chapter 5).
The Polygonal Lasso tool ( ) lets you specify the points of a multi-sided shape
you wish to select. This is useful for selections with straight edges.
While using either the Magnetic Lasso or Polygonal Lasso selection tools, you
can start over by hitting Esc.
Magic Wand
The Magic Wand tool ( ), located in its own spot in the toolbar, magically chooses pixels
of the same color within the specified tolerance limits throughout your image. Use this tool
for irregularly shaped areas of the same color. I explain the Magic Wand in great detail else-
where in the book (
“Separating a Product from Its Background” in Chapter 5).
Cookie Cutter
The Cookie Cutter tool ( ) crops an image into a shape you can choose. An example
of this is shown in Figure A.8. First, choose the shape you would like to constrict your
image to by selecting it in the Cookie Cutter’s options bar. Then click and drag on
your image to see the shape appear. You can move or resize the shape by moving the
cursor over the edge of the bounding regions. Once you are happy with the placement,
commit the selection by choosing the Commit button in the options bar. There are a
few options you can select for your Cookie Cutter tool: the shape’s options, the
amount to feather the selection, and whether to crop the image.
Figure A.8: The Cookie Cutter tool automatically turns an image into a shape.
4363_appendix_p4.qxd 10/11/04 3:37 PM Page 331
332
APPENDIX
:
A REFERENCE TO THE TOOLS
AND FEATURES OF PHOTOSHOP
ELEMENTS
■
Under the shape’s options you can choose Unconstrained, Defined Proportions,
Defined Size, Fixed Size, and From Center. Choosing Unconstrained enables you to
draw the shape to any size you like. Defined Proportions keeps the height and width of
the shape in proportion. Use Defined Size to crop the image to the exact size you want,
and Fixed Size to enter the exact size you want for the completed shape. Select From
Center to draw the shape from the center of your first click.
Selection Brush
The Selection Brush tool ( ), located in its own spot in the toolbar, selects an area by
painting over it. To add to a selection, simply paint over the area you wish to add. To
subtract from a selection, hold the Alt/Option key, and the areas you paint will be des-
elected. At any time you can start over by choosing Select Deselect from the menu
bar or by using the keyboard command Ctrl+D / +D. Holding the Shift key while
dragging this tool will approximately constrain it to straight lines or connect two
clicked points. In the Selection Brush options bar, you can control the brush size and
hardness. Increasing the Hardness setting is much like using the feather command
found in the other selection tool options. 0 percent will produce a soft selection edge,
while 100 percent makes the edge of the selection more sharply defined. (Keep in mind
that this is only a slight feathering. For radical feathering, you need to use Select
Feather and choose higher pixel values.)
In the Selection Brush options bar, you can choose between working in Selection
mode or Mask mode. The default, Selection mode, will produce the familiar pulsing,
dotted “marching ants” lines that define and protect the area contained within the
dots. If you select Mask, the areas you paint over will be colored. The default is a red
overlay at a 50 percent opacity, but you can change both the color and the opacity in
the options bar.
Keep in mind that Selection and Mask modes are essentially opposite selection
methods. When you use Mask mode, areas that are colored by the Selection Brush are
“protected” as opposed to being “selected.” It’s really important to understand the dif-
ference. When something is selected, either by using the Selection Brush in Selection
mode or one of the other selection tools, you can apply Enhance commands, filters, or
effects
only to the selected areas. But when you use the Selection Brush in Mask mode,
the colored areas are the areas that
won’t be affected by such commands. In other
words, they are protected (remember this by thinking of the Mask mode as a way to
put virtual “masking” tape over parts of an image to protect it). Now this gets really
confusing if you go from Mask mode back to Selection mode. The color overlay you
created with the Selection Brush will be replaced by the familiar pulsing dotted line;
however, don’t be fooled. The area within the parameter of the dotted line is still pro-
tected, not selected. If you look carefully, you’ll see more dotted lines that show the
boundaries of the actual selection.
You can selectively deselect masked areas by holding down the Alt/Option key
while painting with the Selection Brush in Mask mode.
4363_appendix_p4.qxd 10/11/04 3:37 PM Page 332
333
■ SELECTION TOOLS
Selection Tool Options
Generally, options for the selection tools other than the Selection Brush include the
following:
Adding, subtracting, or merging selection shapes. You can add to (Shift), sub-
tract from (Alt/Option), or cut multiple selections (Ctrl/ ) by holding
down these additional keys while making selections. You can also click the
respective icons in the options bar.
Moving, copying, or pasting selections and layers. After you make a selection
shape, you can move the outline of the defined area with the Move tool, or
you can more precisely position it with the arrow keys.
Softening edges of a selection. You can blur edges of selections by typing a
specific number of pixels in the Feather field, or by choosing Select
Feather (Ctrl+Alt+D for Windows, or +Option+D for the Mac).
Anti-aliasing a selection. This controls the smoothness of selected shapes’
edges by including transition pixels. By default, the anti-aliasing option is
selected.
Controlling Selections
There are several ways to control the shape and size of a selection:
• You can specify the exact dimensions or proportions of a Marquee selection in
the options bar Style pop-up menu.
• You can reverse any selection and choose nonselected pixels by choosing Select
Inverse or by pressing Ctrl+Shift+I / +Shift+I.
There are several ways you can modify a selection:
Select Modify Border selects a border of pixels the specified number of
pixels above and below the current selection.
Select Modify Smooth excludes pixels outside the specified range from
the current selection. This is especially useful when you use the Magic Wand
and get small selections all over the image. The Smooth option unifies the
many selections into one.
Select Modify Expand makes the current selection larger by the specified
number of pixels.
Select Modify Contract makes the current selection smaller by the speci-
fied number of pixels.
Select Grow incorporates, into the current selection, pixels that are similar
and in a contiguous area.
Select Similar incorporates, into the current selection, pixels that are simi-
lar anywhere within the image.
Select Save Selection allows you to save a selection and load it for
later use.
Except for the options that apply specifically to the Marquee selection tool, all
of these commands apply to a selection created by the Selection Brush.
4363_appendix_p4.qxd 10/11/04 3:37 PM Page 333
334
APPENDIX
:
A REFERENCE TO THE TOOLS
AND FEATURES OF PHOTOSHOP
ELEMENTS
■
At any time, you can cancel a selection by pressing Ctrl+D / +D. The trusty
Undo command (Ctrl+Z / +Z) will get it back for you. You can also click the New
Selection icon ( ) in the floating toolbar. Or, choose Select
Deselect (Ctrl+D / +D),
Select
Reselect (Ctrl+Shift+D / +Shift+D), or Edit Undo.
You can turn a selection into a colored outline by using the Stroke command.
Make a selection with any of the selection tools and choose Edit Stroke. In the
Stroke dialog box, specify a line width and color, as well as the location of where the
pixels fall in relationship to the selection outline: inside, center, or outside. You can
also select a blending mode and opacity.
Viewing and Navigation Tools
For precise work, it is essential to be able to zoom in and out of an image, and to navi-
gate around the window if the image is large. Several tools and commands are avail-
able to help you.
Zoom Tool
To select the Zoom tool ( ), click it on the toolbar or press Z. The Zoom In tool ( )
increases image detail, and the Zoom Out tool ( ) achieves the opposite effect. You
can switch between Zoom In and Zoom Out by clicking their buttons on the toolbar.
Hold down the Alt key to temporarily change the currently selected Zoom tool to the
opposite tool; when you release the Alt key the tool changes back to its original state.
Double-clicking the Zoom tool icon in the toolbox returns the image to 100 percent.
The percent magnification and dimensions (provided this is the option you have
chosen) appear in the lower-left corner of the work area. You can type a desired percent
magnification in this box. You can also choose View Zoom In or View Zoom Out.
With the Zoom In tool selected, you can fill the screen with a particular area of
an image by clicking and dragging the mouse to define a bounding box surrounding
the area of interest. Let go of the mouse, and zoom!
In the Zoom tool options bar, if Resize Windows to Fit is selected, the
Photoshop Elements window is resized as necessary to display the image. When the
option is deselected, the window remains the same size regardless of magnification.
If you have more than one image open, you can have the Zoom tool zoom in on
all the images at the same time by selecting the Zoom All Windows check box in the
options bar. To temporarily set this behavior, you can hold down the Shift key while
clicking the Zoom tool. You can also Shift+double-click the Zoom tool to display all
open images at 100 percent.
View Commands
Several view commands are found in the main menu bar. These include the following:
View New Window for <File Name> creates multiple views of the same image.
Any changes made will apply to all views. You can close any but the last
view before you will be prompted to save the file.
4363_appendix_p4.qxd 10/11/04 3:37 PM Page 334
335
■ VIEWING AND NAVIGATION
TOOLS
View Fit on Screen fills the entire window with the entire image. This is
equivalent to double-clicking the Hand tool.
View Actual Pixels displays an image at 100 percent while taking into
account the height and width of the image, as well as the resolution of the
monitor. Two images can have the same height and width and different
resolutions, and yet appear the same size on the monitor.
View Print Size displays an image at 100 percent if the resolution is 72ppi.
This view takes into account the resolution of the image, as well as the
resolution of the monitor. Two images can have the same height and width
in pixels, but if the resolution is different they will appear as different sizes
on the monitor.
Navigator Palette
The Navigator palette is hidden by default. (You can find it by choosing Window
Navigator from the main menu bar.) The colored view box in this palette helps orient
your current position in the image. This is useful when an image gets too large to dis-
play on-screen. The slider at the top of this palette offers yet another option to increase
or decrease the percent magnification of the image. Change the color of the view box
by selecting Palette Options from the More pop-up menu.
Hand Tool
The Hand tool ( ), located in the toolbar, is used to move the image around in the
work area when the image is magnified outside the boundaries of the work area. The
Navigator palette provides a thumbnail view to orient your position relative to the
entire image. Use the Hand tool in the Navigator palette to move the view box to tar-
get areas within the image. Areas outside the view box remain intact but are simply
off-screen.
You can access the Hand tool temporarily at any time by holding down the
spacebar, or you can switch to it by pressing H. Double-click the Hand tool to reveal
the entire image in the image window. You can optionally select the Scroll All
Windows check box in the options bar. This enables you to scroll all windows at the
same time, which is useful when you have similar images side by side. To temporarily
set this behavior, hold down the Shift key while dragging the Hand tool. You can also
Shift+double-click the Hand tool to apply Fit on Screen on all open images.
Scrubbers
Scrubbers are a new addition to Photoshop Elements 3. They originate in Adobe’s
After Effects and provide a whole new way to control items in numeric entry fields. To
use this feature, place your cursor over the numeric field you want to change. Then
move your cursor to the left over its textual label. You should see the cursor change to
a double-ended arrow, as shown in Figure A.9. If you click and drag to the left, the
numeric entry will decrease; to the right, it will increase. A common one you may use
can be found in the Layers palette’s Opacity field.
4363_appendix_p4.qxd 10/11/04 3:37 PM Page 335
336
APPENDIX
:
A REFERENCE TO THE TOOLS
AND FEATURES OF PHOTOSHOP
ELEMENTS
■
Figure A.9: Move your cursor over a label, and it turns into a scrubber, which gives you
mouse control over numeric entry fields.
Brushes
Many Photoshop Elements tools use brushes to apply different effects. These brushes
can be customized far beyond their size and shape. Version 3 makes it especially easy
to customize a brush and control the look and feel of a particular brush stroke.
When you select the Brush (B) tool from the toolbar, options for controlling the
brush size, shape, and characteristics appear in the options bar. For the other tools that
use brushes—Blur, Sharpen, Sponge, Smudge, Dodge, Burn, Clone Stamp, Pattern
Stamp, Pencil (N), Color Replacement Tool (B), Selection Brush (A), Impressionist
Brush (B), Spot Healing Brush (J), Healing Brush (J), and eraser tools—you have more
limited options.
Available to all tools that use brushes are several brush presets, including the
default set shown on the left in Figure A.10. There are several other presets as well,
including Calligraphic Brushes, Drop Shadow Brushes, and Web Media Brushes. You
can control the size of the preset brushes in the options bar.
Figure A.10: The default brush presets (left). More presets are found in the drop-down
menu. The More Options menu (right) provides additional ways to customize the
Brush tool.
4363_appendix_p4.qxd 10/11/04 3:37 PM Page 336
337
■
B
RUSHES
When you select the Brush tool, you can use the options on the More Options
drop-down menu (shown on the right in Figure A.10) to control the Spacing, Fade,
Color Jitter, Hardness, Scatter, and other characteristics of the brush, as well as the
precise shape of the tip through Angle and Roundness controls.
If you are feeling really ambitious, you can even create a brush from an image.
Make a selection from your image and then choose Edit Define Brush. Name your
brush and select OK. A grayscale brush based on your selection is now available, along
with the other preset options.
Impressionist Brush
I don’t use the Impressionist Brush in this book. It’s a complex tool, and you can spend
countless hours just trying to figure out what it does and then realize that you’ve only
scratched the surface. Through different texture and color settings, you can simulate
various painting styles—think Van Gogh and Cezanne. Play with different Styles,
Fidelity, Area, and Spacing settings. Then when you’ve figured those out, change the
Mode and Opacity settings and see what else you can come up with. The possibilities
are limitless. Enjoy!
Healing Brushes
Two new brushes take the pain out of cleaning up and removing unwanted blemishes
and artifacts.
If the problem area is small, the Spot Healing Brush ( ) is ideal at fixing it. In
most cases you can choose a brush size that is slightly larger than the area you want to
fix, center the brush over the area, and click. You can set two options for the Spot
Healing Brush: Proximity Match and Create Texture. The Proximity Match option
tries to use the pixels around the edge of the selection as a patch. Create Texture uses
all the pixels in the selected area to create a texture to place over the selected area.
If, however, the regions are more complex, you can use the more powerful
Healing Brush ( ). In fact, the Healing Brush not only covers up unwanted areas but
also removes objects entirely from view. There are four options available to control the
brush: Mode, Source, Aligned, and Use All Layers. The Mode option controls how the
source blends with the existing pixels. Source allows you to choose where to get the
repairing pixels: Sampled uses pixels from the current image, whereas Pattern uses pix-
els from a pattern. Aligned will move the sampling point relative to where you are
stroking. If you want to always use the original sampling point, deselect this option.
Use All Layers samples data from all visible layers. If you want to use only the current-
ly selected layer, deselect this option.
4363_appendix_p4.qxd 10/11/04 3:37 PM Page 337
338
Index
Note to the Reader: Throughout this index boldfaced page
numbers indicate primary discussions of a topic. Italicized
page numbers indicate illustrations.
A
actions, undoing, 32
Actual Pixels option, 335
Adaptive color reduction algorithm, 247, 250
Add a colored border option, 300
Add corner crop marks option, 301
Add Noise filter
for background, 137, 137
for faces, 81–82, 81
for gradients, 219
Add Open Files option, 311
Add to Sample eyedropper, 121
Add to Selection option, 118
Adjust Date and Time option, 11
Adjust Hue/Saturation option, 120
adjustment layers
with masks, 279–282, 280–282
working with, 327–328
Adobe Gamma utility, 34
Adobe Photo Downloader, 5–6, 5
Advanced Blending option, 197
Amount setting for sharpening, 58–59
Angelo, Michael, 99–100, 100
animals, dog eye, 65–67, 66–68
animating GIF images, 257–259, 258–259
anti-aliasing
for fonts, 209
for Lasso, 69
for Magic Eraser, 114
for Magnetic Lasso, 117
for selection tools, 333
for transparent GIF images, 254
applications
opening images in, 9
printing from, 296–301, 297–300
Apply Rotation option, 31
archiving in Organizer, 21
Arial font, 209
arranging images in Photomerge, 195–197, 195–196
artifacts, 45
combining tools and techniques, 48–50, 48–50
Reduce Noise filter for, 46, 46
Spot Healing Brush for, 47–48, 47–48
As Shot option, 273
Ask Before Saving Layered TIFF Files option, 320
associating file types, 9
Attach Tag option, 17
Attach to E-mail feature, 305, 305, 309
attachments
in Mac OS, 309–310
in Windows, 304–306, 305
audio notes, adding, 16
Auto Color Correction, 40
Auto Contrast, 37
auto-exposure for panoramics, 191
Auto Fix Photo option, 33
Auto Fix window, 19, 19
for cropping, 53
for dull images, 33
Auto Levels, 36–37, 36–37, 40
Auto option for Camera Raw, 273, 274
auto-processing images, 291
automated tasks in File Browser, 24, 24
automatic resizing for slide shows, 311
B
backgrounds
in product shots, 133
creating, 134–136, 135–136
modifying, 137–138, 137
separating products from, 112–119, 113,
115–116, 118–119
simplifying, 133–134, 134
smart-blurring, 179–181, 180
Web page, 259
tiled patterns for, 259–261, 260–261
tiled strips for, 262–263, 262
backups
for correcting mistakes, 32
in Organizer, 21
balancing, light, 181–182, 181–182
banding, 319
baseball panoramic, 203, 203–204
Baseline options for JPEG images, 233
bevels for navigational graphics, 264–265, 265
Bicubic Sharper option, 154
Bicubic Smoother option, 55, 154
black-and-white images
converting color images to, 50–51, 51
soft-focus effects for, 80, 80
tinting, 44–45, 44–45
black-and-white photos, scanning, 43
blemishes, 75–77, 77
blending
for copyright watermarks, 213
in Photomerge, 197
blizzards, creating, 101, 101
Bloat tool
for eyes, 72
for lips, 73
for teeth fixing, 75
Blur tool for removing people, 106
blurring
backgrounds, 137, 137, 179–181, 180
for faces, 79–80, 80
Gaussian blur. See Gaussian blur
INDEX
■
4363_index_p1.qxd 10/12/04 8:27 AM Page 338