Adobe PageMaker 7.0 Classroom in a Book- P1 pdf
Bạn đang xem bản rút gọn của tài liệu. Xem và tải ngay bản đầy đủ của tài liệu tại đây (6.02 MB, 30 trang )
© 2002 Adobe Systems Incorporated. All rights reserved.
Adobe® PageMaker® 7.0 Classroom in a Book®
This book, as well as the software described in it, is furnished under license and may be used or copied only in accordance with the
terms of such license. The content of this book is furnished for informational use only, is subject to change without notice, and
should not be construed as a commitment by Adobe Systems Incorporated. Adobe Systems Incorporated assumes no responsibility
or liability for any errors or inaccuracies that may appear in this book.
Please remember that existing artwork or images that you may want to include in your project may be protected under copyright
law. The unauthorized incorporation of such material into your new work could be a violation of the rights of the copyright owner.
Please be sure to obtain any permission required from the copyright owner.
Any references to company names in sample templates are for demonstration purposes only and are not intended to refer to any
actual organization.
Except as permitted by such license, no part of this documentation may be reproduced, stored in a retrieval system, or transmitted,
in any form or by any means, electronic, mechanical, recording, or otherwise, without the prior written permission of Adobe
Systems Incorporated.
Adobe, the Adobe logo, Acrobat, Acrobat Reader, Adobe Certified Expert, ACE, Adobe Dimensions, Adobe Type Manager, ATM,
Classroom in a Book, Distiller, FrameMaker, Illustrator, PageMaker, Photoshop, PostScript, and PostScript 3 are either registered
trademarks or trademarks of Adobe Systems Incorporated in the United States and/or other countries. KODAK and Photo CD are
trademarks of Eastman Kodak Company. Apple, ColorSync, Mac, Macintosh, Power Macintosh, and QuickTime, are trademarks
of Apple Computer, Inc., registered in the United States and other countries. Microsoft, Windows, and Windows NT are either
registered trademarks or trademarks of Microsoft Corporation in the United States and/or other countries. Helvetica and Times are
trademarks of Linotype-Hell AG and/or its subsidiaries. “PANTONE Open Color Environment
™
(POCE
™
) © Pantone, Inc. 1994,
1996. Pantone, Inc. is the copyright owner of “PANTONE Open Color Environment
™
(POCE
™
)” and Software, which are licensed
to Adobe Systems Incorporated to distribute for use only in combination with Adobe PageMaker. “PANTONE Open Color
Environment
™
(POCE
™
) and Software shall not be copied onto another diskette or into memory unless as part of the execution of
Adobe PageMaker. The spelling portion of this product is based on Proximity Linguistic Technology. The Proximity/Merriam-Webster
Linguibase © 1983,1990 Merriam-Webster, Inc. TRUMATCH 4-Color Selector © 1992 Trumatch, Inc. All rights reserved. All other
trademarks are the property of their respective owners.
Contains an implementation of the LZW algorithm licensed under U.S. Patent 4,558,302.
Written and designed at Adobe Systems Incorporated, 345 Park Avenue, San Jose, California 95110, USA.
Notice to U.S. Government End Users. The Software and Documentation are “Commercial Items,” as that term is defined at 48
C.F.R. §2.101, consisting of “Commercial Computer Software” and “Commercial Computer Software Documentation,” as such
terms are used in 48 C.F.R. §12.212 or 48 C.F.R. §227.7202, as applicable. Consistent with 48 C.F.R. §12.212 or 48 C.F.R.
§§227.7202-1 through 227.7202-4, as applicable, the Commercial Computer Software and Commercial Computer Software
Documentation are being licensed to U.S. Government end users (a) only as Commercial Items and (b) with only those rights as
are granted to all other end users pursuant to the terms and conditions herein. Unpublished-rights reserved under the copyright
laws of the United States. Adobe Systems Incorporated, 345 Park Avenue, San Jose, CA 95110-2704, USA. For U.S. Government End
Users, Adobe agrees to comply with all applicable equal opportunity laws including, if appropriate, the provisions of Executive
Order 11246, as amended, Section 402 of the Vietnam Era Veterans Readjustment Assistance Act of 1974 (38 USC 4212), and
Section 503 of the Rehabilitation Act of 1973, as amended, and the regulations at 41 CFR Parts 60-1 through 60-60, 60-250, and 60-
741. The affirmative action clause and regulations contained in the preceding sentence shall be incorporated by reference.
Printed in the U.S.A.
ISBN# 0-201-75625-0
10 9 8 7 6 5 4 3 2 1
iii
Contents
Getting Started
About Classroom in a Book . . . . . . . . . . . . . . . . . . . . . . . . . . . . . .1
Prerequisites . . . . . . . . . . . . . . . . . . . . . . . . . . . . . . . . . . . . . . . . . . .1
Installing Adobe PageMaker . . . . . . . . . . . . . . . . . . . . . . . . . . . . .1
Installing the Classroom in a Book fonts . . . . . . . . . . . . . . . . . .2
Creating and printing lesson projects . . . . . . . . . . . . . . . . . . . . .2
Installing PPDs (Windows only) . . . . . . . . . . . . . . . . . . . . . . . . . .3
Copying the Classroom in a Book files . . . . . . . . . . . . . . . . . . . .4
Additional resources . . . . . . . . . . . . . . . . . . . . . . . . . . . . . . . . . . . .4
Adobe Certification . . . . . . . . . . . . . . . . . . . . . . . . . . . . . . . . . . . . .5
Lesson 1
Flyer
Locating files and fonts . . . . . . . . . . . . . . . . . . . . . . . . . . . . . . . . .8
Restoring default settings . . . . . . . . . . . . . . . . . . . . . . . . . . . . . . .8
Starting PageMaker . . . . . . . . . . . . . . . . . . . . . . . . . . . . . . . . . . . . .9
Assembling a two-column flyer . . . . . . . . . . . . . . . . . . . . . . . . 17
Producing the flyer . . . . . . . . . . . . . . . . . . . . . . . . . . . . . . . . . . . 40
Review questions . . . . . . . . . . . . . . . . . . . . . . . . . . . . . . . . . . . . . 43
Answers . . . . . . . . . . . . . . . . . . . . . . . . . . . . . . . . . . . . . . . . . . . . . 43
Lesson 2
Architect’s letterhead
Before you begin . . . . . . . . . . . . . . . . . . . . . . . . . . . . . . . . . . . . . 46
Assembling a custom template . . . . . . . . . . . . . . . . . . . . . . . . 49
Assembling an envelope . . . . . . . . . . . . . . . . . . . . . . . . . . . . . . 68
Assembling a business card . . . . . . . . . . . . . . . . . . . . . . . . . . . 69
Printing the letterhead . . . . . . . . . . . . . . . . . . . . . . . . . . . . . . . . 77
Assembling a letter . . . . . . . . . . . . . . . . . . . . . . . . . . . . . . . . . . . 78
Review questions . . . . . . . . . . . . . . . . . . . . . . . . . . . . . . . . . . . . . 80
Answers . . . . . . . . . . . . . . . . . . . . . . . . . . . . . . . . . . . . . . . . . . . . . 80
CONTENTS
iv
Lesson 3
Project proposal
Before you begin . . . . . . . . . . . . . . . . . . . . . . . . . . . . . . . . . . . . . 82
Assembling a master page . . . . . . . . . . . . . . . . . . . . . . . . . . . . 84
Assembling the first page . . . . . . . . . . . . . . . . . . . . . . . . . . . . . 93
Assembling the second page . . . . . . . . . . . . . . . . . . . . . . . . . 107
Assembling the third page . . . . . . . . . . . . . . . . . . . . . . . . . . . 112
Producing the proposal . . . . . . . . . . . . . . . . . . . . . . . . . . . . . . 116
Review questions . . . . . . . . . . . . . . . . . . . . . . . . . . . . . . . . . . . . 116
Answers . . . . . . . . . . . . . . . . . . . . . . . . . . . . . . . . . . . . . . . . . . . . 116
Lesson 4
Jewelcase booklet
Before you begin . . . . . . . . . . . . . . . . . . . . . . . . . . . . . . . . . . . . 118
Assembling the master page . . . . . . . . . . . . . . . . . . . . . . . . . 119
Assembling the booklet cover . . . . . . . . . . . . . . . . . . . . . . . . 125
Assembling the first double-page spread . . . . . . . . . . . . . . 134
Assembling the second double-page spread . . . . . . . . . . . 143
Assembling the last spread . . . . . . . . . . . . . . . . . . . . . . . . . . . 149
Assembling the back cover . . . . . . . . . . . . . . . . . . . . . . . . . . . 151
Building a booklet . . . . . . . . . . . . . . . . . . . . . . . . . . . . . . . . . . . 152
Printing the booklet . . . . . . . . . . . . . . . . . . . . . . . . . . . . . . . . . 153
Review questions . . . . . . . . . . . . . . . . . . . . . . . . . . . . . . . . . . . . 154
Answers . . . . . . . . . . . . . . . . . . . . . . . . . . . . . . . . . . . . . . . . . . . . 154
Lesson 5
Cycling guidebook
Before you begin . . . . . . . . . . . . . . . . . . . . . . . . . . . . . . . . . . . . 156
Setting up the document . . . . . . . . . . . . . . . . . . . . . . . . . . . . 157
Finishing the cover . . . . . . . . . . . . . . . . . . . . . . . . . . . . . . . . . . 158
Working with styles . . . . . . . . . . . . . . . . . . . . . . . . . . . . . . . . . . 165
Finishing the first spread . . . . . . . . . . . . . . . . . . . . . . . . . . . . . 169
Laying out the next spread . . . . . . . . . . . . . . . . . . . . . . . . . . . 171
Finishing pages 6 and 7 . . . . . . . . . . . . . . . . . . . . . . . . . . . . . . 177
Review questions . . . . . . . . . . . . . . . . . . . . . . . . . . . . . . . . . . . . 180
Answers . . . . . . . . . . . . . . . . . . . . . . . . . . . . . . . . . . . . . . . . . . . . 180
v
Lesson 6
Adventure newsletter
Before you begin . . . . . . . . . . . . . . . . . . . . . . . . . . . . . . . . . . . . 182
Starting the publication . . . . . . . . . . . . . . . . . . . . . . . . . . . . . . 183
Setting up the master pages . . . . . . . . . . . . . . . . . . . . . . . . . . 183
Beginning page 1 . . . . . . . . . . . . . . . . . . . . . . . . . . . . . . . . . . . 185
Adding guides . . . . . . . . . . . . . . . . . . . . . . . . . . . . . . . . . . . . . . 186
Placing art on page 1 . . . . . . . . . . . . . . . . . . . . . . . . . . . . . . . . 187
Placing the text . . . . . . . . . . . . . . . . . . . . . . . . . . . . . . . . . . . . . 188
Formatting the Bungee article . . . . . . . . . . . . . . . . . . . . . . . . 189
Adding the continuation line . . . . . . . . . . . . . . . . . . . . . . . . . 194
Adding the Editor’s Note . . . . . . . . . . . . . . . . . . . . . . . . . . . . . 195
Finishing the Bungee article . . . . . . . . . . . . . . . . . . . . . . . . . . 198
Formatting the Kayaking article . . . . . . . . . . . . . . . . . . . . . . 198
Positioning the pull quote . . . . . . . . . . . . . . . . . . . . . . . . . . . . 200
Laying out the Tibetan Treks sidebar . . . . . . . . . . . . . . . . . . 202
Using the story editor . . . . . . . . . . . . . . . . . . . . . . . . . . . . . . . . 205
Finding and changing text . . . . . . . . . . . . . . . . . . . . . . . . . . . 206
Checking spelling . . . . . . . . . . . . . . . . . . . . . . . . . . . . . . . . . . . 207
Review questions . . . . . . . . . . . . . . . . . . . . . . . . . . . . . . . . . . . . 210
Answers . . . . . . . . . . . . . . . . . . . . . . . . . . . . . . . . . . . . . . . . . . . . 210
Lesson 7
Recreational catalog
Before you begin . . . . . . . . . . . . . . . . . . . . . . . . . . . . . . . . . . . . 212
Placing a Kodak Photo CD image . . . . . . . . . . . . . . . . . . . . . . 214
Working with color . . . . . . . . . . . . . . . . . . . . . . . . . . . . . . . . . . 216
Working with inline graphics . . . . . . . . . . . . . . . . . . . . . . . . . 221
Attaching rules to text . . . . . . . . . . . . . . . . . . . . . . . . . . . . . . . 223
About graphic file formats . . . . . . . . . . . . . . . . . . . . . . . . . . . . 227
Placing and linking a graphic . . . . . . . . . . . . . . . . . . . . . . . . . 228
Managing links . . . . . . . . . . . . . . . . . . . . . . . . . . . . . . . . . . . . . . 229
Preparing for commercial printing . . . . . . . . . . . . . . . . . . . . 233
Review questions . . . . . . . . . . . . . . . . . . . . . . . . . . . . . . . . . . . . 241
Answers . . . . . . . . . . . . . . . . . . . . . . . . . . . . . . . . . . . . . . . . . . . . 241
CONTENTS
vi
Lesson 8
Sailing publication
Before you begin . . . . . . . . . . . . . . . . . . . . . . . . . . . . . . . . . . . . 244
Creating a book list . . . . . . . . . . . . . . . . . . . . . . . . . . . . . . . . . . 245
Adding index entries . . . . . . . . . . . . . . . . . . . . . . . . . . . . . . . . . 247
Generating an index . . . . . . . . . . . . . . . . . . . . . . . . . . . . . . . . . 255
Generating the table of
contents . . . . . . . . . . . . . . . . . . . . . 258
Formatting the table of
contents . . . . . . . . . . . . . . . . . . . . . 260
Printing the book . . . . . . . . . . . . . . . . . . . . . . . . . . . . . . . . . . . . 263
Review questions . . . . . . . . . . . . . . . . . . . . . . . . . . . . . . . . . . . . 264
Answers . . . . . . . . . . . . . . . . . . . . . . . . . . . . . . . . . . . . . . . . . . . . 264
Lesson 9
Newsletter on the Web
Before you begin . . . . . . . . . . . . . . . . . . . . . . . . . . . . . . . . . . . . 266
Comparing HTML and PDF . . . . . . . . . . . . . . . . . . . . . . . . . . . 267
Adding hyperlinks . . . . . . . . . . . . . . . . . . . . . . . . . . . . . . . . . . . 269
Adding a source on a
master
page . . . . . . . . . . . . . . . . . . . . 272
Testing hyperlinks . . . . . . . . . . . . . . . . . . . . . . . . . . . . . . . . . . . 273
Adapting color for the Web . . . . . . . . . . . . . . . . . . . . . . . . . . . 273
Exporting to Adobe PDF . . . . . . . . . . . . . . . . . . . . . . . . . . . . . . 274
Preparing the HTML version . . . . . . . . . . . . . . . . . . . . . . . . . . 279
Exporting to HTML . . . . . . . . . . . . . . . . . . . . . . . . . . . . . . . . . . 289
Comparing the final versions . . . . . . . . . . . . . . . . . . . . . . . . . 292
Adobe on the Web . . . . . . . . . . . . . . . . . . . . . . . . . . . . . . . . . . . 293
Review questions . . . . . . . . . . . . . . . . . . . . . . . . . . . . . . . . . . . . 294
Answers . . . . . . . . . . . . . . . . . . . . . . . . . . . . . . . . . . . . . . . . . . . . 294
Lesson 10
PDF Web page
Before you begin . . . . . . . . . . . . . . . . . . . . . . . . . . . . . . . . . . . . 296
Previewing the final version . . . . . . . . . . . . . . . . . . . . . . . . . . 297
Setting up the publication . . . . . . . . . . . . . . . . . . . . . . . . . . . 298
Using text and graphics as hyperlink anchors . . . . . . . . . . 299
Testing hyperlinks . . . . . . . . . . . . . . . . . . . . . . . . . . . . . . . . . . . 300
Adding a source on a master
page . . . . . . . . . . . . . . . . . . . . 301
Setting up anchors for the rest of the publication . . . . . . . 302
Completing the hyperlink sources . . . . . . . . . . . . . . . . . . . . . 303
vii
Completing the linked table of
contents . . . . . . . . . . . . . . . 305
Creating a multiple-source image map out of
one graphic . . . . . . . . . . . . . . . . . . . . . . . . . . . . . . . . . . . . . . . . . 308
Linking to a movie . . . . . . . . . . . . . . . . . . . . . . . . . . . . . . . . . . . 310
Creating URL anchors . . . . . . . . . . . . . . . . . . . . . . . . . . . . . . . . 311
Importing URL anchors . . . . . . . . . . . . . . . . . . . . . . . . . . . . . . 311
Dragging URL anchors . . . . . . . . . . . . . . . . . . . . . . . . . . . . . . . 312
Adding index entries . . . . . . . . . . . . . . . . . . . . . . . . . . . . . . . . . 314
Generating the hyperlinked index . . . . . . . . . . . . . . . . . . . . . 314
Exporting to PDF . . . . . . . . . . . . . . . . . . . . . . . . . . . . . . . . . . . . 315
Viewing the PDF in a Web browser . . . . . . . . . . . . . . . . . . . . 317
Review questions . . . . . . . . . . . . . . . . . . . . . . . . . . . . . . . . . . . . 318
Answers . . . . . . . . . . . . . . . . . . . . . . . . . . . . . . . . . . . . . . . . . . . . 318
Index
. . . . . . . . . . . . . . . . . . . . . . . . . . . . . . . . . . . . . . . . . . . . . . . . . 319
1
ADOBE PAGEMAKER 7.0
Classroom in a Book
Getting Started
Adobe® PageMaker® 7.0 is the ultimate
software tool for producing professional-
quality business communications for print,
press, or online distribution as Adobe® PDF.
With PageMaker, you can integrate text and
graphics from many sources into virtually
any kind of publication, from newsletter and
brochures to color catalogs and magazines
to Web pages, with maximum precision and
control.
About Classroom in a Book
Adobe PageMaker 7.0 Classroom in a Book
® is
part of the official training series for Adobe
graphics and publishing software developed
by experts at Adobe Systems. The lessons are
designed to let you learn at your own pace. If
you’re new to PageMaker, you’ll learn the
fundamental concepts and features you’ll
need to master the program. And if you’ve
been using Adobe PageMaker for a while,
you’ll find that Classroom in a Book teaches
many advanced features. The enhanced
Export Adobe PDF command is covered in
detail.
The lessons in this edition show how to
assemble a flyer, letterhead, booklet for a CD
jewelcase, pamphlet, newsletter, catalog, and
book. Although each lesson provides step-
by-step instructions for creating a specific
project, there’s room for exploration and
experimentation. You can follow the book
from start to finish or do only the lessons
that correspond to your interests and needs.
Each lesson concludes with a review section
summarizing what you’ve covered.
Prerequisites
Before beginning to use Adobe PageMaker
7.0 Classroom in a Book, you should have a
working knowledge of your computer and
its operating system. Make sure you know
how to use the mouse and standard menus
and commands and also how to open, save,
and close files. If you need to review these
techniques, see the printed or online docu-
mentation included with your Windows® or
Mac® OS system.
Installing Adobe PageMaker
Before you begin using
Adobe PageMaker 7.0
Classroom in a Book
, make sure that your
system is set up correctly and that you’ve
installed the required software and hard-
ware. You must purchase the Adobe
PageMaker 7.0 software separately.
You must install the application from the
Adobe PageMaker 7.0 CD onto your hard
disk; you cannot run the program from the
CD. For system requirements and complete
instructions on installing the software, see
2
Getting Started
the How_to_Install.wri (Windows) or
How_to_Install.txt (Mac OS) file on the
application CD.
Note:
Be sure to install Adobe Acrobat®
Distiller® 5.0, Adobe Acrobat® Reader® 5.0,
Adobe PostScript® Driver from the applica-
tion CD unless you have installed Adobe
Acrobat 5.0 separately, and Adobe Type
Manager
(ATM
).
Make sure your serial number is accessible
before installing the application; you can
find the serial number on the registration
card or CD sleeve.
Installing the Classroom in a
Book fonts
To ensure that the lesson files appear on
your system with the correct fonts, you may
need to install the Classroom in a Book font
files. The fonts for the lessons are located in
the Fonts folder on the Adobe PageMaker
Classroom in a Book CD. If you already have
these on your system, you do not need to
install them. If you have ATM (Adobe Type
Manager), see its documentation on how to
install fonts. If you do not have ATM, install-
ing it from the Classroom in a Book (CIB)
CD will automatically install the necessary
fonts.
You can also install the Classroom in a Book
fonts by copying all of the files in the Fonts
folder on the Adobe PageMaker Classroom
in a Book CD to:
•
Program Files/Common
Files/Adobe/Fonts (Windows)
•
System Folder/Application
Support/Adobe/Fonts (Mac OS)
If you install a Type 1, TrueType, OpenType,
or CID font into these local Fonts folders,
the font appears in Adobe applications only.
Creating and printing lesson
projects
The lesson projects in this Classroom in a
Book are designed to be printed on black-
and white-printers, desktop color printers,
and four-color presses. Some projects are
designed to be distributed on the Web in
HTML or PDF format rather than printed.
If you do not have access to any or all of
these types of printers, or if you don’t have
access to a Web server, you can still complete
the projects.
Although these projects are composed for a
specific printer, you can print them on your
own printer by selecting your printer and its
PPD in the Print dialog box when it is time
to print. (If your printer is not a PostScript
printer, you do not have the option to select
a PPD.) Alternatively you can export the
project files to Adobe PDF and create an
Adobe PDF version of the finished piece
using the Export Adobe PDF command.
When you export to Adobe PDF, PageMaker
creates a PostScript file, and then automati-
cally starts Acrobat Distiller to convert the
PostScript file into Adobe PDF. If you do not
have enough free RAM to run Acrobat Dis-
tiller simultaneously with PageMaker, you
will need to close all open applications other
than PageMaker. For most of the lesson
3
ADOBE PAGEMAKER 7.0
Classroom in a Book
projects, you can use the default options for
Export Adobe PDF, as described in Lesson 1
“Creating an Adobe PDF version of the
flyer” on page 41. For information on using
Export Adobe PDF to create separations, see
Lesson 7 “Creating separations using Adobe
PDF” on page 239. For information on cus-
tomizing the options associated with Export
Adobe PDF command—changing the file
size or image quality, for example, see Les-
son 9, “Setting PDF Options” on page 277.
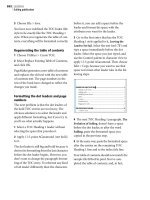
Installing PPDs (Windows only)
In Windows, you need to install the PPDs
for the AGFA-ProSet9800 and the
HP LaserJet 5Si printers. These PPDs are
included on the Classroom in a Book (CIB)
CD in the folder WinPPDs. Even though
you may never print to these printers, you
will specify these printers as
the final output
device in several projects.
Before you begin any project that you plan
to take to a service provider, you must
know which final output device the provider
will
use and, from the start, select that
device for Compose to Printer in the Docu-
ment Setup dialog box, even if you plan
to
print drafts on your own printer. (You’ll
learn how to do this in the lessons.) In
PageMaker for Windows, font choices and
sizes, resolution of text and graphics, and
the print area depend on the device you
select.
To ensure that you get the expected results in
these lessons, install these PPDs now.
The PPDs for the two printers used in this
Classroom in a Book are on the Classroom
in a Book (CIB) CD. Follow these steps to
install them:
1
Insert the Classroom in a Book (CIB) CD,
and
navigate to the folder containing the
two PPD files, AGPRO981.PPD and
HPLJ5SI1.PPD.
2
Using Windows Explorer, open the folder
Program Files\Adobe\PageMaker
7.0\Rsrc\Usenglsh\Ppd4 on your hard drive.
3
Drag the two files, AGPRO981.PPD and
HPLJ5SI1.PPD, from the Classroom in a
Book (CIB) CD to the Ppd4 folder on your
hard drive.
4
Add the two corresponding printers in
turn, using the Windows Control Panel.
5
Select Start > Settings > Control Panel.
Double click the Printers icon. Double click
the Add Printer icon, and follow the Add
Printer wizard instructions to add the two
printers in turn, AGFA-ProSet9800 and HP
LaserJet 5Si.
You have successfully installed the drivers
and printers required to complete the les-
sons in this book.
4
Getting Started
Copying the Classroom in a
Book files
The Adobe PageMaker Classroom in a Book
CD includes folders containing all the elec-
tronic files for the lessons. Each lesson has its
own folder, and you must copy the folders to
your hard drive to do the lessons. To save
room on your drive, you can install only the
necessary folder for each lesson as you need
it, and remove it when you’re done.
To install the Classroom in a Book files:
1
Insert the Adobe PageMaker Classroom in
a Book CD into your CD-ROM drive.
2
Create a folder named PM70_CIB on your
hard drive.
3
Copy the lessons you want to the hard
drive:
•
To copy all of the lessons, drag the Lessons
folder from the CD into the PM70_CIB
folder.
•
To copy a single lesson, drag the individual
lesson folder from the CD into the
PM70_CIB folder.
If you are installing the files in Windows,
you need to unlock them before using them.
You don’t need to unlock the files if you are
installing them in Mac OS.
In Windows, unlock the files you copied:
•
If you copied all of the lessons, double-
click the unlock.bat file in the
PM70_CIB/Lessons folder.
•
If you copied a single lesson, drag the
unlock.bat file from the Lessons folder on
the CD into the PM70_CIB folder. Then
double-click the unlock.bat file in the
PM70_CIB folder.
Note:
If as you work through the lessons, you
overwrite the Start files, you can restore the
original files by recopying the corresponding
Lesson folder from the Classroom in a Book
CD to the PM70_CIB folder on your hard
drive.
Additional resources
Adobe PageMaker Classroom in a Book
is not
meant to replace documentation that comes
with the program. Only the commands and
options used in the lessons are explained in
this book. For comprehensive information
about program features, refer to these
resources:
The Adobe PageMaker 7.0 User Guide.
Included with the Adobe PageMaker 7.0
software, this guide contains a complete
description of all features.
5
ADOBE PAGEMAKER 7.0
Classroom in a Book
Online Help,
an online version of the user guide, which
you can view by choosing Help > Help Top-
ics
(Windows) or Help > PageMaker Help
To pics
(Mac OS).
The Adobe Web site (www.adobe.com),
which you can view by choosing Help >
Adobe Online if you have a connection to
the World Wide Web.
Adobe Certification
The Adobe Training and Certification Pro-
grams are designed to help Adobe customers
improve and promote their product profi-
ciency skills. The Adobe Certified Expert
(ACE) program is designed to recognize the
high-level skills of expert users. Adobe Cer-
tified Training Providers (ACTP) use only
Adobe Certified Experts to teach Adobe
software classes. Available in either ACTP
classrooms or on-site, the ACE program is
the best way to master Adobe products. For
Adobe Certified Training Programs infor-
mation, visit the Partnering with Adobe
Web site at .
319
Index
A
Acrobat
Printer Style 41, 275, 316
Acrobat Reader
installing 1
Actual Size command 12
Add Cont'd Line plug-in 194
adjust layout
Document Setup option 162
Master Page Options setting 163
Master Pages palette option 175
Adobe Certified Expert (ACE)
program 5
Adobe Certified Training Providers
(ACTP) 5
Adobe home page 293
Adobe PageMaker 7.0 Preferences file
restoring defaults 8
Adobe Type Manager 2
AGFA-ProSet9800 printer 3
Align command 88
Align Objects command 88
alignment (text)
center 38
force justify 62
justify 98
anchor icon 302
anchors. see also hyperlinks, sources
to a URL 311–313
text 269–270
application defaults 47
Apply button 24
articles
Distiller 279
viewing preferences in PDF 277
ATM 2
Attach Content 136
Auto-Color Balance option 214
Autoflow command 96, 172
automatic page-numbering 87
automatic text flow 96, 172
automatic trapping 234
B
Balance Columns command 257
baseline 26
baseline leading 95
bleeds 119, 216
book list
about 245
page numbering 246, 259
bookmarks
Distiller 279
books
assembling 245
book list 245
printing 263
Both button 30
Bring Guides to Front command 48
Build Booklet plug-in 152
Bullets and Numbering plug-in 178
C
Center-align button 38
Change command 206
Change to Frame 177
Character-view button 39
CIELAB TIFF 214
clipping paths 228
CMS Setup option 214
color management
turning on 214, 233
colors
applying 219
applying to rules 224
converting spot to process 219
defining process 131
defining spot 53
defining tints 86
redefining 218
rich black 220
setting default 309
for the Web 273
Colors palette
about 11, 29, 55
applying color 36
specifying tints 29
tab 30
Column Break command 199
Column Guides command 19, 184
columns
about 18
changing number of 203
setting 19
unequal width 121
varying on a single page 99
combining publications 245
compatibility options
Distiller 278
compose to printer 18
compression options
Distiller 278
constrained-line tool 40
continuation line 194
Control palette
about 11
cropping 129
formatting text 24
kerning 39
paragraph settings 38
proportional resizing 87
Proxy icon 58
INDEX
320
reference points 58
resizing graphics 58
copying between publications 68, 71
Create Index command 255
Create TOC command 259
cropping
with cropping tool 127
using Control palette 129
cropping tool 216
Cut command 34
D
defaults
application 47
line style and weight 89
measurement units 15, 47
publication 47
restoring 8
Define Colors command 53, 131
Define Styles command 101
Deselect All command 299
dictionary, installing 156
Display Master Items command 92,
185
Distiller
editing job options 278
Export Adobe PDF 41, 274
installing 1
screen job options 278
Document Setup command 162
Document Setup dialog box 17
drag and drop 68
drawing
circles 36
lines 39
rectangles 37
drop cap 25, 192–193
Drop Cap plug-in 25
E
ellipse tool 36
em dash 184, 206
em space 222
ems 39
en space 222
EPS
about 227
exporting page as 286–287
Exit command 43
Expert Kerning command 191–192
Expert Tracking command 98
Export Adobe PDF
creating color separations 239
Export Adobe PDF command 2, 41,
274, 315
F
files
restoring 4
unlocking lesson 4
Files Required for Remote Printing
option 237
fill 30
Fill button 30
Find/Change commands 250–251
finding and changing text 206
first line indent 197
Fit in Window command 26
fixed spaces 222
font options
Distiller 278
fonts
installing Classroom in a Book 2
Force Justify 185
Force-justify button 62
Frame Options command 131
frames
about 130
attaching text 136
converting to 177
creating 130, 158
entering text 132
placing images 159
placing text 132
G
generating a book 263
graphic handles 20
graphics
applying color to 36
circles 36
copying into publication 229
cropping 127, 216
display speed 299
drag and drop 68
file formats 227
frames 130
in libraries 187
inline 221
lines 39
links 228
moving 20
placing 20, 214, 228
rectangles 37
resizing 21, 58
special effects 203
Grid Manager plug-in 186
grids 186
Group command 57, 197
grouping 57, 197
guides
column 16, 121
displaying 16
locking 20, 51
margin 16, 161
moving 89
ruler 26, 32, 50
showing/hiding 16
gutter 19
H
hand tool 32
hanging indent 31
Hide Colors command 14
Hide Guides command 40
Hide Rulers command 16
Horizontal Reflecting button 55
321
horizontal scaling 38
HP LaserJet 5Si printer 3
HTML
and bullet characters 283
compared to PDF 267, 292–293
defined 267
exporting 289–292
formats 281
preparing for export 279–289
preparing graphics 284–286
viewing in Web browser 268
Hyperlinks palette 270
hyperlinks. see also anchors, sources
defined 269
image map 308
on master pages 301
to a movie 310
sorting 304
strategy for building 302
in table of contents 305
testing 273, 300, 313
hyphenation 156
I
Image Control command 146, 203
image map 308
importing
graphics 20
text 22
Include in Table of Contents
option 306
indenting text 31, 62, 98
Indents/tabs command 31
indexes
adding entries 247
copying and pasting index
markers 251
creating book list for 245
cross-references 253, 254
customizing an entry 248–249
editing 253
Find/Change to create entries 250–
251
formatting entries 256
generating 314
generating an index
publication 255–256
page range 249–250
page reference 247–248
placing generated 256
previewing 253
proper names 252
topic levels 249
inline graphics 221
invisible characters,
showing/hiding 247
J
justifying text 62, 98
K
kerning 39, 191
range kerning 39
keyboard shortcuts 36
knocking out
defined 216
setting up 226
Kodak Photo CD images 214
Kodak Photo CD Import Filter dialog
box 214
L
layers
about 125
creating 126
locking 309
Layers palette 125
layout adjustment preferences 161
leader tabs 262–263
leading
about 24
leading methods 95
Left Indent button 62
lesson files
copying 4
Library palette
closing the library 204
using 187
lines 39
Link Options command 229
links
creating 228
graphics 228, 229
managing 229
relinking a file 232
setting defaults 229
updating 232
viewing status 230
Links Manager command 230
Lock Guides command 20, 51
Lock Position command 196
locking guides 20, 51
M
manual text flow 96
margin guides
changing 161
setting 17
master pages
applying 175
changing 163
creating 84
displaying and hiding elements 92
displaying and hiding items 185
Master Pages palette 163
master-page icon 85
Maximize button 10
measurement system 15
misregistration 217
N
New Anchor button 299
New Anchor command 299
New command 17
New Source command 300
Non-Printing command 78
nudging 197
INDEX
322
O
On Screen
PDF Style 316
OnScreen
PDF Style 41, 275
Open command 10
overprinting
defined 217
setting up 221
P
page icons 11
page imposition 152
page numbering
across multiple publications 246,
259
inserting marker 87
page size, changing 161
PageMaker
installing 1
palettes
about 11
Colors palette 29
Control palette 11
Layers 125
Master Pages 163
moving and hiding 13
Styles palette 102
toolbox 10
panning page 32
PANTONE 54
Paragraph command 95, 137
paragraph rules 137, 143
Paragraph-view button 38
Paste command 34
pasteboard 11
compared to HTML 267, 292–293
defined 267
exporting 274, 315
viewing in Web browser 268
PDF options
setting 277
PDF Options dialog box 41, 275, 277
PDF Style 41, 275, 277, 316
Photo CD 214
picas 16, 47
Place command 20
placing
graphics 20
text 22
text in frames 132, 136
plug-ins
Add Cont'd Line 194
Bullets and Numbering 178
Drop Cap 25
Grid Manager 186
Save for Service Provider 236
point size 24
polygon frame tool 158
PostScript PPD 41, 275, 315
PPDs 233
installing 3
preferences 8
Preferences command
General 15
Layout Adjustment 161
Print command 40
Printer Style
Acrobat 41, 275, 316
Printer Styles
defining 239
printing
a book of publications 263
commercial 233
lesson projects 2
on press 216
registration 217
to a desktop laser printer 40
Promote/Demote button 249, 250
proportional leading 95
proportional resizing 87
Proxy icon 58
publication defaults 47
pull quote 200
Q
Quit command 43
R
Reader
installing 1
rectangle frame tool 130
rectangle tool 37
reference points 58
reflecting text 55
registration 217
resizing
with Control palette 58
graphics 21
proportional 87
text blocks 23, 34, 52
rich black 220
Rich Text Format (RTF) 22
Right Indent button 62
rotating text blocks 65
ruler guides
creating 26, 32, 50
locking 20, 51
moving 89
showing/hiding 16
rulers
about 14
positioning zero point 14
resetting zero point 134
showing/hiding 16
zero point in double-sided
publications 120
rules
attached to text 223
paragraph 137, 143
trapping on layout 220
running head 184
S
Save As command 18
Save for Service Provider plug-in 236
Scaling button 87
screen (tint) 196
323
Screen Job Options dialog box 278
screen redraw 25, 148
scrolling 12
searching and replacing text 206
security
Distiller 279
Select All command 24
selecting objects underneath 88
semiautomatic text flow 96, 138, 188
Send Backward command 57, 197
Send Guides to Back command 37
Send to Back command 35
Show Guides command 16
Show Index command 253, 254
Show Layers command 125
Show Library command 187
Show Master Pages command 158
Show Rulers command 16
Show Styles command 14
sidebars 202
Snap to Guides command 40
Sort Pages command 152
sources. see also anchors, hyperlinks
on master page 272
creating for a group 304
graphics 272
text 271
special effects 203
spell-checking 207
spot colors 48
applying 55
defining 53
stacking order 35, 57
start files
restoring 4
Starting Adobe PageMaker 9
story 23
story editor
closing all windows 209
setting preferences 205
stroke 30
Stroke button 30
Stroke command 40
styles
about 101
applying 101, 190
basing on other styles 166, 168
copying 189
creating 101, 142, 225
editing 101, 104, 165, 195, 226
removing 178
Styles palette 11, 102
T
table of contents
creating book list for 245
formatting 259, 260, 262–263
generating 258–260
hyperlinks in 305
marking paragraphs to include
in 258
regenerating 262
tabs 262–263
target output resolution 18
template 50
creating 49
opening 78
text
baseline 26
coloring 30
Column Break command 199
creating a style from 225
deleting 34
editing with Find/Change 206
entering 27
Force Justify 185
in frames 132, 136
importing 22
indenting 31, 62, 98
justifying 62, 98
kerning 39
pasting 34
placing 188, 194
replacing existing 91
reverse 196
reversing 124
selecting 24
threaded 97
tracking and kerning 191
text blocks
about 22
drag and drop 68
dragging to define 37
grouping 57
reflecting 55
resizing 23, 34, 52
rotating 65
unthreading 100
text flow
automatic 96, 172
manual 96
semiautomatic 96, 138
text tool 24
text wrap 109, 171
Text Wrap command 109, 139, 171
threaded text 97
TIFF 227
CIELAB 214
Tiling command 68
tints
applying 29
defining 86
toolbox 10
moving and hiding 13
top of caps leading 95
tracking 98, 191
trapping 49
automatic 234
defined 217
overprinting a spot color 221
rules 220
U
Undo command 21
Ungroup command 72
unlocking lesson files 4
INDEX
324
V
Vertical Reflecting button 56
view
actual size 12
changing 12
fit in window 26
maximizing 10
panning page 32
scrolling 12
tiling 68
W
Web browser
viewing PDF in 276
widows 193
windowshade handles 22
World Wide Web
Adobe home page 293
PDF settings for publishing 315
Z
zero point
double-sided publications 120
positioning 14
resetting to default 134
zoom tool 12
Lesson 1
Flyer
In this project you’ll assemble a single-page,
black-and-white flyer from start to finish.
The
photograph and most of the text featured
in this flyer are ready for you to import into
PageMaker. You’ll also learn how to type text
directly into a publication and you’ll draw
several graphic elements (square, circle,
and
line).
LESSON 1
8
Flyer
For this lesson, you will open and view the
final version of the flyer, and follow the step-
by-step instructions that introduce some of
the basic features and tools of PageMaker.
Even if you have experience using the
PageMaker application, this introduction
may reveal some useful tips and techniques.
This project covers the following topics:
•
Restoring default PageMaker settings
•
Changing the view of a publication
•
Creating a new publication
•
Opening an existing publication
•
Setting up the horizontal and vertical
rulers
•
Displaying and hiding guides
•
Positioning the zero point
•
Using the pointer tool, the text tool, and
the zoom tool
•
Specifying multiple columns
•
Locking the guides
•
Creating, placing, formatting, and
positioning text and graphic elements
•
Creating a drop cap
•
Applying a tint to text
•
Specifying a hanging indent
•
Creating ruler guides
•
Drawing circles, rectangles, and lines
•
Adjusting the stacking order of elements
on the page
•
Range kerning text
•
Using the Snap to Guides option
•
Printing the flyer on a desktop laser
printer
•
Exporting the flyer to Adobe PDF
If this is your first time using PageMaker, it
should take about 2 hours to complete this
lesson. If you have some experience using
PageMaker, it should take about 90 minutes
to complete this lesson.
Locating files and fonts
All files and fonts needed for this lesson are
found on the
Adobe PageMaker Classroom in
a Book
CD-ROM in the folders 01Lesson
and Fonts, respectively.
Restoring default settings
Before starting PageMaker, delete the
PageMaker 7.0 preferences file to ensure all
settings are returned to their default values.
1
If PageMaker 7.0 is running, choose File
>
Exit or Quit.
2
Locate the PageMaker preferences file in
the following location, depending upon
your system:
Windows
\PageMaker 7.0\rsrc\usenglsh\
PM70.cnf
Note:
If Windows is set to hide filename
extensions, the preferences file will instead
appear without the .cnf extension.
9
ADOBE PAGEMAKER 7.0
Classroom in a Book
Macintosh
System Folder: Preferences:
Adobe PageMaker 7.0P Prefs
3
Drag the preferences file to the Recycle
Bin (Windows) or Trash (Macintosh).
The PageMaker preferences settings are
returned to their default values.
To preserve your preference settings,
drag the preferences file to a
different
folder. When you are ready to restore the
settings, drag the file back to
its original
folder and click Yes when
asked whether
to overwrite the existing file.
Starting PageMaker
After verifying that the correct fonts are
installed on your computer, you will start
the PageMaker application.
1
In addition to the commonly used
fonts
identified in the Getting Started
chapter, make sure the
following fonts are
installed on your computer: AGaramond,
AGaramond Italic, and Myriad Roman.
Windows only:
Because of the way Windows
handles fonts, AGaramond Italic does not
appear in font menus in Windows applica-
tions. You must apply italic to AGaramond to
use AGaramond Italic.
Myriad, a multiple master typeface, is a sans
serif design. Myriad makes a good text face
as well as providing flexibility for filling dis-
play needs in all sizes and media.
Note:
Serifs are the small strokes at the top
and bottom of a letter. Typefaces without serifs
are generally called sans (without) serifs.
2
Depending on the platform, start
PageMaker as follows:
•
In Windows, choose Start > Programs >
Adobe > Adobe PageMaker 7.0 (your
menus
may differ depending upon your
installation).
•
In Mac OS, open the Adobe PageMaker 7.0
folder and double-click the
Adobe®
PageMaker® 7.0 icon.
Once launched, PageMaker displays the
menus and tool box. If necessary, close the
Te mplate and Picture palettes (Windows).
LESSON 1
10
Flyer
Opening an existing publication
Opening the final version of the publication
and following the step-by-step instructions
will help you become acquainted with
PageMaker.
Note:
Windows users need to unlock the
lesson files before using them. For infor-
mation, see Copying the Classroom in a
Book files on page 4.
1
Choose File > Open, and, in the Open
Publication dialog box, locate and
double-
click the 01Final.pmd file in
the
01Lesson
folder.
PageMaker opens the final version of the
publication you will create in this lesson,
with horizontal and vertical rulers extending
along the top and left edges of the publica-
tion window.
2
If the publication window does not fill the
screen, click the Maximize button in the
right corner of the title bar to expand the
window.
Macintosh Windows
As you look at the publication window,
notice the following elements:
A.
Zero point marker
B.
Tool palette
C.
Horizontal
ruler
D.
Page
E.
Publication window
F.
Styles
and Colors palettes
G.
Pasteboard
H.
Scroll bars
I.
Control palette
J.
Page icons K. Ve rtical ruler
Toolbox Displays tools that you use for
drawing, entering or editing text, selecting
and dragging objects on the page, panning
the page, and zooming in and out of the
n the heart of the Boston area lies a true architectural
gem. This Victorian dwelling exemplifies turn-of-the-
century New England architecture at its best. In
addition to its prime location just minutes from
downtown Boston, this home enjoys spectacular views of
the Charles River and the downtown Boston skyline.
Completely restored with attention to historic detail this
three-story, three-bedroom residence has incorporated all of
the functional requirements of today's home. The magnifi-
cent interior boasts all original oak finishing, including a
breathtaking spiral bannister, and built-in bookcases in the
library. The kitchen has been fully modernized with state of
the art appliances, yet retains the house’s original charm with
its high ceilings, ornate moldings, and fully operational
woodstove. The original bay windows, refinished hardwood
floors, and ornate paint trim make this home’s interior
complete and as spectacular as its proud exterior.
Consistent with the practical beauty of Victorian archi-
tecture, no space is wasted. The most spectacular room of all
is the converted attic. It clearly takes full advantage of its
immense size and high ceiling with skylights, windows, and a
stairway leading out to a small widow's walk.
This Cambridge residence bestows the colonial charm
of New England's past upon this quaint neighborhood. It
resides just two blocks from the historic house used as
George Washington's headquarters in 1775, and later
occupied by poet Henry Wadsworth Longfellow. A stroll
north on Lyon Street past a hilly intersection looks out over
the pine and maple woods of a nearby park, a dramatic
contrast with the blue Massachusetts bay beyond. These
stunning views must have inspired architects to execute
their best work. For more information about this property
please contact Joan Rutherford at Harbor Realty.
I
Close to the beautiful Charles River, this home shares the
historic charm of its Cambridge neighborhood.
Spacious three bedroom, two bath Victorian
located in the historic city of Cambridge.
Freshly painted exterior and interior detail.
Modern renovations boast the finest electronic
appliances, and highest quality fixtures.
Landscaped by a premiere Boston architect.
Review
Home
322 Harvard Street, Cambridge
K
C
B
D
I
H
J
A
E
F
G
11
ADOBE PAGEMAKER 7.0
Classroom in a Book
page. You click to select a tool. The toolbox
appears in the upper left corner of the pub-
lication window.
Control palette Lets you make precise
changes to text and graphics without
selecting a tool or choosing a menu
command. The Control palette appears in
the lower portion of the publication win-
dow, and changes modes depending upon
what is currently selected.
Page Defines the print area of a publica-
tion. Whenever you create a new publica-
tion, you specify the dimensions of the page.
Only text or graphics on the page will print.
Pasteboard Provides a workspace outside
the page where you can store and manipu-
late elements before positioning them on the
page. The term pasteboard, like many of the
terms in this course, comes from traditional
publishing, where layout artists assemble
text and graphics on a physical pasteboard.
The extra space on the board serves as a
work space for elements not yet placed on
the page.
Styles and Colors palettes Displays the
predefined paragraph styles and colors.
PageMaker also has palettes for layers,
master pages, and hyperlinks (more about
these in later lessons). To save screen space,
PageMaker lets you group the palettes you
regularly use, or you can drag a palette out of
the group if you want to display it
independently. To activate a palette, you
click its tab. Each palette also includes: a
menu; a Maximize button to expand and
minimize the palette; and buttons to create
or delete a style, color, layer, etc.
A. Palette tab B. Maximize
button C. Palette menu
D. Trash button E. New button
Page icons Indicates the currently
displayed page (page one in this case).
PageMaker displays an icon for every page in
the publication. To view a page, you click its
page icon. The L and R page icons represent
the left and right master pages.
Text
Cropping
Constrained line
Frame tools
Zoom
Pointer
Rotating
Line
Rectangle
Ellipse
Polygon
Hand
C
D
A
B
E
LESSON 1
12
Flyer
Changing the view of a publication
PageMaker opens a publication in the view
that was selected when it was last saved.
This publication was saved in the Fit in
Window view.
Note: When the size of this page is reduced to
fit within a 13-inch (or smaller) monitor, the
10-point text is displayed as gray bars (an
effect known as greeking).
1 Choose View > Actual Size.
The view of this publication is magnified to
its actual size (its size when printed), mak-
ing it possible to read the text.
2 To toggle between the Fit in Window and
Actual Size views, while holding down the
Ctrl key (Windows) or the Command and
Option keys (Macintosh), click the page
(use the right mouse button in Windows).
Toggle back to the Actual Size view.
3 Click the scroll arrows or drag the scroll
bars on the right and bottom edges of the
publication window to scroll the page.
Yo u may find it easier to use the following
method to scroll in your publication.
4 Hold down the Alt key (Windows) or
Option key (Macintosh), position the
pointer on the page or pasteboard, hold
down the mouse button until the pointer
changes to a grabber hand, and drag in any
direction to scroll the view of the page.
5 Click the zoom tool () in the toolbox to
select it.
The pointer changes to a magnifying glass.
The zoom tool makes it easy to magnify and
reduce the view of selected portions of the
page. With the zoom tool selected, you can
magnify the view of a specific portion of
the page by either clicking or dragging over
the
area.
6 With the zoom tool selected, hold down
Ctrl (Windows) or Option (Macintosh).
The plus sign in the zoom tool changes to
a
minus (–) sign.
7 Click the page to reduce the view of the
page.
8 With the zoom tool still selected, drag
over any portion of the page. Notice how
PageMaker displays a rectangle with a
dashed line as you drag the tool. When you
release the mouse button, the selected por-
tion of the page fills the publication window.
9 Double-click the zoom tool in the toolbox
to switch to the Actual Size view. Using a
similar shortcut, jump to the Fit in Window
Close to the beautiful Charles River, this home shares the
historic charm of its Cambridge neighborhood.
Review
Home
322 Harvard Street, Cambridge
Spacious three bedroom, two bath Victorian
located in the historic city of Cambridge.
Freshly painted exterior and interior detail.
Modern renovations boast the finest electronic
appliances, and highest quality fixtures.
Landscaped by a premiere Boston architect.
n the heart of the Boston area lies a true architectural
gem. This Victorian dwelling exemplifies turn-of-the-
century New England architecture at its best. In
addition to its prime location just minutes from
downtown Boston, this home enjoys spectacular views of
the Charles River and the downtown Boston skyline.
Completely restored with attention to historic detail this
three-story, three-bedroom residence has incorporated all of
the functional requirements of today's home. The magnifi-
cent interior boasts all original oak finishing, including a
breathtaking spiral bannister, and built-in bookcases in the
library. The kitchen has been fully modernized with state of
the art appliances, yet retains the house’s original charm with
its high ceilings, ornate moldings, and fully operational
woodstove. The original bay windows, refinished hardwood
floors, and ornate paint trim make this home’s interior
complete and as spectacular as its proud exterior.
Consistent with the practical beauty of Victorian archi-
tecture, no space is wasted. The most spectacular room of all
is the converted attic. It clearly takes full advantage of its
immense size and high ceiling with skylights, windows, and a
stairway leading out to a small widow's walk.
This Cambridge residence bestows the colonial charm
of New England's past upon this quaint neighborhood. It
resides just two blocks from the historic house used as
George Washington's headquarters in 1775, and later
occupied by poet Henry Wadsworth Longfellow. A stroll
north on Lyon Street past a hilly intersection looks out over
the pine and maple woods of a nearby park, a dramatic
contrast with the blue Massachusetts bay beyond. These
stunning views must have inspired architects to execute
their best work. For more information about this property
please contact Joan Rutherford at Harbor Realty.
I
13
ADOBE PAGEMAKER 7.0
Classroom in a Book
view by holding down the Alt key
(Windows) or Option key (Macintosh),
and double-clicking the zoom tool in the
toolbox.
Working with the toolbox and palettes
As you work, you may find the toolbox and
palettes are in your way, especially if you
have a small screen. PageMaker gives you
several options to minimize the impact of
the toolbox and palettes, while still keeping
them handy. You can move the toolbox or
palettes, minimize the palettes so just the
title bar and tabs show, temporarily hide all
the palettes at once, or hide each group of
palettes individually.
Throughout these lessons, feel free to move
or hide the toolbox and palettes as necessary.
1 Select the hand tool ().
2 Position the pointer over the title bar of
the Styles and Colors palette window, hold
down the mouse, and drag the palette to the
right edge of the publication window.
You can drag the toolbox or any palette any-
where within the publication window. You
can even let part of the palette or toolbox
extend outside the publication window.
Yo u’ll now see how small a palette can be
while still visible.
3 Click the Maximize button in the Styles
and Colors palette window until the palette
window jumps to its minimum size (just the
title bar and palette tabs display).
Maximize Minimize
4
Click the Maximize button in the palette
window again to return the palette to its
full
size.
If you like the palettes handy, but out of the
way, you can move them to the bottom of
the screen. You’ll try this next.
5 Drag the Styles and Colors palette window
until its bottom edge aligns with the bottom
of the publication window. (In Mac OS, you
may need to drag the palette window until
its bottom edge aligns with the bottom edge
of the monitor screen.) Click the Maximize
button in the palette window.
PageMaker reduces the palette to its mini-
mum size and automatically drops it to the
bottom of the screen. (Normally when you
minimize a palette the titlebar remains
stationary.)
6 Click the Maximize button in the palette
window again to return the palette to its
full
size.