The Adobe Illustrator CS Wow- P2 pot
Bạn đang xem bản rút gọn của tài liệu. Xem và tải ngay bản đầy đủ của tài liệu tại đây (1.59 MB, 30 trang )
for best results you should set all options from within
Illustrator's Print dialog box).
As previously mentioned, the preview area in the
Print dialog box shows you the page's printable area. It
also lets you scale artwork to order as you go to print it,
while choosing exactly which artwork in the document
you want to print. So you no longer have to worry about
changing the size of the Artboard itself in order to print
things at a different scale.
Illustrator CS also lets you save your Print settings as
time-saving presets, so if you're designing billboards or
other very large media sizes, you can set the appropriate
scale and then save it as a Print preset for easy access.
MAKING YOUR MOVES EASIER
Look over this section to make sure you're aware of the
many ways to select tools and access features. Learning
these simple techniques will free you from mousing to the
toolbox or depending on the pull-down menus.
Keyboard shortcuts for tools and navigation
Need to access a tool? Press a key. Press "T" to choose the
Type tool, "P" for the Pen tool, and so on. Choose any tool
in the toolbox by pressing its keyboard shortcut. (Each
shortcut used to be a single key, but there are now so
many tools that a few of them have double-key shortcuts.)
To learn the default keyboard shortcuts for your tools,
with Show Tool Tips enabled (this is on by default), hold
the cursor over any tool in the toolbox, and its keyboard
shortcut will appear in parentheses next to the tool name
(toggle the Tool Tip option in General Preferences).
Note: Keyboard shortcuts won't work while you're in text
editing mode. Press Escape to leave text editing mode and
use a keyboard shortcut. Your text will remain unchanged,
with edits preserved.
Changing keyboard shortcuts
To change a shortcut for a tool or menu item, open the
Keyboard Shortcut dialog box (Edit > Keyboard Short-
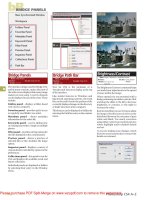
Illustrator's one-stop Print dialog box—note
the preview area in the lower left corner, which
shows you the printable area of the page, and
lets you adjust and scale your artwork to print
Mac users: It's recommended that you set all
your options in Illustrator's Print dialog box,
rather than through the OS-provided Page Setup
dialog box. If you forget, Illustrator will remind
you with the message shown above
Custom keyboard shortcuts
To assign a shortcut to a menu
item or tool, select Edit > Key-
board Shortcuts. Making any
changes will rename the set
"Custom." If you choose a short-
cut already in use, you will get a
warning that it is currently being
used and that reassigning it will
remove it from the item it is cur-
rently assigned to. When you exit
the dialog box you will be asked
to save your custom set. You can't
overwrite a preset.
Chapter 1 Illustrator Basics 5
Resizing and stroke weight
If you double-click the Scale tool,
you can resize your selection with
or without altering line weights:
• To scale a selection, while also
scaling line weights, make sure
to enable the Scale Strokes & Ef-
fects checkbox.
• To scale a selection while
maintaining your line weights,
disable Scale Strokes & Effects.
• To decrease line weights (50%)
without scaling objects, first
scale the selection (200%) with
Scale Strokes & Effects disabled.
Then scale (50%) with it en-
abled. Reverse to increase line
weights.
Tear off tool palettes
cuts). Making a change to a shortcut will change the Set
name to "Custom." When you're finished making changes
and want to exit the dialog box, you will be asked to save
your shortcuts to a new file. This file will be saved in
the Illustrator application folder and will end in ".kys".
As long as these file types are located in the application
folder, they will be available as choices in the Set pop-up
menu. In addition, every time you make any changes to a
saved set (not a default preset), you'll be asked if you want
to overwrite that set. You can also use the Save button to
create a new keyboard shortcut file. Click the Export Text
button if you need a text file as a reference for a specific
set of shortcuts or need to print them.
Note: You can't change most palette items, but the few
you can change are found at the bottom of the menu com-
mands list in the Edit >Keyboard Shortcuts dialog box.
Context-sensitive menus
If you're not already familiar with context-sensitive
menus, you might find them a great time saver. Windows
users merely click the right mouse button. If you're on a
Mac with a single-button mouse, press the Control key
while you click and hold the mouse button. In both cases
a menu pops up (specific to the tool or item you are work-
ing with) providing you with an alternative to the regular
pull-down menus.
Tear off palettes
The Illustrator Toolbox lets you tear off subsets of tools so
you can move the entire set to another location. Click on
a tool with a pop-up menu, drag the cursor to the arrow
end of the pop-up, and release the mouse.
WORKING WITH OBJECTS
Anchor points, lines, and Bezier curves
Instead of using pixels to draw shapes, Illustrator cre-
ates objects made up of points, called "anchor points."
They are connected by curved or straight outlines called
"paths" and are visible if you work in Outline mode (for-
Chapter 1 Illustrator Basics6
merly Artwork mode). (Choose View>Outline to enter
Outline mode, and View > Preview to change back.) Illus-
trator describes information about the location and size
of each path, as well as its dozen or so attributes, such as
its fill color and its stroke weight and color. Because you
are creating objects, you'll be able to change the order
in which they stack. You'll also be able to group objects
together so you can select them as if they were one object.
You can even Ungroup them later, if you wish.
If you took geometry, you probably remember that the
shortest distance between two points is a straight line. In
Illustrator, this rule translates into each line being defined
by two anchor points that you create by clicking with the
Pen tool, or drawing with the Line Segment tool.
In mathematically describing rectangles and ellipses,
Illustrator computes the center, the length of the sides,
or the radius, based on the total width and height you
specify. For more complex shapes involving free-form
curves, Adobe Illustrator allows you to use the Pen tool
to create Bezier curves, defined by non-printing anchor
points (which literally anchor the path at those points),
and direction points (which define the angle and depth
of the curve). To make these direction points easier to
see and manipulate, each direction point is connected to
its anchor point with a non-printing direction line, also
called a "handle." The direction points and handles are
visible when you're creating a path with the Pen tool or
editing the path with the Direct Selection tool. While all
of this might sound complicated, manipulating Bezier
curves can become intuitive. Mastering these curves,
though initially awkward, is the heart and soul of using
Illustrator.
More about Bezier curves
If you're new to using Bezier curves, take some time to
go through the Adobe training materials. The "Ch 02
The Zen of Illustrator" folder on the Wow! CD includes
several "Zen" practice lessons that will help you fine-tune
your Bezier capabilities.
Changing measurement units
To set units of measurement for
rulers, palettes, and some dialog
boxes or filters, as well as units for
measuring strokes and text, use
the Units & Display Performance
area of Preferences.
Note: Control-click (Mac) or right
mouse-click (Win) the rulers to
select different units.
Clicking with the Pen tool to create anchor
points for straight lines
Click-dragging with the Pen tool to create an-
chor points and pulling out direction lines for
curves
Chapter 1 Illustrator Basics
7
When direction handles are short, curves are
shallow; when handles are long, curves are deep
The length and angle of the handles determine
the gesture of the curves
Many graphics programs include Beziers, so mas-
tering the Pen tool, though challenging at first, is very
important. Friskets in Corel Painter, paths in Photo-
shop, and the outline and extrusion curves of many 3D
programs all use the Bezier curve.
The key to learning Beziers is to take your initial
lessons in short doses and stop if you get frustrated.
Designer Kathleen Tinkel describes Bezier direction lines
as "following the gesture of the curve." This artistic view
should help you to create fluid Bezier curves.
Some final rules about Bezier curves
The length and angle of the handles "anticipate" the
curves that will follow.
To ensure that the curve is smooth, place anchor points
on either side of an arc, not in between.
The fewer the anchor points, the smoother the curve will
look and the faster it will print.
Adjust a curve's height and angle by dragging the direc-
tion points, or grab the curve itself to adjust its height.
Starting an object
Adding a point
Removing a point
Creating a corner
(when over an
existing point)
Continuing from
an anchor point
Joining two line
segments
Closing an object
Basic cursor feedback for the Pen tool
WATCH YOUR CURSOR!
Illustrator's cursors change to indicate not only what tool
you have selected, but also which function you are about
to perform. If you watch your cursor, you will avoid the
most common Illustrator mistakes.
If you choose the Pen tool:
• Before you start, your cursor displays as the Pen tool
with "x" indicating that you're starting a new object.
• Once you've begun your object, your cursor changes
to a regular Pen. This indicates that you're about to add to
an existing object.
• If your cursor gets close to an existing anchor point,
it will change to a Pen with "-" indicating that you're
about to delete the last anchor point! If you click-drag on
top of that anchor point, you'll redraw that curve. If you
Chapter 1 Illustrator Basics
8
hold the Option (Mac)/Alt (Win) key while you click-drag
on top of the point, you'll pull out a new direction line,
creating a corner (as in the petals of a flower). If you click
on top of the point, you'll collapse the outgoing direction
line, allowing you to attach a straight line to the curve.
• If your cursor gets close to an end anchor point of
an object, it will change to a Pen with "o" to indicate that
you're about to "close" the path. If you do close the path,
then your cursor will change back to a Pen with "x" to
indicate that you're beginning a new object.
• If you use the Direct Selection tool to adjust the
object as you go, be sure to look at your cursor when
you're ready to continue your object. If it's still a regular
Pen, then continue to place the next point, adding to your
object. If the Pen tool has "x" (indicating that you are
about to start a new object), then you must redraw your
last point. As you approach this last anchor point, your
cursor will change to a Pen with "/"; click and drag over
this last point to redraw the last curve. To form a hinged
corner on the point as you draw, hold down Option (Mac)
/Alt (Win) as you click-drag out a new direction line.
BEZIER-EDITING TOOLS
The group of tools you can use to edit Illustrator paths are
called Bezier-editing tools. To access them, click and hold
the Pen, Pencil, or Scissors tool and drag to select one of
the other tools. You can also tear off this palette. (To learn
how to combine paths into new objects, read about the
Pathfinder palette in the Drawing & Coloring chapter.)
• The Pen tool and Auto Add/Delete can perform a
variety of functions. Auto Add/Delete (which is on by
default, but can be disabled in General Preferences)
allows the Pen tool to change automatically to the
Add Anchor Point tool when the tool is over a selected
path segment, or to the Delete Anchor Point tool when
over an anchor point. To temporarily disable the Auto
Ways to "hinge" Bezier curves
A Bezier curve is "hinged" when
it's attached
to a line, or
to another
curve by a
corner.
• To hinge a curve as you draw
#1: While you are click-dragging
to draw a curve, press Option/
Alt to hinge the curve—pulling
the handle in a new direction
• To hinge a curve as you draw
#2: With the Pen tool, hold
Option/Alt and click-drag over
the last drawn anchor point to
hinge the curve—pulling the
handle in a new direction
• To attach a curve to a line:
Place the Pen tool on a line's an-
chor point and click-drag to pull
out a direction handle for your
next curve.
• Use the Convert Anchor Point
Tool to smooth hinged anchor
points and hinge curves.
The hollow snap-to arrow
As long as Snap to Point is enabled
(View menu), you can grab ob-
jects from any path or point and
drag until they snap to a guide or
another anchor point. Watch for
the cursor to change to a hollow
(white) arrow.
Chapter 1 Illustrator Basics
9
Correcting common mistakes
Avoid these common mistakes:
• If you try to deselect by click-
ing outside your object while
you still have the Pen tool cho-
sen, you'll scatter extra points
throughout your image, caus-
ing possible problems later. If
you're aware that you clicked
by mistake, Undo. To remove
stray points, choose Edit >
Select >Stray Points and then
press Delete. (Or, alternatively,
you can choose Object > Path >
Clean Up.) The best solution is
to remember to hold down the
Ctrl (Win) or (Mac) key when
you click; the cursor will tem-
porarily toggle to the Selection
tool and you can safely click to
deselect.
• If you try to delete an object
that you selected with the
Direct Selection tool, you'll de-
lete only the selected point or
path. What remains of the ob-
ject will now be fully selected.
Press Delete again to remove
the remaining portions of your
object.
Add/Delete function of the Pen tool, hold down the Shift
key. If you don't want the path to constrain to an angle,
release the Shift key prior to releasing the mouse.
• The Convert Anchor Point tool, hidden within the Pen
tool (default is Shift-C), converts an anchor point from a
smooth curve to a corner point by simply clicking on it.
To convert a corner point to a smooth curve, click-drag
on the anchor point counterclockwise to pull out a new
direction handle (or twirl the point until it straightens out
the curve). To convert a smooth curve to a hinged curve
(two curves hinged at a point), grab the direction point
and hold Option/Alt as you drag out to the new position.
With the Pen tool selected, you can temporarily access
the Convert Anchor Point tool by pressing Option or Alt.
• The Add Anchor Point tool, accessible from the Pen
pop-up menu or by pressing the + (plus) key, adds an
anchor point to a path at the location where you click.
• The Delete Anchor Point tool, accessible from the Pen
pop-up menu or by pressing - (minus), deletes an anchor
point when you click directly on the point.
Note: If you select the Add/Delete Anchor Point tools by
pressing + or -, press P to get back to the Pen tool.
• The Pencil tool reshapes a selected path when Edit
selected paths is checked in the tools preferences. Select a
path and draw on or close to the path to reshape it. (For a
Pencil lesson, see "Tracing Details" in the Layers chapter.)
• The Smooth tool smooths the points on already-drawn
paths by smoothing corners and deleting points. As you
move the Smooth tool over your path, it attempts to keep
the original shape of the path as intact as possible.
• The Erase tool removes sections of a selected path. By
dragging along the path you can erase or remove portions
of it. You must drag along the path—drawing perpen-
10
Chapter 1 Illustrator Basics
dicular to the path will result in unexpected effects. This
tool adds a pair of anchor points to the remaining path,
on either side of the erased section of the path.
• The Scissors tool cuts a path where you click by adding
two disconnected, selected anchor points exactly on top
of each other. To select just one of the points, deselect the
object, then click with the Direct Selection tool on the
spot where you cut. This will allow you to select the upper
anchor point and drag it to the side in order to see the
two points better.
• The Knife tool slices through all unlocked visible objects
and closed paths. Simply drag the Knife tool across the
object you want to slice, then select the object(s) you want
to move or delete.
GEOMETRIC OBJECTS
The Ellipse, Rounded Rectangle, Polygon, and Star tools
create objects called "geometric primitives." These objects
are mathematically-described symmetrical paths grouped
with a non-printing anchor point, which indicates the
center. Use the centers of the geometric objects to snap-
align them with each other, or with other objects and
guides. You can create these geometric objects numeri-
cally or manually. Access the tools in the pop-up pal-
ette from the Rectangle tool in the Toolbox. (See the
Zen of Illustrator chapter for exercises in creating and
manipulating geometric objects, and Tip at right.)
• To create a geometric shape manually, select the
desired geometric tool, and click-drag to form the object
from one corner to the other. To create the object from
the center, hold down the Option (Mac)/Alt (Win) key
and drag from the center outward (keep the Option/Alt
key down until you release the mouse button to ensure
that it draws from the center). Once you have drawn the
geometric objects, you can edit them exactly as you do
other paths.
Serious fun with shapes
The Ellipse (select by typing "L"),
Polygon, Star, and Spiral are
simple, but powerful, tools. Used
with these key combinations, you
may find them indispensable:
• Spacebar-drag allows you to re-
position your object.
• Shift constrains the object's pro-
portions.
• Up-arrow increases points on
a star, sides on a polygon, and
coils on a spiral.
• Down-arrow removes points
from a star, sides from a poly-
gon, and coils from a spiral.
• Option (Mac)/Alt (Win) increas-
es the angle of the star's points.
• -drag changes the inside and
outside radius of a star, or in-
creases or decreases the decay in
a spiral.
• ~-drag (tilde-drag) creates mul-
tiple objects based on the speed
and length of your drag. Try it
using the Star tool with stroke,
but no fill. .
• Combinations: Experiment with
all the keys separately and in
combination with the other
keys. Doing so is the only way to
fully understand these fun tools.
Chapter 1 Illustrator Basics
11
Tool tolerance options
Drawing freehand while holding
a mouse or even a digital pen can
be less than elegant. The Pencil,
Smooth, and Brush tools contain
options that can help you to cre-
ate more types of paths, ranging
from very realistic to more shapely
and graceful ones, without the
constant need to adjust anchor
points. Double-click on the tool to
view the options.
• Fidelity: Increases or decreases
the distance between anchor
points on the path created or
edited. The smaller the number,
the more points that will make
up the path and vice versa.
• Smoothness: The smoothness
option varies the percentage
of smoothness you'll see as you
create and edit paths. Use a
lower percentage of smooth-
ness for more realistic lines and
brush strokes, and a higher
percentage for less realistic but
more elegant lines.
Note: Closing Pencil and Brush tool
paths is a bit awkward. If you hold
down the Option (Mac)/Alt (Win)
key when you are ready to close a
path, a straight line segment will
he drawn between the first and last
anchor points. If you hold down the
Option/Alt key and extend slightly
past the first anchor point, the path
will close automatically. Set the tool
preferences to low numbers to make
closing easier. — Sandee Cohen
• To create a geometric object with numeric input,
select a geometric tool and click on the Artboard to estab-
lish the upper left corner of your object. Enter the desired
dimensions in the dialog box and click OK. To create the
object numerically from the object's center, Option-click
(Mac)/Alt-click (Win) on the Artboard.
To draw an arc, select the Arc tool and then click and
drag to start drawing the arc. Press the "F" key to flip the
arc from convex to concave, and use the up and down
Arrow keys to adjust the radius of the arc. Pressing the
"C" key will "close" the arc by drawing the perpendicular
lines that form the axes, and pressing the "X" key will flip
the arc without moving these axes ("F" flips both the arc
and the axes). Release the mouse to finish the arc.
To draw a grid, select either the Rectangular Grid tool
or the Polar Grid tool and click-drag to start drawing the
grid. You can control the shape of the grid by pressing
various keys as you draw (see the User Guide for details).
Release the mouse to finish the grid.
SELECTING & GROUPING OBJECTS
Selecting
The Select menu gives you easy access to basic selection
commands, including the ability to select specific types
of objects and attributes. You can use the Selection tools
to select individual or multiple objects. You can use the
target indicators in the Layers palette to select and target
objects, groups, and layers. Targeting a group or layer
selects everything contained within it, and makes the
group or layer the focus of the Appearance and Graphic
Styles palettes. (For more on targeting and selecting via
the Layers palette, see the Layers chapter.)
Use the Lasso tool to select an entire path or multiple
paths by encircling them. Option (Mac)/Alt (Win) + the
Lasso tool subtracts entire paths from a selection. Shift +
Lasso tool adds entire paths to a selection.
You can also use the Lasso tool to select individual
anchor points or path segments by encircling them with
the tool. Option (Mac)/Alt (Win) + Lasso tool subtracts
Chapter 1 Illustrator Basics12
anchor points from a selection. Shift + Lasso tool adds
anchor points to a selection.
Grouping and selecting
Many programs provide you with a grouping function
so you can act upon multiple objects as one unit. In
Illustrator, grouping objects places all the objects on the
same layer and creates a <group> container in the Lay-
ers palette; remember don't choose group if you want
your objects on different layers. (For more on layers and
objects, see the Layers chapter.) So, when do you want
to group objects? Group objects when you need to select
them repeatedly as a unit or want to apply an appearance
to the entire group. Take an illustration of a bicycle as an
example. Use the Group function to group the spokes of
a wheel. Next, group the two wheels of the bicycle, then
group the wheels with the frame. We will continue to
refer to this bicycle below.
• With the Direct Selection tool. Click on a point or path
with the Direct Selection tool to select that point or por-
tion of the path. If you click on a spoke of a wheel, you'll
select the portion of the spoke's path you clicked on.
• With the Selection tool. Click on an object with the
Selection tool to select the largest group containing that
object. In our example, it would be the entire bicycle.
• With the Group Selection tool. Use the Group Selec-
tion tool to select sub groupings progressively. The first
click with the Group Selection tool selects a single object.
The next click selects the entire spoke path. The third
click selects the entire wheel, the fourth selects both
wheels, and the fifth, the entire bicycle.
Note: To grab and move objects selected with the Group
Selection tool, you must change to one of the other selec-
tion tools or, during a selection, drag without releasing the
mouse. When you continually click with the Group Selec-
tion tool, you're always selecting the next group up.
If you can't group.
If you try to group
objects and get the
message "Can't make
a group of objects
that are within different groups":
• Make certain that the objects to
be grouped are fully selected.
• Cut the objects.
• Use Paste in Front or Paste in Back
to paste the objects back into
your image in exactly the same
location (see introduction to
the Layers chapter). While the
objects are still selected, select
Object > Group.
Efficient ungrouping
To select an object in a group,
you don't need to Ungroup it;
just use the Group Selection
tool. To group, select the objects
and -G (Mac)/Ctrl-G (Win). If
you want to Ungroup, select the
group with the Selection tool and
Ungroup once for each level of
grouping you wish to remove. For
the example of the bicycle (given
in the "Grouping and Selecting"
section), selecting the entirebicy-
cle and pressing -Shift-G (Mac)/
Ctrl-Shift-G (Win) the first time
would remove the last group-
ing applied; typing it four times
would remove all the groupings.
Chapter 1 Illustrator Basics 13
Using the Average command to align selected
endpoints vertically, then choosing Both
Joining warning
If you get an error message that
you can't join points, do the
following—in addition to the
conditions in the warning:
• Make sure you've selected only
two points (no third stray point
selected by mistake).
• Make sure you've selected end-
points, not midpoints.
• See the "Finger Dance" lessons in the Zen chapter.
This section includes a variety of selection exercises.
JOINING & AVERAGING
Two of Illustrator's most useful functions are Average
and Join (both found under the Object > Path menu or in
the Context-sensitive menu). Use the Average function
to sandwich two endpoints on top of each other. Use the
Join function to join two endpoints. The Join function
will operate differently depending on the objects.
Averaging also allows you to align selected points. (To
align objects, use the Align palette.) To average, use the
Direct Selection tool or Lasso tool to marquee-select or
Shift-select any number of points belonging to any num-
ber of objects. Then use the Context-sensitive menu (for
the Mac hold the Control key, use the right mouse but-
ton for Windows) to average, aligning the selected points
horizontally, vertically, or along both axes.
• If the two open endpoints are exactly on top of each
other, then Join opens a dialog box asking if the join
should be a smooth point or a corner. A smooth point is
a curved Bezier anchor that smoothly joins two curves,
with direction handles that always move together; a cor-
ner point is any other point connecting two paths. Once
you've clicked OK in the dialog box, both points will fuse
into a single point. However, keep in mind that a true
smooth point will only result if the proper conditions
exist: namely, that the two curves that you are trying to
join have the potential to join together into a smooth
curve. Otherwise, you'll get a corner point, even if you
chose Smooth in the dialog box.
• If the two open endpoints are not exactly on top of
each other, then Join will connect the two points with
a line. If you try to Join two points to fuse as one but
don't get a dialog box, then you've merely connected your
points with a line! Undo ( -Z for Mac/Ctrl-Z for Win-
dows) and see "Averaging & Joining in one step" below.
14
Chapter 1 Illustrator Basics
• If you select an open path (in this case, you don't need
to select the endpoints), then Join closes the path.
• If the two open endpoints are on different objects,
then Join connects the two paths into one.
• Averaging & Joining in one step. Use the following
keyboard command: -Option-Shift-J (Mac)/Ctrl-Alt-
Shift-J (Win); there is no menu equivalent! The command
forms a corner when joining two lines, or a hinged corner
when joining a line or curve to a curve.
WORKING WITH PALETTES
Most of Illustrator's palettes are accessible via the Win-
dow menu. Each palette is unique, but they all share com-
mon features:
• You can regroup tabbed palettes to save desktop
space. Reduce the space that palettes require by nesting
the palettes together into smaller groups. Grab a palette's
tab and drag it to another palette group to nest it. You can
also drag a tab to the bottom of a palette to dock the pal-
ettes on top of one another.
• You can make most palettes smaller or larger. If
there's a sizing icon in the lower right corner, click and
drag it to shrink or expand the palette. Palettes also have
pop-up menus offering additional options. If a palette
contains more options, it will have an double arrow to
the left of the palette name. Click on the arrows to cycle
through the various options. Click the square (minimize
box), on the top of the title bar to shrink all palettes
docked or nested together down to just title bars and
tabs. Click the right square again, and the palettes will
re-expand. Double-click the title bar to cycle through the
states, from maximum to collapsed.
• Reset palettes easily. Certain palettes (including the
Character, Paragraph and OpenType palettes) contain a
Modes of expansion for docked palettes; lower
figure is Gradient palette, alone and expanded
Typing units into palettes
To use the current unit of mea-
surement, type the number, then
Tab to the next text field or press
Return. To use another unit of
measurement, follow the number
with "in" or " (inch), "pt" (point),
"p" (pica), or "mm" (millimeter)
and Return. To resume typing into
an image text block, press Shift-
Return. You can also enter calcula-
tions in palettes: for example, if
you were specifying the size of a
rectangle, you could type 72 pt
+ 2 cm for the height. Illustrator
would then perform the calcula-
tion and apply the result. Partial
calculations work as well; if you
type + 2, Illustrator will add two
of whatever unit you're currently
using. Try it!
Chapter 1 Illustrator Basics
15
Teeny tiny palettes
Double-click the tab name or the
space to the right of the tab, or
single-click the double arrows on
the tab to cycle through expand-
ed and collapsed views of the
palette. Only palettes with more
options have double arrows on
the palette tab.
The original objects
Objects selected (the bottom of the Toolbox in-
dicates different strokes and fills are selected)
Palette be gone!
If you want to get rid of the
various palettes on your screen
temporarily, it's easy to do. Just
press Tab to hide the palettes and
Toolbox; then press Tab when you
want to toggle them into view
again. If you'd rather keep the
Toolbox visible and just hide the
other palettes, use Shift-Tab.
Reset Palette command that allows you to easily restore
the palette's default settings.
• You must select your object(s) before you can make
changes. With your objects selected, you can click on
the label or inside any edit box in the palette containing
text and begin typing. If you're typing something that has
limited choices (such as a font or type style), Illustrator
will attempt to complete your word; just keep typing until
your choice is visible. If you're typing into a text field, use
the Tab key to move to other text fields within the palette.
IMPORTANT: When you've finished typing into palette
text fields, you must press Return (or Enter). This action
signals the application that you are ready to enter text
somewhere else or to resume manipulating your artwork.
• There are many ways to fill or stroke an object. Focus
on a selected object's fill or stroke by clicking on the Fill
or Stroke icon near the bottom of the Toolbox, or toggle
between them with the X key. To set the stroke or fill to
None, use the / (slash) key. Set your color by: 1) adjusting
the sliders or sampling a color from the color ramp in the
Color palette, 2) clicking on a swatch in the Swatches pal-
ette, 3) sampling colors from the color picker, or 4) using
the Eyedropper to sample from other objects in your file.
In addition, you can drag color swatches from palettes to
selected objects or to the Fill/Stroke icon in the Toolbox.
• Objects, groups of objects, or layers can have
appearances associated with them. Appearance attri-
butes are properties that affect the look of an object with-
out affecting its underlying structure—such as strokes,
fills, transparency and effects. The term appearance is
used in this book to refer to an object's appearance attri-
butes collectively. All objects have an appearance, even if
that appearance is no stroke and no fill.
• You can apply a graphic style to an object, group of
objects, or a layer. The total sum of applied character-
Chapter 1 Illustrator Basics
16
istics can be saved as a style in the Graphic Styles palette.
Graphic styles are "live" (updatable) combinations of fills,
strokes, blending modes, opacity, and effects. For details
about working with the Graphic Styles palette, see the
Live Effects & Graphic Styles chapter, especially the chap-
ter introduction and the "Scratchboard Art" lesson.
GRAPHING & CHARTING
Using the Graph tools, Illustrator allows you to create
charts and graphs in nine different styles. If you're new to
charts or graphs, be sure to read "Creating Graphs" in the
"Advanced Drawing Chapter" of the User Guide. Please
keep in mind that the purpose of a chart or graph is clear
communication of numeric information as a visual aid.
A properly selected chart design will accomplish this. If
you create a lot of charts or graphs, look into a specialty
graphic application. Before you begin, set a default chart
or graph style by double-clicking on a Graph tool and
choosing the style you want. To produce your graph, use
the Graph tool you've chosen as you would use the Rect-
angle tool: either click-drag to create a rectangular object
from corner to corner, or click with the tool to numeri-
cally specify the dimensions of your graph.
After you establish the dimensions, the Graph dia-
log box opens, awaiting input of numeric data. Enter
labels and numbers by highlighting the desired cell and
typing into the entry line along the top. Tab to enter text
in the next horizontal cell. See the PDF version of the
User Guide on the application CD to determine how you
should enter data for the specific graph style you want.
Note: It's very easy to enter text into the wrong field by
mistake; so be meticulous. Mistakes are difficult to correct.
Alternatively, you can import data that's been saved
in Tab-delineated text format. Most word processing,
spreadsheet, or charting programs let you save or export
data and labels as text, separated by Tabs and Returns.
To change the style of an existing graph, select the
entire graph with the Selection tool and double-click on
the current Graph tool in the Toolbox. Choose another
Copying stroke and fill
It's easy to copy your stroke and
fill settings from one object to
the next. Select an object with
the stroke and fill you want your
next object to have. Illustrator
automatically picks up those at-
tributes, so the next drawn object
will have the same stroke and fill
as the last one selected.
Note: This doesn't work for type.
To update or replace a graphic style throughout
the entire document, select an object and apply
the style you want to modify and update. With
the object selected, make changes to its appear-
ance and choose Replace Graphic Style from the
Appearance palette menu. The name of the style
will display next to the replace command. This
will globally update all objects using this named
graphic style. To change the name of the style,
clouble-click on the proxy in the Graphic Styles
palette and rename it.
Chapter 1 Illustrator Basics 17
Maintaining "graphness"
If you want to continue to work
with your graph numerically,
don't, under any circumstances,
Ungroup your graph; it will make
numerical data changes impos-
sible. To avoid losing the special
graph formatting, follow these
special precautions:
• Using the Selection tool, select
the entire graph for changes in
style. With the graph selected,
1) Double-click the current
Graph tool to change the graph
style; or 2) Choose Object >
Graph >Data to change numeric
data; or 3) To apply shaped de-
sign elements, see "Customizing
graph designs" in this section.
• Use the Group Selection tool to
select a category of data, then
restyle or recolor as desired.
• Use the Direct Selection tool
to select individual elements to
change their styling.
• Use the Direct Selection tool or
Type tool to select and change
individual text elements.
When you do Ungroup
Once you're completely finished
numerically adjusting a graph,
you may wish to delete some
objects. Select the graph (with
the Selection tool) and Ungroup
( -U/Ctrl-U). Once ungrouped,
the objects are no longer part of
a graph and can be deleted.
style and click OK. Be aware that some types of charts
may not be translatable to all other formats.
To re-access a graph's numeric data, save your graph,
then select your graph with the Selection tool and choose
Object > Graph > Data. There is no Cancel command in
data entry, but you can always use Undo ( -Z/Ctrl-Z).
Customizing graph designs
Being able to insert design elements into a graph is a
snazzy—but overused—aspect of the graphing feature.
Illustrator allows you to define graph designs, which can
be used as substitutes for rectangular column bars and
line markers. For instance, using the "scaling" option, you
can take a heart-shaped design and incorporate it into a
graph by stretching (vertically scaling) or enlarging (uni-
formly scaling) the heart to the correct height. A variant
of this technique allows you to define a portion of the
heart to be scaled (called the "Sliding" Design). By using
the "repeating" option, you can stack the hearts on top of
each other until they reach the correct height.
Here's how to define a graph design element. After
creating the object(s) you wish to use as a design ele-
ment, select the object(s) and choose Object > Graph >
Design. In the dialog box, click the New Design button;
your creation will appear in the list of designs with the
name "New Design." To give it a distinctive name, make
sure "New Design" is selected in the list, click the Rename
button, and name your design. To apply the design, use
the Selection tool to select a previously created graph,
and choose Object > Graph > Column. In the Graph Col-
umn dialog box, select your new design from the list
and choose from the options that determine how your
design will be adapted to the column size (e.g. whether it's
scaled or repeating, how many units each incidence of the
design represents, how fractions of that amount are repre-
sented, etc.) You can also use design elements to serve as
"markers" (indicating plotted points) for line and scatter
graph styles. Follow the above procedure to create and
name your design, select your graph, and choose Object >
Chapter 1 Illustrator Basics18
Graph > Marker to select the previously defined design
that will be used as a marker in the graph.
Some of the nation's busiest newspapers and periodi-
cals say that even though they may finish their charts and
graphs in Illustrator, most use other programs to translate
numbers into graphics. Fortunately for those using Mac
OS X, documents from other programs (like Microsoft
Excel) can be easily converted to Illustrator documents
using OS X's built-in support for PDF format. The Print
dialog box in many OS X applications contains a Save as
PDF button, and/or a Preview option that can be saved as
a PDF. The resulting PDF can be opened in Illustrator.
TRANSFORMATIONS
Moving, scaling, rotating, reflecting, and shearing are
all operations that transform selected objects. Begin by
selecting what you wish to transform. If you don't like
a transformation you've just applied, use Undo before
applying a new transformation—or you'll end up apply-
ing the new transformation on top of the previous one.
In Illustrator, you can perform most transformations
manually (see the Zen of Illustrator chapter for exercises),
through a dialog box for numeric accuracy, with the Free
Transform tool (as an effect), or with the Transform pal-
ette. In addition, you can select more than one object and
choose Object >Transform >Transform Each. Illustrator
remembers the last transformation you performed, stor-
ing those numbers in the appropriate dialog box until you
enter a new transform value or restart the program. For
example, if you previously scaled an image and disabled
Scale Strokes & Effects, the next time you scale (manually
or numerically), your strokes and effects won't scale.
The bounding box
The bounding box should not be confused with the
Free Transform tool (which allows you to perform addi-
tional functions; see discussion of the Free Transform
tool below). The bounding box appears around selected
objects when you are using the Selection tool (solid
Defining a design; using the heart to create col-
umns vertically scaled; uniformly scaled; forming
a repeating design
Using graphs as templates
Designers use the Graph tools
to plot points and generate the
scale and legend. They create an
illustration that uses the place-
ment of the graph as a guide. See
the Brushes & Symbols chapter for
help in locking the graph for use
as a template.
Eve Elberg used this bar graph as a template
to plot the basic points in this illustration.
For the glowing effect, she used blends and
gradients (see the Blends, Gradients & Mesh
chapter)
Chapter 1 Illustrator Basics
19
Updating graphs with symbols
Try defining a graph design ele-
ment using a symbol. Then you
can update your graph easily just
by redefining the symbol. (See
the Brushes & Symbols chapter for
more info on symbols.)
Moving complex images
If the Transform palette fails,
create a proxy rectangle closely
surrounding the objects you wish
to move. Move the proxy in one
motion to the desired location,
and delete. To apply the move,
select your objects, double-click
the Selection arrow, and click OK.
Free Transform variations
With the Free Transform tool you
can apply the following transfor-
mations to selected objects:
• Rotate—click outside the
bounding box and drag.
• Scale—click on a corner of the
bounding box and drag. Op-
tion-drag/Alt-drag to scale
from the center and Shift-drag
to scale proportionally.
• Distort—click on a corner han-
dle of the bounding box and
-drag/Ctrl-drag.
• Shear—click on a side handle of
the bounding box and -drag/
Ctrl-drag the handle.
• Perspective—click on a corner
handle of the bounding box
and -Option-drag/Ctrl-Alt-
Shift-drag.
arrow), and can be useful for quick moving, scaling,
rotating, or duplicating objects. With the bounding box,
you can easily scale several objects at once. Select the
objects, click on a corner of the bounding box and drag.
To constrain proportionally while scaling, hold down the
Shift key and drag a corner. By default, the bounding box
is on. Toggle it on/off via the View > Hide/Show Bound-
ing Box, or switch to the Direct Selection tool to hide the
bounding box. To reset the bounding box after perform-
ing a transformation so it's once again square to the page,
choose Object >Transform > Reset Bounding Box.
Note: Holding down the Option or Alt key when you
transform with the bounding box will not create a dupli-
cate, but will instead transform from the center.
Moving
In addition to grabbing and dragging objects manually,
you can specify a new location numerically: Double-click
the Selection arrow in the Toolbox or use the Context-
sensitive menu to bring up the Move dialog box (select
the Preview option). For help determining the distance
you wish to move, click-drag with the Measure tool the
distance you wish to calculate. Then immediately open
the Move dialog box to see the measured distance loaded
automatically, and click OK (or press Return/Enter).
The Free Transform tool
The Free Transform tool can be an easy way to transform
objects once you learn the numerous keyboard combina-
tions to take advantage of its functions. In addition to
performing transformations such as rotate, scale, and
shear, you can also create perspective and distortions
(see the Tip "Free Transform variations" at left, and the
"Distort Dynamics" lesson in the Drawing & Coloring
chapter). Bear in mind that the Free Transform tool bases
its transformations on a fixed center point that can not be
relocated. If you need to transform from a different loca-
tion, use the individual transformation tools, Transfor-
mation palette, or the Transform Each command.
Chapter 1 Illustrator Basics20
The Transform palette
From this palette, you can determine numeric trans-
formations that specify an object's width, height, and
location on the document and how much to rotate or
shear it. You can also access a palette pop-up menu that
offers options to Flip Horizontal and Vertical; Transform
Object, Pattern, or Both; and to enable Scale Strokes &
Effects. The current Transform palette is a bit odd: You
can Transform Again once you've applied a transforma-
tion, but the information in the text fields is not always
retained. To maintain your numeric input, apply trans-
formations through the transform tool's dialog box, dis-
cussed on the next page.
Individual transformation tools
For scaling, rotation, reflection, and shearing of objects
with adjustable center points, you can click (to manually
specify the center about which the transformation will
occur), then grab your object to transform it. For prac-
tice with manual transformations see the Zen chapter.
Each transformation tool has a dialog box where you can
specify: the parameters for the tool, whether to transform
the object or make a copy with the specified transform
applied, and whether to transform just the objects and/or
any patterns they may be filled with. (For more on trans-
forming patterns see the Drawing & Coloring chapter.)
Here are three additional methods you can use to
apply the individual transformation tools to objects:
• Double-click on a transformation tool to access the
dialog box. This allows you to transform the objects
numerically, originating from an object's center.
• Option (Mac)/Alt (Win)-click on your image with a
transformation tool to access the dialog box that allows
you to transform your objects numerically, originating
from where you clicked.
Transform again
Illustrator remembers the last
transformation you performed—
from simple moves to rotating a
copy of an object. Use the Con-
text-sensitive menu to repeat the
effect (Transform Again).
Transform palette modifiers
To modify your transformations
when you press Return, hold
down Option (Mac)/Alt (Win) to
transform and make a copy. Click
a point in the Transform palette
to select a reference point.
Scaling objects to an exact size
• The Transform palette way: Type
the new width or height in the
palette and press -Return
(Mac)/Ctrl-Return (Win). (Click
the lock icon in the palette to
scale proportionately.)
• The proxy way: Create a proxy
rectangle the size of your
image, then from the upper left
corner of the proxy, Option/Alt-
click to create another rectangle
in the target dimensions. With
your proxy selected, click with
the Scale tool in the upper left
and grab-drag the lower right
to match the target. (Hold Shift
to scale in only one dimension.)
Delete these rectangles, select
you objects, double-click the
Scale tool and apply settings.
Chapter 1 Illustrator Basics 21
An exception to the rule!
Usually, you should scale an image
before placing it in a page layout
program. But, if the file contains
brushes, patterns, gradients, and
gradient meshes, you may want to
scale the final image after you've
placed it. (For best results, be sure
the Transform Pattern Tiles and
Scale Strokes & Effects options are
enabled in General Preferences.)
Don't forget about your edges!
Unlike Photoshop's Hide Edges
command, once you hide your
edges (View>Hide Edges or -H/
Ctrl-H), they stay hidden for all
subsequent paths and selections.
If you are trying to select a path
or draw a new object, but the an-
chor points and path are not vis-
ible, try toggling to Show Edges.
To change your object
To make changes to a path, click
on it with the Direct Selection
tool. Then make adjustments by
selecting and dragging anchor
points, direction points, or the
curve itself. If you select an object
but don't see direction handles:
• Deselect it, then try again.
• If you're in Preview mode, be
sure to click on the path itself or
switch to Outline mode.
• Check Object Selection by Path
Only in the General Preferences.
• Enable View >Show Edges.
Note: Only curves have handles!
• Click-drag on your image with a transformation tool
to transform the selected objects, originating from the
center of the group of selected objects.
Reshape & Shear
The Reshape tool is quite different from the other trans-
formation tools. Start by Direct-selecting the paths you
wish to reshape. If you use the Selection tool by mistake,
the entire path will move, and if you haven't made any
selection you won't be able to use the tool. Next, choose
the Reshape tool from the Scale tool pop-up menu. With
this tool, marquee or Shift-select all points you wish
to affect, then drag the points to reshape the path. The
selected points move as a group, but instead of all moving
the same distance, as they would if you dragged with the
Direct Selection tool, the points closer to the cursor move
more, and the ones farther away move less.
You will also find the Shear tool hidden within the
Scale tool. It's used to slant objects.
Transform Each
To perform multiple transformations at once, open the
Transform Each dialog box (Object >Transform >Trans-
form Each). You can perform the transformations on
several objects or on a single one. Additions to this dialog
box include the ability to reflect objects over the X and
Y axes, and to change the point of origin. If you want to
apply a transformation, but you think you might want to
change it later, try a Transformation Effect (see the Trans-
parency & Appearances chapter).
WORKING SMART
Saving strategies
Probably the most important advice you'll ever get is to
save every few minutes. Whenever you make a substantial
change to your image, use File > Save As and give your
image a new name.
It's much more time-efficient to save incremental
versions of your image than it is to reconstruct an earlier
22 Chapter 1 Illustrator Basics
version. Back up your work at least once a day before you
shut down. Just think to yourself, "If this computer never
starts up again, what will I need?" Develop a backup
system using CDs, DVDs, Zip or Jaz drives, DATs (digital
audio tapes), or opticals so you can archive all of your
work. Use a program such as Dantz's Retrospect to auto-
matically add new and changed files to your archives.
Get in the habit of archiving virtually everything,
and develop a file-naming system that actually helps
you keep track of your work in progress—simplifying
your recovery of a working version if necessary. A good
system involves three components. First, start with a
meaningful description of your current image ("hearts
compound"), and second, add a numerical notation of the
version ("1.0"). Keep your numbering system consecu-
tive, regardless of the label, throughout the entire project.
Keep the number in a decimal sequence when you make
an incremental change to your image ("1.1,1.2,1.3 ").
Change to the next numeric sequence when you make
a substantive change ("2.0"). Don't start numbers at 1.0
for each phase of the project or you'll be unable to figure
out which came first: "Sky 1.0" or "Heart 1.0." Instead,
if labels are "Sky 1.0" and "Heart 4.0," then the creation
order is self-explanatory. Third, add a suffix to indicate
its file type (.ai for Illustrator, .psd for Photoshop, .eps
for Encapsulated PostScript file). Also, make sure that
you keep all files in a named and dated folder that distin-
guishes them from other projects. (For saving in other
formats see "Image Formats" later in this chapter.)
Multiple Undos
Some programs give you only one chance to undo your
last move. Illustrator CS allows "unlimited undos," which,
practically speaking, means that the number of undos
you can perform is limited only by how much memory
you have available.
Even after you save a file, your Undos (and Redos)
will still be available (as long as you haven't closed and
reopened the file), making it possible for you to save the
The selected area indicated in red
Direct-selected and dragged wing objects
For Eric Hess's "Soaring Hearts Futons" logo, he
roughly Direct-selected, then with Reshape he
marqueed as indicated above, and dragged
The Transform Each dialog box
(Object > Transform > Transform Each)
Chapter 1 Illustrator Basics 23
Faster Saves
You may know that Illustrator's
native format is PDF, which means
you can view Al files in Acrobat
Reader. But the PDF content in
Al files adds to their size, which
means it takes Illustrator longer
to save the files and open them. If
you're working on a large file and
saving often (as you should), save
times might be slow. When you
save as an Al file, you have the
option to "Create PDF Compatible
file" or turn it off (on by default)
in the Illustrator Options dialog
box that pops up after the Save
dialog box. Turning this option
off reduces file size and speeds up
saves. But it's important to note
that some applications (like In-
Design and LiveMotion) read the
PDF content in Illustrator files. So
if you're going to import your art-
work into those programs, leave
PDF compatibility on.
How many Undos are left?
The status line in the lower left
corner of your image window is
actually a pop-up menu that lets
you choose to display Current
Tool, Date and Time, Number of
Undos, or Document Color Profile.
Easter egg alert: Try Option-click-
ing (Mac) or Alt-clicking (Win) the
menu for some other fun choices.
current version, undo it to a previous stage and save it,
or continue working from an earlier state. But once you
close your file, your undos are cleared from memory, so
they won't be available the next time you open the file.
You can also revert the file to the most recently saved
version by choosing File > Revert, but you can't undo a
revert, so you'll want to be careful.
Note: Not all operations are undoable. For example,
changes to Preferences aren't affected by Undo.
CHANGING YOUR VIEWS
Preview and Outline
To control the speed of your screen redraw, learn to make
use of the Preview mode and the Outline mode (formerly
Artwork mode), which can be toggled in the View menu.
In Preview mode, you view the document in full color; in
Outline mode you see only the wire frames of the objects.
Illustrator CS also adds a great new way to control the
speed and quality of your screen redraws when using the
Hand Tool. In the Units & Display Performance area of
Preferences, there's a Display Performance slider for the
Hand Tool that lets you set your own preferred balance
between speed and quality of redraws.
New View
New View (View > New View) allows you to save your
current window viewpoint, remembering also your zoom
level and which layers are hidden, locked, or in Preview
mode. Custom views are added to the bottom of the View
menu to let you easily recall a saved view. You can rename
a view, but the views themselves are not editable—if you
need to make a change to a view, you'll have to make a
New View.
New Window
Illustrator gives you the ability to display different aspects
of your current image simultaneously. This allows you to
separately view different Proof Setups, Overprint or Pixel
Previews, and zoom levels. You can resize them, have
24
Chapter 1 Illustrator Basics
edges hidden or visible, or hide or lock different layers in
Preview or Outline (see the Layers chapter and "Hide/
Show Edges" later in this chapter). Most window configu-
rations are saved with the file.
Window controls
There are three small icons at the very bottom of the Tool-
box. One is always selected; this is the default in which
Illustrator displays your file window. Starting at the far
left, choose from Standard Screen mode (desktop show-
ing around the edges of your file), Full Screen mode with
menu bar (file window visible, but confined to the center
of the screen with no desktop showing; you can access
your menu bar) and Full Screen mode (same as above, but
you cannot access your menu bar). You can toggle among
the views by pressing the "F" key.
ZOOMING IN & OUT
Illustrator provides many ways to zoom in and out.
• From the View menu. Choose Zoom In/Out, Actual
Size, or Fit in Window.
• With the Zoom tool. Click to zoom in one level of mag-
nification; hold down the Option (Mac)/Alt (Win) key
and click to zoom out one level. You can also click-drag to
define an area, and Illustrator will attempt to fill the cur-
rent window with the area that you defined.
• Use the shortcut (Mac)/Ctrl (Win) for Zoom. With
any tool selected, use -hyphen (Mac)/Ctrl-hyphen
(Win)—think "minus to zoom out"—and + (Mac)/
Ctrl+ (Win)—think "plus to zoom in".
• Use Context-sensitive menus. With nothing selected,
Control-click (Mac) or use the right mouse button (Win-
dows) to access a pop-up menu so you can zoom in and
out, change views, undo, and show or hide guides, rulers,
and grids.
Interrupting Preview
You don't have to wait for Il-
lustrator to finish redrawing the
Preview before you pull down the
next menu or perform another
task. You can interrupt redraw-
ing the preview and go to Outline
mode by typing (Mac)/Ctrl
(Win)-, period, or the Esc key for
Windows.
Two views
Illustrator allows you to preview
precise anti-aliasing in Pixel
Preview mode, and allows you to
preview overprints and traps in
Overprint Preview mode.
Zoom shortcuts while typing
Press /Ctrl + spacebar to zoom in
or -Option/Ctrl-Alt + spacebar to
zoom out even while typing.
Grabbing and dragging the ruler corner to re-
center the ruler origin (zero point)
Clicking inside the ruler and dragging into your
image to create a vertical or horizontal guide
Chapter 1 Illustrator Basics 25
The Navigator palette & views
Where did the window go?
If you have many file windows
open, simply select the file you
want to bring to the front from
the list of files at the bottom of
the Window menu.
• Navigator palette. With the Navigator palette, you can
quickly zoom in or out and change the viewing area with
the help of the palette thumbnail (see Tip "The Navigator
palette & views" at left).
SHOW/HIDE CHOICES
From the View menu, you can show and hide several
items, such as grids, guides, smart guides, transparency
grid, edges, Artboard, and page tilings.
Rulers, Guides, Smart Guides, and Grids
Toggle Illustrator's Show/Hide Rulers, or use the
-R / Crtl-R shortcut, or use the Context-sensitive menu
(as long as nothing in your document is selected). The
per-document ruler units are set in Document Setup.
If you want all new documents to use a specific unit of
measurement, change your preferences for Units (Prefer-
ences > Units & Display Performance).
In some previous versions of Illustrator, the ruler
origin (where 0,0 is) was in the lower right corner of the
image. In Illustrator CS, the location of the ruler origin
depends on the tiling options you've chosen in the Setup
area of the Print dialog box. Generally, if you've chosen
either Single Full Page or Tile Full Pages, the origin will
be in the lower left corner. To change the ruler origin,
grab the upper left corner (where the vertical and hori-
zontal rulers meet) and drag the crosshair to the desired
location. The zeros of the rulers will reset to the point
where you release your mouse (to reset the rulers to the
default location, double-click the upper left corner).
But beware—resetting your ruler origin will realign
all patterns and affect alignment of Paste in Front/Back
between documents (see the Layers chapter for more on
Paste in Front/Back).
To create simple vertical or horizontal ruler guides,
click-drag from one of the rulers into your image. A guide
appears where you release your mouse. You can define
guide color and style in General Preferences. Guides auto-
matically lock after you create them. To release a guide
Chapter 1 Illustrator Basics26
The Navigator palette (always in
Preview mode) offers many ways
to zoom in and out of documents:
• Double-click the mountain icons
along the bottom edge of the
palette window to increase or
decrease the amount of zoom in
200% increments.
• Hold the (Mac)/Ctrl (Win)-key
drag to marquee the area in
the palette thumbnail that you
want to zoom into or out from.
• Enable View Artboard Only to
keep your view limited to the
Artboard area. This is helpful
if you are working on a large
document with objects on the
pasteboard that are distracting
your focus.
Change the color of the border
around the thumbnail in the View
Options dialog box (found in the
Navigator palette pop-up menu).
Note: Navigator might slow down
files with a lot of text objects. The
Navigator creates a thumbnail view
of the document; every time you
zoom or scroll, the Navigator must
redraw its thumbnail. Unless you
need to view the Navigator palette,
close it.
quickly, -Shift-double-click/ Ctrl-Shift-double-click
on the guide. You can lock and unlock guides with the
Context-sensitive menu in Preview mode. You should
note that locking or unlocking guides affects every open
document. If you have too many guides visible in your
document, simply choose View > Guides > Clear Guides.
This only works on guides that are on visible, unlocked
layers. Hiding or locking layers retains any guides you
have created (see the Layers chapter). To learn how to cre-
ate custom guides from objects or paths, see the "Varied
Perspective" lesson in the Layers chapter.
Smart Guides can be somewhat unnerving when you
see them flash on and off as you work. However, with
practice and understanding of each option, you'll be able
to refine how to incorporate them into your work flow.
Illustrator also has automatic grids. To view grids, select
View > Show Grid, or use the Context-sensitive menu.
You can adjust the color, style of line (dots or solid), and
size of the grid's subdivisions from Preferences > Guides
& Grid. As with guides, you can also enable a snap-to
grid function. Toggle Snap to Grid on and off by choosing
View > Snap to Grid (see Tip "Glorious grids" at right).
IMPORTANT: If you adjust the X and Y axes in Prefer-
ences > General > Constrain Angle, it will affect the drawn
objects and transformations of your grid, as they will fol-
low the adjusted angle when you create a new object. This
works out well if you happen to be doing a complicated
layout requiring alignment of objects at an angle.
Transparency Grid & Simulate Color Paper
Now that Illustrator can use transparency, you might
want to change the background of the Artboard to the
transparency grid, or better yet, to a color. Both the trans-
parency grid and simulated color paper are non-printable
attributes.
To view the transparency grid, select View > Show
Transparency Grid. Change the grid colors in the Trans-
parency panel of the Document Setup dialog box. If you
change both grid colors to the same color, you can change
Zippy zooming
Current magnification is displayed
in the bottom left corner of your
document. Access a list of per-
centages (3.13% to 6400%) or Fit
on Screen from the pop-up, or
simply select the text and enter
any percentage within the limit.
Glorious grids
Customize your, grids in Illustrator.
Select a grid style and color.
• View>Show Grid, use the Con-
text-sensitive menu or (Mac)/
Ctrl (Win)-' apostrophe.
• Toggle SnaptoGrid on and off
from the View menu or use the
shortcut (Mac)/Ctrl (Win)-
Shift-' apostrophe.
• Set the division and subdivision
for your grid in Preferences >
Guides & Grid and choose either
dotted divisions or lines and the
color of those lines.
• To toggle the grid display in
front or in back of your art-
work, check or uncheck the
Grids In Back checkbox (Prefer-
ences>Guides & Grid).
• Tilt the grid on an angle by
choosing Preferences >General
and then changing the Con-
strain Angle value.
Note: The Constrain Angle af-
fects the angle at which objects are
drawn and moved. (See the Draw-
ing & Coloring chapter on how to
adjust it for creating isometrics.)
Chapter 1 Illustrator Basics 27
Understanding Smart Guides
There are a multitude of Smart
Guide preferences. Here's what
each one does:
• Text Label Hints provide infor-
mation about an object when
the cursor passes over it—help-
ful for identifying a specific
object within complicated art-
work.
• Construction Guides are the
temporary guidelines that help
you align between objects and
anchor points.
• Transform Tools help with trans-
formations.
• Object Highlighting enables the
anchor point, center point, and
path of a deselected object to
appear as your cursor passes
within a specified tolerance
from the object. This can be
very useful for aligning objects.
For best alignment results,
select an object's anchor point
or center point.
Note: Smart Guides will slow you
down when working on very large
files. Also, you can't align using
Smart Guides if View > Snap to Grid
is enabled.
Bounding box and Hide edges
When you toggle to Hide Edges
and have Show Bounding Box
enabled (both in the View menu),
the bounding box will remain vis-
ible while the anchor points and
paths of objects will be hidden.
the white background to a color (see the Transparency
chapter).
Hide/Show Edges
If looking at all those anchor points and colored paths
distracts you from figuring out what to do with selected
objects in your current window, choose View > Hide/
Show Edges to toggle them on or off. (Or use the shortcut:
-H/Crtl-H.) Once you hide the edges, all subsequent
path edges will be hidden until you show them again.
Hide/Show Edges is saved with your file.
COLOR IN ILLUSTRATOR
Consumer-level monitors, which display color in red,
green, and blue lights (RGB), cannot yet match four-color
CMYK (cyan, magenta, yellow, black) inks printed onto
paper. Therefore, you must retrofit the current technol-
ogy with partial solutions, starting with calibrating your
monitor.
Some programs (such as the Apple Display Calibrator,
found in the Apple Displays control panel) provide some
degree of control over the way your monitor displays col-
ors. ColorSync (Mac) and Kodak Digital Science Color
Management (Windows) are the two main systems. The
colors displayed on the screen will be closer to the color
you output if you follow a few key steps (see the User
Guide for more information on using color management).
In addition to color management through software
calibration, methods of hardware calibration are available
that actually adjust the beams of the cathode-ray tube
emitting the RGB lights. Generally, the larger the moni-
tor, the more likely the colors will vary in different areas
of the screen. Monitor color is also affected by the length
of time your monitor is on and the ambient light in your
workroom.
In order to produce an accurate proof (if a printing
press is your target), Illustrator needs to support printing
profiles for both composite (your printer) and separation
(the final printing device) ICC(M) printers. Illustrator
Chapter 1 Illustrator Basics28
now supports ICC(M) profiles for both types of printing,
although it is still not possible to emulate the separation
printer on the composite printer. It is, however, possible
to use Illustrator for proofing directly on your screen and
for printing a more accurate proof to your printer when
you are not soft proofing to the screen. If you are creating
art for placement into QuarkXPress, InDesign, or Page-
Maker, there is no application-level color management
module currently supporting the EPS file format. Always
consult with your pre-press house and run a proof prior
to printing an entire job.
Working in RGB or CMYK
Illustrator offers you the flexibility of working and print-
ing in either RGB or CMYK color. This is a mixed bless-
ing, because the printing environment cannot accurately
capture vibrant RGB colors. As a result, the RGB colors
are usually muddy or muted when printed. If your final
artwork is going to be printed, work in CMYK!
Work in an RGB color space when creating artwork
that will be displayed on-screen, or to simulate a spot
color (such as a day-glo color) on your printer. (For more
on working in RGB, see the Web & Animation chapter.)
Single color space
When you open a new document, you select a color model
(or color space). Illustrator no longer allows you to work
in multiple color spaces at the same time. If you work in
print, always check your files to make certain they are
in the appropriate color model before you output. The
document's color model is always displayed next to the
file name, on the title bar. You can change the document's
color mode at any time by choosing File > Document
Color Mode > CMYK Color or RGB Color.
Opening legacy documents (documents created with
older versions of Illustrator) with objects containing
mixed color spaces will invoke a warning asking you
to decide which color space (RGB or CMYK) the docu-
ment should open in. Currently, linked images are not
CMY (Cyan, Magenta, Yellow) subtractive col-
ors get darker when mixed; RGB (Red, Green,
Blue) additive colors combine to make white
Whiter whites/blacker blacks
If your whites or blacks seem to
be taking on an undesirable color
cast, look to your color manage-
ment system as the possible
source of the problem. (See the
User Guide for more details on
color management in this version
of Illustrator.) Also, check your
Proof Setup or preview modes.
Converting RGB to CMYK
Although Illustrator can make
conversions from RGB to CMYK
(and vice versa), File >Document
Color Mode>CMYK/RGB, such
conversions may result in undesir-
able color shifts. Consult the User
Guide, your service bureau, and/
or printer for detailed directions
based on your job specifications.
Chapter 1 Illustrator Basics
29