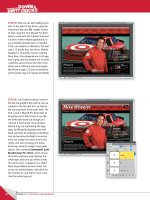
Essential Blender- P4 pps
Bạn đang xem bản rút gọn của tài liệu. Xem và tải ngay bản đầy đủ của tài liệu tại đây (1.19 MB, 30 trang )
There are a number of ways to find out information about the objects you have selected, but the
simplest way is through using the Transform Properties panel. Within the 3D view, pressing the
N-key brings up a panel that contains information about the Active Object. There are other
screens in Blender that use the same hotkey to bring up a properties panel for selected objects,
like the Ipo Window and NLA Editor. Pressing the N-key again will hide the panel.
Figure OMD.13: The Transform Properties panel.
The panel shows the current location, rotation, scale and overall dimensions of the object. In
addition to simply showing information about the object, the panel can also be used to change
those values. Each of the controls is a spinner, allowing you to either LMB click on the value
itself to type a new one, LMB click on the right and left arrow to raise and lower the value, or to
LMB click and drag inside of it.
In addition, any of the values can be locked by LMB clicking on the grayed-out lock icon beside
its spinner. Locking a value on the transform panel will prevent the object from being moved,
rotated or scaled along that axis. For example, if you had an object like a sliding door that was
supposed to only move left to right, you could lock both its z and y axes so that it could only be
transformed along the x (left/right) axis.
Tip:
N-key toggles the Transform Properties panel in the 3D
view.
Transforming Objects
Objects can be transformed ("transformed" is an overall term for moving, rotating and scaling) in
a number of ways. As seen above, location, rotation and scale can be changed by entering values
in the transform properties panel. Of course, this being an interactive 3D application, these
transformations can also be accomplished visually - and much more intuitively - in the 3D view.
Transforming with Hotkeys
Often, the fastest method for transforming objects is to use the hotkeys G (for Grab/Move), R (for
Rotate) and S (for Scale, or Size). When you use the transform hotkeys, the selected object (or
objects) enters a transformation mode that allows you to move it freely with the mouse. If at any
time during a transform you want to cancel the operation, click the RMB. When you have the
object transformed as you like, clicking the LMB accepts the operation.
Tip:
G-key lets you translate (move) an object. R-key lets you
rotate an object. S-key lets you scale (resize) an object.
While you are transforming an object, it is often useful to limit the change to a certain axis. For
example, if you are trying to make an egg shape from a sphere, you would only want to scale the
sphere along, say, the z axis, creating an oblong, egg-like shape.
This sort of transform limitation is accomplished with the X or Y or Z-keys, used while the object
is in transformation mode. So, to move an object only along the Z axis, you would press the G-
key, followed by the Z-key. Using Shift with the axis keys does the opposite, allowing an object
to transform along the other two axes. For example, pressing the G-key, followed by Shift-Z,
would allow the object to move freely in along the X and Y axes, while not allowing vertical (Z
axis) movement.
Tip:
X, Y, or Z-key constrains transformation to each axis.
Shift-X, Y or Z constrains transformation within each
plane.
Of course, there is more than one way to do this in Blender. Pressing the G-key (or R or S), then
beginning a transformation and clicking the MMB will constrain the object's transformation
along whichever axis you have begun the motion. Clicking the MMB again while still in
transformation mode removes the constraint, giving you complete freedom of movement again.
There is one further way to limit transformation with these hotkeys, and that is to press the axis
key (X, Y or Z) not once, but twice. The second key press causes the object to use what is called
the "alternative transformation space". Which alternative space is used is defined in the header of
the 3D Window, and can also be set by the Alt-Spacebar hotkey.
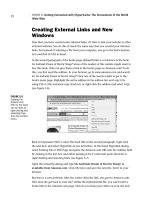
Image:Dummy.png
Figure OMD.14: The Alternative Transformation Space menu on the 3D header.
In the case of a rotated cube, transforming the cube with the G-key followed by the Z-key will
move it directly upwards in the scene. However, with the alternative transformation space set to
"Local", a second press on the Z-key will move the cube vertically in relation to its current
orientation.
Figure OMD.15: A cube is shown moving away from the origin, constrained in both Global and
Local spaces.
Tip:
Pressing one of the axis constraints (X, Y, Z-key) twice
during transformation constrains the transform to each axis
in the alternative transformation space, which is local space
by default.
Transformation Center
When rotating or scaling objects, Blender, by default, causes the rotation or resizing to occur
relative to the object's center. Pressing the R-key on a cube, then moving the mouse will cause
the cube to rotate in place, around its own center. But what if you want to use a different center
point for rotation or scaling? Blender can be set to use several different methods for determining
what to use as an object's transformation center, all accessible in the "Rotation/Scaling Pivot"
menu in the 3D view header.
Figure OMD.15.1: The Pivot Point menu on the 3D header.
Although each option in this menu is useful under certain circumstances, the two most
commonly-used are "Bounding Box Center" (the default), and "3D Cursor". In fact, each of these
options has a hotkey attached to it: Comma-key (",") for Bounding Box Center, and Period-key
(".") for 3D Cursor. It is not unusual to see an experienced modeler or animator rapidly switching
between these two modes when making transformations.
Figure OMD.15.2: Two cubes, the left rotating around its Bounding Box Center, the right
rotating around the 3D cursor.
The "Bounding Box" referred to above is just the outer limits of an object.
Figure OMD.16: Several objects with their bounding boxes showing. Note how the cube's
bounding box is just itself.
Of course, you already know how to set the location of the 3D Cursor (LMB). A word of warning
when using the 3D Cursor as the pivot point for a rotation or scale transformation: make sure you
set the 3D Cursor from two different views (like front and top). If you set it in front view alone, it
will only set the 3D Cursor's x and z coordinates, leaving its y coordinate unaltered. If that y
coordinate is drastically offset from the object you are transforming, it can lead to unexpected
(read: bad) results.
Tip:
Change the rotation and scaling pivot point through the
menu on the 3D header, or with the hotkeys Comma (for
Bounding Box Center) and Period (for 3D Cursor).
Transform Manipulators
In many cases, using the G/S/R hotkeys for transformation can be the most efficient method.
However, it is not for everyone, and Blender provides tools that can accommodate many different
working styles.
The graphical transformation manipulators give users direct, mouse-based access to all of the
transformation controls. The manipulator is turned On by default, and can be switched on and off
either through its button on the 3D View header, or by choosing "Enable/Disable" from the Ctrl-
Spacebar menu in the 3D View.
Figure OMD.17: The Manipulator controls on the 3D header.
There are separate manipulators for movement (called translation), rotation and scaling. Each
manipulator functions in a similar fashion: simply LMB-drag on the manipulator handle that
corresponds to the axis you wish to transform. The rotation manipulator in particular gives
excellent visual feedback, showing a "pie chart" representation of the current rotation.
Figure OMD.17.1: The three different types of manipulators.
Like many things in Blender, the transform manipulator icons on the 3D header can be Shift-
clicked to build a selection, allowing you to show and use up to all three manipulator types
(move, rotate and scale) at once.
One more interesting aspect of the visual feedback that manipulators give is that locking
transformation in the Transformation Properties Panel (N-key, discussed earlier) actually
removes that axis from the manipulator, making it impossible for you to use the manipulator to
transform along a locked axis.
Tip:
The manipulators provide direct, one-click access
transformations.
We encourage you to become comfortable with the hotkeys G, R and S and the axis constraints
(x, y, and z) before you start to use the manipulators. The manipulators are generally considered
to be more intuitive, and in certain circumstances (like moving vertices relative to their normals
during mesh editing and rolling and rotating bones in armatures for character animation) are
perhaps the best way to accomplish the task.
If you find that the manipulators are not to your taste, you can get them out of the way (they can
cause trouble with selections in cluttered environments) by disabling them with their button on
the 3D Header or through the Ctrl-Spacebar menu. Don't forget they are there, though - they may
come in handy someday. Whatever the case, make sure that you try out both methods of working
so you can find the one that suits you best.
Clearing Transforms
Sometimes, it is helpful to completely remove any movement, rotation or scaling from an object.
While this can be accomplished by entering zeros in the Location and Rotation sections of the
Transform Properties panel and ones in the Scaling spinners, there is a simpler way. Adding the
Alt key modifier to the transformation hotkeys clears that particular transformation. Alt-G returns
the object to coordinates (0,0,0). Alt-R clears all rotations, and Alt-S sets any scaling that has
been done to an object back to 1.
Tip:
Alt-G clears all translations. Alt-R clears rotations. Alt-S
clears scaling.
Applying Transforms
There are cases when you may have transformed an object by changing its scale and orientation
in order to get it into a beginning state for animation or other work. Perhaps you imported a
model of a car from an Internet repository, and it was of a completely different scale and rotation
than the rest of your scene. Using the S and R-keys, you adjusted the model to fit in with
everything else. When it was done, your Transform Properties panel looked like this:
Figure OMD.18: The Transform Properties panel.
You could proceed with the construction of the scene and eventually animate just like this.
However, it would be nice when animating to start with a "clean slate," especially for rotations.
Pressing Ctrl-A and LMB clicking through the popup that reads "OK? Apply scale and rotation"
will reset both Scale and Rotation values to their defaults (ones for Scale and zeros for Rotation),
while leaving the object exactly as it appeared before.
Tip:
Ctrl-A applies scaling and rotation to an object, resetting
them to their base values without transforming the object.
Duplicating Objects
There are two ways to duplicate objects in Blender, each suited to a slightly different task. The
first is the standard duplication which is accomplished by selecting an object (or objects) and
pressing Shift-D. This creates a full, independent copy of the object, including any data, such as
mesh data, that might be linked to it. The new object can be edited without affecting the original.
Tip:
Shift-D creates a complete duplicate of the selected object.
The other method of duplication uses Alt-D instead, and creates a new object whose data is still
linked to that of the original. For example, a duplicate of a Mesh object that was created with Alt-
D will actually share the mesh with the original. If the Mesh of either object is modified in Edit
mode, the change will show up in both objects, in real time. One excellent use for this method of
duplication is for lighting setups: creating a series of Alt-D duplicated lamps would allow you to
adjust the lighting intensity on one lamp and have that change used for all of the duplicates.
Copies made with Alt-D are referred to as "linked duplicates".
Tip:
Alt-D creates a duplicate of the selected object, but shares
any object data (mesh shape, lamp settings, etc.) with the
original.
Parenting
Many graphics applications allow you to create parent-child relationships between objects. In a
parent-child relationship, any transformations that you perform on the parent also happen to the
child. In fact, when transforming a parent, the child is transformed as though the parent and child
together were a single larger object, with the parent's center being the overall center of the object.
For example, rotating a parent will cause not only the parent to rotate, but the child to move in a
curve through space, as though they were connected by a rigid bar. Directly transforming a child
object still works as you would expect, but it has no effect on the parent.
Figure OMD.18.1: When the central parent object is rotated, the child follows as though it were
part of the parent.
To create a parent-child relationship, select more than one object, press Ctrl-P, then LMB to
accept the "OK? Create parent" prompt. The active object becomes the parent, and any other
selected objects become the children. A dashed line appears between parent-child sets, allowing
you to visually keep track of which object is related to which.
To clear a parent-child relationship, select the child object and press Alt-P.
Perhaps the best way to get the hang of parent-child object relationships is to create two Blender
objects, give them a parent-child relationship with Ctrl-P, then begin transforming them.
Tip:
Ctrl-P causes the active object to become the parent, and
any other selected objects to become the children in a
parent-child object relationship. Alt-P removes the parent-
child relationship.
Layers
Complex scenes can quickly become cluttered with mesh objects, lamps, placeholders and
guidelines. When that happens (well, actually before that happens) it becomes useful to sort your
scenes into groups of objects that can be selectively hidden when they are not needed. This kind
of grouping is best accomplished in Blender through Layers.
Figure OMD.19: The layer buttons.
The layer buttons on the 3D header indicate which layers are visible and which are hidden. Layer
selection follows the same rules as object selection. Using LMB on a layer makes it the current
selection, clearing all others, meaning that objects on that layer become visible while all others
are hidden. To make several layers visible at once, you build a layer selection by holding down
Shift while using the LMB. Shift-LMB more than once on the same layer button will toggle it on
and off.
An object may be placed on a layer either by clicking the appropriate layer button in the Draw
panel of the Object Buttons (F7), or by pressing the M-key in the 3D View to bring up a layer
button pop up.
Figure OMD.19.1: The same set of buttons is used whenever dealing with layers.
Tip:
Which layers an object appears on is set from the Draw
panel, or in the M-key popup in the 3D view.
Objects can be set to appear on more than one layer. For example, in the case of a farm scene, the
farmhouse itself could reside on all layers, while fencing, grass, a barn and animal objects could
each reside on their own layers. Having the farmhouse appear in all layers can provide you with a
good reference for positioning all the other objects.
In addition to directly clicking on the layer buttons, layers can be activated and set through
hotkeys. The keypad numbers 1 through 9 and 0 (which functions as 10 here) are the equivalent
of clicking on layer buttons 1 through 10, activating the appropriate layer. Holding Shift with 1
through 0 has the same effect as is it does when clicking: it builds and subtracts from the layer
setting. Alt-1 through Alt-0 access layers 11 through 20. The "set to layer" M-key popup can also
be controlled with the same number keys if you wish.
Sometimes, you may be performing an operation with the keyboard in Blender, and suddenly,
your entire Scene seems to disappear. Often, it may be that you have accidentally pressed one of
the number keys on the main keypad, telling Blender to show only objects on that layer. If your
Scene disappears, don't panic - check the layer buttons on the 3D header. It could be that
everything is all right, but simply hidden.
Tip:
Layers can be selected and set through the keypad numbers
1-9 and 0, and Alt-1 through Alt-0.
Chapter 3: Object Manipulation and Basic
Animation
By Roland Hess
In this tutorial, you'll learn about object creation, manipulation and organization in Blender, as
well as different techniques of object-level animation. In this tutorial, we will be make a model of
a molecule that will allow us to experiment with different methods of creating motion through
animation.
Use Ctrl-X to begin a clean session of Blender.
At this point, it wouldn't be a bad idea to review the interface elements for changing the 3D view
(Numpad-1, 3, and 7 for front, side and top view; Numpad-5 to toggle into and out of perspective
mode; Z-key to toggle shaded view, as well as the MMB and scroll wheel to freely zoom and
rotate the view. If you haven't already worked through Chapter 2: The Basic Interface, now
would be a good time to do so). Once you're done getting your 3D legs, its time to start creating
your molecule.
Figure 1.01: The default 3D view, with a cube, a lamp and a camera.
First, you must get rid of the default cube. If your zooming about in the previous paragraph has
resulted in the default objects being off screen, press the Home key and Blender will auto-zoom
the view so that all objects are visible again. Now, press Numpad 7 to move into a top view.
Select the default camera by placing the cursor over it and pressing the Right Mouse Button
(RMB). Many new users are thrown off by this unconventional selection method (many programs
use the Left button for selection). Learn, right now, that RMB selects in the 3D view. When you
RMB the camera, you will see that its outline is highlighted in light pink. This pink outline
indicates that the object, in this case the camera, is selected.
RMB the cube and you will see that it is now outlined in pink (selected), while the camera has
returned to its original state. Selection in Blender is accumulated like most other programs with
which you are familiar, with the Shift key. With the cube still selected, hold down the Shift key
and RMB the camera. Keep holding the Shift key and RMB select the default lamp. Your
selection has been extended to all three objects: the cube, camera and lamp.
But you don't want all of that to be selected. You only want the cube selected.
Figure 1.01.11: The default scene with everything selected.
Figure 1.01.12: The default scene with nothing selected.
Press the A-key. A-key toggles selection on and off for everything. Pressing A-key once selects
everything (you can think of it as 'select All'). Pressing it again deselects everything. Do you want
to make sure that nothing is selected? Press A-key twice.
Of course, when you just pressed the A-key, everything most likely deselected. Why? Well,
remember that by Shift-RMB clicking you had already selected all the objects in the Scene. So, if
nothing is selected, you're where you need to be. If instead everything is selected, press the A-key
one more time. Get the current scene to a point where nothing is selected. Now, you'll learn one
final method of selection.
With your cursor over the 3D window, press the B-key, and watch the cursor become the target
of moving crosshairs. These moving guidelines indicate that you are in Border Select mode.
Simply LMB click and drag across the 3D window, and any object that falls within the area of the
box shape that your dragging creates becomes selected when you release the mouse button.
Unlike RMB selection, border select is always cumulative and will add to your previous
selection. If you want to use border select to deselect objects, then drag with either the MMB or
RMB instead of the LMB.
You might want to try using the B-key and border selecting objects for practice, clearing your
selection each time with the A-key.
When you're done, use the selection method of your choice to select only the default cube.
Press the X-key to delete the cube. You will be prompted "OK? Erase selected object(s)". Click
the LMB to accept this and erase the cube. Over time, you will probably find that the combined
motion of X-key/LMB to delete an object will become second nature, and that you'll probably
forget there's a click-through confirmation there.
Tip:
Right Mouse Button selects in the 3D view. Shift-RMB
builds selection. A-key toggles between Select All and
Select None. B-key enters border select mode. Dragging
with LMB selects. Dragging with RMB/MMB deselects.
X-key deletes selected objects.
Undo
But wait, you didn't want to remove that cube! Why? Well, let's pretend for a second that the
cube was in fact a head model that you've just worked on for eight hours straight without saving
once. And you accidentally deleted it.
Ctrl-Z, like in many other programs, is Undo. Press Ctrl-Z to bring the cube you just deleted back
from the great digital beyond. Ctrl-Shift-Z is the Blender equivalent of Redo, sending the cube
back to the netherworld. Unlike other programs, however, there is no menu entry for Undo or
Redo, so learning to use the hotkey combination for this one is essential.
The 3D Cursor
Figure 1.02: The 3D cursor.
The 'aiming sight' that you've seen hanging around in the 3D view is the 3D cursor. The 3D
cursor is where new objects and items will appear when created in the 3D workspace. It can also
be used to control how objects rotate and scale.
If you're like most new Blender users, you've mistakenly LMB clicked somewhere in the 3D
view, hoping to select something (and select is RMB, remember?). Using LMB in the 3D view
sets the location of the 3D Cursor. Before you begin creating your first model, we'd like to make
sure that the 3D Cursor is in the center of the 3D world.
Go into front view (Numpad 1) and LMB as close to the center of the intersection of the blue and
red (z and x) axes as you can. The 3D Cursor jumps to the position of your click. Now go into
side view (Numpad 3) and LMB once again at the intersection of the blue and green (z and y)
axes, if the 3D Cursor isn't already there. Use Numpad 1 to return to a front view. Great. Now
you're set.
We wanted you to practice using the LMB to set the 3D Cursor in the previous example, but
there's an even easier way to return the 3D Cursor to the origin. Shift-C snaps the 3D Cursor to
the center of the 3D world.
Tip:
LMB in the 3D view sets the location of the 3D Cursor
Shift-C centers the 3D Cursor in the global workspace.
Adding Objects
With the cursor over the 3D window, bring up the toolbox by pressing the Spacebar.
Figure 1.03: The toolbox, about to add an Icosphere.
As you can see in the illustration, there are many different kinds of objects you can add to the 3D
view, but for this chapter we're going to focus on the Mesh category. From within the Add-
>Mesh section of the toolbox, choose Icosphere, then click OK when a pop-up says 'Subdivision:
2". You've just added a mesh sphere object to the 3D world, and it has been created at the
location of the 3D cursor.
Note: If you've done this, but don't see anything resembling a sphere on your screen, you may be
zoomed in or out too far, or have panned the view too far off to one side. Try pressing the Home
key, which will auto-zoom and pan the view to show all available objects.
The icosphere will most likely be a lavender or purple color with yellow edges covering its
surface. This is because new objects are created in Edit Mode, which allows you to change the
mesh's shape and geometry. You won't be dealing with that yet, but you can learn about it in
Chapter 4. For now, get out of Edit Mode by pressing the Tab key. When you do it, the mesh
lines disappear, the faces turn gray, and the entire object is given a light pink outline. If you'll
recall from earlier in the chapter, that pink outline indicates that the icosphere you just created is
currently selected.
So, adding a new object does three things:
1. Creates a new object wherever the 3D Cursor is;
2. Puts the object in Edit Mode (if such a thing is possible for that object. For example,
Lamps do not have an Edit Mode);
3. And automatically selects the new object.
Just to give you enough examples to work with, your sample atom will have three protons and
three neutrons in its nucleus, so you're going to need to create a few more objects. If you just
added several more with the spacebar toolbox right now, they would all be created at the location
of the 3D cursor, meaning that they would be created in the same space as your first icosphere.
Of course, this is a virtual world, so doing this won't hurt anything. It would only make it difficult
to keep track of how many objects you have and where they are. You already know how to set
the location of the 3D Cursor, so go ahead and reposition it away from the first sphere.
Figure 1.04: The 3D cursor positioned away from the icosphere.
LMB a short distance away from the original icosphere. Then, use the spacebar toolbox to add
another icosphere. Don't forget to hit Tab afterward to get out of the default Edit Mode.
Getting Oriented
Before you start moving things around, you need to get oriented in 3D space. Use Numpad-1 to
make sure you are looking at the scene from the front. Notice the little icon in the lower left of
the view: a vertical blue line labeled Z that meets a horizontal red one labeled X.
Figure 1.05: The axis icon in the 3D view.
This icon is to help you remember that the x axis runs left to right, and the z axis runs bottom to
top. Press Numpad-3 to move into side view, and you will see that the icon still shows the z axis,
but now also shows the y axis. The y axis runs from back to front.
If you're completely new to 3D, a little explanation is in order. An 'axis' is a convenient way to
refer to a direction. 3D objects are located by finding their location along each axis. A more
detailed explanation is in the discussion section of this chapter if you should need it.
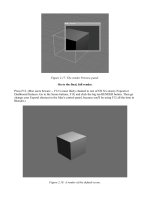
Image:Dummy.png
Figure 1.06: [no text]
In the illustration, the object is said to be located at (3,2,4), with each of those numbers
corresponding to its location along the respective axes (x,y,z).
So, in Blender, the axes are: X: left/right Y: back/front Z: bottom/top
This will have to become second nature to you, and, if you use the keyboard shortcuts for object
manipulation and again later for modeling, it will.
Moving, Rotating and Scaling Objects
There are three main things you can do to an object once it has been created. Move it around,
rotate it, and change its size (usually called scaling). All together, these kinds of changes are
referred to as "transformation".
RMB on one of the icospheres to select it.
To rotate the icosphere, press the R-key. Now start moving the mouse in circles around the
icosphere. You will see it rotate to follow your motion. When you're done, RMB will cancel this
rotation mode, returning the sphere back to its original orientation. Try it again, by hitting R-key,
then rotating, but this time, end the motion with the LMB instead. The sphere leaves rotation
mode, but now stays wherever it was when you hit LMB.
This is the main workflow for manipulating objects and using tools in the 3D workspace
throughout Blender. A hotkey (R in this case), followed by a mouse motion, ending either with
RMB to cancel and return to the previous state, or with LMB, which confirms the change.
Since the R-key triggered a rotation, any guesses as to how to go about scaling an object?
S-key, followed by mouse motion, ending in either LMB (accept) or RMB (cancel). Try scaling
one of the spheres. Select it, use S-key, and make it grow to twice the size of the other. LMB to
accept the change.
Figure 1.07: The original sphere, scaled to double its size.
Now, use the same procedure to try to return that icosphere close to its original size. If things get
really messed up, remember that you can use Ctrl-Z to Undo.
And finally, movement. In Blender, although R rotates and S scales, it is the G-key that moves
objects. G stands for what? Most Blender users think of it as "Grab". If it helps you to remember
it, you can too.
Select your icospheres and use the G-key to move them around. Once again, RMB cancels the
movement, resetting things to how they were before you pressed G, while LMB accepts the
movement.
Now, let's put your knowledge of the axes (x,y,z) to work in conjunction with these basic motion
tools.
Using the MMB, click-drag in the 3D window to rotate the view until you have something similar
to this (it doesn't really matter as long as you have a nice angled view).