Microsoft Word 2010 Product Guide ppsx
Bạn đang xem bản rút gọn của tài liệu. Xem và tải ngay bản đầy đủ của tài liệu tại đây (2.62 MB, 66 trang )
Microsoft Word 2010
Product Guide
Introduction .................................................................................................................................................... 1
Word 2010: At-a-Glance ................................................................................................................................ 2
Give your text the power to jump off the page ....................................................................................................... 2
Create visually compelling documents ....................................................................................................................... 2
Get easier access to the right tools, at the right time ........................................................................................... 3
Save time and simplify your work ................................................................................................................................. 3
Redefine working together on documents ............................................................................................................... 4
Work when and where you choose .............................................................................................................................. 5
Word 2010: A Closer Look ............................................................................................................................. 6
Text Effects New! .............................................................................................................................................. 6
OpenType Typography New!....................................................................................................................... 7
Picture Editing Tools New and Improved! ............................................................................................... 8
Insert Screenshot New! ............................................................................................................................... 10
Additional Office Themes Improved! ..................................................................................................... 10
Additional SmartArt Graphics Improved! ............................................................................................. 12
Shapes and Shape Effects Improved! ..................................................................................................... 13
Ribbon Improved! .......................................................................................................................................... 14
Microsoft Office Backstage View New! ................................................................................................. 15
Navigation Pane Improved! ....................................................................................................................... 16
Find Tools Improved! ................................................................................................................................... 17
Recover Unsaved Versions New! ............................................................................................................. 18
Paste with Live Preview New! ................................................................................................................... 19
OneNote Linked Notes New!.................................................................................................................... 20
Contextual Spell Checker Improved! ...................................................................................................... 21
Co-authoring New! ....................................................................................................................................... 22
Streamlined Communications New! ...................................................................................................... 24
Protected View New! ................................................................................................................................... 25
Trusted Documents New! .......................................................................................................................... 26
Accessibility Checker New! ........................................................................................................................ 26
Language Tools Improved! ........................................................................................................................ 27
Translation Tools Improved! ...................................................................................................................... 28
Share through Communicator ―14‖ New! ............................................................................................ 28
Content Controls Improved! ...................................................................................................................... 29
Word Web App New! .................................................................................................................................. 30
Word Mobile 2010 Improved! .................................................................................................................. 32
Power User Tips ............................................................................................................................................ 33
Where to Find It............................................................................................................................................ 39
Version Comparison ..................................................................................................................................... 46
FAQ................................................................................................................................................................. 53
Requirements\Disclosures........................................................................................................................... 62
If you are one of the millions of people worldwide who rely on Microsoft® Word to create
documents for business, school, or personal projects, you might have some expectations for
what you’ll find in this new version. Whether you want faster, more convenient ways to
accomplish everyday tasks or new technologies that help take your results to a new level,
Microsoft Word 2010 has the tools you need.
Create better documents that help your important content shine.
Work more quickly and easily when working with others on documents.
Access and edit your documents when it’s convenient for you—online or on the road—
rather than being tied to your computer.
New and improved tools for formatting and managing documents make it easier than ever to
create incredible content. Working with others on documents no longer means waiting your
turn. And, you can access and work on your files where and when your best ideas occur.
Welcome to Word 2010—our most powerful, intuitive, and customizable release yet.
1
Today’s documents range from simple letters and lists, to forms, complex reports and papers
that used to require a professional print shop. But one thing is common to all of them—your
documents represent your ideas. That’s why you want them to be more than just words on
paper.
Word 2010 gives you the tools to create the professional, polished documents that help you
express yourself effectively.
Give your text the power to jump off the page
Effective document design is about helping you convey your important information. When you
need your text to be as powerful as your images, Word 2010 offers flexible and easy-to-use
tools that give new life to your words.
Apply impressive text effects—such as gradient fills and reflections—directly to the text
in your document, as easily as applying bold or underline.
Put a creative flourish on your documents by getting the most out of OpenType fonts.
New OpenType typography features provide support for ligatures, stylistic sets, and
more.
Create visually compelling documents
Whether good or bad, the colors, effects, and graphics in documents always get noticed. So, if
you’re not a graphic designer and you don’t have a lot of time to spend on the look of your
documents, how can you create a customized, well-crafted look? Word 2010 provides an array
of new and improved features that help you look like a design pro and help your documents
make the right statement every time.
Use new and improved picture editing tools—including professional-quality artistic
effects and advanced correction, color and cropping tools—and fine-tune the pictures in
your documents without the need for additional photo-editing programs.
2
Take advantage of more professionally-designed, customizable Office themes and
coordinating Word templates. Use themes to apply consistent colors, fonts, and graphic
formatting effects throughout all of your Microsoft Office 2010 documents in just a few
clicks.
Explore a wide selection of additional SmartArt graphics—including many new layouts
for organization charts and picture diagrams—to create inspiring graphics just by typing
a bulleted list.
Get easier access to the right tools, at the right time
New and improved features can help you be more productive, but only if you can find them
when you need them. Fortunately, the enhanced, customizable Ribbon in Word 2010 makes it
easy to uncover more commands so you can focus on the end product, not how to get there.
Want an easier time making sure the document you’re working on is finished and ready to
share? Wishing for a faster, more direct way to print something? The new Microsoft Office
Backstage™ view can help you achieve all of this and more. You can now more easily print,
share, and manage your documents, and customize your Word 2010 experience, all from one
convenient location.
Save time and simplify your work
No matter what type of documents you create, you want to focus on your content, not the tasks
associated with creating and managing documents. Word 2010 delivers new and improved tools
that simplify and save time at every step.
Find your way with the improved Navigation Pane with integrated Find tools in Word
2010. Jump to the right place in your document, easily rearrange content, and find what
you need quickly with a new results list and automatic hit highlighting.
Recover files that you closed without saving! You can now recover files after you
accidentally close without saving, even if you had never saved the document.
Save time and improve results with intuitive features such as the new Paste with Live
Preview and an improved Contextual Spell Checker. Getting it right the first time is
always faster than doing it over.
3
Keep your thoughts and ideas organized and accessible while planning and authoring
your document by using the new Linked Notes feature with Word 2010 and Microsoft
OneNote® 2010.
You may need to share documents with colleagues, classmates or friends, or perhaps you need
to work with others on a team project. Regardless, the complications and delays that can arise
when sharing or working together on content can be frustrating to say the least. That is, until
now. Word 2010 makes waiting your turn a thing of the past and gives you new and improved
tools that make sharing your work simple and hassle-free.
Redefine working together on documents
Word 2010 provides easy ways to bring people together. New and improved technologies help
break down barriers so you can share and collaborate more efficiently and effectively.
You can now edit the same document, at the same time, as other people in other
locations. 1 You can even communicate instantly as you work, directly from Word.2
Collaborate with confidence using new, improved and simplified security tools. For
example, the new Protected View helps you make informed decisions when opening
unknown files, before exposing your computer to possible vulnerabilities.
Break down language barriers with improved translation tools and language settings.
If your ideas, deadlines, and work emergencies don’t always occur conveniently when you are at
your desk, you are certainly not alone. Fortunately, Word 2010 gives you the power to get things
done when and where you want.
1
®
Co-authoring requires Microsoft SharePoint Foundation 2010 for business or a free Windows Live™ ID for personal use. Co-
authoring via Windows Live will become available in the second half of calendar year 2010.
2
Instant messaging requires one of the following: Microsoft Office Communications Server 2007 R2 with Microsoft Office
Communicator 2007 R2; Windows Live Messenger, or another instant messaging application that supports IMessenger. Voice calls
require Office Communications Server 2007 R2 with Office Communicator 2007 R2 or an instant messaging application that supports
IMessengerAdvanced.
4
Work when and where you choose
It’s easy to take your Word 2010 documents with you and stay on top of your work when you’re
on the go.
Microsoft Word Web App enables you to view a high fidelity version of your
documents and make light edits using some of the same formatting and editing tools
that are in Word 2010, from virtually any computer with a Web browser.3
Microsoft Word Mobile 2010 gives you a lightweight editor for your documents that’s
especially designed for easy use on your Windows phone.4
Whether you’re writing that career-making report, revising your term paper, working with a
volunteer team on the next big fundraiser, or getting things done on the run, Word 2010 makes
it easier to get what you need done more quickly, with more flexibility, and with better results.
3
Microsoft Office Web Apps require an appropriate device, Internet connection, supported Internet Explorer, Firefox, or Safari
browser, and either SharePoint Foundation 2010 for business or a free Windows Live ID for personal use. Editing in Word Web App
via Windows Live will become available in the second half of calendar year 2010. There are some differences between the features of
Office Web Apps and the Office 2010 applications.
4
An appropriate device is required. Some mobile functionality requires an Internet connection. Office Mobile 2010 is not included in
Office 2010 applications, suites, or Office Web Apps. It will be available at the general availability of Office 2010 on Windows phones
(Windows Mobile 6.5 or above). There are some differences between the features of Office Mobile 2010 and the Office 2010
applications.
5
Give your text the power to jump off the page
Text Effects New!
You already use graphics and images to call attention to important content in your documents.
Now, you can apply the same types of formatting that you use for those graphics and images
directly to document text. Unlike WordArt from earlier versions of Word, you apply text effects
to actual document text, so you can still edit and spell check that text and even add text effects
to paragraph, character, list, or table styles.
Available text effects include gradient fills, custom shadows, reflection, glow, soft edges, bevels
and more, as well as a range of preset gallery options that enable you to quickly apply a
coordinated set of effects.
Figure 1: Find the Text Effects
gallery in the Font group on
the Home tab.
Note: When you access the command labeled WordArt from the Insert tab in Word 2010, you
now get an editable text box within which you can use the same text effects discussed here.
These same effects are also available to any text in Microsoft PowerPoint® 2010 and to text in
6
graphics in Microsoft Excel® 2010. Text effects were introduced in PowerPoint and Excel in Office
2007 and are referred to as WordArt in those applications.
Quick Tip: For additional text effects that you do not see in the Text Effects gallery, click the dialog box
launcher icon in the Font group. At the bottom of the Font dialog box, click Text Effects to open a dialog
box that includes effects such as gradient fills, gradient lines, and 3-D bevels.
OpenType Typography New!
In Word 2010, it’s easy to make an impact with your text by taking advantage of the typography
capabilities in many OpenType fonts. For example, explore the OpenType typography features in
existing fonts such as Calibri, Corbel, and Cambria. Or try Gabriola, a new font in Office 2010
that offers a rich array of Stylistic Sets.
Word 2010 provides support for the following OpenType typography features:
Ligatures: Ligatures give your document the look of professional typesetting by
combining character pairs, as shown in Figure 2.
Figure 2: Standard
ligatures applied to text
in the Constantia font.
Stylistic Sets: Use stylistic sets to add flair to your documents, as shown in Figure 3.
Figure 3: Text in the Gabriola
font, using stylistic sets 1, 4,
and 7.
7
Alternate Number Forms and Number Spacing: Control the appearance and layout of
numbers in your text using number forms and number spacing alternatives, as you see in
Figure 4.
Figure 4: Number Forms and Number
Spacing applied to text in the Cambria font.
OpenType Kerning: When you apply the font kerning in Word that you already know,
Word 2010 now uses the OpenType values when available in the font for a more precise
result as specified by the font designer.
Note: Several OpenType typography features are also available in Microsoft Publisher 2010.
Create visually compelling documents
Picture Editing Tools New and Improved!
Word 2010 gives you the freedom to be your own graphic artist with a range of new and
improved tools for working with images.
Apply all new Artistic Effects, such as paint strokes, glass, pencil sketch, and pastels.
Grab only what you want from your image and leave the rest behind with the new
Remove Background tool.
Figure 5: An original image (top left) and the same image with the glow edges (center) and
glass (right) artistic effects applied, and with background elements removed (bottom). Picture
styles and effects are also applied to the top row of images to provide shapes, reflection,
gradient border, shadow, bevel, and 3-D rotation.
8
Explore new Sharpen and Soften correction tools along with improved Brightness and
Contrast.
Experiment with new color tools including Color Saturation and Color Tone, as well as an
improved Recolor tool.
Perfect your pictures quickly with an advanced cropping tool that enables you to crop to
a shape or to a selected aspect ratio, or to pan and zoom in on key image elements just
by dragging and resizing the picture within the crop area.
Figure 6: An advanced cropping tool displays your full image in shadow while you crop.
Quick Tip: Use Live Preview to save time when editing photos. Point to an option in the Correction,
Color, or Artistic Effects galleries to see the settings applied to your selected picture. And, if you don’t
see exactly what you want in the galleries, click … Options at the bottom of any of those galleries for a
dialog box that offers advanced formatting choices.
Note: The same new and improved picture editing tools are also available in PowerPoint 2010,
Excel 2010, and Microsoft Outlook® 2010.
9
Insert Screenshot New!
Want even more ways to add the impact of images to your documents? Take screenshots in
your other open windows directly from Word 2010. Or, select from a gallery of available
screenshots automatically populated by your open windows.
Note: The ability to take screenshots directly from Office 2010 programs is also available in
PowerPoint, Excel, Outlook, Publisher and OneNote.
Additional Office Themes Improved!
You want all your documents to have a consistent, professional look—but who has the time for
all that formatting? You do, because Office themes enable you to apply a coordinated set of
fonts, colors, and graphic effects to your entire document in just a couple of clicks.
Themes were introduced in Office 2007 for Word, PowerPoint, Excel, and Outlook, enabling you
to apply a consistent, professional look to all of your content. Office 2010 adds 20 additional
built-in, professionally-designed themes for a total of 40 built-in designs, as well as easy access
to many additional themes on Office.com. Customize or create your own themes for an
effortless way to implement your own personal or business branding, or use the designs
provided to quickly add impact to any content.
Figure 7: Find the Themes
group on the Page Layout tab
in Word.
10
Quick Tips:
In Word 2010, you can also apply theme effects or other theme fills to shapes. The other theme fills
available are the PowerPoint slide backgrounds from your theme—making it easy to coordinate all of
your Office 2010 documents. To access the fills that match your PowerPoint slide backgrounds, select
the shape to fill and then, on the Drawing Tools Format tab, in the Shape Styles group, expand the
Shape Styles gallery and then point to Other Theme Fills. (Note that these same fills are also
available to shapes in PowerPoint and Excel and were introduced in those programs in Office 2007.)
Word 2010 also includes several new, professionally-designed templates that coordinate with Office
themes. For example, create a new document based on the Adjacency Report template and then point
to different themes in the Themes gallery to see how the graphic elements in that template change,
as shown in Figure 8. Notice that shapes used as backgrounds on the first two pages of this template
use the slide background fills noted in the preceding tip. To access templates that are installed with
Word 2010, click the File tab to open the new Backstage view, click New and then click Sample
Templates.
Figure 8:
Original
Adjacency
Report template
(top) and,
clockwise from
top with Black
Tie, Austin,
Angles, and
Hardcover
themes applied.
11
Quick Tips: You can mix and match theme elements to create a custom look in no time. Select
separate theme colors, theme fonts, and theme formatting effects from their respective galleries on
the Page Layout tab, in the Themes group. Then, use the Save Current Theme option at the bottom
of the Themes gallery to save your selections as a custom theme that you can apply to content in
Word, PowerPoint, Excel, Outlook, and even Microsoft Access® 2010.
In addition to the 40 built-in themes available from the Themes gallery, explore the Office.com
category in that gallery and check it often—select themes appear automatically as they become
available.
Additional SmartArt Graphics Improved!
You know that a graphic can often help display your important points more effectively than just
text. That’s why it’s so important to choose the right type of graphic for your content and make
it look its best. Fortunately, Office 2010 adds dozens of additional SmartArt layouts for a total of
more than 130 different diagrams that you can create as easily as typing a bulleted list.
These popular graphics, introduced in Office 2007, make it possible for anyone to create truly
impressive diagrams. SmartArt layouts include a broad range of options from lists to process,
cycle, and relationship diagrams that can help you convey related ideas and non-linear concepts
with greater visual impact.
The new layouts added in Office 2010 include additional organization charts, picture diagrams,
and many more. You also get improved tools for working with picture diagrams, such as the
ability to easily add or replace images from within the text pane or replace selected images in
your diagram using the Change Picture Command on the Picture Tools Format tab.
Figure 9: The
Choose a SmartArt
Graphic dialog box,
available on the
Insert tab in the
Illustrations group.
12
Quick Tips:
When you insert or select a SmartArt graphic, the SmartArt Tools Design and Layout tabs become
available on the Ribbon. On the SmartArt Tools Design tab, find galleries of formatting effect styles
and color options that automatically coordinate with your theme. Also find the Layouts gallery on
that tab, from which you can select a different layout and just click to apply it to your selected
diagram. Content you’ve already added to your graphic automatically updates in the new layout.
When you insert a SmartArt graphic, a text pane automatically appears. Type in that text pane to
populate shapes in your graphic with text, press ENTER to add new shapes, and use the TAB and
SHIFT+TAB keys just as you do in a bulleted list, to promote or demote shapes or text within shapes.
Notice the Office.com category in the SmartArt dialog box. Check that category periodically for select
new layouts that are added automatically as they become available.
Note: SmartArt graphics are also available in PowerPoint 2010, Excel 2010, and Outlook 2010.
Shapes and Shape Effects Improved!
Word 2010 provides full support for Office Art. That means you now have many of the advanced
capabilities for working with shapes in Word that you have in PowerPoint and Excel. Select from
additional shape types and enjoy more tools, timesavers, and formatting flexibility. For example,
just select a shape and start typing to add text.
Additionally, you can apply the same formatting effects to shapes that you can apply to other
graphics in your documents, such as bevels, reflections, and soft edges. As with SmartArt
graphic styles and chart styles, shape styles now also coordinate automatically with your theme
fonts, colors, and effects.
13
Figure 10: The Shape Styles group
on the Drawing Tools Format tab
provides styles that automatically
coordinate with your active
document theme as well as a wide
selection of effects.
Quick Tips:
Try new keyboard shortcuts for working with shapes. Select the shape and then use SHIFT+ the arrow
keys on your keyboard to resize the shape. Or, hold the ALT keys while you press left or right arrow
keys to rotate a shape. Add CTRL to these key combinations to resize or rotate in smaller increments.
Also new to Word 2010, check out the Selection Pane. Find this pane on the Home tab, in the Editing
group or on the Drawing Tools Format or Picture Tools Format tabs, in the Arrange group. the
Selection Pane enables you to easily select, rename, reorder or hide graphics in your document.
Expand the Shape Styles gallery for the option Other Theme Fills, which enables you to apply the
PowerPoint slide backgrounds from your theme as shape fills. See the information on Office themes
earlier in this guide for more detail and examples.
Get easier access to the right tools, at the right time
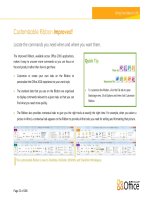
Ribbon Improved!
Locate the commands you need when you want them and where you want them. The improved,
customizable Ribbon, available in all Office 2010 applications, replaces traditional menus and
toolbars to give you a more personalized work experience. It’s designed to help you more easily
find and use the full range of features that Word provides—so that you can get more done in
less time.
Create your own tabs or customize built-in tabs on the Ribbon to personalize the Word 2010
experience to your work style.
14
The standard tabs that you see on the Ribbon are organized to display commands relevant
to a given task, so that you can find what you need more quickly.
The Ribbon also provides contextual tabs to give you exactly the right tools for the task. For
example, when you click in a table, contextual tabs appear on the Ribbon to provide easy
access to all the features you need for working with that table.
Figure 11: Contextual tabs automatically display when you need them.
Microsoft Office Backstage View New!
On the left edge of the Ribbon you see the File tab. Just click that tab for an all-access pass that
makes it easier than ever to manage your files and customize your Word experience.
The new Backstage view replaces the traditional File menu to provide a single location for all of
your document management tasks. For example:
When you first open Backstage view, you’re on the Info tab. From this one location, you
can manage document protection options, view and edit file properties, inspect the
document for proprietary information you may not want to share, and much more.
From the Save & Send tab in Backstage view, you can send your document as a Word
2010 attachment, or as a PDF or XPS file. You can also publish your document as a blog
post or save the document to an online location for access to incredible new
collaboration features discussed later in this guide.
The Print tab, shown in Figure 12, provides a new, integrated print experience with a full
page Print Preview right alongside all of the print options you need.
15
Figure 12: The new
integrated Print
environment
available from
Backstage view.
Quick Tip: Check out the Recent tab in Backstage view for lists of both recently accessed files and
recently accessed locations. Pin files or locations to that tab to move them to the top and keep them
easily accessible. In addition, you can remove a recently used file or location by right-clicking the list item
and then clicking Remove from list..
The Ribbon helps you create your content. Backstage view helps you manage it.
Save time and simplify your work
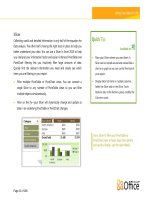
Navigation Pane Improved!
The improved Navigation Pane in Word 2010 (formerly called the Document Map) transforms
the document navigation user experience, providing a visual representation of the heading
structure of your document.
Using the Navigation Pane, you can do the following:
Browse headings to quickly find your place within a document and just click to go to that
location.
Drag and drop to quickly and easily rearrange headings and the content beneath them.
Locate where someone else is currently editing in the document, or where their most
recent changes were.
16
Figure 13: Drag and drop headings in the improved Navigation Pane to quickly rearrange
document content.
Find Tools Improved!
The improved Find experience is now seamlessly integrated in the Navigation Pane. Word 2010
automatically searches as you type the term you’re looking for, visually highlighting all matches.
The new results view in the Navigation pane shows a quick preview of all search
matches—click any preview to jump to that point in the document.
The headings view highlights the areas in the document in which results appear.
The thumbnails view filters to show you just the set of pages that contain a search result.
From the Navigation Pane, you can also browse the document by object type, including
graphics, tables, equations, footnotes, endnotes, and comments.
The familiar Find and Replace dialog box is still available for more advanced searches
and Replace tasks.
17
Figure 14:
The
improved
Find tools,
integrated
into the
Navigation
pane, include
the new
search results
pane shown
here.
Quick Tip: Use the familiar CTRL+F shortcut to activate the Search Document box in the Navigation
pane. To access the Find and Replace dialog box, click the arrow on the right edge of the Search
Document box and then click Advanced Find. Or, press CTRL+H to open the Find and Replace dialog
box to the Replace tab and CTRL+G to open that dialog box to the Go To tab.
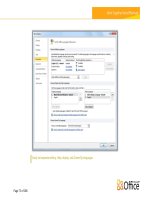
Recover Unsaved Versions New!
We’ve all done it. You work for a while, get the content just right, and then close the document
without saving. Maybe you thought the save prompt was for a different file that you didn’t want
or maybe you were just distracted while closing the file. The result is the same—your work and
the time you spent to create it have been lost. Well, not anymore!
Expanding on the AutoRecover capabilities that you may know from earlier versions of Microsoft
Office, Office 2010 now recovers versions of files that you close without saving.5 Easily access
and manage recovered documents right from the Info tab in Backstage view, as shown here.
5
Recovering available unsaved documents and autosave versions requires you elect to save AutoRecover information. To keep an
autosave version until your next editing session you must also elect to keep the last autosaved version when you close without
saving. To access these options, in Backstage view click Options and then click Save.
18
Figure 15: Access
recovered versions
of your documents
on the Info tab in
Backstage view,
under the Versions
heading.
You can recover drafts of documents that were never saved. Find this option in
Backstage view, on the Info tab, under the Manage Versions button.
Also access up to the last five autosave versions of your previously saved active
document from the Info tab in Backstage view. By default, the last autosave version
remains available temporarily if you close the document without saving.
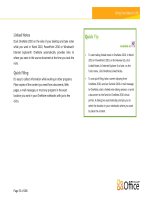
Quick Tips:
Need to quickly access other content in the folder where your active document is stored? In
Backstage view, on the Info tab, just click Open File Location. Find this option under the heading
Related Documents in the Properties pane shown in Figure 15.
Learn more about working with recovered versions in the Power User Tips section of this guide.
Paste with Live Preview New!
Save time when reusing content within Word 2010 or across applications. Paste with Live
Preview enables you to preview various Paste Options, such as Keep Source Formatting or Keep
Text only, so you can see how your pasted content will look prior to actually pasting. Instead of
using Undo and trying again, Paste with Live Preview now helps you get it right the first time.
19
Figure 16: Point to a
paste option to preview
results and then click to
select the option you
prefer.
Quick Tip: You can still access paste options after you paste and change your mind without having to
undo actions. Click the icon that appears alongside pasted content to expand Paste Options. Or, if you
prefer to use the keyboard, press CTRL to expand Paste Options and then use the left and right arrow keys
to move through options. If you select a new option, the result automatically updates.
Note: Paste with Live Preview is also available in PowerPoint 2010, Excel 2010, Outlook 2010,
and for text in Publisher 2010.
OneNote Linked Notes New!
You do research and gather content while working on documents. But, how do you keep all of
the pieces connected and find the information you need when you need it?
OneNote 2010 makes it easy by creating links not just to the document you’re working on, but
to the location where you were working in the document when you took a given note. Dock
OneNote on the side of your desktop and take notes while you work on your Word 2010
document. As you see in Figure 17, OneNote adds an icon in the margin beside your notes. Just
click that icon when reviewing your notes later to open the source file and jump straight to the
information you need.
20
Figure 17: The OneNote Linked Notes feature adds an icon in the margin of each paragraph
as you take notes in the docked OneNote pane, indicating the source program and providing
a link to your location in the source file at the time you took the note.
Quick Tip: To take Linked Notes while working in Word, start with a previously-saved document in Word
2010 file format and take your notes in a OneNote 2010 notebook.
Note: This OneNote 2010 feature is also available when working in PowerPoint 2010 or when
browsing the Web using Windows® Internet Explorer® 6 or later.
Contextual Spell Checker Improved!
The improved contextual spell-checker in Word 2010 delivers a context-sensitive speller that
corrects your spelling errors when a word is correctly spelled but misused. For example,
―economical condition‖ will be flagged so you can correctly communicate ―economic condition.‖
21
Redefine working together on documents
Co-authoring New!
Save time, simplify tasks, and improve your teamwork. Co-authoring capabilities in Word 2010
enable you to simultaneously edit the same document with colleagues or friends.6 Automatically
see who else is editing and where they are working in the document. You can even initiate a
conversation with other editors instantly, right from Word 2010.7
Figure 18: Clearly see where another editor is working in the same document and connect
with them without leaving Word.
Wherever you see the name of another editor, as shown in Figure 18, you see presence
information that tells you the person’s availability. Point to the person’s name for a
contact card from which you can begin a conversation.
Just save the document to see changes from other editors as you work. Your changes
also become available to other editors each time you save.
6
Co-authoring requires SharePoint Foundation 2010 for business or a Windows Live ID for personal use. Co-authoring in Word 2010
via Windows Live will become available in the second half of calendar year 2010.
7
Instant messaging requires one of the following: Microsoft Office Communications Server 2007 R2 with Microsoft Office
Communicator 2007 R2; Windows Live Messenger, or another instant messaging application that supports IMessenger. Voice calls
require Office Communications Server 2007 R2 with Office Communicator 2007 R2 or an instant messaging application that supports
IMessengerAdvanced.
22