adobe dreamweaver cs5 on demand part 4 potx
Bạn đang xem bản rút gọn của tài liệu. Xem và tải ngay bản đầy đủ của tài liệu tại đây (831.79 KB, 7 trang )
ptg
Chapter 2 Getting Started with Dreamweaver CS5 21
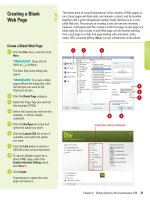
The whole point of using Dreamweaver is the creation of Web pages. In
turn, these pages will load static and dynamic content, and be bundled
together with a good navigational system; finally winding up as a com-
plete Web site. The process of creating a site can become involved;
however, it all begins with the creation of the first page. A new page is a
blank slate for you to draw. A new Web page can be literally anything
from a text page to a high-end page dealing with animation, video,
audio, CSS, incontext editing (New!) or any combination of the above.
Creating a Blank
Web Page
Create a Blank Web Page
Click the File menu, and then click
New.
TIMESAVER
Press Ctrl+N
(Win) or
A
+N (Mac).
The New Document dialog box
opens.
TIMESAVER
To create a We b
page without the dialog box, click
the file type you want at the
Welcome Screen.
Click the Blank Page category.
Select the Page Type you want (in
this example, HTML).
Select the Layout you want (in this
example, 1 column, elastic,
centered).
Click the DocType list arrow and
select the option you want.
Click the Layout CSS list arrow, if
available, and select the option
you want.
Click the Link button to attach a
CSS file to the current document.
To add an editable region for a
blank HTML page, select the
Enable InContext Editing check
box (New!).
Click Create.
Dreamweaver creates the new
page and opens it.
9
8
7
6
5
4
3
2
1
3
4
2
5
7
6
9
Create New without a dialog box
8
From the Library of Wow! eBook
ptg
A Dreamweaver template is a common structure created and used for
all or some pages of a Web site. Each section of a Web site can have
its own template with variations in structure or color from the others.
Templates are fantastic timesaving tools because they allow you to
create pages that share the same design but different content, and if
you modify a template document, you immediately update the design of
all pages that were created from that template. Dreamweaver tem-
plates are special master files that contain editable and locked regions.
Pages based on a template enable Dreamweaver users to edit parts of
a Web page within the editable regions without the risk of accidentally
changing the locked regions. This is a major advantage, because if you
are creating a site that will be maintained by other users you can spec-
ify which parts of pages editors can and cannot change.
22 Chapter 2
Creating a Web
Page from a Blank
Template
Create a Blank Template
Click the File menu, and then click
New.
Click the Blank Template category.
Select the Template Type you want
(in this example, HTML Template).
Select the Layout you want (in this
example, 2 column, elastic, left
sidebar).
In this example leave the Doc Type
and Layout CSS at their default
values of XHTML 1.0 Transitional,
and Add to Head, respectively.
Click Create.
Dreamweaver opens the template.
Click the File menu, click Save,
click OK if necessary to dismiss
the no editable region alert,
specify a name, and then click
Save.
6
5
4
3
2
1
3
4
2
5
Storing Templates
When you work with templates, Dreamweaver automatically creates a
folder called Templates, and all template files are stored in this folder. If
you move a template file outside that folder, Dreamweaver will not be
able to create new files based on that template. In addition, it creates
problems when you insert paths for hyperlinks. Keep your templates
within the Templates folder.
For Your Information
From the Library of Wow! eBook
ptg
Chapter 2 Getting Started with Dreamweaver CS5 23
Create Editable Regions
Use your cursor to select an area
of the image that you want to have
the ability to edit. An editable area
can be defined as an AP element,
or table, or table cell, etc.
Click the Insert menu, point to
Template Objects, and then select
from the following Region options:
◆ Editable Region. Use this
option to allow contributors to
the Web page the ability to
change or modify that selected
area.
◆ Optional Region. Use this
option to define a section of the
page that will or will not be
shown, depending on what the
content contributor decides.
◆ Repeating Region. Use this
option to allow contributors to
the Web page the ability to
duplicate the region. For
example, creating a table that
holds customer comments, and
the contributor needs the ability
to generate new pages, and
add more rows to the table, as
needed.
Enter an appropriate name for the
Region.
Click OK.
The selected area now takes on
the appropriate characteristics.
4
3
2
1
2
1
3
4
Editable
Region
From the Library of Wow! eBook
ptg
24 Chapter 2
Instead of creating a Web page from scratch, you can create a new
Web page based on the existing template, which can save you a lot of
time and effort. In the New Document dialog box, you can select your
own custom template designs available in the Page From Template cat-
egory or click Get More Content to open the Dreamweaver Exchange
on the Web to download more template page designs.
Creating a Web Page
from a Template
Create a Web Page from an
Existing Template
Click the File menu, and then click
New.
TIMESAVER
Press Ctrl+N
(Win) or
A
+N (Mac).
The New Document dialog box
opens.
Click the Page From Template
category.
Select the site that contains the
template you want.
Select the template you want to
use.
Select or clear the Update Page
When Template Changes check
box.
Click Create.
Click the File menu, click Save,
specify a name, and then click
Save.
7
6
5
4
3
2
1
3
4
2
6
5
Did You Know?
You can create a document from a
template in the Assets panel.
Open the
Assets panel using the Windows menu,
click the Templates icon to view the list
of templates, right-click (Win) or
Control-click (Mac) the template you
want, click New From Template, and
then save the document.
From the Library of Wow! eBook
ptg
Chapter 2 Getting Started with Dreamweaver CS5 25
If you’re not sure where you start, you can use one of Dreamweaver’s
sample designs as a starting point for a new page and then make any
changes you want to customize it to suit your specific needs. In the
New Document dialog box, you can preview sample file designs and
then create a new document based on the one you want to use. You
can select from sample pages with CSS (Cascading Style Sheets),
frames, themes (starter pages for Entertainment, Lodging, etc.), and
basic types (starter pages for Commerce, Data, Images, etc.). When
you create a new document, Dreamweaver makes a untitled copy of
the sample file, which you can save with a new name.
Creating a Web Page
from a Sample
Create a Web Page from a
Sample
Click the File menu, and then click
New.
TIMESAVER
Press Ctrl+N
(Win) or
A
+N (Mac).
The New Document dialog box
opens.
Click the Page From Sample
category.
Select the type of sample folder
you want to use: CSS Style Sheet,
Frameset, Starter Page (Theme), or
Starter Page (Basic).
TIMESAVER
At the Welcome
Screen, click the type of sample
file you want.
Select the sample page you want.
If available, click the DocType list
arrow, and then select from the
available options.
Click Create.
Dreamweaver creates the new
page and opens it.
Click the File menu, click Save,
specify a name, and then click
Save.
If the Copy Dependent Files dialog
box appears, set the options you
want, and then click Copy.
8
7
6
5
4
3
2
1
3
4
2
6
Preview
5
From the Library of Wow! eBook
ptg
26 Chapter 2
Web pages should be saved as soon as they're opened. Naming con-
ventions should be according to a predefined list of names that you
created during the planning stage of the project. It's important to save
pages early, that way if there's any problem such as: the application
locking up, you will be able to start again from the last-saved version.
Another important reason is error checking and validating. Web pages
must be in a saved state before performing any validation.
Saving a Web Page
Save a Web Page
Click the File menu, and then
select from the following options:
◆ Save. If the file is new, you will
be prompted to enter a proper
file name and location for the
new page. If the file has been
previously saved, Dream-
weaver saves the file, using the
original file name and location
(without prompting).
TIMESAVER
Press Ctrl+S
(Win) or
A
+S (Mac).
◆ Save As. Use this option to
make a copy of a file; you will
be prompted to give the file a
new name and location.
TIMESAVER
Press Ctrl+Shift+S
(Win) or
A
+Shift+S (Mac).
◆ Save All. Use this option if you
have more than one file open,
and you want to save all of
them at the same time. If any of
the files are new, you will be
prompted to enter a file name
and location.
◆ Save All Related Files. (New!)
Use this option to save web site
related files, which includes
external CSS rules, server-side
includes, external JavaScript
files, parent templates files,
library files, and iframe source
files.
1
Local root site
Site
folders
Naming Conventions for Files and Elements
When you name your files and elements in Dreamweaver, it’s impor-
tant to use standard guidelines for naming to make sure your Web
site works properly on different server platforms, such as Windows or
UNIX. Keep the following in mind: (1) Use underscores in place of
spaces and avoid special characters (colons, slashes, periods, and
apostrophes), and (2) use shorter names; filenames on the Mac can-
not be more than 31 characters.
For Your Information
From the Library of Wow! eBook
ptg
Chapter 2 Getting Started with Dreamweaver CS5 27
◆ Save As Template. Use this
option to save the open
document as a template. A
template is a reusable
document that contains
editable regions.
Navigate to the drive and folder
location where you want to save
the file.
Type a name for the file, or use the
suggested name.
When naming files, avoid using
spaces and special characters, or
punctuation.
For this example, leave the other
options at their default levels.
Click Save to finalize the process.
Click Copy.
5
4
3
2
2
4
3
5
Did You Know?
You can revert to the last saved ver-
sion of a document.
Click the File
menu, click Revert, and then click Yes
to revert to the previous version, or
click No to keep your changes. If you
save a document and then exit
Dreamweaver, you cannot revert to the
previous version when you restart
Dreamweaver.
Macintosh and Windows computers
systems are not case sensitive.
Therefore when you create a file name
for a Web page (or the files loaded on
the page), you won't have a problem
validating that page on your computer;
however, when you move the site to
the server, many servers are case-sen-
sitive, and the same pages may not
load correctly. For example, if a Web
page is named Index.html and you call
it using index.html. It validates on your
computer, but it might not work on the
server… pay attention to case.
From the Library of Wow! eBook
