adobe dreamweaver cs5 on demand part 6 potx
Bạn đang xem bản rút gọn của tài liệu. Xem và tải ngay bản đầy đủ của tài liệu tại đây (747.26 KB, 6 trang )
ptg
36 Chapter 2
Getting Help While
You Work
Get Dreamweaver Help
Click the Help menu, and then
click Dreamweaver Help, or type a
keyword in the Search box.
TIMESAVER
Press F1 (Win) or
A
+/ (Mac).
To se arch a nother CS produ ct,
click the Select Product list arrow,
and then select a CS product.
To se t s earch options, click Search
Options to expand it, and then
select any of the following:
◆ Search This Help System Only.
Select to constrain the search
to the selected product.
◆ Search Location. Select Local
Help, Community Help, or
Adobe.com.
◆ Filter Results. For Adobe.com,
select a filter option.
Click Help categories (plus sign
icons) until you display the topic
you want or type in keywords to
search in the Search box.
Click the topic you want.
Read the topic, and if you want,
click any links to get information
on related topics or definitions.
When you’re done, click the Close
button (Win) or click the Adobe
Help menu (Mac), and then click
Quit Adobe Help.
7
6
5
4
3
2
1
7
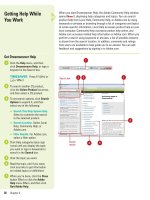
When you start Dreamweaver Help, the Adobe Community Help window
opens (New!), displaying help categories and topics. You can search
product help from Local Help, Community Help, or Adobe.com by using
keywords or phrases or browsing through a list of categories and topics
to locate specific information. Local Help accesses product help on your
local computer, Community Help accesses product help online, and
Adobe.com accesses related help information on Adobe.com. When you
perform a search using keywords or phrases, a list of possible answers
is shown from the search location. In addition, comments and ratings
from users are available to help guide you to an answer. You can add
feedback and suggestions by signing in to Adobe.com.
1
2 3
Search box
4
5
6
Search
results
From the Library of Wow! eBook
ptg
Chapter 2 Getting Started with Dreamweaver CS5 37
Get Additional Help
Click the Help menu, and choose
from the following options:
◆ Dreamweaver Help. Standard
help systems for all areas of
Dreamweaver.
◆ Spry Framework Help. Online
help for Spry, an open source
Ajax framework developed by
Adobe which is used in the
construction of Rich Internet
Applications.
◆ Get Started with Business
Catalyst InContext Editing.
Online information about Adobe
InContext Editing.
◆ Omniture. Online information
about the Omniture company.
◆ ColdFusion Help. Online help
for CFML (ColdFusion Markup
Language). CFML is a tag-
based Web scripting language
supporting dynamic Web page
creation and database access.
◆ Reference. Gives you access to
fourteen books and manuals
with product information.
◆ Dreamweaver Support Center.
Gives you access to Adobe
online support, and allows you
to search through an extensive
LiveDocs data base.
◆ Dreamweaver Exchange. Gives
you access to the Adobe
Marketplace & Exchange with
tools and resources.
◆ Manage Extensions. Opens
Adobe Extension Manager CS5.
◆ CSS Advisor. Gives you access
to information about using
Cascading Style Sheets (CSS).
◆ Adobe Online Forums. Gives
you access to the Adobe online
forums, where you can get
information from contributors.
1
1
Participating in Adobe Product Improvement
You can participate in the Adobe Product Improvement Program. Click
the Help menu, click Adobe Product Improvement Program, and then
follow the on-screen instructions. This is an opt-in program that allows
you to test Adobe products and make suggestions for future products.
This program enables Adobe to collect product usage data from cus-
tomers while maintaining their privacy.
For Your Information
From the Library of Wow! eBook
ptg
38 Chapter 2
Getting Dreamweaver
Updates on the Web
Get Dreamweaver Updates on
the Web
Click the Help menu, and then
click Updates.
Adobe checks your software with
the latest available version and
automatically updates it.
To ma nually ch eck, c lick t he
Check For New Updates button.
To ch ange p references, click
Preferences, select the update
options you want, and then click
Done.
Click Quit.
4
3
2
1
2
3
4
As time passes, Dreamweaver—like any other program—will change.
There are two types of changes to a program: updates and patches.
Updates are improvements to a program such as a new feature, option,
or command. Patches are software fixes for problems discovered after
the public release of the program. The good news is that both updates
and patches are free, and once downloaded, are self-installing. Adobe
gives you two ways to check for changes. You can check manually by
going to the Adobe web site, or automatically through the Adobe
Updater. The Adobe Updater Preferences dialog box allows you to set
update options for Dreamweaver and other installed Adobe products,
such as Bridge. You can also set an option to have Adobe notify you of
updates in the menu bar (New!).
Did You Know?
You can deactivate or activate
Dreamweaver to use on another com-
puter.
You can use your serial number
on only one computer at a time. If
you’re moving from one computer to
another, you can deactivate your serial
number on one computer and then
activate it another one. Click the Help
menu, click Deactivate, click Suspend
Activation (saves serial number) or
Deactivate Permanently (removes
serial number), and then click Done. To
activate it, click the Help menu, and
then click Activate.
From the Library of Wow! eBook
ptg
Chapter 2 Getting Started with Dreamweaver CS5 39
After you finish working on a Web page, you can close it and open
another one, or close it and exit Dreamweaver. Closing a Web page
makes more computer memory available for other processes. Closing a
Web page is different from exiting Dreamweaver: after you close a Web
page, Dreamweaver is still running until you exit it. You can use the
Exit command on the File menu (Win) or Quit Dreamweaver command
on the Dreamweaver menu (Mac) to close a document and exit
Dreamweaver, or you can use the Close button on the Document tab. If
you try to close a document without saving your final changes, a dialog
box opens, asking if you want to do so.
Closing a Web
Page or File
Close a Web Page or File
Click the Close button on the
Document tab, or click the File
menu, and then click Close.
TIMESAVER
Click the Close
button in the Document window or
press Ctrl+W (Win) or
A
+W
(Mac).
Click Yes to save any Web page
changes; click No to close the
Web page or file without saving
any changes; or click Cancel to
return to the Web page or file
without closing it.
2
1
Did You Know?
You can close all Web pages at one
time.
Click the File menu, and then
click Close All Pages or press
Ctrl+Shift+W (Win) or A+Shift+W
(Mac).
You can cascade or tile Document
windows.
To casc ad e d ocument wi n-
dows, click the Windows menu, and
then click Cascade. To tile documents,
click the Windows menu, and then
click Tile Horizontally or Tile Vertically
(Windows), or Tile (Mac).
1
Click to close file
Click to close all files
From the Library of Wow! eBook
ptg
40 Chapter 2
Finishing Up
Exit or Quit Dreamweaver
Use any of the following methods:
TIMESAVER
Press Ctrl+Q
(Win) or
A
+Q (Mac).
◆ Click the Close button on the
Dreamweaver program window
title bar.
◆ In Macintosh, click the
Dreamweaver menu, and then
click Quit Dreamweaver.
◆ In Windows, click the File
menu, and then click Exit.
Click Yes to save any Web
changes, or click No to ignore
any changes.
Dreamweaver performs an orderly
shutdown of the program.
2
1
As much as we enjoy working in Dreamweaver, the time will finally
come when you want to shut down for the day. The process of closing
out a Dreamweaver Web site, is not difficult; as a matter of fact, it's no
more complicated than closing down any application. Dreamweaver is
smart, if you attempt to exit or quit before saving that last file you were
working on, Dreamweaver prompts you to save or ignore any changes.
Click to exit Dreamweaver
1
From the Library of Wow! eBook
ptg
Working Within the
Dreamweaver Environment
Introduction
Getting to know the Dreamweaver authoring environment
makes you more effective and efficient as you create Web
pages and manage Web sites. You’ll get to know the parts
of the Dreamweaver window, which include toolbars and
panels.
The Toolbars contain buttons that you can use to perform
common tasks. Dreamweaver comes with four toolbars. The
main one is the Document toolbar, which appear by default.
The Document toolbar appears under an open document tab
and allows you to change views, specify a title, manage files,
preview pages, enable or disable page view options, and per-
form document validation. The Dreamweaver window also
included panels. Panels are windows that allow you to view,
organize, and change elements and related options in a docu-
ment. The Insert panel provides the commands for inserting
various types of objects. The Properties panel is a specialized
panel that allows you to change object specific attributes and
options. To work efficiently in Dreamweaver you need infor-
mation about the active document. Dreamweaver displays
current information about the active document and common
display tools on the Status bar, located at the bottom of the
document window. For example, working with the Zoom tool
on the Status bar gives you one more way to control the
view size to exactly what you see in Dreamweaver. In addi-
tion, you can use rulers, guides, and the grid to help you lay
out artwork and objects with precision.
Dreamweaver uses built-in keyboard shortcuts designed
specifically for Dreamweaver. The built-in keyboard shortcuts
are organized into sets, which you can duplicate and cus-
tomize to create your own personalized set. Dreamweaver
allows you to set preferences to customize the way you work
in the program.
3
3
What You’ll Do
Examine the Dreamweaver Window
Work with Toolbars
Resize Panels
Work with Panels
Dock and Undock Panels
Group and Ungroup Panels
Create a Workspace
Use the Status Bar
Change the View with the Zoom Tool
Work with Rulers
Work with the Grid and Guides
Create Keyboard Shortcuts
Set General Preferences
Set New Document Preferences
Work with Colors
Set Highlighting Color Preferences
41
From the Library of Wow! eBook
