adobe dreamweaver cs5 on demand part 8 potx
Bạn đang xem bản rút gọn của tài liệu. Xem và tải ngay bản đầy đủ của tài liệu tại đây (821.75 KB, 7 trang )
ptg
48 Chapter 3
Docking and
Undocking Panels
Dock a Panel
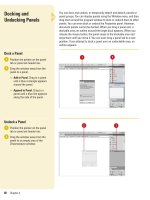
Position the pointer on the panel
tab or panel set header bar.
Drag the window away from the
panel to a panel.
◆ Add to Panel. Drag to a panel
until a blue rectangle appears
around the panel.
◆ Append to Panel. Drag to a
panel until a blue line appears
along the side of the panel.
Undock a Panel
Position the pointer on the panel
tab or panel set header bar.
Drag the window away from the
panel to an empty area of the
Dreamweaver window.
2
1
2
1
You can dock and undock, or temporarily attach and detach, panels or
panel groups. You can display panels using the Window menu, and then
drag them around the program window to dock or undock them to other
panels. You can even dock or undock the Properties panel. However,
document panels cannot be docked. When you drag a panel over a
dockable area, an outline around the target dock appears. When you
release the mouse button, the panel snaps to the dockable area and
stays there until you move it. You can even drag a panel tab to a new
position. If you attempt to dock a panel over an undockable area, no
outline appears.
2
1
2
1
From the Library of Wow! eBook
ptg
Chapter 3 Working Within the Dreamweaver Environment 49
Grouping and
Ungrouping Panels
Group Panels Together
Position the pointer on the panel
tab or panel set header bar.
Drag the window away from the
panel to another panel window.
◆ Add to Panel. Drag to a panel
until a blue rectangle appears
around the panel.
◆ Append to Panel. Drag to a
panel until a blue line appears
along the side of the panel.
Ungroup Panels
Position the pointer on the panel
tab or panel set header bar.
Drag the window away from the
panel to an empty area of the
Dreamweaver window.
2
1
2
1
You can group panels together to improve organization and workflow.
When you group panels together, you can stack one on top of the other,
or group related panels together as a tabbed panel group, such as the
Component Inspector panel. You can add a panel to an existing panel
group or you can create a new panel group. If you no longer need pan-
els grouped together, you can ungroup them. You can use the panel
gripper to group or ungroup as well as dock or undock panel windows.
2
2
1
1
See Also
See “Working with Panels” on page 46
for information on using panels, or
“Docking and Undocking Panels” on
page 48 for information on moving
panels around the screen.
From the Library of Wow! eBook
ptg
50 Chapter 3
Creating a Workspace
Create a Workspace
Open and position the panels you
want to include in a panel set.
Click the Window menu, point to
Workspace Layout, and then click
New Workspace.
TIMESAVER
Click the
Workspace menu on the menu bar
(Win) or title bar (Mac) to access
workspace commands.
The New Workspace dialog box
opens.
Type a name in the Name box.
Click OK.
The panel set is now saved.
Display a Workspace
Click the Window menu, point to
Workspace Layout or click the
Workspace menu, and then select
a panel option:
◆ Custom Panel Name. Displays a
custom panel layout in which
you created.
◆ Predefined Layouts. Displays
the default panel layout: App
Developer, App Developer Plus,
Classic, Coder, Coder Plus,
Designer, Designer Compact, or
Dual Screen.
1
4
3
2
1
As you work with Dreamweaver, you'll open, close, and move around
windows and panels to meet your individual needs. After you customize
the Dreamweaver workspace, you can save the location of windows
and panels as a custom workspace. You can create custom work-
spaces, or use the default ones provided by Dreamweaver, such as
Designer, Code, Dual Screen, and App Developer. If you no longer use a
custom workspace, you can remove it at any time. You can also rename
a custom workspace to better recognition and use.
2
1
3
4
1
Workspace menu with panel name
From the Library of Wow! eBook
ptg
Chapter 3 Working Within the Dreamweaver Environment 51
Delete a Workspace
Click the Workspaces menu, and
then click Manage Workspaces.
The Manage Workspaces dialog
box opens.
Select the panel set you want to
delete.
Click Delete.
Click Yes to confirm the deletion.
Click OK.
The panel set is now deleted.
Rename a Workspace
Click the Workspaces menu, and
then click Manage Workspaces.
The Manage Workspaces dialog
box opens.
Select the panel set you want to
rename.
Click Rename.
Type a new name, and then click
OK.
The panel set is now renamed.
Click OK.
5
4
3
2
1
5
4
3
2
1
5
3
2
5
3
2
4
Did You Know?
You can hide all panels.
Click the
Window menu, and then click Hide
Panels to select the check mark.
From the Library of Wow! eBook
ptg
52 Chapter 3
Using the Status Bar
Use the Status Bar
View the display information or click
a tool on the Status bar:
◆ Tag Selector. Shows the
hierarchy of tags surrounding the
current selection.
◆ Select Tool. Use to enable or
disable the Select tool.
◆ Hand Tool. Use to drag a
document into the Document
window.
◆ Zoom Tool. Use to increase or
decrease the magnification level
for a document.
◆ Set Magnification. Use to select a
predefined magnification level.
◆ Window Size. Use to resize the
Document window to a
predefined value in Design view.
◆ Document Size And Estimated
Download Time. Shows the
estimated document size and
download time for the page.
1
To wo rk ef fic ie ntl y in Dr eam wea ve r you n eed i nfo rma ti on ab out t he
active document. Details about the document's size and estimated
download time all help in the design and preparation of the page.
Dreamweaver displays current information about the active document
and common display tools on the Status bar, located at the bottom of
the document window. The Status bar displays the Tag selector for the
current selection and the estimated document size and download time,
and allows you to use the Select, Hand, or Zoom tools, set document
magnification, or resize the Document window.
Tag se le ct or
Status bar
Select
Document Size/
Download Time
Set Magnification
Hand
Window Size
Zoom
Encoding
From the Library of Wow! eBook
ptg
Chapter 3 Working Within the Dreamweaver Environment 53
Set Windows Size and
Connection Speed from the
Status Bar
Click the Dreamweaver (Mac) or
Edit (Win) menu, and then click
Preferences.
Click the Status Bar category.
Set the options you want:
◆ Window Sizes. Specify the
window sizes you want to
appear in the Status bar.
◆ Connection Speed. Select the
connection speed (in kilobits
per second) you want to use to
calculate the download size
that appears in the Status bar.
Click OK.
4
3
2
1
3
2
4
Did You Know?
You can display the download size for
an image.
When you select an image,
the image’s download size appears in
the Properties panel.
From the Library of Wow! eBook
ptg
54 Chapter 3
Working with the Zoom tool gives you one more way to control exactly
what you see in Dreamweaver. The Zoom tool does not change the
active image, it only lets you view the image at different magnifications.
The Zoom tool is located on the Status bar, and resembles a magnifying
glass. Increasing the magnification of an image gives you control over
what you see and gives you control over how you work. Large docu-
ments are difficult to work with and difficult to view. Many documents,
when viewed at 100 percent, are larger than the maximized size of the
document window. When this happens, viewing the entire image
requires reducing the zoom.
Changing the View
with the Zoom Tool
Zoom In or Out the View
Select the Zoom tool on the Status
bar.
Use one of the following methods
to zoom in:
◆ Click On The Document. The
image increases in
magnification centered
on where you clicked.
◆ Drag To Define An Area With
The Zoom Tool. The image
increases in magnification
based on the boundaries of the
area you dragged.
TIMESAVER
Press Ctrl+=
(Win) or
A
+= (Mac) to zoom in.
To zo om ou t, ho ld d own t he Al t
(Win) or Option (Mac) key, and
then click on the screen to reduce
the zoom of the active document.
The zoom reduction centers on
where you click on the active
document.
TIMESAVER
Press Ctrl+- (Win)
or
A
+- (Mac) to zoom out.
3
2
1
1
From the Library of Wow! eBook
