The Complete IS-IS Routing Protocol- P9 ppsx
Bạn đang xem bản rút gọn của tài liệu. Xem và tải ngay bản đầy đủ của tài liệu tại đây (134.08 KB, 10 trang )
The counterpart of set is the delete command. As the name implies, it is used to
delete a certain flag from the configuration. For instance, to remove the checksumming
flag from interface so-3/0/0.0, then the command would be delete interface
so-3/0/0.0 checksum:
[edit protocols isis]
hannes@Frankfurt# delete interface so-3/0/0.0 checksum
[edit protocols isis]
hannes@Frankfurt# show
[edit protocols isis]
hannes@Frankfurt#
A very convenient use of the delete command is that you can specify both individ-
ual elements and even entire branches (folders) for deletion. For instance, if you have a
rich set of parameters configured under the protocols isis level 2 {} branch,
and you do not want to delete the elements one by one, you can delete the entire level 2
configuration by issuing a delete level 2 command.
[edit protocols isis]
hannes@Frankfurt# show
[ … ]
level 2 {
authentication-key “$9$f5z69CuIEy36cl”; # SECRET-DATA
authentication-type md5; # SECRET-DATA
no-hello-authentication;
wide-metrics-only;
preference 100;
}
[ … ]
[edit protocols isis]
hannes@Frankfurt# delete level 2
[edit protocols isis]
hannes@Frankfurt# show
[edit protocols isis]
hannes@Frankfurt#
As with file systems in the UNIX world, you can access a configuration from any
context – all you have to do is specifying the full path in the configuration hierarchy. There-
fore, you can turn on checksumming from the protocols isis {} hierarchy level:
[edit protocols isis]
hannes@Frankfurt# set interface so-3/0/0.0 checksum
[edit protocols isis]
hannes@Frankfurt#
But this can also be done from the top-level hierarchy (note the longer path in the
command):
Juniper Networks JUNOS CLI 67
[edit]
hannes@Frankfurt# set protocols isis interface so-3/0/0.0 checksum
[edit]
hannes@Frankfurt#
Unlike IOS, when you enter the set and delete commands your JUNOS config-
uration does not become active immediately. You can modify the configuration file as
much and as often as you like, even deleting it fully and starting from scratch (not often
a good idea, but possible). Even complete deletion will not do any harm or disrupt your
connectivity to the router – yet.
3.3.6 Activating a Configuration
JUNOS changes its configuration on a transactional model. You really have two config-
urations in the system:
•
The active configuration
•
A candidate configuration
The active configuration is the one that the router currently executes. The candidate
configuration is originally a copy of the active configuration created when you enter con-
figuration mode, and it is the candidate configuration which is modified. Think of it
like a document that you open and modify – nothing changes until you do a SAVE on
your wordprocessor. The analogy of the wordprocessor’s SAVE in JUNOS is the
commit command. The commit command does a syntax and sanity check of the can-
didate configuration and, if satisfied, copies the candidate configuration to the active
configuration.
[edit protocols isis]
hannes@Frankfurt# commit
commit complete
[edit protocols isis]
hannes@Frankfurt#
Do not forget to commit your changes when you start working with JUNOS. You
might wonder why the changes did not take effect. If you are used to an IOS environ-
ment, forgetting to do a commit is a frequent mistake.
In wordprocessors there is the UNDO function if you made a change and you want get
back to a previous version of your document. JUNOS has a similar mechanism, which is
executed using the rollback command. You can go back to up to nine versions of the
configuration history by specifying a number after the rollback command.
[edit]
hannes@Frankfurt# rollback 3
[edit]
hannes@Frankfurt#
Note that the rollback command loads a historical configuration as just another can-
didate configuration. It is only re-activated using the commit command again.
68 3. Introduction to the IOS and JUNOS Command Line Interface
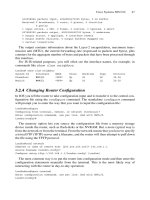
Figure 3.11 presents an overview of how the commit and rollback commands syn-
chronize between the active, candidate and historical configuration files.
When you first go into the configuration mode, it means that up to now there has been
no candidate configuration, and the candidate configuration is copied unchanged from
the active configuration. If a change to the candidate configuration is made and commit-
ted, then the candidate configuration replaces the active configuration. The old active
configuration is moved into the “archives”. Historical configurations in the archive are
numbered like the log rotation tools you may know from UNIX operating systems. Up to
fifty instances of the file are kept. During a commit operation, historical file #49 is rolled
out and deleted. The remaining other nine configuration files are renamed. Config #1
becomes Config #2, Config #2 becomes Config #3. And finally the previous active con-
figuration becomes historical Config #1.
The JUNOS configuration editor is a very comfortable piece of software that you
should enjoy using, especially those familiar with programming. Even more important
are the troubleshooting facilities, which you need to know in order to debug customers’
problems of all kinds.
3.3.7 Troubleshooting Tools
In the Cisco IOS, debugging routing protocol traffic is done using the debug command
once you are in privileged (enable) operational command mode. JUNOS is very
transaction-oriented and a transition from one configuration state to another has to be
explicitly executed using the commit command. And in JUNOS, debugging is done
in the configuration mode, not operation mode. Why?
Recall that turning on the debugging facility is a potentially dangerous thing and can put
the router out of commission very quickly. Just imagine what might happen if you receive
140,000 routes from an Internet route reflector and you have turned on detailed debugging
Juniper Networks JUNOS CLI 69
Commit
Rollback n
Candidate
configuration
Active
configuration
1 2
0
F
IGURE 3.11. JUNOS has a transactional system for changing, activating and rolling back
configurations
for each and every BGP packet. Most likely the router will be busier writing the debug out-
put to the local hard disk than doing something more useful, like routing packets. Therefore,
many network administrators are very cautious about permitting operators to use debug.
So one of the JUNOS design choices was that debugging should be part of the config-
uration file. There are actually several reasons for this:
•
You can at least track who turned on a certain debug output, in case the router
becomes unstable.
•
A router’s full configuration state (including the debugging state) is stored in one file.
For certain events, it may be desired to monitor the events constantly, like protocol
errors. In IOS the debugging state is lost after a reboot and so you need to manually
turn on all the debugging states that you want to monitor after a router reboot.
•
Because it is part of the configuration file, you can take advantage of the commit
confirmed command. The commit confirmed command performs an automatic
rollback of the router to a safer state after a certain amount of time if the router
becomes unstable or unreachable. (This rollback is indeed automatic: you have to make
the change explicitly permanent to countermand this action.)
Each configuration branch in the JUNOS command line hierarchy like interfaces,
protocols isis, protocols bgp has a dedicated traceoptions branch
where you can configure all the events you want to debug. But first you have to specify
a file where all the debugging output is written. In JUNOS, you can’t just tell the router
to (for instance) put out all debug output directly to the console. You have to first
write the entire debug output into a file. However, you can make the CLI display all the
new lines in the file and display those on the console in real-time. The configuration snip-
pet below shows a typical configuration for tracing (debugging) the IS-IS routing
process:
[edit]
hannes@Frankfurt# show
[ … ]
protocols {
isis {
traceoptions {
file isis-trace size 10 m;
flag error;
flag state;
flag normal;
flag lsp;
}
[ … ]
}
}
The traceoptions configuration branch always consists of two mandatory
statements. The file statement specifies the filename plus arbitrary properties like pro-
tection, maximum file size until it is rolled over and so on. The flag statement describes
70 3. Introduction to the IOS and JUNOS Command Line Interface
feature-specific event triggers that make the router log a line in the specified file. Each
routing protocol has different flags: BGP has different traceoption flags to IS-IS,
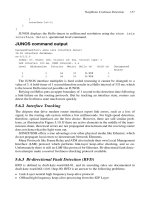
and so on, since routing protocols can work in fundamentally different ways. Figure 3.12
list the current layout of the traceoptions for the protocols isis {} branch.
You can examine the entries in the log file using the show log Ͻlogfile-nameϾ
command:
hannes@Frankfurt> show log isis-trace
Aug 9 23:06:25 trace_on: Tracing to “/var/log/isis-trace” started
Aug 9 23:06:26 Received L2 CSN, source London, interface so- 2/1/0.0
Aug 9 23:06:26 LSP range Penssauken.00-01 to ffff.ffff.ffff.ff-ff
Aug 9 23:06:26 packet length 179
Aug 9 23:06:26 ERROR: CSN from London without authentication
Aug 9 23:06:26 Sending L2 CSN on interface so-3/0/0.0
Aug 9 23:06:26 LSP range 0000.0000.0000.00-00 to Stockholm.00-00
Aug 9 23:06:26 packet length 1478
The show log command starts displaying the file from the beginning, but it does
not display any additions to the end of the file made in real-time as the display scrolls.
You know the log file is displayed from the beginning because the first line contains the
Juniper Networks JUNOS CLI 71
bgp
protocols
policy-options
isis
file
flag
interfaces chassis
traceoptions
all
csn
error
general
graceful-restart
hello
lsp
lsp-generation
normal
packets
policy
psn
route
spf
state
task
timer
FIGURE 3.12. The IS-IS traceoption flags control the verbosity of the logfile
statement that tracing has just started. However, if you want to display the most recent
additions to the end of the file in real-time, you need to start a monitor job.
hannes@Frankfurt> monitor start isis-trace
hannes@Frankfurt>
*** isis-trace ***
Aug 10 00:14:29 ERROR: IIH from London without authentication
Aug 10 00:14:29 Received L2 LSP Stockholm.00-00, interface so-3/0/0.0
Aug 10 00:14:29 from London
Aug 10 00:14:29 sequence 0x7c2, checksum 0x55bf, lifetime 65522
Aug 10 00:14:29 Updating L2 LSP Stockholm.00-00 in TED
Aug 10 00:14:29 Sending L2 LSP Stockholm.00-00 on interface fe-2/1/0.0
Aug 10 00:14:29 sequence 0x7c2, checksum 0x55bf, lifetime 65522
The router now continuously displays any new traces that are written to the file. If
there is a lot of routing protocol activity in the network, your console might get over-
whelmed by all the logging messages and you won’t even be able to type anything to stop
the flood. To stop the output from overwhelming your console, simply type ESC Q and
then the output immediately stops;
Aug 10 00:22:01 ERROR: CSN from London without authentication
Aug 10 00:22:01 ERROR: CSN from London without authentication
Aug 10 00:22:01 ERROR: CSN from London without authentication
*** monitor and syslog output disabled, press ESC-Q to enable ***
The output is now suspended, and resumes when the ESC Q toggle is used again. But
even with console output suspended, the monitoring job is still active, as shown by issu-
ing the monitor list command:
hannes@Frankfurt> monitor list
monitor start “isis-trace” (Last changed Aug 00:23:37 20)
hannes@Frankfurt>
Finally, to stop the output to the console, issue a monitor stop isis-trace
command. Don’t forget to unsuspend the output by pressing ESC Q again, otherwise you
may wonder when you issue your next monitor start command why there is no
output appearing on the screen:
hannes@Frankfurt> monitor stop isis-trace
hannes@Frankfurt>
*** monitor and syslog output enabled, press ESC-Q to disable ***
The traceoptions tell you about system internal events as seen by the routing software.
Sometimes the routing protocol messages seen from an interface perspective (as opposed
to the router perspective) may be critical for troubleshooting purposes. JUNOS has built-in
protocol analyzer software, which is basically an enhanced version of the UNIX tcpdump
72 3. Introduction to the IOS and JUNOS Command Line Interface
utility. It is invoked using the monitor traffic interface <interface-name>
command. There are a lot of additional options for the monitor traffic command. The
most important is the size option, as the tcpdump default only captures 68 bytes of a
packet, typically enough to display the headers of an IP packet, but not always enough
for a complete analysis of problems. If you need to troubleshoot routing protocols you
should specify at least the maximum size of the packet, because all of the information is
critical – not just the headers. For IS-IS this maximum size is 1492 bytes:
Tcpdump output
hannes@frankfurt> monitor traffic interface fe-0/0/1 size 1492
Listening on fe-0/0/1
00:37:30.219626 OSI, IS-IS, length: 77
L2 Lan IIH, hlen: 27, v: 1, pdu-v: 1, sys-id-len: 6 (0), max-area: 3 (0)
source-id: 1921.6807.7003, holding time: 120s, Flags: [Level 1, Level 2]
lan-id: 1921.6807.7003.02, Priority: 70, PDU length: 77
IS Neighbor(s) TLV #6, length: 6
SNPA: 00d0.b7b2.71cc
Protocols supported TLV #129, length: 2
NLPID(s): IPv4 (0xcc), IPv6 (0x8e)
IPv4 Interface address(es) TLV #132, length: 4
IPv4 interface address: 172.17.33.1
IPv6 Interface address(es) TLV #232, length: 16
IPv6 interface address: fe80::7777:69ff:fea0:8001
Area address(es) TLV #1, length: 4
Area address (length: 3): 49.0001
Restart Signaling TLV #211, length: 3
Flags [none], Remaining holding time 0s
Checksum TLV #12, length: 2
checksum: 0x5dfd (correct)
The monitor traffic command is very useful for diagnosing low-level protocol
errors. Because it provides very detailed output (as shown in the previous example), it is
also a good tool for learning about the IS-IS protocol.
3.3.8 Routing Policy
JUNOS probably has the most powerful language for controlling routing information
flow between routers. Because subsequent chapters modify the default behaviour as to
how IS-IS passes on routes to other routers, some familiarity with the JUNOS Routing
Policy Language (RPL) is required.
In JUNOS virtually every flow of routing information, even the flow of prefixes inter-
nal to the routing protocol (like the transfer of routes on an OSPF Area Border Router
(ABR) from one area to another) is subject to policy processing. Policies are present
simply everywhere in the routing sub-system.
In order not to reinvent the semantics of policy processing a new for each protocol, Juniper
Networks’ engineers took a different approach. Policies are stored in a protocol-neutral way
Juniper Networks JUNOS CLI 73
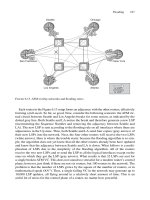
in the system and may be used by any protocol. Figure 3.13 illustrates the differences between
the policy processing model on IOS platforms and JUNOS.
In the IOS model, the flow of routes occurs between the various protocols. If, for
example, you want to configure redistribution from RIP to OSPF, the RIP process tells
the OSPF process that it has routes that may be included for redistribution. In JUNOS,
there is not that much interaction in between the protocols – there is a defined “choke
point” where all protocols install their routing information, which is the main unicast
routing table inet.0. So for each protocol one or more routing policies can be called. The
74 3. Introduction to the IOS and JUNOS Command Line Interface
Import
IS-IS
BGP
OSPF
RIP
STATIC
Import
Import
Export
Export
Export
Export
Export
Export
Export
Export
Export
Export
Import
Import
IPv4 unicast routing table
Metric:
193.203.0.0/25
Next-Hop:
FIGURE 3.13. In IOS the protocols own all the transactions for route redistribution
JUNOS model is shown in Figure 3.14, where the routing entry in the central routing
table holds “metainformation” about all routing protocol attributes.
Let’s compare how IOS and JUNOS work when it comes to routing information redis-
tribution. Consider a Cisco IOS configuration example where we redistribute RIP routes
to OSPF:
London#show running-config
[ … ]
router ospf 1
redistribute rip subnets
The configuration makes the router take all RIP routes and redistribute them to OSPF
with a default metric of 1. The interesting thing here is that we lose the metric informa-
tion of the original RIP routes. Maybe it would be important to the OSPF part of the net-
work what metric (in RIP it is called the hop count) the prefixes originally had, but that
is not possible.
In JUNOS things work differently: each route carries all the attributes that the differ-
ent routing protocols generate. Each route has fields for storing BGP attributes like the
community or AS-Path attributes, as well as OSPF and IS-IS information like the OSPF
area or IS-IS level. Each protocol fills in the fields that are relevant to the respective pro-
tocol when a route is installed in inet.0. For example, BGP fills in fields called Metric-1
and Metric-2 for BGP local preference and multi-exit discriminator (MED), and retains
the BGP community and AS-Path as well. In contrast, a route learned through OSPF
would only fill in the Metric and Tag fields (if it is an external route and the OSPF Tag is
Juniper Networks JUNOS CLI 75
IPv4 unicast routing table inet.0
Metric 1:
Metric 2:
AS-Path:
Community:
Tag:
193.83.223.224/28
Level:
Area:
Interface:
Next-hop:
Color:
Color 2:
IS-IS
BGP
OSPF
RIP
STATIC
AGGREGATE
Import
Export
Import
Export
Import
Export
Import
Export
Import
Export
Import
Tag 2:
FIGURE 3.14. In JUNOS the main routing table holds up meta-attribute information from all
possible routing protocols
present). Because of this routing table-centric approach, you do not lose information like
the routing metric when passing on information from one protocol to the other, because
some fields are common to all routes. Furthermore, you can even install an attribute that
does not exist in the source protocol. For example, you could set the AS-Path when cer-
tain routes are passed on from Level-1 to Level-2 in IS-IS. (Not that this particular exam-
ple is of practical relevance, it just demonstrates how powerful and flexible the JUNOS
policy language is.)
JUNOS policies work fairly directly: all they can do is either reject or modify incom-
ing routing updates, or alter or suppress outgoing routing updates. Policies can therefore
be applied on the inbound and on the outbound side of a routing protocol. In JUNOS an
inbound policy is called an import policy and an outbound policy is called an export
policy. Figure 3.15 shows where import and export policies take effect.
The import policy controls which routes get installed in the unicast routing table. An
export policy controls which routes are advertised to neighbouring routers. Note that
only routes that are installed in the routing table inet.0 are exportable to other routers.
A route that is known to JUNOS but not installed in inet.0 is called a hidden route in
JUNOS. Many issues arise when routes can plainly be seen arriving at the router, but are
never advertised because for one reason or another they have become hidden routes and
seem to have been swallowed up by the router in question.
In JUNOS, there is no interaction directly between the protocols. There is just
interaction between an individual routing protocol and the routing table as shown in
Figure 3.15. Each routing protocol may call one or more import and export policies.
The interesting thing is that there is a common syntax for routing policies irrespective
which routing protocol calls the policy. For illustration, create a simple policy that
selects the entire set of static routes present on a router. Routing policies consist of a
match clause and an action clause. The JUNOS keyword for the match clause is from,
and the action clause is introduced by the keyword then:
policy-options {
policy-statement all-statics {
from protocol static;
then accept;
}
}
76 3. Introduction to the IOS and JUNOS Command Line Interface
Neighbors
Protocol
Forwarding
table
Neighbors
Protocol
Import
Routes Routes
PFE
Export
Routing
table
F
IGURE 3.15. JUNOS controls route advertisements via import and export policies