Lập trình Wrox Professional Xcode 3 cho Mac OS part 5 pot
Bạn đang xem bản rút gọn của tài liệu. Xem và tải ngay bản đầy đủ của tài liệu tại đây (2.52 MB, 9 trang )
32
❘
CHAPTER 3 XCODE LAYOUT
Delete this element and save the fi le. The next time you launch Xcode, it will recreate the default
Implementation Files and NIB Files groups. All other user - created smart groups will be gone.
DETAILS, DETAILS
Now that you ’ ve learned to organize, customize, and navigate the top groups of your project, you ’ re
going to start digging into the details of those groups and what they contain. Details about the
content of groups are displayed in a table called the details list. The columns of the table display
properties about each item.
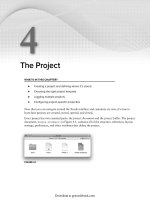
In the Default and All - In - One layout styles, the details list is displayed in a pane on the right side
of the window, as shown in Figure 3 - 12. The Condensed layout style does not include a details pane
in the project window.
The details pane shares its side of the window with an editor pane. If the details list is not visible,
choose View ➪ Detail or View ➪ Zoom Editor Out to reveal it. You can also drag the divider
between the details list and the editor pane.
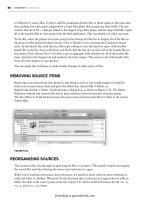
FIGURE 3-11
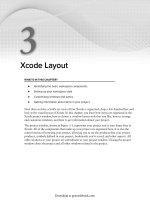
To delete all of the smart groups saved for all projects, fi rst quit Xcode. Using the Property List
Editor (you will fi nd this in the /Developer/Applications/Utilities folder), open the
com.apple.Xcode.plist fi le in your account ’ s ~/Library/Preferences folder. Look for an
element with the key com.apple.ide.smrt.PBXUserSmartGroupsKey.ver10 , shown in Figure 3 - 11.
c03.indd 32c03.indd 32 1/22/10 12:12:01 PM1/22/10 12:12:01 PM
Download at getcoolebook.com
You can hide the details view and compact the window by double - clicking the expand/collapse
control that sits between the Groups & Files list column header and the details list column header,
also shown in Figure 3 - 11. Double - clicking the divider completely collapses the Groups & Files
pane, leaving only the details list.
There are some shortcut commands in the View ➪ Smart Groups submenu.
Each brings the project window to the front and selects the chosen smart group.
The details list always displays the set of source items encompassed by the current selection in the
Groups & Files list. Selecting an item in the Groups & Files list displays that item. Selecting a group
lists the details of all of the items contained in that group and any subgroups. Selecting a target lists
all of the items used to build that target. Selecting combinations of groups and items displays the
aggregate union of those sets.
A few obscure exceptions to this rule exist. For instance, the content of
frameworks and bundles are not included in the details list unless the framework
or bundle is explicitly selected in the Groups & Files list. This avoids
commingling the individual components of a framework, which might include
hundreds of header fi les, with the source fi les of your project.
FIGURE 3-12
Details, Details
❘
33
c03.indd 33c03.indd 33 1/22/10 12:12:02 PM1/22/10 12:12:02 PM
Download at getcoolebook.com
34
❘
CHAPTER 3 XCODE LAYOUT
The details list is typically used to see the status of an item; for example, to see whether it contains
any compiler errors, has been modifi ed, or needs to be built. Double - clicking an item in the list
opens that item and is generally equivalent to opening the corresponding item from the Groups &
Files list. A few properties can be edited directly in the details list; most notably, the Target column.
An item with a check box in this column can be immediately added or removed from the current
target by ticking its check box.
Showing and Hiding Detail Columns
The columns shown in the details list are dependant both on the type of items being listed and
which columns you ’ ve elected to display. Each group contains only one kind of item: The Project
group contains source fi les, the Find Results group contains search results, the Bookmarks group
contains bookmarks, and so on. Some properties that apply to source fi les (Target membership,
compiled size, and so on) do not apply to bookmarks and vice versa. Selecting a set of fi les displays
only the detail columns appropriate to source fi les. Selecting one or more bookmarks displays
columns appropriate only to bookmarks.
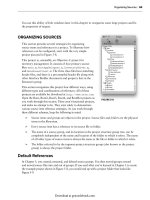
Within the set of applicable columns, you are free to choose which are shown by enabling and
disabling individual columns. To change the columns in a details list Right/Control+click any
column header, as shown in Figure 3 - 13. A pop - up menu shows all the columns and which are
currently displayed. Some detail lists have columns that you cannot hide. For example, the Role
column in the Targets group cannot be hidden, and does not appear in the pop - up list.
FIGURE 3-13
c03.indd 34c03.indd 34 1/22/10 12:12:15 PM1/22/10 12:12:15 PM
Download at getcoolebook.com
You can resize columns by dragging the divider line between column headers. Reorder columns by
dragging the column header to a new position. The layout for each type of list is remembered
separately, so changes to one type of list do not affect others.
Showing Details in the Groups & Files List
In addition to choosing the columns for the details list, you can add selected detail columns directly
to the Groups & Files list. Right/Control+click any column header in the Groups & Files list. Not
all details apply to all types of items; ones that don ’ t will be blank.
This ability is particularly useful in the Condensed layout style, which does not have a details pane
in the project window. For example, in multi - target projects I invariably add the Target Membership
column to the Groups & Files list so that I can quickly see (and change) what fi les are members of
the active target.
INFO WINDOWS
The Inspector and Info windows are the third, and fi nest, level of detail in Xcode. The details list
shows basic properties about many items at once, but an Info window tells the whole story. It is
where you can inspect and modify every aspect, property, and setting of each item. For some items,
that ’ s a lot of information.
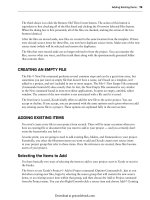
You can view the information about an item either in an Info window or in the Inspector
palette. Info windows are regular windows. One is shown on the left in Figure 3 - 14. You can
have multiple Info windows open at a time, which is particularly useful for comparing the
details of two items. To open the Info window for an item, select the item in the project window,
or have an editor window active, and choose the File ➪ Get Info (Command+I) command, click the
blue i icon in the toolbar, or Right/Control+click the item and choose Get Info from the contextual
menu.
Changing the properties of the project, target, or executable is such a common activity that
Xcode provides additional shortcuts just for those. When you double - click the top - level project
group, individual targets, and individual executables, Xcode opens an Info window — rather
than expanding or collapsing their contents like other groups. The Project menu contains three
commands: Edit Project Settings, Edit Active Target, and Edit Active Executable. All of these
commands just open the appropriate Info window.
Info Windows
❘
35
c03.indd 35c03.indd 35 1/22/10 12:12:16 PM1/22/10 12:12:16 PM
Download at getcoolebook.com
36
❘
CHAPTER 3 XCODE LAYOUT
The Inspector palette, shown on the right in Figure 3 - 14, is a single fl oating palette that
shows the information for the currently selected item or active window. Getting information
about a different item is as easy as selecting the item. The Inspector is always on top of all
other windows and disappears when Xcode is not the active application. You can use both the
Inspector and Info windows at the same time.
To reveal or hide the Inspector palette, hold down the Option key and select the File ➪ Show/Hide
Inspector command (Option+Command+I).
The Inspector and Info windows can display and alter the properties for more than one item at a
time. Select multiple items and the Info window presents all of the properties that are common to
those items. If you select disparate items, the Info window may only present one or two properties
that are common to all, such as the item ’ s Comments. Radically different items result in an Info
window that says “ Nothing to Inspect. ”
For each property, Xcode displays the value that is common to all of the items or it presents
an indicator that the value of the property varies between the items. Changing the value of the
property changes it for all of the items. If the property cannot be logically applied to all items, it is
disabled.
FIGURE 3-14
c03.indd 36c03.indd 36 1/22/10 12:12:17 PM1/22/10 12:12:17 PM
Download at getcoolebook.com
Changes made in the Inspector and Info windows are immediate. There is
no opportunity to cancel the change and most changes are not tracked by the
Undo facility, so be mindful about making changes that you might want to
retract, although there are actually very few changes that you could make in
an Info window that aren ’ t easily reversed. The advantage is that you do not
have to close the Inspector or Info window for the changes to take effect. This
is particularly useful when you ’ re changing values like build settings, because
you can edit the setting and build immediately with the new settings. The only
exceptions are some text entry fi elds. You may have to tab out of a fi eld, or
switch focus to another control or window, before the change is applied.
TOOLBARS
The toolbar is a standard Macintosh user - interface element. Toolbars can contain command
buttons, pop - up lists, search fi elds, and other controls right at the top of each window, making
them immediately visible and quickly accessible. Refer back to Figure 3 - 1, or almost any other
fi gure of a window, for an example. The items you want in your toolbar are those functions that
you use repeatedly and to which you want fast access, as well as settings and conditions that you
want to refer to quickly. If you ’ ve been using OS X for any length of time, you are undoubtedly
familiar with toolbars. If not, here ’ s a crash course on Mac OS X toolbars:
Toolbars can be shown or hidden by clicking the elongated white button at the right side of
the window ’ s title bar, or by choosing View ➪ Show/Hide Toolbar.
Toolbars can be customized by choosing View ➪ Customize Toolbar or by clicking the
toolbar button while holding down the Command and Option keys.
Add, remove, or rearrange items in the toolbar customization sheet by dragging.
Choose the icon mode and size at the bottom of the sheet.
You can rotate through the toolbar ’ s icon modes and sizes by repeatedly clicking the toolbar
button while holding down the Command key.
All like windows share the same toolbar. Customizing the toolbar of an editor window
changes the toolbar for all editor windows.
Almost all toolbar controls implement a command, setting, or function found elsewhere in the
Xcode system. Toolbars do not add functionality — they merely add convenience. Some toolbar
items are specifi c to certain windows. For example, the Debugger ’ s toolbar can be populated with
all kinds of debug - specifi c items, which do not appear in other toolbars. Explore the toolbars for
each window type to discover what items you can use there.
Although most of the controls you can place in the toolbar are self - explanatory, the following table
lists three that might need a little more explanation.
➤
➤
➤
➤
➤
➤
Toolbars
❘
37
c03.indd 37c03.indd 37 1/22/10 12:12:18 PM1/22/10 12:12:18 PM
Download at getcoolebook.com
38
❘
CHAPTER 3 XCODE LAYOUT
TOOLBAR CONTROL FUNCTION
Project An oft - overlooked toolbar shortcut that simply brings you back to
your project window, equivalent to View ➪ Project (Command+0). If
you have a lot of editor windows obscuring your screen, it ’ s a quick
way back home.
Tasks The “ stop sign ” item is used to stop running tasks. Tasks include
building, running, and debugging. Click once to stop the most
recently started process or application. Hold down the button
to reveal a list of running tasks and choose the task you want to
terminate.
Overview The Overview pop - up menu is a combination of the Active SDK,
Active Build Confi guration, Active Target, Active Executable, and
Active Architecture tools. If you work with multitarget projects
that produce several executables or have more than three build
confi gurations, this is probably the most useful tool to have in your
toolbar.
The project window ’ s toolbar (in the Default and All - In - One layout style) has one oddball tool
that you can only add or remove using the View ➪ Layout ➪ Show/Hide Page Control command.
It adds a tool to the left side of the toolbar that performs the same function as the expand/
collapse control that sits between the Groups & Files list column header and the details list
column header, as shown in Figure 3 - 15.
STATUS BAR AND FAVORITES BAR
The thick portion at the bottom of the window ’ s frame (which was visible in Figure 3 - 1) is not
merely decorative — it ’ s the status bar. The status bar displays various progress and status messages
for processes like builds and multifi le searches. You can hide or show the status bar in most
windows using the View ➪ Layout ➪ Hide/Show Status Bar command.
You can reveal the Favorites bar in the project window, shown in Figure 3 - 15, using the View ➪
Layout ➪ Show/Hide Favorites Bar command. Here you can place fi les and bookmarks to which
you want convenient access. Drag a fi le or bookmark into the Favorites bar to add it. Drag it out to
remove it.
c03.indd 38c03.indd 38 1/22/10 12:12:21 PM1/22/10 12:12:21 PM
Download at getcoolebook.com
Clicking once on a favorites item selects that item in the project window. Double - clicking opens the
fi le. In the case of a bookmark, it jumps to that bookmark location. If you add a source group to
the Favorites bar, click and hold on the folder to get a pop - up menu of the fi les in that group.
ACTIVITY VIEWER WINDOW
The Activity Viewer window is a bit of an odd duck. It ’ s the only window that doesn ’ t really belong
to any specifi c Xcode function, tool, or item. It simply displays the progress of various Xcode tasks.
Open it using the Windows ➪ Activity command. It displays the status of background processes
such as builds, re - indexing, batch fi nds, predictive compilation, and similar behind - the - scenes
activity. It is most useful for observing Xcode itself. If you ’ re wondering whether the project indexer
is fi nished indexing your project, a quick trip to the Activity window will tell you what ’ s going on.
Or, maybe you just want something interesting to look at while building a large project.
SUMMARY
You should now have a good feel for how to get around in Xcode. You know how to choose the
visual style that fi ts your needs, customize the interface a little, organize the items in your projects,
and get varying degrees of information about items in a project.
You are now ready to create a working project.
FIGURE 3-15
Summary
❘
39
c03.indd 39c03.indd 39 1/22/10 12:12:22 PM1/22/10 12:12:22 PM
Download at getcoolebook.com
c03.indd 40c03.indd 40 1/22/10 12:12:24 PM1/22/10 12:12:24 PM
Download at getcoolebook.com