Lập trình Wrox Professional Xcode 3 cho Mac OS part 7 pot
Bạn đang xem bản rút gọn của tài liệu. Xem và tải ngay bản đầy đủ của tài liệu tại đây (3.56 MB, 11 trang )
5
Sources
WHAT'S IN THIS CHAPTER?
Understanding source item type and reference types
Editing source item references and attributes
Learning some strategies for organizing assets in a project
Creating and adding new source fi les
Adding source items for existing fi les, folders, and frameworks
Reorganizing a project
You ’ ve learned how to create and reorganize projects. Everything you ’ ve learned so far has
dealt exclusively with the project document. The project document contains its settings,
targets, and preferences, but it doesn ’ t contain any of the assets — fi les and folders — that will
be used to build the project. All of your project ’ s assets, essentially everything to which your
project needs to refer, are defi ned and organized in the project source group. Each item in the
source group contains a reference to an actual fi le or folder in the fi lesystem.
The most important concept to keep in mind while you ’ re working with source items is this:
Every item in the project group is a reference to a real fi le or folder. There are different kinds
of source items and there are different kinds of references. Just to make things interesting,
source items can refer to other source items, creating references to references.
Source item references in Xcode are very fl exible, affording you a great deal of latitude to
organize your source fi les and projects in just about any way imaginable. The number of
possible combinations, however, can potentially create a lot of confusion and indiscriminately
defi ned references can quickly create a tangled maze of relationships. Once you learn the
basic reference types you shouldn ’ t have any problem understanding your project ’ s structure,
choosing the correct type for new source items, or straightening out broken ones.
➤
➤
➤
➤
➤
➤
c05.indd 53c05.indd 53 1/21/10 1:21:16 PM1/21/10 1:21:16 PM
Download at getcoolebook.com
54
❘
CHAPTER 5 SOURCES
This chapter describes the different types of source items and references, shows you how to add and
redefi ne source items, gives you some strategies for maintaining some sanity in your project ’ s source
references, and provides some tips on how to reorganize a project without breaking it, or fi xing it
if necessary.
REFERENCES
Every fi le, folder, and framework that you see in the project group of your project ’ s window is
a source item . Every source item contains a reference to a fi le or folder in the fi lesystem. Each
reference consists of two attributes:
1. Path
2. Reference Type
The path attribute is a POSIX path to a fi le or folder. The reference type determines where
the path originates. The six reference types, their path types, and their origins are listed in the
following table.
REFERENCE TYPE PATH TYPE PATH ORIGIN
Relative to Enclosing Group Relative Location of Enclosing Folder
Relative to Project Relative Project Folder
Absolute Absolute None
Relative to Build Product Relative Active Build Product Folder
Relative to Current SDK Relative Current SDK Root Folder
Relative to Xcode Relative /Developer
A relative path can be empty, which means that it refers to the origin directory —
equivalent to the identity POSIX path ( . ).
A Relative to Enclosing Group reference, like the one shown in Figure 5 - 1, is the typical reference
type and the one created by default. To view or edit a source item ’ s reference, select the item, open
its Info window, and switch to the General tab. The path of an enclosing group reference is relative
to the folder referred to by the source group that contains the item. This reference type is the default
because it simplifi es many aspects of project organization. Ironically, it ’ s also the most diffi cult to
explain, so I ’ ll come back to it after I ’ ve described the other reference types.
c05.indd 54c05.indd 54 1/21/10 1:21:19 PM1/21/10 1:21:19 PM
Download at getcoolebook.com
A Relative to Project reference uses a path relative to the current location of the project folder — the
folder that contains the project document. The topmost project group always refers to the location
of the project folder (you can ’ t change the folder reference of the project group). The origin of
these references is dynamic; if you move or rename the project ’ s folder, the origin of the references
changes accordingly. Items with this kind of reference are always valid as long as the relative path
from the project folder to the source item remains consistent. The most likely candidate for a
Relative to Project reference would be a key subfolder inside the project folder. A less common use
would be a sister folder outside the project folder that shares a common enclosing folder, or some
other near relationship.
Absolute references are the easiest to explain; the path of an absolute reference contains an
absolute path to a source fi le or folder. Absolute references are usually used for referencing system
components, such as libraries and frameworks, that never move. You would never use an absolute
FIGURE 5-1
References
❘
55
c05.indd 55c05.indd 55 1/21/10 1:21:31 PM1/21/10 1:21:31 PM
Download at getcoolebook.com
56
❘
CHAPTER 5 SOURCES
reference to a source fi le that you ’ ve created. You might use an absolute path to refer to a shared
pool of resources on a fi le server, but source control or source trees would provide a better solution.
Both of these alternatives are described in Chapter 21.
The last three reference types — Relative to Build Product, Relative to Current SDK, and Relative to
Xcode — defi ne references relative to one of three dynamic locations.
A Relative to Build Product reference uses a path relative to the current product build folder. A
single target can produce several different products (typically one built for debugging and a different
one built for deployment). Each of these variations is defi ned by a build confi guration. Changing the
build confi guration changes the active project build folder.
If you want to include the product of one target (say, a target that produces a plug - in) as a
source item for another target (say an application that includes that plug - in), you would use
a source item with a Relative to Build Product reference. When the application is being built with
the Debug build confi guration, the source item of the application will refer to the plug - in that was
built with the Debug confi guration. When the application is built with the Release
confi guration, its source item will automatically refer to the plug - in that was built with the
Release confi guration. All items in the Product source group (naturally) use Relative to Build
Product references.
Similarly, a Relative to Current SDK reference is relative to the active SDK being used to build
the project — specifi cally, the SDKROOT build setting. You would use this kind of reference to
include SDK resources (like system - supplied image fi les) in your project. The reference will refer to a
different fi le should you change your base SDK setting.
Last, the Relative to Xcode reference is much like the Relative to Project reference.
The reference path is relative to the folder where the Xcode tools are installed. Unless you selected
an alternate installation location in Chapter 1, this will be
/Developer . You would use this
reference type if your project were using one of the developer tool resources, like the unit testing
framework.
Now, back to the Relative to Enclosing Group reference type. Enclosing group references
are those created by default, and the origin of each is the folder referred to by its enclosing
group. If all of the references are relative to other references, you might be wondering to
what they all refer. To fi nd out, examine any newly created Xcode project. The Simple
project, shown in Figure 5 - 2, uses an enclosing group reference with a path of
MyDocument.h .
c05.indd 56c05.indd 56 1/21/10 1:21:31 PM1/21/10 1:21:31 PM
Download at getcoolebook.com
The fi le to which it refers is the MyDocument.h fi le in the folder of its enclosing group — the Classes
group. If you examine the Classes source item, it also uses an enclosing group reference with an
empty path, meaning that it simply refers to the folder of its enclosing group. Its enclosing group is
the Simple project group, whose folder reference is always the project folder.
Mystery solved: Every source item reference in the project is relative to its enclosing group, so
eventually all references refer (indirectly) to the project folder. The effect is stunningly simple. You
can create, rename, and reorganize your project ’ s source groups and items any way you want. No
matter how you arrange them, each group eventually refers to the project folder, and all asset fi les
get stored in that one folder.
This is a simple, fl at, storage arrangement for the assets of your project; it doesn ’ t require any
maintenance and is extremely robust. You use source groups to organize your assets and eschew
any attempt to organize the actual fi les. This project organization strategy is discussed later in the
chapter, along with some alternatives.
FIGURE 5-2
References
❘
57
c05.indd 57c05.indd 57 1/21/10 1:21:32 PM1/21/10 1:21:32 PM
Download at getcoolebook.com
58
❘
CHAPTER 5 SOURCES
SOURCE ITEM TYPES
A source item — the generic term for anything in the project group — will be one of the following
four types:
SOURCE ITEM TYPE REFERENCE
Source File Any fi le used to build the project
Source Group A folder that members of the group can refer to
Source Folder A folder used to build the project
Framework A folder containing a framework
A source fi le item is a reference to a data fi le. It can be a program source fi le, a header, an Interface
Builder document, an XML fi le, an image fi le, or a font — it doesn ’ t matter. Every source fi le item
refers to exactly one fi le or package.
You ’ ve already spent some time working with source groups . They are the logical containers of the
project. Each source group refers to a real folder on the fi lesystem. What the group contains (in the
project structure group) is entirely up to you and may have little or no correspondence with the fi les
in that folder. The folder to which it refers is of primary interest to subitems that use enclosing group
references.
Two more source item types also refer to a folder but much more directly. A source folder item is very
much like a source fi le item, but the folder to which it refers defi nes its content. The visual differences
between a source group and source folder are slight, but their behavioral differences are profound.
Figure 5 - 3 shows two projects. In the one on the left, the Help item is a source group containing
three items (
index.html , help.css , and background.png ). In the project on the right, the
Help item is a source folder containing three fi les. Do they look the same? In a black - and - white
illustration it ’ s going to be hard to tell the difference. The source group (left) is yellow in the Xcode
interface, whereas the source folder (right) is blue. Looking at the attributes of the two items, as
shown in Figure 5 - 4, reveals that the item on the right is of type “ folder. ”
FIGURE 5-3
c05.indd 58c05.indd 58 1/21/10 1:21:33 PM1/21/10 1:21:33 PM
Download at getcoolebook.com
FIGURE 5-4
The key difference is this:
A source group is a logical container for other source items.
A source folder is a source item.
To put it another way, a source group is a folder within your project, while a source folder is a folder
in the fi lesystem. Although Xcode lets you browse the contents of both, a source folder is treated
as a single source object. The contents of the folder are not treated as separate source items. This
means that they can ’ t be individually included in a target or otherwise referred to in the project, nor
do they have attributes or references.
Source folders are not that common, but are handy when you have a prepopulated folder structure
that you need to treat as a single entity in a target or build phase. Typical examples would be a
folder of HTML help fi les or a precompiled database.
You can see this difference in the interface. Look again at Figure 5 - 2. A target membership attribute
appears next to the source folder, but not next to any of its items; a source folder is a single object
that can be a member of a target. The situation for the source group is reversed. A source group is
never a member of a target; it ’ s only a container for other source items, which have their own target
membership attributes.
➤
➤
Source Item Types
❘
59
c05.indd 59c05.indd 59 1/21/10 1:21:34 PM1/21/10 1:21:34 PM
Download at getcoolebook.com
60
❘
CHAPTER 5 SOURCES
TIP TO REMEMBER
Like smart groups, the items in a source folder item dynamically refl ect the
contents of its folder. Add a fi le to the folder and it appears in the source folder
item — well, sometimes. Xcode can be lazy about updating its display. Collapse
and re - expand a folder item to see any changes made to the folder.
How you add a source folder item to your project isn ’ t particularly obvious. It ’ s described later in
this chapter in the section “ Adding Existing Items, ” under the subsection “ Recursively Creating
Groups and Creating Folder References. ”
Finally, a framework item is yet another kind of folder item. The only difference between a
framework item and a folder item is that Xcode automatically recognizes framework folders and
integrates them into the project. It indexes the
headers of the framework, includes the framework
symbols in auto - completion, and correctly links
to the dynamic libraries in the framework. In the
project, treat it as you would a single library to
which your project links. Xcode takes care of the
details.
SOURCE ITEM ATTRIBUTES
You already know how to see the source item ’ s
attributes in its Info window, as shown in
Figure 5 - 5. This section explains how to edit an
item ’ s reference. You can do this individually or for
a group of items.
The Name fi eld contains the name of the item. If
the item can be renamed, this fi eld is editable. The
name of a fi le, folder, or framework item is always
the same as the item ’ s actual fi lename. Editing the
name of a fi le, folder, or framework item renames
the actual fi le or folder . A source group ’ s name is
independent of the folder it refers to, and renaming
a source group merely renames it in the project
document.
Setting an Item ’ s Path
The Path and Path Type fi elds defi ne the item ’ s reference, and are what most of this chapter has been
about so far. The Full Path fi eld displays the ultimate (resolved) path to the fi le or folder. This is how
FIGURE 5-5
c05.indd 60c05.indd 60 1/21/10 1:21:35 PM1/21/10 1:21:35 PM
Download at getcoolebook.com
Xcode interprets the path using the given reference type. You can change the reference type using
the pop - up menu. Xcode recalculates an equivalent path.
If you want to see the fi le or folder to which an item refers, Control/Right - click
the source item in the project and choose Reveal in Finder.
To change the path, click the Choose button. Select a fi le or folder from the browser. For fi le,
folder, and framework items, the name of the item changes to match that of the newly selected fi le
or folder.
Selecting a new path for a source group also renames the source group to the
name of the chosen folder. If you want the group to have a different name, edit it
after choosing the folder.
Source Item Type and Encoding
The next section in the Info window is the item ’ s type. This is an internal categorization based on
the fi le ’ s fi le type and extension so that Xcode knows how to treat the item. It is used to determine
whether an item can be included in a target, and in what phase of the target the item should be. It
determines how, or whether, Xcode will display the item in an editor window and what language
and syntax coloring should be used.
You can change how Xcode treats an item by selecting a different type. Normally Xcode sets the
type correctly, but on rare occasions you might need to change it if, say, Xcode identifi es a fi le
as being
text.xml when it ’ s actually text.plist.xml . The type attribute only affects Xcode ’ s
handling of the fi le. The operating system, external build systems, and compilers still interpret the
fi le based on its type and extension. That is, changing the type of an .m fi le from source.c.objc to
source.c.cpp will not cause the fi le to be compiled as a C++ fi le.
The File Encoding, Line Endings, and Tab attributes apply only to text fi les and are disabled for
all other types. The File Encoding defi nes the expected binary format for the characters in the fi le.
Change this setting if the assumption is wrong. The Line Endings attribute is also an assumption,
but one that is largely superfl uous; most Xcode editors determine what line endings are being used
when the fi le is opened.
Changing the File Encoding for a text fi le presents the dialog box shown in Figure 5 - 6. The Convert
button interprets the fi le using the previous encoding, and then rewrites the fi le using the new
encoding. Use this option if the encoding of the fi le was correct and you want to change the format
of the fi le to a different encoding. The Reinterpret button simply changes the encoding attribute in
the source item, leaving the fi le unaltered. Select Reinterpret if the encoding attribute of the fi le was
incorrect, and you ’ re changing it to what it should be.
Source Item Attributes
❘
61
c05.indd 61c05.indd 61 1/21/10 1:21:37 PM1/21/10 1:21:37 PM
Download at getcoolebook.com
62
❘
CHAPTER 5 SOURCES
The Tab Width, Indent Width, and Editor
Uses Tabs options (see Figure 5 - 5 again) are
explained in the next chapter. Normally, you
will want to use the same settings for all fi les,
but you can change them for an individual
fi le here, or by using the View ➪ Text ➪ Tab
Settings command while editing the fi le. Click
the Reset to Text Editing Defaults button to
restore the fi le ’ s settings to the defaults set in
the editor preferences.
The Make File Localizable and Add Localization buttons are used to create multiple, locale - specifi c
versions of a fi le. Many fi les can be localized so that language - and location - specifi c information in
the fi le can be customized for different regions and populations. File localization is also covered
in the next chapter.
Changing Attributes for
Multiple Items
In Chapter 3, you learned how to use the Inspector
palette or an Info window to display the aggregate
attributes for multiple items. Settings that are
common to all of the items are shown. If all of the
items have the same value for a particular setting,
that value is displayed. If a value differs for some
items, the value displayed is some kind of Mixed
value, as shown in Figure 5 - 7. For check boxes, this
displays as a dash. Changing any of the settings in
a multi - item Info window changes that setting for
all of the items to the same value.
Some settings behave a little differently when they
are changed for multiple items. This is particularly
true of the Path attribute. You wouldn ’ t want
Xcode literally to set the same path attribute for
multiple items; all of the items would suddenly
point to the same fi le or folder! Instead, the Choose
button in a multi - item Info window enables you to
choose the folder that contains all of the items. The
name of each item is not altered, and a new path
for each is constructed by combining the chosen
folder and the item ’ s fi le or folder name. This is an effi cient way of setting the location for any
number of source fi les at once. Note that this can cause item references to be broken if the folder
chosen does not contain one or more of the items.
FIGURE 5-7
FIGURE 5-6
c05.indd 62c05.indd 62 1/21/10 1:21:47 PM1/21/10 1:21:47 PM
Download at getcoolebook.com
You use this ability of Info windows later in this chapter to reorganize some large projects and fi x
the properties of targets.
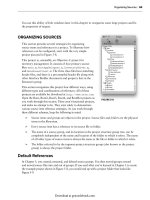
ORGANIZING SOURCES
This section presents several strategies for organizing
source items and references in a project. To illustrate how
references can be confi gured, start with the very simple
project pictured in Figure 5 - 8.
This project is, ostensibly, an Objective - C project for
inventory management. It consists of four primary source
fi les:
main.m , RootAppDelegate.m , InventoryServer.m ,
and WarehouseClient.m . The three class fi les have matching
header fi les, and there is a precompiled header fi le along with
other Interface Builder documents and property lists in the
Resources group.
This section reorganizes this project four different ways, using
different types and combinations of references. All of these
projects are available for download at
.
Open the Root, Root2, Root3, Root4, and RootRot projects as
you work through this section. These aren ’ t functional projects,
and make no attempt to be. They exist solely to demonstrate
various source item reference strategies. As you work through
these different schemes, keep the following in mind:
Source items and groups are objects in the project. Source fi les and folders are the physical
items in the fi lesystem.
Every source item has a reference to its source fi le or folder.
The name of a source group, and its location in the project structure group tree, can be
completely independent of the name and location of the folder to which it refers. The name
of all other types of source items is always the same as the fi le or folder to which it refers.
The folder referred to by the topmost project structure group (also known as the project
group) is always the project folder.
Default References
In Chapter 3, you created, renamed, and deleted source groups. You then moved groups around
and moved source fi les into and out of groups. If you used what you ’ ve learned in Chapter 3 to create
the example project shown in Figure 5 - 8, you would end up with a project folder that looks like
Figure 5 - 9.
➤
➤
➤
➤
FIGURE 5-8
Organizing Sources
❘
63
c05.indd 63c05.indd 63 1/21/10 1:21:48 PM1/21/10 1:21:48 PM
Download at getcoolebook.com