Lập trình Wrox Professional Xcode 3 cho Mac OS part 8 pot
Bạn đang xem bản rút gọn của tài liệu. Xem và tải ngay bản đầy đủ của tài liệu tại đây (3.52 MB, 13 trang )
You use this ability of Info windows later in this chapter to reorganize some large projects and fi x
the properties of targets.
ORGANIZING SOURCES
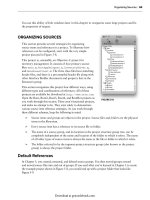
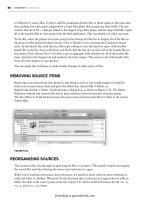
This section presents several strategies for organizing
source items and references in a project. To illustrate how
references can be confi gured, start with the very simple
project pictured in Figure 5 - 8.
This project is, ostensibly, an Objective - C project for
inventory management. It consists of four primary source
fi les:
main.m , RootAppDelegate.m , InventoryServer.m ,
and WarehouseClient.m . The three class fi les have matching
header fi les, and there is a precompiled header fi le along with
other Interface Builder documents and property lists in the
Resources group.
This section reorganizes this project four different ways, using
different types and combinations of references. All of these
projects are available for download at
.
Open the Root, Root2, Root3, Root4, and RootRot projects as
you work through this section. These aren ’ t functional projects,
and make no attempt to be. They exist solely to demonstrate
various source item reference strategies. As you work through
these different schemes, keep the following in mind:
Source items and groups are objects in the project. Source fi les and folders are the physical
items in the fi lesystem.
Every source item has a reference to its source fi le or folder.
The name of a source group, and its location in the project structure group tree, can be
completely independent of the name and location of the folder to which it refers. The name
of all other types of source items is always the same as the fi le or folder to which it refers.
The folder referred to by the topmost project structure group (also known as the project
group) is always the project folder.
Default References
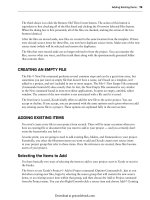
In Chapter 3, you created, renamed, and deleted source groups. You then moved groups around
and moved source fi les into and out of groups. If you used what you ’ ve learned in Chapter 3 to create
the example project shown in Figure 5 - 8, you would end up with a project folder that looks like
Figure 5 - 9.
➤
➤
➤
➤
FIGURE 5-8
Organizing Sources
❘
63
c05.indd 63c05.indd 63 1/21/10 1:21:48 PM1/21/10 1:21:48 PM
Download at getcoolebook.com
64
❘
CHAPTER 5 SOURCES
In Chapter 3 you were probably unaware that every group you created had a folder reference. The
InventoryServer.m fi le is relative to the folder referred to by the Services group, which is relative
to the folder referred to by the Classes group, which is relative to the folder referred to by the Root
project group. You can see this by examining any source item ’ s reference.
Now you know that all of these source items and groups use enclosing group references, which
mean they all indirectly refer to the project folder. This is why all of the fi les are in the same folder
(see Figure 5 - 9).
Whenever you create a new group using the File ➪ New Group command, Xcode creates a group
with an empty path and an enclosing group reference. The net effect is a kind of “ null ” folder
reference that always refers to the same folder as its parent group.
Thus, the default organization of Xcode projects places all of the source fi les directly in the project
folder. You are free to reorganize the hierarchy of your source groups and items to any depth you
want; the organization of the actual fi les will remain fl at. For small - to medium - sized projects
that are self - contained and have no duplicate fi lenames, this is the easiest organization. It is
uncomplicated and shouldn ’ t cause any surprises. Better yet, you don ’ t have to worry about source
group folder references. If your project falls into this category, feel free to skip ahead to the next
section now and come back here when your projects get more complex.
However, if you want to control the physical organization of the fi les in your project, or your project
source fi les are already organized into multiple folders, read on.
Sharing a Subfolder
Often, source fi les are already organized into a hierarchy of folders. They may have been organized
this way in a former project, for source control, or by an obsessive programmer — we know who
you are. The next few variations of the Root project present different techniques for grafting a
source group structure onto an existing folder structure.
Figure 5 - 10 shows a reorganization of the source fi les by type. All of the programming source fi les
in the Root2 project have been moved into a Source folder and the application bundle resource
fi les have been moved into a Resources folder.
FIGURE 5-9
c05.indd 64c05.indd 64 1/21/10 1:21:49 PM1/21/10 1:21:49 PM
Download at getcoolebook.com
The folder references for the Classes, Other Source, and Resources groups were changed from
enclosing group to project relative. The paths of the fi rst two groups were both set to Source . The
Resources group ’ s path was set to Resources .
TIP TO REMEMBER
If you want to quickly browse the properties of several source items, open up
the Inspector palette (Option+Command+I). The Inspector follows the current
selection, so just click each source item to review its path and reference type.
This is a variation of the default references you looked at in Root. Instead of lumping
everything together in the project folder, a few key folders are designated as gathering places
for a broad collection of assets. The Source folder contains all of the program source fi les. In the
project, the Classes, Services, Client, and Other Sources groups all refer to the same folder.
This allows fi ne - grained organization within the project structure group, using a coarser folder
structure.
This is a good organization for a medium - sized project whose fi les are grouped by type,
where you just want to keep the main project folder uncluttered, or there is some other logical
reason for subdividing the fi les. A good application of this approach would be for a project that
produced multiple targets (that is, a client and a server). The project might have broad subfolders
like
Common , Client , and Server , whereas the project structure group would have more detailed
groups, like Utilities, Network Services, Logging, Database, and so on.
By establishing a few key high - level groups anchored to a specifi c subfolder, then using default
subgroups, you keep much of the fl exibility of Xcode default source group arrangement, while
imposing a modest amount of structure on the actual fi les.
FIGURE 5-10
Organizing Sources
❘
65
c05.indd 65c05.indd 65 1/21/10 1:21:50 PM1/21/10 1:21:50 PM
Download at getcoolebook.com
66
❘
CHAPTER 5 SOURCES
Everything is Relative
Another approach is to mirror the structure of a complex hierarchy of folders in the project group.
Rather than being disconnected from the folder structure in the fi lesystem, the project source groups
mimic them verbatim. This is a good solution for large projects with an extensive folder hierarchy.
The folder structure in Figure 5 - 11 isn ’ t that large or extensive, but the technique applies to a
hundred folders as easily as it applies to these six.
FIGURE 5-11
In this scheme, each source group uses its path to point to a specifi c subfolder within its enclosing
group ’ s folder. In earlier projects, all of the source groups using an enclosing group reference type
have had empty paths — referring to the same folder as their parent group. These groups all have
paths that refer to a subfolder of the enclosing group and have the same name as the folder to
which they refer. The end result is a source group structure that parallels the folder structure in the
fi l e s y s t e m .
In Figure 5 - 12, the Source group refers to the
Source folder within the folder of its enclosing group.
Its enclosing group (Server) refers to the Server folder within its enclosing group, which is the
project folder.
c05.indd 66 c05.indd 66 1/21/10 1:21:51 PM1/21/10 1:21:51 PM
Download at getcoolebook.com
A few of the source items in the Root3 project are listed in the following table to illustrate the
relationships.
ITEM REFERENCE TYPE PATH COMPLETE PATH
Root3 Fixed project … /Root3
Client Enclosing - group Client … /Root3/Client
Resources Enclosing - group Resources … /Root3/Client/Resources
Source Enclosing - group Source … /Root3/Client/Source
Server Enclosing - group Server … /Root3/Server
Resources Enclosing - group Resources … /Root3/Server/Resources
Source Enclosing - group Source … /Root3/Server/Source
Warehouse-
Client.m
Enclosing - group WarehouseClient.m … /Root3/Client/Source/
WarehouseClient.m
Root - Info.plist Enclosing - gr
oup Root - Info.plist … /Root3/Server/Resources/
Root - Info.plist
main.m Enclosing - group main.m … /Root3/Server/Source/main.m
FIGURE 5-12
Organizing Sources
❘
67
c05.indd 67c05.indd 67 1/21/10 1:21:52 PM1/21/10 1:21:52 PM
Download at getcoolebook.com
68
❘
CHAPTER 5 SOURCES
As you develop the project, it ’ s pretty easy to maintain the relationship between the source groups
and the fi lesystem folder structure. New and imported fi les are automatically added to the correct
folder. If a folder is reorganized or renamed, making the same change to its source group keeps all
enclosing references valid.
You might think that setting up all of these references would be tedious — especially for the
imagined project containing hundreds of source fi les. Fear not. Xcode ’ s import process, described
a little later in this chapter, will create any number of nested source groups — exactly like those
described here — with a single command.
Outside the Box
Conveniently, all of the references so far have been to folders inside the folder of the enclosing group
or project, but this does not have to be the case. Figure 5 - 13 shows the project group and the fi les in
project folder for Root4.
FIGURE 5-13
You ’ ll notice that the project includes a Client group that contains two source fi les
( WarehouseClient.h and WarehouseClient.m ) that aren ’ t in the project folder, so where
do these fi les come from? The answer can be found in the Client group ’ s properties, as shown in
Figure 5 - 14.
FIGURE 5-14
c05.indd 68c05.indd 68 1/21/10 1:21:53 PM1/21/10 1:21:53 PM
Download at getcoolebook.com
The Client group uses a project relative reference. Its POSIX path refers to a subfolder of Root4 ’ s
sister project, Root3. The Root4 project has included fi les outside its project folder, just as if it
owned them. Some selected source item references are listed in the following table.
ITEM REFERENCE TYPE PATH COMPLETE PATH
Root4 fi xed Project … /Root4
Client Project - relative /Root3/Client/
Source
… /Root3/Client/Source
WarehouseClient.h Enclosing - group WarehouseClient.h … /Root3/Client/Source/
WarehouseClient.h
WarehouseClient.m Enclosing - group WarehouseClient.m … /Root3/Client/Source/
WarehouseClient.m
Root4AppDelegate.h Enclosing - group Root4AppDelegate.h … /Root4/Root4AppDelegate.h
Although it ’ s easier to create a single project with multiple targets, as you see in Chapter 16, this
isn ’ t always possible. If you must create multiple projects that need to share common assets, relative
paths that refer to sister project folders is one way to share a single source fi le.
A popular use for this scheme is to set up “ libraries ” of source fi les (that is, a Utilities folder full
of commonly used C functions or classes). Any number of projects can include selected fi les from
the shared Utilities folder, without duplicating source fi les, or incurring the added complexity of
creating a formal framework or dynamic library.
A more robust solution to sharing folders amongst multiple projects is to use
source trees . See Chapter 21 if you have this type of folder structure.
This technique can also be used to create “ shell ” projects. Suppose you have a large project written
for Linux in an Eclipse project folder. You can create an Xcode project that uses source group paths
that refer to the folders inside the Eclipse workspace folder. The Xcode project wouldn ’ t have to
contain anything beyond the project document and any project - specifi c fi les.
The disadvantage to this technique is that it creates a rather fragile project structure:
If the fi rst project ’ s folder were renamed, the references in the second project would break.
If either project were moved without the other, the references would break.
If the folder structure of the fi rst project were reorganized, the references in the second proj-
ect would break.
Ideally, project folders are self - contained and autonomous. The only references they have to assets
outside the project folder are to system frameworks that never change location. When the ideal isn ’ t
practical, you can use relative paths to include shared assets outside the project ’ s folder.
➤
➤
➤
Organizing Sources
❘
69
c05.indd 69c05.indd 69 1/21/10 1:21:54 PM1/21/10 1:21:54 PM
Download at getcoolebook.com
70
❘
CHAPTER 5 SOURCES
Bad References
It ’ s just as important to know what kind of references you should not create. I left this last
project open overnight, and some mischievous pixies snuck in and decided they would have a little
fun with it.
At fi rst glance, the RootRot project looks pretty much like project Root3. All of the references are
valid, and the project builds and runs — at least on my computer. Things can ’ t be all bad, can they?
The following table lists a few of the references in the project.
ITEM REFERENCE TYPE PATH COMPLETE PATH
RootRot fi xed project … /RootRot
Client Absolute … /RootRot/Client … /RootRot/Client
Source Enclosing - group Database … /RootRot/Source/
Database
WarehouseClient.h Enclosing - group /Source/
WarehouseClient.h
… /RootRot/Client/Source/
WarehouseClient.h
main.m Project - relative Server/Source/main.m … /RootRot/Server/Source/
main.m
Resources Project - relative /Root3/Server/Resources … /Root3/Server/Resources
Root - Info.plist Enclosing - group Root - Info.plist … /Root3/Server/Resources/
Root - Info.plist
Here ’ s some of what ’ s going on in the RootRot project:
The Client source group uses an absolute path. If you copied this project to your system —
or moved it anywhere other than where the project was originally created — the project
won ’ t build because Client won ’ t refer to a valid folder, and all items that refer to Client ’ s
folder will be broken.
The WarehouseClient.h item was moved from the Source group to the Resources
group. Xcode conveniently “ fi xed ” the path of the item so that it still refers to the
WarehouseClient.h fi le that ’ s in the sister directory to Resources. If the location or name
of the Source folder ever changed, this reference would break.
main.m uses a project relative path. If the location or name of either the Server or Source
folder changed, the reference would break. On the other hand, this item could be moved
anywhere in the project structure group and would still refer to the main.m fi le.
The second Resources group has been changed to a project relative reference that refers
to the Resources folder in the Root3 project. None of the references for its subitems (like
Root - Info.plist ) has been altered. Because they all use enclosing folder references, they
all now refer to items in Root3 ’ s, not RootRot ’ s, project folder. This could create a great
deal of confusion.
➤
➤
➤
➤
c05.indd 70c05.indd 70 1/21/10 1:21:59 PM1/21/10 1:21:59 PM
Download at getcoolebook.com
Although Xcode provides you very fl exible structures for organizing and referring to your project ’ s
assets, you can see that this fl exibility can be abused. If you checked out a project like RootRot to a
new directory, you ’ d probably end up spending more time trying to fi gure out what ’ s wrong with the
project than you would building it.
Best Practices
Here are some simple tips for keeping your project group functional and tidy:
Use enclosing group references unless there ’ s a compelling reason to use some other refer-
ence type.
Avoid references to items outside your project folder.
Use project relative references to point to top - level folders within the project folder that
aren ’ t likely to move, or to top - level folders outside the project that contain assets shared
with other projects.
When referring to assets included in an SDK or the Xcode tool, use the appropriate SDK or
Xcode reference type.
Never use absolute references for anything except system frameworks or other reasonably
static assets, like a shared repository of development resources on a fi le server.
Learn to use source trees (see chapter 21).
If your asset is a product, or any part of a product, that ’ s produced by a target, always use
a product relative reference (or an enclosing folder reference that refers to a product relative
reference).
CREATING NEW SOURCE FILES
In this section you learn how to add new fi les to a project. You ’ ve already created source groups.
This section describes how to create new fi les and add them to your project. The next section shows
you how to import existing fi les and folders into a project.
Unless your project is trivial, you will soon want to create new source fi les. The File ➪ New File
command creates a new source fi le based on a fi le template of your choosing, and adds that fi le as
a source item to your project. The item is added to the currently selected group, or the group that
contains the currently selected item. The fi rst step to creating a new source fi le is to choose the
location in the project where you want it added. Now choose File ➪ New File (Command+N) or
Right/Control+click a source item and choose Add ➪ New File.
Figure 5 - 15 shows the New File Assistant where you choose a fi le template. Most templates are
self - explanatory. Source fi le templates produce skeletal fi les with some basic comments and
appropriate
#include or #import statements. The C++ and Objective - C class fi le templates declare
an empty class with the same name as the fi le.
➤
➤
➤
➤
➤
➤
➤
Creating New Source Files
❘
71
c05.indd 71c05.indd 71 1/21/10 1:22:00 PM1/21/10 1:22:00 PM
Download at getcoolebook.com
72
❘
CHAPTER 5 SOURCES
Many templates have other options that can be selected before creating the fi le.
For example, the Objective - C template has an option to choose the base class for the new class.
The UIViewController class template will optionally produce a companion NIB document
containing the UIView for the new controller. Choose your desired options and click the Next
button. This presents the dialog box shown in Figure 5 - 16.
FIGURE 5-15
FIGURE 5-16
c05.indd 72c05.indd 72 1/21/10 1:22:01 PM1/21/10 1:22:01 PM
Download at getcoolebook.com
In the File Name fi eld, edit the name of the fi le. Be careful not to alter the fi le ’ s extension. If the
template is for a source fi le type that normally has a companion header fi le (C, C++, and Objective - C
templates), Xcode offers to create both fi les at the same time. Uncheck this option if, for some
exceptional reason, you want Xcode to skip the creation of the companion header fi le.
The Location fi eld displays the path to the folder where the new fi le will be created. This is always
the folder referred to by the source group where the new item will be created. New fi le references
are always relative to the enclosing group. Think twice before navigating to another folder, because
Xcode will construct a relative path from the group ’ s folder to the new fi le. Review the RootRot
project again, if you need a reminder of why that ’ s probably a bad idea.
If you do decide to change the location, enter the path or click the Choose button to select an
existing folder. You can also create an arbitrary number of new folders at the same time by
appending the paths of the nonexistent folders to the path. Before the new folders are created, a
dialog appears that asks whether you really want to create them. Alternatively, you can use the
New Folder button in the Choose browser to create any number of new folders before selecting the
fi nal one.
The Add to Project option (see Figure 5 - 16) selects the project to which the new source item will
be added. The default is the active project, but you can choose another open project or “ none. ”
Selecting none creates the fi le, or fi les, but does not add any new source items to the project. That ’ s
one situation where changing the fi le ’ s location fi eld won ’ t have unexpected consequences.
The Targets list shows all of the targets that accept the type of fi le being created. Only targets in
the project selected in the Add to Project pop - up menu are considered; the list will be empty if the
project is “ none, ” or if no targets in the selected project accept the type of fi le being created.
Each target in the list has a check box next to it. If checked, the newly created source item is added
to that target. If you are creating both a source fi le and its companion header fi le, checking a target
adds both fi les to the target — unless the target only accepts one of the two types. This can actually
be a hazard for targets that accept both types, because you often want to add the source fi le to a
target but not the header. The “ Ridding Targets of Unwanted Files ” section has a trick for quickly
getting unwanted headers out of a target.
Once the new fi le has a name, a location, a project, and a list of targets, click the Finish button to
create the fi le and add its source item to the project. The new fi le opens automatically in an editor
window.
If you try to create a fi le that already exists, Xcode warns you with the dialog box shown in
Figure 5 - 17.
Creating New Source Files
❘
73
c05.indd 73c05.indd 73 1/21/10 1:22:02 PM1/21/10 1:22:02 PM
Download at getcoolebook.com
74
❘
CHAPTER 5 SOURCES
You have three choices, obtusely explained in the dialog box. The fi rst choice, which is probably the
best, is to cancel the operation.
Your second choice is to check the boxes next to the fi les you want to replace and click the
Overwrite Selected Files button. Despite the fact that the button says “ Overwrite, ” the checked fi les
are not overwritten. They are fi rst moved to a new subfolder named with a numeric suffi x and the
extension .moved - aside , as shown in Figure 5 - 18. The folder will be in the same folder where
the new fi les are being created.
FIGURE 5-17
FIGURE 5-18
c05.indd 74c05.indd 74 1/21/10 1:22:02 PM1/21/10 1:22:02 PM
Download at getcoolebook.com
The third choice is to click the Remove Old Then Create button. The action of this button is
equivalent to fi rst checking all of the fi les listed and clicking the Overwrite Selected Files button.
When the dialog box is fi rst presented, all of the fi les are checked, making the action of the two
buttons identical.
After the fi les are moved aside, new fi les are created in the same location from the template. If there
were already source items for these fi les, you now have duplicate source items. Make note of the new
source items (which will be selected) and remove the duplicates.
The fi les that were moved aside are no longer referred to from the project. You can examine the
fi les, recover what you want, and then trash them along with the spontaneously generated folder
that contains them.
CREATING AN EMPTY FILE
The File ➪ New File command performs several common steps and can be a great time saver, but
sometimes you just want an empty fi le that doesn ’ t have a name, isn ’ t based on a template, isn ’ t
added to a project, and isn ’ t included in one or more targets. The File ➪ New Empty File command
(Command+Control+N) does exactly that. In fact, the New Empty File command is very similar
to the New command found in most text editor applications. It opens an empty, untitled, editor
window. The content of the new window is not associated with a fi le until it is saved.
The fi rst time it is saved, Xcode kindly offers to add the new fi le to the active project. You can
accept or decline. If you accept, you are presented with the same options you ’ re given when you add
any existing source fi le to a project. These options are explained fully in the next section.
ADDING EXISTING ITEMS
You won ’ t create every fi le in your project from scratch. There will be many occasions when you
have an existing fi le or document that you want to add to your project — and you certainly don ’ t
write the frameworks you link to.
At some point, you are going to need to add existing fi les, folders, and frameworks to your project.
Essentially, you select the fi lesystem items you want to add and Xcode creates new source items
in your project group that refer to those items. Once the references are created, those fi les become
assets of your project.
Selecting the Items to Add
You have basically two ways of selecting the items to add to your project: start in Xcode or start in
the Finder.
The fi rst is to use Xcode ’ s Project ➪ Add to Project command (Option+Command+A). Just as you
did when creating new fi les, begin by selecting the source group that will contain the new source
items, or an existing source item within that group, and then choose the Add to Project command
from the Project menu. You can also Right/Control+click a source item and choose Add ➪ Existing
Adding Existing Items
❘
75
c05.indd 75c05.indd 75 1/21/10 1:22:03 PM1/21/10 1:22:03 PM
Download at getcoolebook.com