Lập trình Wrox Professional Xcode 3 cho Mac OS part 10 potx
Bạn đang xem bản rút gọn của tài liệu. Xem và tải ngay bản đầy đủ của tài liệu tại đây (1.76 MB, 7 trang )
80
❘
CHAPTER 5 SOURCES
or Objective - C source fi les. Trying to add the companion header fi les to those targets at the same time
does nothing, but some native targets have a Copy Files phase that accepts any kind of fi le. The end
result is that all of the .h fi les get added to the target ’ s Copy Files phase, and the target dutifully copies
all of the headers fi les in your project into the fi nal application. This is probably not what you want.
To fi x this, select the project structure group in the Groups & Files list to display all of the fi les in
the project in the details window (choose View ➪ Details if you are using the Condensed layout
style). In the details list, click the icon (fi le type) column to sort the items by type. Click the fi rst
header fi le in the list, then scroll down and Shift - click the last one to select all of the header fi les in
the project. Now choose File ➪ Get Info to get an aggregate Info window for all of the header fi le
items. Switch to the Targets tab and uncheck all of the targets. This removes all of the header fi les
from all of the targets in your project.
You can adapt this technique to make similar changes in other types of fi les.
REMOVING SOURCE ITEMS
Removing source items from your project is just about as easy as you would imagine it would be.
Select one or more source items and press the Delete key, choose Edit ➪ Delete, or
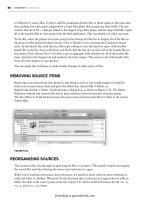
Right/Control+click ➪ Delete. Xcode presents a dialog box, as shown in Figure 5 - 22. The Delete
References button only removes the source item (reference) from your project structure group.
The Also Move to Trash button removes the source item and moves the fi le(s) it refers to the system
Trash folder.
FIGURE 5-22
REORGANIZING SOURCES
This section walks you through reorganizing the fi les in a project. This usually entails rearranging
the actual fi les and then altering the source item references to agree.
When you ’ re working with source item references, it ’ s useful to know when an item ’ s reference is
valid and when it ’ s broken. Whenever Xcode discovers that a reference no longer refers to a fi le or
folder, the item in the source group turns red. Figure 5 - 23 shows invalid references for the Two.h ,
Two.m , and main.cpp items.
c05.indd 80c05.indd 80 1/21/10 1:22:12 PM1/21/10 1:22:12 PM
Download at getcoolebook.com
Again, this is hard to see in black - and - white. Red items are usually a clue that the item ’ s reference
needs to be fi xed — but not always. Whenever you create a new project or target, a source item is
created for the product that will be produced. Until you successfully build the target, its product
doesn ’ t exist and its product item in the source tree will be red. This is perfectly normal and
expected.
You can fi x a reference in two ways: open the Info window for the item and correct its Path
attribute, or put the fi le or folder the item is pointing to where the reference expects it to be.
Xcode immediately recognizes that the reference is valid again, and changes the item ’ s color
back to black.
The next three sections present typical project item reorganization chores, and the steps you need to
follow to keep your source item references valid.
Moving Files
The ReorganizeMe1 project, shown in Figure 5 - 24, has two subfolders: Main and Flipside .
You decide that the SpinningWidget class fi les need to be moved from the Main group to the
Flipside group.
FIGURE 5-23
Reorganizing Sources
❘
81
c05.indd 81c05.indd 81 1/21/10 1:22:13 PM1/21/10 1:22:13 PM
Download at getcoolebook.com
82
❘
CHAPTER 5 SOURCES
To relocate the two fi les, follow these steps:
1. Open the ReorganizeMe1 project.
2. Drag the SpinningWidget.h and SpinningWidget.m items from the Main group into the
Flipside group.
3. Control/Right - click the Main source group and choose Reveal in Finder.
4. In the Finder window, move the two source fi les, SpinningWidget.h and SpinningWidget.
m , from the Main folder into the Flipside folder.
5. Switch back to the project window. Notice that the two source items are now red. Select
both items and choose File ➪ Get Info.
6. In the multi - item Info window, click the Choose button. Select the Flipside folder and
click Choose. The item references are now valid again.
Whenever you move a source item, Xcode adjusts the path (never the reference type) of the item so
it continues to refer to the same fi le or folder. This is convenient in one sense, because it allows you
to reorganize your source items freely without breaking any references. The disadvantage is that it
permits you to create convoluted item references with relative paths through parent folders and an
organization that no longer refl ects the organization of the physical fi les.
All of the items in this exercise use enclosing - group references. When you moved the two source fi le
items from one group to the other in step 2, Xcode recalculated new paths starting from
the new group back to the old one ’ s folder. If you had stopped and looked at the attributes of the
two items after step 2, their paths would have been
/Main/SpinningWidget.h and
/Main/SpinningWidget.m . This also explains why the two items were still valid after the move.
In step 4, you moved the actual fi les. As a result, the fi les were no longer in the Main folder and the
source item references broke. When you switched back to the project window, Xcode displayed
the two items in red.
FIGURE 5-24
c05.indd 82c05.indd 82 1/21/10 1:22:13 PM1/21/10 1:22:13 PM
Download at getcoolebook.com
In steps 5 and 6, you examined the attributes of the two items in a multi - item Info window and used
it to point both items to their respective fi les in the Flipside folder. Remember that when you select
a new path for multiple items , you ’ re selecting the parent folder for every individual item — you ’ re
not setting every item to the same path. The path for each was recalculated using a relative path to
the Flipside folder (which is nothing, because the enclosing group ’ s folder is the Flipside folder)
and their respective fi lenames. The references are once again valid.
Rearranging Folders
Now you are going to relocate entire folders. This demonstrates the principle advantage of using
enclosing - group references in your project.
ReorganizeMe2 has a Source folder that contains two subfolders: Product and Order . The project
is about to grow into a client and server. The source fi les for the client and server are to be kept
apart, and the common code moved into a shared tree. Follow these steps:
1. Open the ReorganizeMe2 project.
2. Select the Order group. Control/Right - click the Order group and choose Reveal in Finder.
In the Finder window, create three new folders inside the Source folder: Common , Client ,
and Server . Drag the Product and Order folders into the Common folder.
3. Switch back to the project window. Select the Product and Order groups and choose Project
➪ Group to enclose them in a new group. Name the group Common. Use the File ➪ New
Group command to create new groups named Client and Server in the Source group.
4. Select the Common group. Control/Right - click the Common group and choose Get Info. In
the Info window, click the Choose button and select the Common folder in the project. Click
Choose to change the path.
5. Repeat step 4 for the Client and Server groups, choosing the Client and Server folders,
respectively.
The Order and Product source groups refer to the Order and Product subfolders in their enclosing
group ’ s folder. Moving the Order and Product folders into the newly created Common folder broke
the references to those folders, and all the references of the items they contained.
In step 3, the new groups Common, Client, and Server were created with enclosing group references
that referred to the folder in the source group (remember that this is the default for all newly created
source groups). Although the Order and Product groups are now enclosed in the Common group,
they still indirectly refer to the same location and are still broken.
In step 4, you changed the Common group ’ s folder from the Source folder to the new
Common subfolder. As soon as that happened, the references in the Order and Product folders were
valid again.
Step 5 simply prepared the other two groups, Client and Server, so they reference fi les in their
respective folders.
When you ’ re using enclosing - group references, it is usually easier to rearrange folders than it is to
move individual fi les around. Xcode only adjusts the path of the group being moved. Items within
that group are not adjusted and continue to have the same relative relationship to their enclosing
group. After the parent group references are fi xed, all of the child references are valid again.
Reorganizing Sources
❘
83
c05.indd 83c05.indd 83 1/21/10 1:22:14 PM1/21/10 1:22:14 PM
Download at getcoolebook.com
84
❘
CHAPTER 5 SOURCES
Reorganizing by Re - adding
You can see how using the multi - item Info window and relative references can save a lot of time
when changing references for large trees of groups and fi les. If you ’ re moving just a few folders
around, that ’ s probably the best way, but even this can be a fair amount of work if you ’ re making a
lot of changes at once.
Another technique is simply to throw the whole thing away and let Xcode rebuild all of the
relationships from scratch. Start with the ReorganizeMe3 project. All of the items in this project
have enclosing - group references.
ReorganizeMe3 has several subfolders: Database , Product , Order , ShoppingCart , and Utilities .
Create three new folders in the Source folder: Common , Client , and Server . Move the Database
folder into the Server folder. Move the ShoppingCart folder into the Client folder. Move the
Product , Order , and Utilities folders into the Common folder. The fi le structure should now look
like Figure 5 - 25.
FIGURE 525
Now follow these steps:
1. Open the ReorganizeMe3 project.
2. Select the Source group. Control/Right - click the Source group and choose Delete. In the
dialog box, click Delete References.
3. Select the Project Structure group. Choose Project ➪ Add to Project. Select the Source
folder and click the Add button.
4. In the Add to Project dialog box, uncheck the Copy option, set Reference Type to Default,
and select Recursively Create Groups for Any Added Folders. Click the Add button.
c05.indd 84c05.indd 84 1/21/10 1:22:15 PM1/21/10 1:22:15 PM
Download at getcoolebook.com
Remember that the project document doesn ’ t contain any of the source material for your project;
just references to those fi les. In step 2, you deleted all of the references to the source fi les in this
project — but just the references; the original source fi les are still in the project folder.
In steps 2 and 3, you used the Add to Project command to re - create new groups and source fi le items
that match the reorganized folder hierarchy exactly.
If you have major asset reorganization to do, the fastest and easiest way to rectify your groups and
source items might be simply to start over. This might inadvertently include other fi les, or place fi les
in targets that don ’ t belong there, but these aberrations can usually be dealt with swiftly.
Why you would not want to let Xcode rebuild all the groups and items? Deleting
the source items also deletes any other attributes associated with those items.
File encoding, custom tab settings, specifi c target membership, comments, and
build options are lost when the source items are deleted. The newly created
source items will all have default attributes. If you need to preserve attributes for
a large number of source items, you probably have no choice but to reorganize
the groups and folders “ the hard way, ” using one of the fi rst two techniques.
SUMMARY
You should now have a clear understanding of how Xcode refers to source fi les in a project. As you
work with Xcode, keep these key concepts in mind:
Every source item has a path to the fi le or folder to which it refers.
A path can be absolute, relative to the project folder, or relative to the folder of the enclosing
group.
File, folder, and framework items have the same names as the source fi les or folders to
which they refer. Renaming the source item renames the physical fi le or folder. In contrast,
the name of a source group is independent of the folder to which it refers.
The path and reference type of an item can be changed in an Info window. A multi - item
Info window can change the location or reference type for several items at once.
Moving an item in the source tree adjusts its path so that it continues to refer to the same
fi le or folder.
Now that you can add new and existing source fi les to your project, you will undoubtedly want to
edit them. Editing text is the topic of the next chapter.
➤
➤
➤
➤
➤
Summary
❘
85
c05.indd 85c05.indd 85 1/21/10 1:22:16 PM1/21/10 1:22:16 PM
Download at getcoolebook.com
c05.indd 86c05.indd 86 1/21/10 1:22:19 PM1/21/10 1:22:19 PM
Download at getcoolebook.com