Lập trình Wrox Professional Xcode 3 cho Mac OS part 37 pps
Bạn đang xem bản rút gọn của tài liệu. Xem và tải ngay bản đầy đủ của tài liệu tại đây (1.6 MB, 7 trang )
278
❘
CHAPTER 13 INTERFACE BUILDER
keep the classes you defi ne in the interface design tool in synchronization with the source code of the
application. If that fails, you end up with a nib document that contains classes, outlets, and actions
that don ’ t actually exist in the application.
The modern incarnation of Interface Builder eliminates these problems by eliminating round - trip
editing. You defi ne your classes, outlets, and actions in the Xcode project, and then switch to
Interface Builder to create, confi gure, and connect them together. It ’ s demonstrably the fastest and
easiest way to work, and it keeps your project in perfect synchronization with your nib document.
Nevertheless, a few vestiges of the old methodology still lurk in Interface Builder. The commands File ➪
Read Class Files and File ➪ Write Class Files will import or export class defi nitions from/to a text fi le.
To export a class, choose one or more objects in a nib document and choose File ➪ Write Class
Files. Interface Builder will generate skeleton class defi nitions that include every outlet and action
method Interface Builder is aware of. It does not include any attribute properties.
To import a class, choose File ➪ Read Class Files and select one or more class defi nition ( .h ) fi les.
Interface Builder will interpret these, locating all of the IBOutlet and IBAction declarations, and
add the class to its internal model of known classes. You can now create custom instances of the
class that will include the defi ned outlets and actions. It ’ s up to you to ensure that those classes,
with those outlets and actions, exist at run time.
NIB DOCUMENT FORMATS
Both Xcode and Cocoa have evolved over the years. The format of nib documents has changed to
accommodate that evolution, adding new features and capabilities — along with compatibility issues. The
biggest recent change in Interface Builder has been the support for a new XML - based nib document. The
XML document is compiled to produce the binary NIB fi le that ’ s actually deployed with your application.
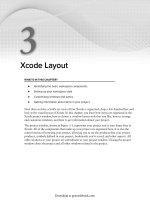
Choose the Window ➪ Document Info (Option+Command+I) command to open the nib document ’ s
info window, as shown in Figure 13 - 43.
FIGURE 13-43
Here you can set and verify a number of different compatibility settings.
c13.indd 278c13.indd 278 1/21/10 3:38:26 PM1/21/10 3:38:26 PM
Download at getcoolebook.com
Document Format
The Document Format tells you what kind of format the nib document uses. The basic types are
Cocoa, Cocoa Touch, and Carbon. If the nib document was created recently, it will probably be in
the new XML (XIB) format. If not, it will be in one of the legacy (NIB) fi le formats.
You can ’ t change the type of a nib document; the type is fi xed when the document is created.
XIB nib documents are stored as XML documents. When your application is built, the XML
representation is compiled (via the ibtool ) into a binary form suitable for deployment. If you are
still using one of the legacy nib document bundles, the binary portion of the nib document is simply
copied into your application ’ s bundle.
You can use the ibtool command - line tool to extract information, convert between storage
formats, and perform other manipulations. For example, the following command converts the
legacy MainMenu.nib bundle into a modern XIB document:
ibtool upgrade MainMenu.nib write NewMainMenu.xib
Use Xcode ’ s Help ➪ Open man Page command to review the documentation for ibtool .
Document Locking
The Document Locking controls are exactly the same as those in the identity inspector, but apply
to every object in the document. If you ’ ve individually locked some objects, the Reset All Objects
button will clear all locked objects in the nib.
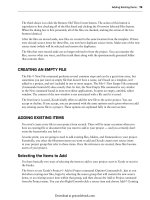
Checking Deployment Compatibility
The Deployment Target performs some basic deployment compatibility checks on the objects in your
nib document. As operating systems evolve, so do the features and capabilities of the objects in
your nib document. Setting the minimum anticipated deployment target for the nib document
presents any possible confl icts or incompatibilities that might exist when the nib document is loaded
on an older system, as shown in Figure 13 - 44.
FIGURE 13-44
NIB Document Formats
❘
279
c13.indd 279c13.indd 279 1/21/10 3:38:27 PM1/21/10 3:38:27 PM
Download at getcoolebook.com
280
❘
CHAPTER 13 INTERFACE BUILDER
Compatibility confl icts can be notes, warnings, or errors. In Figure 13 - 44, the error tells you that
the MKMapView class did not exist prior to iPhone OS 3.0. If this nib document were loaded
using an older iPhone OS, it would fail to create the necessary objects, possibly failing to load
altogether. The solution would be to either restrict this application to iPhone OS 3.0 or later, or
prepare two nib documents: one to load on iPhone OS 3.0 and a second one (without an instance
of MKMapView) for earlier systems.
Keeping Backward Compatibility
The Development Target setting lets you defi ne the earliest version of Interface Builder that you
want the nib document to be compatible with. This is important if you are working on projects that
are being maintained using an older version of Xcode. Though it would be nice if everyone were
always using the latest version of Xcode, sometimes that ’ s not practical. Setting this option warns
you if any properties of the nib document are incompatible with earlier versions.
CUSTOMIZING INTERFACE BUILDER
Interface Builder can be customized in a few small, and one very signifi cant, ways.
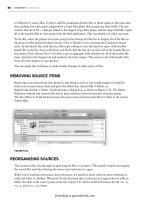
Customizing the Library Palette
There are number of ways to customize the
look and content of the library palette. The
typical library palette, shown on the left in
Figure 13 - 45, has three panes: the library
group, the objects in the selected groups, and
a description of the selected object.
You can collapse the group list down to
single pop - up menu by dragging the upper
pane separator to its highest position.
You can eliminate the description pane by
dragging the lower separator to its lowest
position. Both are shown on the right in
Figure 13 - 45.
Choose the action menu at the bottom, or
Right/Control - click the objects list, to choose
the display style. You can choose from very
compact to extremely verbose listings.
Creating Custom Groups
If you have a number of objects that you use
regularly, you can collect them in a custom
group. Choose New Group from the action menu at the bottom of the palette and give your group
FIGURE 13-45
c13.indd 280c13.indd 280 1/21/10 3:38:27 PM1/21/10 3:38:27 PM
Download at getcoolebook.com
a descriptive name. Items can be added to
your group by dragging them from the other
library groups into your group. To remove
items, select them and choose the Remove
From Group command. To delete the entire
group, choose Remove Group.
You can also create smart groups using
the New Smart Group command. A smart
group collects objects automatically based
on some criteria that you defi ne, as shown
in Figure 13 - 46.
Saving Custom Objects
You can also preconfi gure one or more objects, and then save them in the library palette for use
again later. To save custom objects:
1. Create an interface with one or more objects.
2. Customize, confi gure, and connect them.
3. Drag the objects from your nib document back into either the Custom Objects group or
your own custom group, as shown on the left in Figure 13 - 47.
4. Provide a name and some details for the saved objects, as shown on the right in
Figure 13 - 47.
The custom object, or objects, are saved in the library and can be re - created like any standard
object. To delete a custom object, select it and choose Remove From Library in either the action
menu or by Right/Control - clicking the item.
FIGURE 13-46
FIGURE 13-47
Customizing Interface Builder
❘
281
c13.indd 281c13.indd 281 1/21/10 3:38:28 PM1/21/10 3:38:28 PM
Download at getcoolebook.com
282
❘
CHAPTER 13 INTERFACE BUILDER
Customizing Document and Compatibility Checking
The compatibility checks that Interface Builder performs are done based on known
incompatibilities, common practices, and Apple ’ s recommendations. You might not agree with these
recommendations, their perceived severity,
or they might not apply to your projects. You
can edit the error and compatibility checks in
the Interface Builder preferences, as shown in
Figure 13 - 48.
The Alerts panel of the Interface Builder
preferences (Interface Builder ➪ Preferences)
lists all of the document and compatibility
checks that Interface Builder performs. Next
to each is a severity, which you can change.
Set the severity to Ignore and Interface
Builder will stop checking that issue. In
Figure 13 - 48, I ’ m raising the severity of an
invalid outlet connection, because I consider
that to be a profound programming error
(although at run time the connection is
simply ignored).
At the bottom is the Alert When Saving
option. Set it to the minimum severity that you want to be alerted to every time you save your
nib document.
Developing Custom Interface Builder Objects
Xcode and Interface Builder make it very easy to defi ne and create custom objects. It ’ s almost
trivial to add outlets and actions to those objects, which you can connect to other objects in the nib
document, but three things are still lacking:
You can ’ t defi ne new attributes for your custom objects, or edit your object properties using
the attributes inspector.
Your custom objects can ’ t defi ne actions that they send.
You can ’ t preview how your custom view object will look in Interface Builder.
The solution to these, and other, limitations is to create an Interface Builder Plug - In. An Interface
Builder Plug - In, or just plug - in for short, is a resource bundle that you create — probably as a
separate project — that defi nes one or more custom objects that will appear in the Interface Builder
library palette right alongside all of the standard objects. In fact, most of the objects you seein
Interface Builder ’ s library palette are provided by plug - ins. You can see (and change) those plug - ins
in the Plug - Ins panel of Interface Builder ’ s preferences window, as shown in Figure 13 - 49.
➤
➤
➤
FIGURE 13-48
c13.indd 282c13.indd 282 1/21/10 3:38:28 PM1/21/10 3:38:28 PM
Download at getcoolebook.com
A plug - in object can have attributes, editable
using the attributes panel. It can have a
simulated representation, so you can see how
it will look in Interface Builder, and it can
embody many of the advanced features of the
built - in objects: intelligent alignment guides,
embedded objects, size restrictions, and so on.
If you decide you want to create your own
Interface Builder Plug - In, start with the
Interface Builder Plug - In template in Xcode.
You ’ ll also fi nd the IBKit Interface Builder
templates convenient for adding additional
object defi nitions to an existing plug - in.
A rough sketch of how an Interface Builder
Plug - In is developed is as follows:
1. Create an Interface Builder Plug - In
project.
2. Defi ne a nib document that will present the object in the library palette.
3. Defi ne a nib document that contains the controls that will appear in its attributes panel.
4. Prepare an abstract description of the object that describes its properties, outlets, and
actions.
5. Write an object simulator that Interface Builder will use to draw instances of your object in
Interface Builder.
6. Build your plug - in and add the fi nished product in the Plug - Ins preferences panel.
These steps, and many other details, are described in the Interface Builder Plug - in Programming
Guide , included in the developer tools documentation.
SUMMARY
Interface Builder provides a rich environment for designing menus and windows, but it goes beyond
that, letting you defi ne classes, create custom objects, and connect those objects together at runtime,
all without having to write a single line of code.
You ’ ll quickly become addicted to designing your application interfaces and object relationships
using Interface Builder. If you like seeing your interface design graphically, you ’ ll enjoy the next
chapter, where you learn how to visualize your classes graphically.
FIGURE 13-49
Summary
❘
283
c13.indd 283c13.indd 283 1/21/10 3:38:29 PM1/21/10 3:38:29 PM
Download at getcoolebook.com
c13.indd 284c13.indd 284 1/21/10 3:38:29 PM1/21/10 3:38:29 PM
Download at getcoolebook.com