Lập trình Wrox Professional Xcode 3 cho Mac OS part 41 potx
Bạn đang xem bản rút gọn của tài liệu. Xem và tải ngay bản đầy đủ của tài liệu tại đây (3.74 MB, 10 trang )
15
Data Modeling
WHAT'S IN THIS CHAPTER?
Create a data schema
Defi ne entities, properties, and relationships
Migrate between data schema versions
Quickly create a user interface
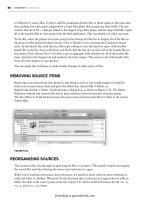
Data modeling is a visual tool for defi ning data objects and their relationships, called a
data schema. A schema defi nes entities that contain properties. Properties can be values or
relationships to other entities. The data modeling tools in Xcode let you create and edit a data
model, as shown in Figure 15 - 1. The data model then becomes a resource that can be used by
your application at run time.
To use data modeling effectively, you must have a rudimentary understanding of Core Data.
If you are not familiar with Core Data, start by perusing the Core Data Programming
Guide . You can fi nd it in the Xcode documentation, or you can browse it online at
http://
developer.apple.com/mac/library/documentation/Cocoa/Conceptual/CoreData/ .
This book is not about database development or Core Data programming, but like the chapter
on Interface Builder, it ’ s diffi cult to explain how to use the data modeling tools without
describing what you ’ re doing and why. This chapter focuses on the Xcode tools you use to
develop and maintain data models. In the process, I ’ ll explain the data model ’ s relationship
to the run time environment and touch on some best practices. Just know that the modeling
tools are the tip of the Core Data iceberg; Core Data can be extended extensively with custom
code — all well beyond the scope of this book. If you have questions, refer to the Core Data
Programming Guide .
➤
➤
➤
➤
c15.indd 309c15.indd 309 1/21/10 3:51:35 PM1/21/10 3:51:35 PM
Download at getcoolebook.com
310
❘
CHAPTER 15 DATA MODELING
TECHNOLOGY
Data modeling in Xcode has similarities to both class modeling and Interface Builder.
The user interface for data modeling is essentially the same as what you ’ ve used for class modeling,
with one very important difference: in data modeling, you actually create and edit the objects in the
data model. It is a true editor, not just a fancy visualization tool.
The user interface for data modeling is almost identical to the interface used for
class modeling; so similar that discussion of the common features has been
omitted from this chapter. If you haven ’ t read Chapter 14, I strongly urge you to
at least browse through the “ Class Model Browser, ” “ Class Model Diagram, ”
and “ Editing a Class Model ” sections. For the most part, simply substitute the
words “ entity ” for “ class ” and “ property ” for “ member. ”
From a conceptual standpoint, data modeling is most like Interface Builder: you graphically
defi ne objects and relationships. These defi nitions are stored in a data fi le that is included in
FIGURE 15-1
c15.indd 310c15.indd 310 1/21/10 3:51:38 PM1/21/10 3:51:38 PM
Download at getcoolebook.com
the application ’ s bundle. At run time, the data is read and objects are created. In Interface
Builder, the objects are archived in a nib document. In data modeling, the data schema is
deployed in a mom (Managed Object Model) fi le, produced by the data model compiler.
Entities (the containers you defi ne in a data model) are essentially class defi nitions: They defi ne the
form from which any number of instances are created. Unlike Interface Builder, you don ’ t defi ne
the instances in the class model. Instances are created dynamically to represent the records in your
database. The number of instances of the Employee entity that get created is a function of how
many employee records are read or created at run time. A human resources application that tracks
employees might create 50,000 Employee objects for a large company or none at all when used by a
sole proprietor.
Every instance of an entity becomes an instance of an NSManagedObject at run time.
If you need to add functionality to your entities — beyond what ’ s possible using the data
modeling tools — you can defi ne your own subclasses of NSManagedObject to be used instead.
The “ Creating NSManagedObject Subclasses ” section toward the end of this chapter explains how
that ’ s done.
TERMINOLOGY
One of the things that can be immediately confusing about data modeling is the terminology.
The data schema concepts are so much like classes and objects that it ’ s hard to see why the same
vocabulary isn ’ t used. The reason is largely historical: Database design and computer programming
had independent origins. Later, the two embraced many of the same concepts, ultimately merging
to form Object - Oriented Database Management Systems (ODBMS). Though many of the concepts
of object - oriented programming (OOP) and object - oriented databases (OODB) are the same, they
retain their original lexicons.
Despite their resemblance, signifi cant differences still exist between entities and classes, and the
different monikers help reinforce that. Just keep these two principles in mind:
At development time, you are designing a database .
At run time, managed objects are created to contain the data in that database .
The following table defi nes common terms used in Core Data and data modeling:
TERM DEFINITION
Entity An entity defi nes a container of properties. An entity can also contain
other auxiliary data such as user - defi ned values and predefi ned fetch
requests. Defi ning an entity is similar to defi ning a class or a table in a
database. At run time, instances of an entity are embodied by instances
of NSManagedObject.
Property The generic term for a member of an entity. The properties of an entity
can be attributes, relationships, or predefi ned queries.
➤
➤
Terminology
❘
311
continues
c15.indd 311c15.indd 311 1/21/10 3:51:50 PM1/21/10 3:51:50 PM
Download at getcoolebook.com
312
❘
CHAPTER 15 DATA MODELING
TERM DEFINITION
Attribute A value in an entity. In a class, this would be an instance variable. In a
database, this would be a fi eld. Values store primitive, atomic values
such as strings and integers.
Relationship A connection between an entity and other entities. Relationships
can be one - to - one or one - to - many. A Person entity might have two
relationships, mother and father, both of which would be one - to - one
relationships. The same entity might have a cousin relationship. This
would be a one - to - many relationship that connects that entity to all of
its cousins — which might be dozens or none at all. Relationships can
be defi ned in the actual storage using any number of techniques, but
typical database tools would use foreign keys or junction tables.
Inverse Relationship If entity A has a relationship to entity B, and entity B has a refl exive
relationship back to entity A, these two relationships are considered to
be the inverse of each other. The data modeler can recognize inverse
relationships, and uses that to simplify the data model diagram and to
highlight bidirectional connections.
Fetched Property A fetched property is like a relationship in that it connects an entity
to some other set of entities. Unlike a regular relationship, fetched
properties are based on a fetch request. A Person entity might have a
relationship called
siblings . It might then defi ne a fetched property
named sisters , which would be defi ned as all of the siblings where
sex == “ female ” .
Fetch Request A fetch request is a predefi ned query, usually created with the
predicate builder. A fetch request defi nes some criteria, such as
person.age < 21 , that can be used to fi lter entities.
CREATING A DATA MODEL
If you started your Xcode project using one of the Core Data application templates, your project
already has a data model document, and you can skip to the next section.
If you ’ re new to Core Data, I highly recommend that you start by creating your
fi rst data model via one of the Core Data project templates — if only to examine
what it does. There ’ s a modest amount of “ plumbing ” that has to be connected
before your data model will work at all. Specifi cally, NSManagedObjectContext,
NSPersistentStoreCoordinator, and NSManagedObjectModel objects have to be
created, confi gured, and shutdown properly. The Core Data project templates
do all of these basics already and make a great place to start.
(continued)
c15.indd 312c15.indd 312 1/21/10 3:51:50 PM1/21/10 3:51:50 PM
Download at getcoolebook.com
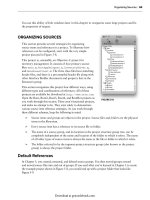
Create a new data model and add it to your project by choosing the File ➪ New command.
Choose the Data Model template — you ’ ll fi nd it in the Resource subgroup of either the iPhone
OS or Mac OS X groups. G ive the document a name and decide in what targets the model
should be included. Unlike class models, data models produce a product and should be included
in the targets that will use it. Clicking Next presents a dialog box like the one shown in
Figure 15 - 2.
FIGURE 15-2
If your project already has classes that represent your data model, or you ’ ve already started your
Core Data design by creating subclasses of NSManagedObject, Xcode can import your class
defi nitions and — as best as it can — use those to create an equivalent set of entities. If you ’ re
starting your data model from scratch, just skip this step.
On the left are the project ’ s source fi les and groups. Select a set of sources, and Xcode scans those
source fi les for class defi nitions. The classes it fi nds are listed in the center column. Click the Add
All button to add them all to the data model, or select specifi c classes and use the Add button to
add them selectively. Repeat this process until you ’ ve added all of the classes you want included in
the model. If you add too many classes, select them in the right column and click the Remove button
to forget them.
Click the Finish button to create the model and add it to the project. For every class added to
the Selected Classes list, Xcode creates an entity with that class name and implementation. As
mentioned earlier, entities based on classes other than NSManagedObject must ultimately be
Creating a Data Model
❘
313
c15.indd 313c15.indd 313 1/21/10 3:51:55 PM1/21/10 3:51:55 PM
Download at getcoolebook.com
314
❘
CHAPTER 15 DATA MODELING
a subclass of NSManagedObject. In other words, you can use your existing classes as the basis for
your new data model, but before your application will work you ’ ll have to change those classes so
they are subclasses of NSManagedObject. The section “ Creating NSManagedObject Subclasses ”
explains both how to subclass NSManagedObject and why you might not need to.
Creating Entities
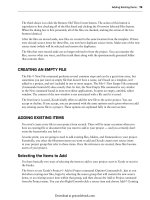
The fi rst thing to do is create entities — if you haven ’ t already. Underneath the Entity list are
plus (+), minus ( – ), and disclosure buttons. Click the plus button to create a new entity.
Alternatively, choose Design ➪ Data Model ➪ Add Entity. A new entity is created and given a
generic name. Edit the name in the details pane, as shown in Figure 15 - 3. You can also edit a name
by double - clicking an entity name in the browser list or by double - clicking the title of an entity
node in the diagram.
FIGURE 15-3
In the upper - right corner of the details pane is a small tab control that switches between several
different groups of settings. The different groups are similar to the different inspectors in Interface
Builder; each edits a particular aspect of the entity (or property). The leftmost settings tab is the
details pane of primary interest. I ’ ll also discuss some of the migration tab (wrench icon) settings
later in this chapter. You can fi nd descriptions of the other settings in the Core Data Programming
Guide .
Newly created entities have a class of NSManagedObject. If the entity is implemented by a custom
class, enter the name of your custom class in the Class fi eld. At run time, an instance of that class is
created instead.
Like classes, entities can inherit from other entities. You can defi ne common properties of several
entities in a superentity, with subentities fi lling out the differences. If an entity extends the defi nition
of another entity, select its superentity in the Parent menu. A superentity that exists only as a base
for subentities — one that is never used on its own — can be marked as Abstract. Abstract entities
are never created at run time.
To delete one or more entities, select them and click the
- button, press the Delete key, or choose
Edit ➪ Delete.
c15.indd 314c15.indd 314 1/21/10 3:51:56 PM1/21/10 3:51:56 PM
Download at getcoolebook.com
Creating Properties
Entities aren ’ t too interesting until they contain something. To add properties to an entity, begin by
selecting the entity in the browser or diagram. The list of existing properties appears in the middle
column of the browser. Click the + button below the Properties list and choose the Add Attribute,
Add Relationship, or Add Fetched Property command. If you don ’ t see this menu, choose Show
All Properties from the disclosure menu to the right of the – button. Alternatively, you can choose
the Design ➪ Data Model ➪ Add Attribute (Control+Command+A), Design ➪ Data Model ➪ Add
Relationship (Control+Command+R), or Design ➪ Data Model ➪ Add Fetched Property commands
from the main menu.
Interestingly, you can select multiple entities and add a new property to every one
using any of the Add Property commands. For example, selecting three classes
and choosing Add Attribute adds a new attribute to all three classes. So if you
needed to add a
tag attribute to eight different entities, you could do it with
a single Add Attribute command by selecting all eight entities before you began.
Adding any property creates the kind of property you chose and gives it a generic name. Edit the
name, type, and other specifi cs of the new property in the details pane. To rename a property,
you can also double - click its name in either the browser list or in the diagram. All property names
should begin with a lowercase letter. The three principal kinds of properties are described in the
following sections.
Attributes
Attribute properties contain discrete values, and are the basic building blocks of your data. The
types of data that Core Data supports are listed in the Type menu. Select the data type for
the attribute from the list. Depending on which type you select, additional validation fi elds appear,
as shown in Figure 15 - 4. The validation settings are used to determine if the value stored, or
attempting to be stored, in this attribute is allowed.
FIGURE 15-4
Creating a Data Model
❘
315
c15.indd 315c15.indd 315 1/21/10 3:51:57 PM1/21/10 3:51:57 PM
Download at getcoolebook.com
316
❘
CHAPTER 15 DATA MODELING
The scalar numeric types (Integer, Decimal, Float, and Date) defi ne minimum and maximum values.
String attributes can have minimum and maximum lengths. Alternatively, string attributes can
be matched against a regular expression. If the regular expression matches the string, the string is
valid. Other types, like Boolean and Binary Data, have no constraints.
An attribute can be Optional. If this is checked, the attribute is allowed to be completely absent
( nil ) when stored. Entities — like most databases — make a distinction between no value ( nil ) and
a neutral or default value like zero or a zero - length string. Attributes that are not optional must be
set before the entity can be stored.
The Default Value is the value given to an attribute when a new instance of the entity is created. If
left blank, the initial value will be absent ( nil ).
The Transient option is used for attributes that are not persistent (that is, they aren ’ t saved). As long
as the instance of the entity ’ s object exists in memory, the attribute will hold its value, but when the
entity is stored for later retrieval, transient properties are discarded.
One reason for using transient attributes is to model data types that Core Data
doesn ’ t understand. A transient attribute can use the Undefi ned data type,
allowing you to use any kind of value your application needs. In order to store
the value, you also include one or more persistent attributes in the entity that the
undefi ned type can be translated into. The persistent attributes store the value in
the database, which can be converted back into the special type when needed.
For example, you might defi ne a custom class that represents a direction
(course, azimuth, and velocity). Core Data does not know how to store your
object, but your object can be easily converted into three Double attributes that
Core Data can store. You can read more about non - standard attributes at
/>Conceptual/CoreData/Articles/cdNSAttributes.html .
Relationships
Relationships connect an instance of an entity to some number of other entities, and put the
“ relational ” in relational database . The Destination of a relationship is the kind of entity, or
entities, the relationship contains. By defi nition, all entities stored by a relationship must be the
same. The destination can be any other entity in the model, including abstract entities or even itself.
Self - referential references are common. For instance, a Person entity might have
children and
parent relationships, both of which refer to other Person entities.
The Inverse menu chooses the relationship in the destination entity that refers back to, or refl exively
includes, this entity. A Class entity with a students relationship holds references to all of the
Student entities enrolled in a class. The Student entity has a classes relationship that lists all of
the Class entities a student is enrolled in. The students and classes relationships are said to be
inverses of each other. Any Class that refers to a Student will fi nd itself in the list of classes that
student is enrolled in. Data modeling does not create inverse relationships automatically. You must
create both complementary relationships yourself. Setting the inverse relationship simplifi es the data
model diagram and highlights the symmetrical nature of the relationships, as described in the “ Data
Model Diagram ” section later in this chapter.
c15.indd 316c15.indd 316 1/21/10 3:52:02 PM1/21/10 3:52:02 PM
Download at getcoolebook.com
Relationships come in two fl avors: to - one and to - many . By default, a relationship is a to - one
relationship, meaning that the relationship refers to exactly one other entity. A mother relationship
in a Person entity would be a to - one relationship because every person has exactly one mother. (For
the purposes of this discussion, I ’ ll use nominal biological mothers and ignore boundary conditions
such as adoption and cloning.) A to - many relationship stores a variable number of references to
other entities. Defi ne a to - many relationship by checking the To - Many Relationship option in the
details pane, as shown in Figure 15 - 5. A
children relationship in a Person entity would be a
to - many relationship. A person could have none, one, or many children.
FIGURE 15-5
To - many relationships can be bounded, enforcing that the number of entities referred does not fall
outside a set range. Use the Min Count and Max Count fi elds to set those bounds. An example
would be a livingParents relationship, which would have a minimum count of 0 and a maximum
count of 2.
Like attributes, relationships can be Optional. This means that the relationship may be empty. On
a to - one relationship, it means that that the relationship might be nil — logically equivalent to a
to - many relationship with a minimum count of 0 and a maximum count of 1.
Relationships also have a Delete Rule. The Delete Rule determines what happens when an entity is
removed from a relationship — or even if it is allowed to be removed. The meanings of the different
settings are explained in the Core Data Programming Guide .
Adding Fetched Properties
Fetched properties are like relationships in that they defi ne a set of related entities. Unlike
relationships, they don ’ t store actual references to other entities. Instead, they defi ne a predicate
(such as a rule or criteria) that determines what entities are included. Like relationships, you must
select a destination entity. To defi ne the predicate to use, click the Edit Predicate button. The
predicate builder uses the context of the destination entity, so don ’ t forget to select the destination
before editing the predicate. The textual version of the predicate you defi ne is displayed in the
Predicate fi eld but is not directly editable there, as shown in Figure 15 - 6.
Creating a Data Model
❘
317
c15.indd 317c15.indd 317 1/21/10 3:52:07 PM1/21/10 3:52:07 PM
Download at getcoolebook.com
318
❘
CHAPTER 15 DATA MODELING
Adding Fetch Requests
Fetch requests are simply predefi ned predicates. Your application can use them in a variety of ways.
When you add a fetch request, the property list display changes from displaying regular properties
to listing only fetch requests. To switch between two, select the desired view using the disclosure
triangle at the bottom of the properties list. See the “ Data Model Browser ” section for more details.
DATA MODELING INTERFACE
The interface used by data modeling is so similar to the interface used for class modeling that it
would be a waste to reiterate it all here. Instead, this section just points out the differences between
class modeling and data modeling. Before reading this section, you should familiarize yourself with
the class modeling interface if you have not already done so. Class modeling was described in detail
in Chapter 14.
Data Model Browser
The data model browser lists the entities on the left, the entity properties in the middle, and the
details pane on the right, as shown in Figure 15 - 7.
FIGURE 15-7
FIGURE 15-6
c15.indd 318c15.indd 318 1/21/10 3:52:08 PM1/21/10 3:52:08 PM
Download at getcoolebook.com