Lập trình Wrox Professional Xcode 3 cho Mac OS part 75 pptx
Bạn đang xem bản rút gọn của tài liệu. Xem và tải ngay bản đầy đủ của tài liệu tại đây (1.62 MB, 5 trang )
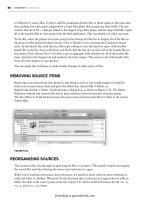
22
Using the Organizer
WHAT'S IN THIS CHAPTER?
Adding items to your organizer
Using, editing, and creating custom organizer actions
Making snapshots of organizer items
Managing iPhone/iPod devices
Confi guring your iPhone/iPod for development
Using iPhone/iPod developer utilities
The organizer window, shown in Figure 22 - 1, is a recent addition to Xcode. It encompasses an
eclectic collection of ad hoc functionalities, and could have easily been named the “ Doesn ’ t Belong
Anywhere Else ” window. Nevertheless, it performs a number of vital functions, particularly for
iPhone and iPod Touch developers. It acts as
a gathering point for disparate resources,
furnishes a framework for automating and
scripting your workfl ows, provisions
and authorizes devices for development, aids
in iPhone app debugging, and even provides a
means of managing non - Xcode projects.
Choose the Window ➪ Organizer
(Control+Command+O) command to open
the organizer window. There is only one
organizer window; it doesn ’ t belong to any
project. The organizer window has a set
of predefi ned groups on the left. Click the
details button at the bottom of the window
to expand or collapse the optional details
pane on the right.
➤
➤
➤
➤
➤
➤
FIGURE 22 - 1
c22.indd 617c22.indd 617 1/21/10 4:37:50 PM1/21/10 4:37:50 PM
Download at getcoolebook.com
618
❘
CHAPTER 22 USING THE ORGANIZER
The fi rst part of this chapter focuses on the Projects & Sources group. Here you can manage
projects, folders, documents, and other fi le items, attach custom scripts to those items, and perform
basic manipulations like editing, moving, and renaming them.
The later sections deal with the Devices and iPhone Development groups. These are specialized
features designed specifi cally for iPhone and iPod Touch development.
PROJECTS & SOURCES
The Projects & Sources group lets you collect projects, folders, and fi les in a single location. Once
you have added items to the organizer, you can:
Open or edit items
Rename, move, and copy fi les
Build, clean, and run projects
Execute custom scripts
Search folders
Take snapshots
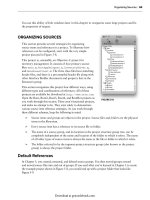
These actions are available via the add menu or action menu in the lower - left corner of the window,
the action buttons in the toolbar, and the Right/Control+click contextual menu for each item. All
four menu locations are illustrated in Figure 22 - 2.
➤
➤
➤
➤
➤
➤
Action Toobar Buttons
Right/Control+click Menu
Details Pane
Action Menu
Add Menu
FIGURE 22 - 2
c22.indd 618c22.indd 618 1/21/10 4:37:53 PM1/21/10 4:37:53 PM
Download at getcoolebook.com
Adding Items to the Organizer
The fi rst step in using the organizer is to add some items to it. Though you can add almost any item
(document or folder) to the organizer, its capabilities bloom when you add folders, particularly
project folders. Use any of these techniques to add items to the organizer:
Drag a document or folder into the Projects & Sources group.
Choose Add Existing Folder from either the add or Right/Control+click menu.
Create a new fi le or folder and add it to the organizer using any of the following action
menu commands:
New File
New Folder
New From Template ➪ Template Name
Once you have an item in the organizer, what you can do with it depends greatly on what kind
of item it is. The following table lists all of the things you can do with an item directly from the
organizer, but not all actions apply to every type of item:
TO DO THIS DO THIS
Open document or folder in Finder Double - click the item or choose the Open With
Finder command
Open project folder Choose the Open With Finder command
Open project in project folder Double - click the item
Edit a fi le that Xcode understands Select the document
Reveal item in Finder Choose the Reveal In Finder command
Edit folder location Choose the Assign New Location command
Rename item Select, and then single - click the item ’ s name
Build a project in a folder Choose a build action from the Build button
Clean a project in a folder Choose an action from the Clean button
Run an executable in a folder Choose an action from the Run button
Run a custom action script for a folder Choose an action from the Action button
Search the contents of a folder Choose the Find In Selected Organizer Folder command
Take a snapshot of a folder Choose the Make Snapshot command
Manage the snapshots of a folder Choose the Snapshots command
Remove a top - level item Select it and then press the Delete key or choose the
Remove from Organizer command
➤
➤
➤
➤
➤
➤
Project & Sources ❘ 619
c22.indd 619c22.indd 619 1/21/10 4:37:55 PM1/21/10 4:37:55 PM
Download at getcoolebook.com
620
❘
CHAPTER 22 USING THE ORGANIZER
Xcode provides very basic actions for documents, signifi cantly more for folders, and even more for
project folders. The basic actions — open, edit, rename, and reveal in Finder — should all be
self - explanatory.
Items in the organizer are much closer to the “real thing.” You might be tempted
to treat them like source items in a project — that is, quasi-independent objects
that abstractly refer to a real item in the fi le system — but organizer items act
much more like items in the Finder. If you rename any item, drag an item into a
folder, drag an item out of a folder, or delete an item in a folder, you’re initiating
a real action in the fi le system — the item will be renamed, moved, copied, or
trashed. About the only non-destructive action you can take in the organizer is
to delete a top-level item in the Projects & Sources group. This merely removes
the organizer’s reference to the item, but does not delete the source item.
The organizer makes a subtle distinction between a folder and a project folder that contains a
project document. For example, double - clicking a project folder opens the project in Xcode, not
the project folder in the Finder.
In a somewhat ironic twist, Xcode largely ignores project documents that you add to the organizer;
it prefers that you add the project folder that contains it. You are free to add a project document,
but Xcode will treat it like a generic document, not a project.
Any folder in the organizer can be associated with actions . Folders that have one or more actions
are stamped with the Xcode “ tool ” icon. The Build, Clean, Run, and (the eponymous) Action
actions that you can invoke are described in the “ Using Organizer Actions ” section.
Embracing Foreign Projects
The organizer is a great place to manage foreign — that is, non - Xcode — projects. As you ’ ll see
in later sections, you can defi ne custom actions for organizer items; actions like make, clean, and
install. Adding a project that ’ s built using make or ant (a Java build tool) lets you manage that
project from within Xcode. You can defi ne actions to build various targets, perform source control,
or anything else you need.
The add menu includes a number of templates for Java projects that are built with ant. Use these as
starting points for subsuming your non - Xcode projects into the organizer, then automate them using
organizer actions.
Searching Organizer Folders
You can search all of the fi les within a folder in the organizer using the multi - fi le search window.
To search the contents of a folder, follow these steps:
1. Select a folder in the organizer.
2. Choose the Find in Selected Organizer Folder command in the actions menu.
3. Perform your search using the multi - fi le search window.
c22.indd 620c22.indd 620 1/21/10 4:37:56 PM1/21/10 4:37:56 PM
Download at getcoolebook.com
The multi - fi le search window is described in Chapter 8. It ’ s identical to using the project fi nd
window, except that the target fi le set is permanently set to In Selected Organizer Folder.
Taking Snapshots
You can take and restore snapshots of any top - level folder in the organizer. To take a snapshot,
choose Make Snapshot from the action menu. To review, compare, restore, or delete a
snapshot, choose Snapshots from the action menu.
Using snapshots in the organizer is identical to using snapshots in a project, described in
Chapter 11. When taking snapshots from within your project, the project folder gets copied.
In the organizer, the snapshot is whatever top - level folder you ’ ve selected in the organizer.
Organizer snapshots and project snapshots are maintained independently.
That is, making a snapshot of a project folder in the organizer does not add a
snapshot to that project’s snapshot window, and vice versa.
USING ORGANIZER ACTIONS
The action buttons in the toolbar execute action scripts that (can potentially) perform an almost
unlimited variety of tasks. Actions can only be defi ned for folder items in the organizer. A newly
added non - project folder will (probably) have no actions defi ned. Xcode automatically generates a
number of useful actions whenever you add a project folder to the organizer. You are free to use,
modify, remove, and add your own actions, as you ’ ll see in the next few sections.
Each action toolbar button is a combination of a button and a menu. Click and hold the button —
don ’ t Right/Control + click the button, you ’ ll only get the toolbar menu — to reveal its action menu,
as shown in the upper left of Figure 22 - 2. It lists the actions defi ned for the selected folder along
with an Edit Actions command.
Notice that one of the actions in the menu is checked. This is the default action . If you simply click
the action button, this is the action that will be performed. Executing a different action in the list
also makes it the new default. Just remember that clicking the button will perform the last selected
action again.
Automatically Created Actions
When you add a project folder to the organizer, Xcode generates a number of actions
automatically — the exception to this is described in the “ Preserving and Sharing Actions ” section
later in this chapter. The actions it generates are based on the project documents found in the
project folder. After adding a project folder you will fi nd:
The Build button has a build action for each build confi guration in the project.
The Clean button has a clean action and a clean all action for each build confi guration in
the project.
➤
➤
Using Organizer Actions
❘
621
c22.indd 621c22.indd 621 1/21/10 4:38:01 PM1/21/10 4:38:01 PM
Download at getcoolebook.com