Laptops All-in-One Desk Reference For Dummies- P29 doc
Bạn đang xem bản rút gọn của tài liệu. Xem và tải ngay bản đầy đủ của tài liệu tại đây (447.84 KB, 10 trang )
Curing Some Evils with System Restore
254
When you enable System Restore, it automatically creates a restore point
every day, just as a snapshot of your up-and-running machine. It also creates
a restore point any time you add a new device driver, receive an automatic
update from Microsoft, or install certain new applications.
In my office, I make it a point to manually record a restore point any time I
am about to significantly change settings or install a new program.
Sometimes this results in a duplicate restore point — my manual point plus
the one automatically created in certain circumstances; as far as I’m con-
cerned the duplication is no big deal. I’d rather have a pair of rescue rafts
than none.
System Restore works only with NFTS-formatted disks, which is the current
drive standard. It doesn’t protect drives with FAT32 and earlier FAT file systems.
When good intentions go bad
This section’s main title indicates that System Restore can cure “some” evils.
Alas, the utility isn’t perfect. System Restore doesn’t copy every single
system file, and sometimes the one that goes bad isn’t included. You can
restore all you want and not fix the problem.
Another situation that can arise: Something goes wrong with one or more of
your system files while the machine is running, and you keep using it for a
while before realizing you need to go back in time. In certain circumstances,
your system may endure some additional changes (or even corruption) after
the most recent restore point.
How to defend? Backup, backup, and backup. Don’t rely on your machine to
always be there for you; make copies of essential data files on a regular basis
and store them on external drives or disks.
Restoring your system settings
Follow these steps to use System Restore:
1. Save any open files and close all programs.
2. Make sure you have current backups of essential data files.
3. Click the Windows icon.
4. Choose All Programs ➪ System Tools ➪ System Restore.
Alternately, you can go to Control Panel, click the System icon, and then
choose the System Restore tab.
The utility asks if you want to create a restore point (to set one manually)
or if you want to choose a previously recorded snapshot.
18 140925-bk03ch04.qxp 4/8/08 12:39 PM Page 254
Book III
Chapter 4
Honk, Honk!
Windows Backup
and Restore Utilities
Curing Some Evils with System Restore
255
5. Choose one of the following:
• Create a Restore Point
• Restore My Computer to an Earlier Time
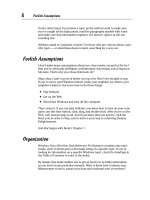
If you want to do a restore, you’re shown a calendar; days with one or
more restore points are in bold. The Windows Vista version automatically
displays data from the past five days; you can click the check box to show
restoration points older than that. See Figure 4-6.
6. Select a restore point just before the day and time you began experi-
encing problems with your Windows installation.
7. Highlight the checkpoint you want to use and click Next.
The computer chugs along for a few moments preparing the information
it needs, and then the system reboots. You’ve nothing to do but wait. If
the restoration is successful, a screen appeared when Windows loads; if
the restoration fails, your system restarts in the same condition it was
before you attempted a fix. You can try again by selecting a different
restore point.
Figure 4-6:
A manual
selection
offers
recent
restore
points.
18 140925-bk03ch04.qxp 4/8/08 12:39 PM Page 255
Curing Some Evils with System Restore
256
Try to choose the most recent restoration point when you knew the machine
was working properly. Going further back than necessary could result in dis-
abling updates and changes that you’d rather have available.
In normal operations, any time you choose a restore point, System Restore
automatically makes a snapshot of the day’s files so you can undo any prob-
lems you might introduce reaching further back on the calendar. However, if
you use System Restore when the computer has been booted in Safe Mode,
you can’t directly undo the restore. Instead, you have to run System Restore
again and choose a specific previous restore point.
18 140925-bk03ch04.qxp 4/8/08 12:39 PM Page 256
Book IV
Using Common
Applications
The Slide Sorter window in PowerPoint lets
you see dozens of slides in a presentation.
19 140925-pp04.qxp 4/8/08 12:39 PM Page 257
Contents at a Glance
Chapter 1: Writing Documents . . . . . . . . . . . . . . . . . . . . . . . . . . . . . . . .259
Processing Words No Matter the Program 259
Knowing What Elements to Expect 260
Starting a Document 263
Formatting a Document 266
Advancing Your Microsoft Office 2007 Functions 284
Formatting Files in Word 2007 285
Controlling Microsoft Word from the Keyboard 286
Chapter 2: Crunching Data with Spreadsheets . . . . . . . . . . . . . . . . . .299
Starting the Incredible What-If Machine 299
Spreading out an Excel 2007 Sheet 301
Printing Excel Spreadsheets 305
Introducing New File Formats of Excel 2007 306
Taking Excel Shortcuts 307
Chapter 3: Presenting Yourself with PowerPoint
Professionalism . . . . . . . . . . . . . . . . . . . . . . . . . . . . . . . . . . . . . . . . . . . . .313
Pointing out Your Power Spots 313
Designing and Refining a PowerPoint Presentation 315
Putting on at the Ritz 328
Presenting New PowerPoint 2007 Features 331
Taking PowerPoint Shortcuts 333
Chapter 4: Checking Your Calendar . . . . . . . . . . . . . . . . . . . . . . . . . . . .345
Picking a Calendar 345
Making Contact 350
Going Old School with Address Book 354
Watching It Fly 356
19 140925-pp04.qxp 4/8/08 12:39 PM Page 258
Chapter 1: Writing Documents
In This Chapter
ߜ Going from typewriter to typesetter
ߜ Formatting, styles, themes, and other flashy stuff
ߜ Finding, replacing, and changing text and styles
ߜ Discovering new Microsoft Office file formats
I
’m going to skip right over Neanderthal cave drawings, ancient
Egyptian papyrus scrolls, the handwritten Magna Carta of 1215, and
the Declaration of Independence of 1776. And I’m not going to discuss
the first mechanical typewriters of the 19th century.
All these prior technologies were just variations of a brush and ink or chisel
on stone. If you made a mistake you had to go back and redo your work;
if you wanted to move a sentence from one place to another you had to cut
and paste (with a scissors and glue) or start over from “When in the course
of human events . . . ”
It was only 40 years or so ago that engineers and programmers began work-
ing with the concept of applying computer memory and processing power
to the job of creating, correcting, revising, and perfecting an assemblage of
characters strung together into groups that had individual and collective
meaning: words, sentences, paragraphs, and entire manuscripts.
Processing Words No Matter the Program
In this book I primarily use examples of office productivity tools from the
Microsoft Office suite: Microsoft Word, Microsoft Excel, and Microsoft
PowerPoint. I have chosen these because they’re the most commonly used
applications.
You may have a different set of tools on your machine because you found
some special features that suit your needs better, or you prefer a different
piece of software because you like the way it’s organized. And some users
make decisions based on cost; you can find shareware office applications
and even free tools offered by major companies like Google.
20 140925-bk04ch01.qxp 4/8/08 12:39 PM Page 259
Knowing What Elements to Expect
260
However, the basic concepts of word processing are the same for all of the
various tools. You type, the computer puts the words up on the screen, and
together you and the machine make them into pearls of wisdom, beautifully
typeset, and safely stored away for the ages.
The most important thing to look for in any word processor is its ability to
exchange documents with other applications. You can do your writing and
processing in Microsoft Word and send it to someone who works with Corel
WordPerfect or Google Docs (one of the cloud computing products that exist
on the Web; see this section’s sidebar). I’d never recommend using a word
processor that can’t read files created by any major competitor and can’t
save a version of its own files in a format that the others can use.
In this chapter I concentrate on some of the less obvious or more useful
features that sometimes even the most experienced users overlook.
Knowing What Elements to Expect
The days of the manual typewriter offered a limited number of choices when
it came to the design and appearance of a typed page. You could mechani-
cally adjust the amount of white space on the left and right sides of the page
by setting margins, and you could start each page a particular distance
down from the top and end at certain height above the bottom.
Everything else — underlines, footnotes, page numbers, chapter and section
headings, and the like — were all done by hand and eye. High-school and
professional school classes devoted entire semesters to mastering the art of
manual formatting. Today, you merely have to choose from an ever-growing
menu of options. You can make your documents simple or complex; your
choices ensure consistent and neat presentation. Figure 1-1 is a sample page
from Microsoft Office Word 2007.
Get on my cloud
A developing trend in applications — one that
may or may not become the way everyone
works in coming years — is the use of Web-
based applications, also known as
cloud com-
puting.
In this design, the software exists
mostly somewhere out there on the Internet
while your documents reside on your laptop or
sit on a server maintained by the company that
offers the software.
20 140925-bk04ch01.qxp 4/8/08 12:39 PM Page 260
Book IV
Chapter 4
Writing Documents
Knowing What Elements to Expect
261
The elements of a complex document typically include
✦ One or more fonts
✦ Headers and footers (labels that appear at the top or bottom
of each page)
✦ Page numbering
✦ Footnotes
✦ Citations
✦ Mathematical equations
✦ Index
✦ A table of contents
✦ A bibliography
To ensure consistency across a project or for all work done in a particular
department or an entire organization, you — or a supervisor — can create a
document template to apply to any or all files of a particular type.
Figure 1-1:
A chapter in
progress
under Word
2007. This
new edition
added a
changing
ribbon of
options that
adjusts to
the work
being
performed.
20 140925-bk04ch01.qxp 4/8/08 12:39 PM Page 261
Knowing What Elements to Expect
262
My back pages
In my first job as a newspaper reporter, I began
with a manual typewriter and was thrilled when
I was upgraded to an electric version. My type-
writer, that is. But here was how my words made
it from my hand-scrawled notebook to the front
page of the
Gazette:
I pecked away to write
sentences on a piece of paper. If I made a mis-
take, I backspaced and
X
ed it out — or just
reached into the machine with a thick, soft
pencil and struck out a word or a sentence. If I
wanted to move paragraph five to become
paragraph two, I removed the sheet of paper
and, with scissors and a role of clear tape,
rearranged the paragraphs.
When the article was done, I yelled, “Copy!” and
a young kid would dash from one of the corners
of the newsroom to grab the sheaf of pages I was
holding in my hand. He or she would move over
to a shelf along the wall and tape the pages one
to another so that they were in a continuous roll.
After a copy editor had gone over the story —
penciling in corrections and doing some addi-
tional cutting and pasting — the entire roll would
be placed in a metal cylinder and sent through a
whooshing pneumatic tube down two floors to
the pressroom.
And there a typesetter (a human, not a machine)
would mount my roll of words onto a stand and
retype the characters and words into a machine
that would set type. There was one last step: A
proofreader (a person, drawing a paycheck) read
the typeset text and compared it to the typewrit-
ten, hand-corrected, cut-and-pasted original.
The first processed words
As the computer began to become relatively
common in offices in the 1960s and 1970s, the
first connection between “secretaries” and the
machine were introduced. Xerox, IBM, and
Wang were among the first companies to offer
electric typewriters that had a way of storing
words or sentences or even entire documents.
The devices began with small blocks of memory
in the machine that allowed for corrections, and
then we moved onto larger storage devices
including paper tape and eventually to magnetic
disks.
But it really was not until the late 1970s before
workstations connected to a central room-sized
computer allowed the first text editors to
replace backspacing, pencil marks, scissors,
and tape at the keyboard. And then history — at
least as it concerns the written word — was
changed forever in 1981 when the first IBM PC
was introduced.
Swept aside by technology
The first word-processing software for personal
computers (including Multimate, WordPerfect,
and WordStar) swept aside almost any reason
to hold on to rolls of paper, paste pots, and scis-
sors. Also swept aside: copy boys and copy girls,
pneumatic tubes that carry documents, typeset-
ters to retype edited manuscripts, and proofread-
ers. And in most offices, personal secretaries and
entire squadrons of workers in the “typing pool”
were let go (which was bad) or given more mean-
ingful and professional job assignments.
Look at this revolution in one other way: With the
arrival of the personal computer and its laptop
cousin, job descriptions have changed to
include a multitude of other tasks. The person at
the keyboard no longer merely writes a memo or
a letter or a book called
Laptops All-In-One Desk
Reference For Dummies.
You’re also correcting
your own mistakes, editing and revising the
structure of your work, and saving a copy for
future use. And in the process you’re also
designing a format, setting the type, and trans-
mitting it to a printer or sending it across the
world in a stream of 0s and 1s for reconstruction
at the other end.
20 140925-bk04ch01.qxp 4/8/08 12:39 PM Page 262
Book IV
Chapter 4
Writing Documents
Starting a Document
263
Starting a Document
The arrival of Microsoft Office 2007 brought a large, round button in the
upper-left corner of the editing screen; the Microsoft Office Button replaces
the File menu of previous Office versions, and you can get to many places
and do many things from that single button. See Figure 1-2.
Open a blank document and start typing:
1. Click the blank page icon (part of the Office toolbar).
If you want to get there another way, try one of these methods:
• Press Ctrl + N.
• Click the Microsoft Office Button, and then click New.
A menu appears.
2. Double-click Blank Document.
3. Click the Microsoft Office Button.
Choose from a set of options that opens:
✦ New. Opens an empty unformatted file.
✦ Open. Opens a previously saved file. Windows Explorer opens the folder
Word most recently used to store a new or revised file; you can also nav-
igate to any other folder or location on your laptop or on an attached
network or Internet location.
✦ Save. Saves the currently active and open file in the same location it
currently resides.
✦ Save As. Allows you to select a specific file format for the current file:
• Word Document. This new format is based on the Open XML specifi-
cation. Files are stored with a .DOCX filename extension and gener-
ally require about half the space as previous Word file formats.
• Word Template. A special form of file that can apply settings to new
or existing documents.
• Word 97-2003 Document. A way to save a file created in Microsoft
Office 2007 in the older (and larger) file format used by the previous
few generations of the program.
• PDF or XPS. Lets you save a file created in Word in the Adobe PDF
(Portable Document Format) specification, whose files can be viewed
or printed on other machines exactly the way you intend. XPS is a
similar fixed-layout electronic file format promoted by Microsoft.
20 140925-bk04ch01.qxp 4/8/08 12:39 PM Page 263