Owner''''s Handbook for Vehicle P2 doc
Bạn đang xem bản rút gọn của tài liệu. Xem và tải ngay bản đầy đủ của tài liệu tại đây (457.48 KB, 20 trang )
29
Entertainment OverviewControlsDriving hintsNavigationMobilityReference
> "Driver's door only"
Press the button once to unlock only
the driver's door and the fuel filler flap.
Press it twice to unlock the entire car.
9. Press the controller.
Comfort opening
Press and hold down the button. The win-
dows and the panorama glass roof
*
are
opened.
Locking
Press the button.
Do not lock the car from the outside when
there is someone inside it, as it cannot
then be unlocked from the inside in some
national-market versions.<
Comfort closing
Press and hold down the button. The
windows and the panorama glass roof
*
are
closed.
Watch the closing movement to ensure
that no-one is trapped. The closing pro-
cedure is interrupted immediately if the button
is released.<
Switching on the interior light
When the car is locked:
Press the button.
This function enables you to locate the car, for
instance in a parking garage.
Panic mode*
You can also activate the alarm system in the
event of danger:
Press the button for at least 3 seconds.
To switch the alarm off: press any button.
Unlocking upper tailgate
Press the button for about one second.
The tailgate opens slightly, regardless of
whether it was locked or unlocked.
On certain national-market versions, the
tailgate can only be opened if the car has
first been unlocked.
The tailgate swings out and up when opened.
Make sure that there is sufficient clearance.
To avoid locking yourself out of the car inad-
vertently, do not leave the remote control in the
load area. If the tailgate was previously locked, it
will be locked again as soon as it is closed.<
Wrap protective material around any
sharp ends or edges of items of luggage
that could strike the rear window while the car is
moving, to prevent these damaging the heating
conductors in the rear window.<
Adjusting confirmation signals
You can also deactivate the optical acknowl-
edgement signal for unlocking or locking.
1. Press the button.
The start menu is called up.
2. Press the controller to call up the menu.
3. Select "Settings" and press the controller.
4. Select "Vehicle / Tyres" and press the con-
troller.
5. If necessary, move the highlighted marker
to the uppermost field. Turn the controller
until "Door locks" is selected and press the
controller.
Online Edition for Part-No. 01 41 0 013 209 - © 04/07 BMW AG
Opening and closing
30
6. Select "Confirmation" and press the con-
troller.
7. Select the desired signal.
8. Press the controller.
The signal is switched on.
Malfunctions
The remote control may malfunction as a result
of interference from localised radio signals. If
this occurs, unlock and lock the car by inserting
a key into the door lock.
If the car can no longer be locked with a remote
control, the battery in the remote control is flat.
Use this remote control when driving a relatively
long distance to recharge its battery, see
page 26.
Opening and closing:
via the door lock
Do not lock the car from the outside when
there is someone inside it, as it cannot
then be unlocked from the inside in some
national-market versions.<
In some national versions, the alarm sys-
tem
*
is triggered when the door lock is
unlocked.
To switch off the alarm:
Unlock the car with the remote control, see
page 28, or insert the remote control fully into
the ignition lock.<
For more information about the alarm system
*
,
see page 32.
Comfort operation
The windows and the panorama glass roof
*
can
also be operated via the door lock.
Hold the key in the lock or unlock position.
Watch the closing movement to ensure
that no-one is trapped. The movement is
stopped when the key is released.<
Manual operation
In the event of an electrical fault, you can lock
and unlock the driver's door by turning the key
to the limit positions in the door lock.
Opening and closing:
from the inside
This button unlocks or locks the doors and
upper tailgate when the front doors are closed,
but does not deadlock them. The fuel filler flap
remains unlocked
*
.
You can in addition determine in which situa-
tions the vehicle is locked.
Online Edition for Part-No. 01 41 0 013 209 - © 04/07 BMW AG
31
Entertainment OverviewControlsDriving hintsNavigationMobilityReference
iDrive, principle, see page 14.
1. Press the button.
The start menu is called up.
2. Press the controller to call up the menu.
3. Select "Settings" and press the controller.
4. Select "Vehicle / Tyres" and press the con-
troller.
5. If necessary, move the highlighted marker
to the uppermost field. Turn the controller
until "Door locks" is selected and press the
controller.
6. Select "Central locking" and press the con-
troller.
7. Select a menu item:
> "Relock if no door opened"
The central locking is engaged automat-
ically after a short while if no doors have
been opened.
> "Lock after moving off"
The central locking is engaged as soon
as you drive off.
8. Press the controller.
indicates that the setting is selected.
The setting is saved for the remote control cur-
rently in use.
Unlocking and opening
> Either use the central locking button to
unlock all doors at once, then pull the door
handle above the armrest, or
> Pull the handle on each individual door
twice: the first time to unlock the door, and
the second time to open it.
Locking
> Either lock all doors by pressing the central
locking button, or
> Press down the safety lock button on one of
the doors. To avoid being shut out of the car
accidentally, the driver's door cannot be
locked with the safety lock button when it is
open.
Persons remaining in the car or pets left
inside can lock the doors from the inside.
You should therefore take the remote control
with you when you get out of the vehicle so that
the car can be opened from the outside.<
Upper tailgate
The tailgate swings out and up when
opened. Make sure that there is sufficient
clearance.<
Opening from inside
Press the button: the tailgate will open slightly
as long as it is not deadlocked.
Opening from outside
Press the button on the tailgate or press the
button on the remote control for approx.
Online Edition for Part-No. 01 41 0 013 209 - © 04/07 BMW AG
Opening and closing
32
1 second: the tailgate opens slightly. It can now
be swung upwards.
On certain national-market versions, the
tailgate can only be opened with the
remote control if the car has first been
unlocked.<
Opening manually
In the event of an electrical fault:
1. From inside the load area, press out the
handle in the tailgate, see arrow, with the aid
of a screwdriver and pull it. This will unlock
the tailgate.
2. Open the tailgate and press the handle back
into place.
The tailgate is locked again as soon as it is
closed.
Closing
To avoid injuries, ensure that the closing
area of the tailgate is unobstructed.<
The recessed handles in the tailgate lining
make it easier to pull the tailgate down.
Wrap protective material around any
sharp ends or edges of items of luggage
that could strike the rear window while the car is
moving, to prevent these damaging the heating
conductors in the rear window.<
Lower tailgate
Opening
Pull the lever and swing the tailgate down.
The open tailgate can support loads of up
to 250 kg, approx. 550 lb.<
Closing
Swing the tailgate up and press it shut.
Alarm system*
Principle
The alarm system will respond if:
> A door, the engine compartment or the
upper tailgate are opened
> There is any movement inside the car: inte-
rior movement detector, see page 33
> The car's inclination changes, for instance
if an attempt is made to jack it up and steal
the wheels or to raise it prior to towing away
> There is an interruption in the power supply
from the battery
The alarm will respond briefly as follows to indi-
cate unauthorised attempts to access the car:
> Audible alarm
> Activation
*
of the hazard warning system
Online Edition for Part-No. 01 41 0 013 209 - © 04/07 BMW AG
33
Entertainment OverviewControlsDriving hintsNavigationMobilityReference
Arming and disarming
Whenever the car is locked or unlocked, either
with the remote control or at the door lock, the
alarm system is armed or disarmed at the same
time.
Even when the alarm system is armed, you can
open the upper tailgate by pressing the
button on the remote control, see page 29.
When you close the tailgate subsequently, it will
be locked and monitored.
On certain national-market versions, the
upper tailgate can only be opened with
the remote control if the car has first been
unlocked.
Opening certain national-market versions via
the door lock triggers the alarm.<
Switching off the alarm
> Unlock the car with the remote control, see
page 28.
> Insert the remote control fully into the igni-
tion lock.
Indicator light displays
> The indicator light beneath the inside mirror
flashes steadily: the system is armed.
> The indicator light flashes after the car has
been locked: the doors, engine compart-
ment lid or upper tailgate have not been
closed properly. Even if an item is not
closed fully, the remaining items are dead-
locked and the indicator light begins to flash
steadily after 10 seconds. However, the
interior movement detector is not activated.
> The indicator light goes out after the car has
been unlocked: no attempt was made to
tamper with the car during your absence.
> The indicator light flashes after unlocking
until the remote control is inserted into the
ignition, but for no longer than approx.
5 minutes: an attempt was made to tamper
with the car.
Tilt alarm sensor
The car's angle is monitored. The alarm will be
triggered for instance if an attempt is made to
steal the car's wheels or tow it away.
Interior movement detector
Before the interior movement detector can
operate correctly, the windows and panorama
glass roof
*
must be closed.
Avoiding false alarms
The tilt alarm sensor and the interior movement
detector can be switched off together. This pre-
vents false alarms, e.g. in the following situa-
tions:
> In two-level garages
> When being transported on car-carrying
trains, boats/ships or trailers
> If pets are to remain inside the car
Switching off the tilt alarm sensor and
interior movement detector
Press the button on the remote control
again as soon as the car is locked.
The indicator light lights up briefly, then contin-
ues to flash steadily. The tilt alarm sensor and
interior movement detector are switched off
until the next time the car is unlocked and
locked.
Comfort access*
Comfort access enables you to access your car
without having to take hold of the remote con-
trol. It is sufficient to have the remote control on
your person, for example in your hand or in a
jacket pocket. The car automatically recognises
your remote control when it is in the immediate
vicinity or inside the car.
Online Edition for Part-No. 01 41 0 013 209 - © 04/07 BMW AG
Opening and closing
34
Comfort access supports the following func-
tions:
> Unlocking/locking the car
> Comfort closing
> Opening upper tailgate
> Starting the engine
Operating requirements
> The car can only be locked once it ascer-
tains that the remote control being carried is
not located inside the car.
> Approximately two seconds need to elapse
before the car can be unlocked and locked
again.
> The engine can only be started once the car
ascertains that the remote control is located
inside the car.
Comparison with conventional remote
control
You can control the above functions using com-
fort access or by pressing the buttons on the
remote control. Consequently, you should
begin by familiarising yourself with the instruc-
tions for opening and closing, starting on
page 26.
The features specific to comfort access are
described below.
A short delay when opening or closing the
windows or panorama glass roof
*
indi-
cates that a test is being carried out to ascertain
whether there is a remote control inside the car.
You may need to repeat the opening or closing
operation.<
Releasing
Take a firm hold of one of the door handles,
arrow 1. This corresponds to pressing the
button.
Locking
Touch the area highlighted in the illustration,
arrow 2, with your finger for approx. 1 second.
This corresponds to pressing the but-
ton.
Please make sure that all electrical con-
sumers are switched off prior to locking in
order to preserve the battery.<
Comfort closing
Hold your finger or the back of your hand
against the area, arrow 2. Comfort closing, see
page 29.
Opening upper tailgate
Press the button on the upper tailgate. This cor-
responds to pressing the button.
If the car detects a remote control which
has been left in the load area accidentally
once the upper tailgate has been closed, the lid
will reopen. The hazard warning system flashes
and an audible signal
*
sounds.<
Switching on radio readiness
Briefly touching the start/stop button switches
on radio readiness, see page 54.
Do not depress the brake, otherwise the
engine will start.<
Online Edition for Part-No. 01 41 0 013 209 - © 04/07 BMW AG
35
Entertainment OverviewControlsDriving hintsNavigationMobilityReference
Starting the engine
You can start the engine or switch on the igni-
tion when a remote control is inside the car. It is
not necessary to insert the remote control into
the ignition lock, see page 54.
If the car is unable to detect a remote control,
once the engine has been switched off, you will
only be able to restart it within approx.
10 seconds, provided no door has been
opened.
Stopping the engine
> Remote control not in ignition lock:
Transmission position P is automatically
engaged after the engine has been
switched off.
> Remote control in ignition lock:
If transmission position N is engaged, the
transmission remains in that position after
the engine has been switched off.
Before entering a car wash
The vehicle will be able to roll if you observe the
following steps:
1. Insert the remote control into the ignition
lock.
2. Depress the brake.
3. Engage transmission position N.
4. Release parking brake.
5. Switch off the engine.
6. Leave remote control in the ignition lock.
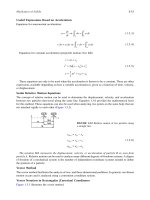
Malfunction
Comfort access may malfunction as a result of
interference from local radio signals. In this
case, open or close the car using the buttons on
the remote control or the key. You can subse-
quently start the engine by inserting the remote
control into the ignition lock.
The warning light in the instrument
cluster comes on if an attempt is
made to start the engine: engine
starting not possible. The remote control is not
inside the car or is faulty. Bring the remote con-
trol inside the vehicle or have it checked. Try
inserting a different remote control in the igni-
tion lock.
The warning light in the instrument
cluster comes on when the engine is
running: the remote control is no
longer inside the car. After the engine has been
switched off, it can only be restarted within
approx. 10 seconds, provided no door has been
opened.
The indicator light in the instrument
cluster comes on and a message
appears on the control display:
change the battery in the remote control.
Changing the battery
The battery in the remote control for comfort
access requires replacement from time to time.
1. Remove the integrated key from the remote
control, see page 26.
2. Remove the cover.
3. Insert a new battery with the plus side up.
4. Press the cover back into position.
Dispose of the old battery only at an
authorised collecting point or hand it in to
BMW Service.<
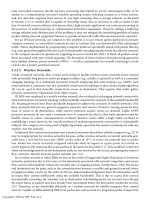
Windows
Observe the windows during the closing
procedure, to avoid any injuries.
Take the remote control with you when you
leave the car, otherwise children, for example,
could operate the windows and possibly injure
themselves.<
Online Edition for Part-No. 01 41 0 013 209 - © 04/07 BMW AG
Opening and closing
36
Opening, closing
> Press the switch until the pressure point is
felt:
The window is opened for as long as you
press the switch.
> Press the switch beyond the pressure point:
The window opens automatically. Press the
switch again to halt the opening movement.
Close the window similarly by pulling the
switch.
There are separate switches in the rear of the
car for the rear windows.
Comfort operation using the remote control or
door lock, see pages 29 or 30.
Comfort closing with comfort access, see
page 34.
After the ignition is switched off
You can still operate the windows for approx.
1 minute after the remote control has been
removed or the ignition switched off.
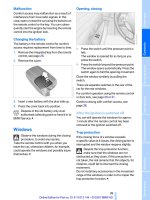
Trap protection
If the closing force of a window exceeds
a specific value as it closes, the closing action is
interrupted and the window reopens slightly.
Despite the trap protection function,
make sure that the windows are not
obstructed as they close; if this precaution is
not taken, the risk remains that thin objects, for
instance, could fail to interrupt the closing
movement.
Do not install any accessories in the movement
range of the windows in order not to impair the
trap protection function.<
Closing without the trap protection
function
If an external hazard or ice on the windows does
not allow you to close the windows normally,
proceed as follows:
1. Pull the switch past the pressure point and
keep it there.
2. Pull the switch beyond the pressure point
again within about 4 seconds and keep it
there. The window closes without the trap
protection function.
Safety switch
This enables you to prevent the rear door win-
dows being opened and closed at the switches
in the rear seat area, for instance by children.
When the safety function is switched on, the
LED lights up.
Press the safety switch when carrying
children on the rear seat, otherwise care-
less closing of the windows could result in
injury.<
Panorama glass roof*
Observe the panorama glass roof during
the closing procedure, to avoid any inju-
ries.
Take the remote control with you when you
leave the car, otherwise children could operate
the roof and possibly injure themselves.<
Online Edition for Part-No. 01 41 0 013 209 - © 04/07 BMW AG
37
Entertainment OverviewControlsDriving hintsNavigationMobilityReference
Raising, opening, closing
Press the switch or push it in the required direc-
tion as far as the pressure point.
With the sliding trim open, the roof can be
closed, opened and tilted independently.
When the roof is closed or in the raised position,
the sliding trim can be opened or closed inde-
pendently.
Comfort operation using the remote control or
door lock, see pages 29 or 30.
Comfort closing with comfort access, see
page 34.
Vent position
Press the switch:
The glass roof is raised and the sliding trim
opened a short distance.
After the ignition is switched off
You can still operate the roof for approx.
1 minute after the remote control has been
removed or the ignition switched off.
Automatic opening and closing
Press the switch beyond the pressure point.
Pressing the switch again stops this movement.
Opening and closing roof and sliding
trim together
Press the switch twice in rapid succession
beyond the pressure point.
Pressing the switch again stops this movement.
Comfort position
Each time it is fully opened and subsequently
closed, the panorama glass roof halts in the
comfort position. If desired, the movement can
then be continued using the switch.
The comfort position minimises wind noise
inside the car.
Trap protection
If the panorama glass roof or sliding trim
encounters an obstruction during closing from
approximately one-third of the roof aperture, or
during closing from the raised position, the
closing movement is interrupted and the pano-
rama glass roof and sliding trim are opened
again slightly.
Despite the trap protection function,
make sure that the roof is not obstructed
as it closes; if this precaution is not taken, the
risk remains that thin objects, for instance,
could fail to interrupt the closing movement.<
Closing without the trap protection
function
If there is an external hazard, slide the switch
forward beyond the pressure point and keep it
there. The roof closes without the trap protec-
tion function.
After a power failure
After a power failure, it is possible that the roof
will only move to the raised position. Then have
the system initialised. BMW recommends that
you have this work performed by BMW Service.
Online Edition for Part-No. 01 41 0 013 209 - © 04/07 BMW AG
Adjusting
38
Adjusting
Safe seated position
A seated position that suitably reflects your
requirements is a vital condition of relaxed driv-
ing with a minimum of fatigue. In conjunction
with the seat belts, the head restraints and the
airbags, the seated position has a major influ-
ence on your safety in the event of an accident.
You should therefore observe the following
notes in order to maintain the protective func-
tion of the car's safety systems.
For additional notes on carrying children in
safety, see page 50.
Airbags
Keep your distance from the airbags.
Always grip the steering wheel on the rim,
with your hands in the 3 o'clock and 9 o'clock
positions, to minimise the risk of injury to the
hands or arms in the event of the airbag being
triggered.
No other persons, pets or objects should be
held or permitted to remain between the airbag
and yourself.
Do not use the front airbag cover on the front
passenger's side as a tray. Make sure that the
front passenger likewise adopts a correct
seated position and does not rest feet or legs on
the instrument panel, for example, otherwise
they could sustain leg injuries in the event of the
front airbag being triggered.
Make sure that passengers do not use the side
or head-level airbags as headrests, otherwise
they may sustain injuries in the event of the air-
bags triggering.<
Even if all these instructions are complied with,
certain injuries as a result of contact with the
airbag cannot be entirely ruled out, depending
on the circumstances in which an accident
occurs. Occupants with sensitive hearing may
be subject to brief and generally temporary
impaired hearing caused by the ignition and
inflation noise.
The locations of the airbags and additional
notes are given on page 89.
Head restraint
Head restraints adjusted to the correct height
reduce the risk of injuries to the neck in the
event of an accident.
Adjust the head restraint in such a way
that its centre is at approximately ear
level; otherwise, there is an increased risk of
injury should an accident occur.<
Push the head restraints for the third row of
seats
*
to their uppermost position.
Head restraints see page 42.
Seat belt
All occupants should always fasten their seat
belts before you set off. The airbags are a com-
plementary safety feature and not a substitute
for the seat belts.
Never restrain more than one person with
each seat belt. Babies or small children
must not travel on the lap of another occupant.
Around the pelvis, make sure that the belt sits
firmly on the hips and does not press down on
the stomach. Do not fasten the seat belt around
the neck, pull it across sharp edges or route or
fasten it over fixed or fragile objects. Pull the
seat belt tight and without twisting across the
pelvis and shoulder and keep it as close as pos-
sible to the body in order to avoid it slipping over
the hips and injuring the stomach in the event of
a frontal collision. Avoid wearing bulky clothing
and regularly pull the belt in the upper-body
area taut, otherwise its restraining effect could
be impaired.
If the centre seat belt is used, the wider seat
back must be locked in position, see page 121,
otherwise the centre seat belt will not have any
restraining effect.<
Seat belts, see page 44.
Online Edition for Part-No. 01 41 0 013 209 - © 04/07 BMW AG
39
Entertainment OverviewControlsDriving hintsNavigationMobilityReference
Seats
Note before adjusting
Do not reposition or calibrate the driver's
seat while the car is in motion. The seat
could move unexpectedly, leading to the driver
losing control of the car, and possibly resulting
in an accident.
Do not adjust manual seats while the car is in
motion, otherwise the restraining effect of
these seats in the event of an accident could be
impaired.
Do not recline the driver's or front passenger's
seat back too far, otherwise there will be a risk
of sliding under the seat belt in an accident, so
that the belt loses its protective effect.<
Also observe the notes on damage to seat belts
on page 45 and on the head restraint height on
page 42.
Adjusting manually
Failure to comply with the notes on
page 38 may put your personal safety at
risk.<
1 Forward/back
2 Angle of driver's seat
Forward/back: pull the lever up and slide the
seat to the preferred position. After releasing
the lever, move the seat gently forward or back
to make sure it engages properly in position.
Angle of driver's seat: pull the lever up and
move the seat until the desired angle is
obtained. After releasing the lever, move the
seat gently forward or back to make sure it
engages properly in position.
Thigh support*
Pull the lever and move the thigh support for-
ward or back.
Electrical adjustment
Failure to comply with the notes on
page 38 may put your personal safety at
risk.<
3 Height
4 Seat back
Non-standard, depending on seat:
1 Longitudinal direction
*
2 Height
*
3 Seat tilt
*
Online Edition for Part-No. 01 41 0 013 209 - © 04/07 BMW AG
Adjusting
40
4 Seat back
*
Additional, depending on seat:
1 Seat back width
*
2 Shoulder support
*
3 Thigh support
*
4 Lumbar support
*
, see further below
Seat back width
The width of the seat back can be adjusted via
the side sections, to adapt lateral support to
individual requirements.
Shoulder support
This also supports the back around the shoul-
ders. This results in a relaxed seated position
and reduces the load on the shoulder muscles.
Adjusting lumbar support*
The seat back contour can be altered to provide
more support to the curved, lumbar section of
the spine.
The upper edge of the pelvis and the spinal col-
umn are supported, to encourage an upright but
relaxed seated position.
> To increase or reduce the curvature:
Press switch at front or rear edge.
> To move the curved section up or down:
Press switch at top or bottom.
Seat, mirror and steering
wheel position memory*
You can memorise and call up two different
driver's seat, outside mirror and steering wheel
positions.
The seat back width and lumbar support set-
tings are not stored in the position memory.
Memorising
1. Switch on radio readiness or the ignition,
see page 54.
2. Select the desired seat, outside mirror and
steering wheel positions.
Online Edition for Part-No. 01 41 0 013 209 - © 04/07 BMW AG
41
Entertainment OverviewControlsDriving hintsNavigationMobilityReference
3. Press the button:
The LED in the button lights up.
4. Press the desired memory button 1 or 2:
The LED goes out.
The driver's seat and exterior mirror posi-
tion is saved for the remote control cur-
rently in use.
Calling up automatically
You can choose when the memorised driver's
seat and exterior mirror position is called up.
> Calling up when unlocking the car
> Calling up when opening the driver's door
If this function is used, first make sure that
the footwell behind the driver's seat is
unobstructed. Otherwise persons could be
injured or objects damaged if the seat should
start to move towards the rear.<
The adjusting procedure is halted when you
press a seat adjustment switch or touch one of
the MEMORY buttons.
Selecting automatic call-up
iDrive, principle, see page 14.
1. Call up the start menu.
2. Press the controller to call up the menu.
3. Select "Settings" and press the controller.
4. Select "Vehicle / Tyres" and press the con-
troller.
5. If necessary, move the highlighted marker
to the uppermost field. Turn the controller
until "Door locks" is selected and press the
controller.
6. Select "Central locking" and press the con-
troller.
7. Select "Last seat pos." and press the con-
troller.
8. Select "After unlocking" or "After door
opens".
9. Press the controller.
Switching off automatic call-up
Select "Automatic off" and press the controller.
Calling up manually
Do not call up the memory while the car is
in motion, otherwise an unexpected seat
or steering wheel movement may cause an
accident.<
Comfort function
1. Unlock and open the driver's door or switch
on radio readiness.
2. Briefly press memory button 1 or 2 as
desired.
The adjusting procedure is halted when you
press a seat adjustment switch or touch one of
the MEMORY buttons.
Safety function
1. Close the driver's door and switch the igni-
tion on or off.
2. Press memory button 1 or 2 as desired until
the adjusting procedure has been com-
pleted.
If the button was pressed accidentally:
Press the button again; the LED will go out.
Online Edition for Part-No. 01 41 0 013 209 - © 04/07 BMW AG
Adjusting
42
Head restraints
Head restraints adjusted to the correct height
reduce the risk of injuries to the neck in the
event of an accident.
Adjust the head restraint in such a way
that its centre is at approximately ear
level; otherwise, there is an increased risk of
injury should an accident occur. Only remove
the head restraints if no one will be sitting on the
seat in question. Reattach the head restraints
before transporting any passengers on the
seats; otherwise the passenger's head will be
unprotected.<
Front seats: adjusting head restraint
height
You can adjust the height of the head restraints
manually or electrically, depending on the type
of seat.
Adjusting manually
> Up: pull.
> Down: press the button, arrow 1, and slide
the head restraint down.
To remove:
1. Pull the head restraint up as far as its limit of
travel.
2. Press the button, arrow 1, and pull the head
restraint fully out.
Adjusting electrically*
To remove:
1. Tilt the seat back to the rear.
2. Pull the head restraints right up.
3. Give the head restraints a good tug and pull
them out.
To fit:
1. Slide the switch up until the buzzer tone
changes to indicate that an installed head
restraint would have reached in the upper-
most position – this should take no longer
than 10 seconds.
2. Insert the head restraints and push them
down on both sides until you hear and feel
them snapping into place.
Front seats: adjusting head restraint
angle
Tilt the head restraint as required.
On the Comfort seat, you adjust the distance
between the head restraint and the back of your
head via the shoulder support.
Adjusting side sections* of head
restraints on the Comfort seat
Fold the side sections forward to provide
greater lateral support in the rest position.
Online Edition for Part-No. 01 41 0 013 209 - © 04/07 BMW AG
43
Entertainment OverviewControlsDriving hintsNavigationMobilityReference
Rear seats and third seat row*
Adjusting head restraint height
> Up: pull.
> Down: press the button, arrow 1, and slide
the head restraint down.
Seats at rear
Second seat row
With divided
*
seats, you can adjust both seats
individually.
Do not adjust the second seat row while
the car is in motion, otherwise there is a
risk of injuring the occupants of the third seat
row.
Ensure that the catches of the second-row
seats engage properly after they have been
adjusted. Otherwise the restraining effect of the
seat belts could be impaired in the event of an
accident.<
Forward/back
1. Pull the lever up and slide the seat to the
preferred position.
2. Release the lever and move the seat for-
ward or back slightly so that it engages.
Seat back
The seat backs can be adjusted in four stages.
Pull up the lever and either apply your weight to
the seat back or lean forward to relieve it of load.
Access to the third seat row
Pull the lever and fold the seat forwards.
There is a recessed handle on the inside
trim of the door post for ease of entry.<
When folding back the second-row seats,
ensure that the footwell beneath the sec-
ond-row seats is not obstructed. Persons sit-
ting in the third seat row could otherwise be
injured, or objects could be damaged.<
Warning light for second seat row:
comes on if the second seat row is
not engaged. In addition, a message
appears on the control display.
Third seat row*
The third seat row is divided and offers space
for two persons.
Folding up seat back
Before folding up the seat back, remove the
roller cover, see page 120.
Online Edition for Part-No. 01 41 0 013 209 - © 04/07 BMW AG
Adjusting
44
1. Pull the lever, see arrow. This will unlock the
seat back.
2. Fold up the seat back and engage it in posi-
tion.
Make sure that the catches engage
properly. If this is not done, even brak-
ing or swerving could be sufficient to dis-
place items of luggage into the occupant
compartment, endangering the occu-
pants.<
3. Push the head restraints to their uppermost
position.
4. Release the tongue of the seat belt from the
holder, arrow.
5. Remove the second tongue from its holder,
arrow 1, and insert it in the seat belt's
release lock, see arrow 2. The belt tongue
must engage audibly.
Folding down seat back
1. Push the head restraints down, see
page 43.
2. Pull the lever, see arrows. This releases the
seat backs.
3. Fold down the seat back.
Seat belts
Failure to comply with the notes on
page 38 may put your personal safety at
risk.<
All occupants should always fasten their seat
belts before you set off. The airbags are a com-
plementary safety feature and not a substitute
for the seat belts.
Fastening
The seat belt buckle must audibly engage.
Belt reminder for driver's and front
passenger's seat*
The indicator light lights up and an
audible signal sounds. In addition, a
message will appear on the control
display. Please check whether the seat belt is
fastened correctly.
Online Edition for Part-No. 01 41 0 013 209 - © 04/07 BMW AG
45
Entertainment OverviewControlsDriving hintsNavigationMobilityReference
The belt reminder is issued if the driver's seat
belt has not yet been fastened. On certain
national-market versions, the belt reminder is
also activated at road speeds above approx.
8 km/h, approx. 5 mph, if the front passenger's
seat belt is not fastened, if objects are placed on
the front passenger seat, or if the driver or front
passenger unfasten their seat belts.
Opening
1. Hold onto the belt.
2. Press the red button on the belt buckle.
3. Guide the belt back up to the reel.
The upper belt anchorage is suitable for adults
of any stature as long as they are sitting cor-
rectly, see page 39.
The two seat belt buckles integrated into the
rear bench seat are intended for the left and
right seat occupants. The buckle marked
CENTER is only to be used by a person occupy-
ing the centre rear seat.
Damaged seat belts
In the event of stress due to an accident
or damage: replace the belt system,
including the seat-belt tensioner and any child
restraint systems and have the belt anchorage
tested. Have this work performed only by BMW
Service or by a workshop that operates to BMW
specifications and has suitably trained person-
nel, otherwise the correct functioning of this
safety equipment is not guaranteed.<
Heated seats*
Front
Press once per temperature stage. The highest
temperature is indicated by three LEDs.
To switch off: press and hold down the button.
Temperature distribution*
The temperature distribution between the seat
cushion and seat back can be varied.
iDrive, principle, see page 14.
1. Call up the start menu.
2. Move the controller to the left to call up
"Climate".
3. Select "Seat-heating distribution" and
press the controller.
4. Move the controller to the left or right to
select "Driver" or "Passenger".
5. Turn the controller. The setting is adopted;
you can now change to another field.
Online Edition for Part-No. 01 41 0 013 209 - © 04/07 BMW AG
Adjusting
46
Rear
Function as for front seat heating, without tem-
perature distribution.
Active seat ventilation* and
seat heating*
Front
1 Seat heating
2 Active seat ventilation
Press button 1 or 2 once per temperature or
ventilation stage. The LED in the corresponding
button lights up.
The temperature or ventilation stages are
shown on the control display.
To switch off: press button 1 or 2 for longer.
Temperature distribution
The temperature distribution between the seat
cushion and seat back can be varied.
iDrive, principle, see page 14.
1. Call up the start menu.
2. Move the controller to the left to call up
"Climate".
3. Select "Seat climate, driver" or "Seat
climate, front passenger" and press the
controller.
4. Turn the controller to adapt the distribution.
The setting is adopted.
Rear heated seats
Function as front heated seats, no temperature
distribution, see page 45.
Active seat*
The seat cushion is actively varied by the right
and left halves of the seat cushion being raised
and lowered alternately. This helps to avoid
muscular strain and signs of fatigue, and thus
guards against back pains in the lumbar region.
To switch on, press the button; the LED lights
up.
When you switch off the active seat, it may take
up to 1 minute for the two halves of the base
cushion to return to their home positions.
Online Edition for Part-No. 01 41 0 013 209 - © 04/07 BMW AG
47
Entertainment OverviewControlsDriving hintsNavigationMobilityReference
Mirrors
Outside mirrors
The outer sections of the mirrors depict a larger
field of view
*
than the inner sections. In this
way, the view to the rear is extended and the
blind spot, as it is known, is reduced in size.
The objects seen in the mirrors are closer
than they appear. Do not gauge your dis-
tance from following traffic based on what you
see in the mirrors, otherwise there is an
increased risk of accident.<
1 Adjusting
2 Switching over to the other mirror or auto-
matic parking function
3 Folding mirrors in and out
*
Memorising mirror positions, see Seat, mirror
and steering wheel position memory on
page 40.
Adjusting manually
The mirrors can also be adjusted manually: by
pressing the mirror glass at its edges.
Folding mirrors in and out*
At speeds up to approx. 20 km/h, approx.
12 mph, you can fold the mirrors in and back out
again by pressing button 3. This can be useful
for example in car washes or narrow roads, or
for folding the mirrors back out into the correct
position after they have been folded in manu-
ally.
If the mirrors have been folded in, they are
folded out again when a speed of approx.
40 km/h, approx. 25 mph, is reached.
Before putting the car through a car wash,
fold the mirrors in either manually or by
pressing button 3, otherwise they could sustain
damage on account of the car's width.<
Automatic heating
When the engine is running or the ignition is
switched on, the automatic heating for both
outside mirrors will be switched on when the
outside temperature reaches a certain level.
Passenger-side mirror tilt-down –
automatic parking function*
Activating
1. Push the switch to the position for the
driver-side mirror, arrow 1.
2. Engage transmission position R.
The glass in the mirror on the passenger
side tilts slightly down. The road surface
close to the car, e.g. the kerb, is then
brought within the driver's field of view in
the mirror, for instance while parking the
car.
The parking function is switched off if you
are towing a trailer.<
Deactivating
Push the switch to the position for the passen-
ger-side mirror, arrow 2.
Online Edition for Part-No. 01 41 0 013 209 - © 04/07 BMW AG
Adjusting
48
Inside mirror
To reduce glare from following vehicles after
dark, turn the knob.
Inside and outside mirrors, automatic-
dim*
There are two photocells in the inside mirror for
this purpose. One photocell is in the mirror
glass, the other slightly offset on the back of the
mirror.
In order to ensure that the system functions
correctly, keep the photocells clean, do not
cover the area between the inside mirror and
windscreen, and do not affix adhesive labels or
stickers of any kind to the windscreen directly in
front of the mirror.
Steering wheel
Adjusting
Do not adjust the steering wheel position
while the car is in motion, or an accident
may result from any unexpected movement.<
Adjusting manually
1. Fold the lever down.
2. Move the steering wheel to the preferred
height and angle to suit your seated posi-
tion.
3. Fold the lever back up.
Adjusting electrically*
The steering wheel can be adjusted in four
directions.
Memorising the steering wheel position, see
Seat, mirror and steering wheel position mem-
ory, page 40.
Easy entry/exit*
To facilitate entry and exit, the steering wheel
temporarily moves to its highest position.
Online Edition for Part-No. 01 41 0 013 209 - © 04/07 BMW AG