Tương tác giữa PHP và jQuery - part 19 docx
Bạn đang xem bản rút gọn của tài liệu. Xem và tải ngay bản đầy đủ của tài liệu tại đây (792.75 KB, 10 trang )
CHAPTER 5 ■ ADD CONTROLS TO CREATE, EDIT, AND DELETE EVENTS
181
Save this file, and then navigate to http://localhost/admin.php and create a new event with the
following information:
• Event Title: Dinner Party
• Start Time: 2010-01-22 17:00:00
• End Time: 2010-01-22 19:00:00
• Description: Five-course meal with wine pairings at John’s house
After clicking the Create new event button, the calendar is updated with the new event (see
Figure 5-3).
Figure 5-3. The new event as it appears when hovered over
Adding a Button to the Main View to Create New Events
To make it easier for your authorized users to create new events, add a button to the calendar that takes
the user to the form in admin.php. Do this by creating a new private method called
_adminGeneralOptions() in the Calendar class:
CHAPTER 5 ■ ADD CONTROLS TO CREATE, EDIT, AND DELETE EVENTS
182
<?php
class Calendar extends DB_Connect
{
private $_useDate;
private $_m;
private $_y;
private $_daysInMonth;
private $_startDay;
public function __construct($dbo=NULL, $useDate=NULL) { }
public function buildCalendar() { }
public function displayEvent($id) { }
public function displayForm() { }
public function processForm() { }
private function _loadEventData($id=NULL) { }
private function _createEventObj() { }
private function _loadEventById($id) { }
/**
* Generates markup to display administrative links
*
* @return string markup to display the administrative links
*/
private function _adminGeneralOptions()
{
/*
* Display admin controls
*/
return <<<ADMIN_OPTIONS
<a href="admin.php" class="admin">+ Add a New Event</a>
ADMIN_OPTIONS;
}
}
?>
CHAPTER 5 ■ ADD CONTROLS TO CREATE, EDIT, AND DELETE EVENTS
183
■ Note Checks to ensure that this button is only displayed to authorized users will be added Chapter 6.
Next, modify the buildCalendar() method to call your new _adminGeneralOptions() method by
inserting the following bold code:
public function buildCalendar()
{
// To save space, the bulk of this method has been omitted
/*
* Close the final unordered list
*/
$html .= "\n\t</ul>\n\n";
/*
* If logged in, display the admin options
*/
$admin = $this->_adminGeneralOptions();
/*
* Return the markup for output
*/
return $html . $admin;
}
Finally, add the admin stylesheet (admin.css) to index.php using the following code in bold to make
sure the link displays correctly:
<?php
/*
* Include necessary files
*/
include_once ' /sys/core/init.inc.php';
/*
* Load the calendar
*/
$cal = new Calendar($dbo, "2010-01-01 12:00:00");
/*
* Set up the page title and CSS files
*/
$page_title = "Events Calendar";
$css_files = array('style.css', 'admin.css');
/*
* Include the header
CHAPTER 5 ■ ADD CONTROLS TO CREATE, EDIT, AND DELETE EVENTS
184
*/
include_once 'assets/common/header.inc.php';
?>
<div id="content">
<?php
/*
* Display the calendar HTML
*/
echo $cal->buildCalendar();
?>
</div><! end #content >
<?php
/*
* Include the footer
*/
include_once 'assets/common/footer.inc.php';
?>
Save the file and reload http://localhost/ to see the button (see Figure 5-4).
CHAPTER 5 ■ ADD CONTROLS TO CREATE, EDIT, AND DELETE EVENTS
185
Figure 5-4. The Admin button appears in the bottom left of the calendar
Adding Edit Controls to the Full Event View
Next, you need to make it possible for authorized users to edit events. You will do this by adding a button
to the full view of an event in view.php.
However, unlike the simple link used to create a new option, an Edit button will require an actual
form submission. To keep this code manageable, you’ll create a new private method called
_adminEntryOptions() in the Calendar class that will generate the markup for the form.
For now, this form will simply return the form markup to display the Edit button. More will be
added to the form as you continue on through the exercises in this book.
You create this method by adding the following bold code to the Calendar class:
<?php
class Calendar extends DB_Connect
{
CHAPTER 5 ■ ADD CONTROLS TO CREATE, EDIT, AND DELETE EVENTS
186
private $_useDate;
private $_m;
private $_y;
private $_daysInMonth;
private $_startDay;
public function __construct($dbo=NULL, $useDate=NULL) { }
public function buildCalendar() { }
public function displayEvent($id) { }
public function displayForm() { }
public function processForm() { }
private function _loadEventData($id=NULL) { }
private function _createEventObj() { }
private function _loadEventById($id) { }
private function _adminGeneralOptions() { }
/**
* Generates edit and delete options for a given event ID
*
* @param int $id the event ID to generate options for
* @return string the markup for the edit/delete options
*/
private function _adminEntryOptions($id)
{
return <<<ADMIN_OPTIONS
<div class="admin-options">
<form action="admin.php" method="post">
<p>
<input type="submit" name="edit_event"
value="Edit This Event" />
<input type="hidden" name="event_id"
value="$id" />
</p>
</form>
</div><! end .admin-options >
ADMIN_OPTIONS;
}
CHAPTER 5 ■ ADD CONTROLS TO CREATE, EDIT, AND DELETE EVENTS
187
}
?>
Modifying the Full Event Display Method to Show Admin Controls
Before the Edit button will be displayed, the _adminEntryOptions() method needs to be called from
within the displayEvent() method. This is as simple as storing the return value of _adminEntryOptions()
in a variable, $admin, and outputting that variable along with the rest of the entry markup.
Add the following bold modifications to displayEvent() in the Calendar class:
/**
* Displays a given event's information
*
* @param int $id the event ID
* @return string basic markup to display the event info
*/
public function displayEvent($id)
{
/*
* Make sure an ID was passed
*/
if ( empty($id) ) { return NULL; }
/*
* Make sure the ID is an integer
*/
$id = preg_replace('/[^0-9]/', '', $id);
/*
* Load the event data from the DB
*/
$event = $this->_loadEventById($id); /*
* Generate strings for the date, start, and end time
*/
$ts = strtotime($event->start);
$date = date('F d, Y', $ts);
$start = date('g:ia', $ts);
$end = date('g:ia', strtotime($event->end));
/*
* Load admin options if the user is logged in
*/
$admin = $this->_adminEntryOptions($id);
/*
* Generate and return the markup
*/
return "<h2>$event->title</h2>"
. "\n\t<p class=\"dates\">$date, $start—$end</p>"
CHAPTER 5 ■ ADD CONTROLS TO CREATE, EDIT, AND DELETE EVENTS
188
. "\n\t<p>$event->description</p>$admin";
}
■ Note Make sure that you include the $admin variable at the end of the return string.
■ Note As with the Create a new entry button, checks will be added later to ensure that only authorized users see
the editing controls.
Adding the Admin Stylesheet to the Full Event View Page
The last step before the Edit button is ready for use is to include the admin.css stylesheet in the
$css_files variable of view.php:
<?php
/*
* Make sure the event ID was passed
*/
if ( isset($_GET['event_id']) )
{
/*
* Collect the event ID from the URL string
*/
$id = htmlentities($_GET['event_id'], ENT_QUOTES);
}
else
{
/*
* Send the user to the main page if no ID is supplied
*/
header("Location: ./");
exit;
}
/*
* Include necessary files
*/
include_once ' /sys/core/init.inc.php';
/*
* Output the header
*/
$page_title = "View Event";
CHAPTER 5 ■ ADD CONTROLS TO CREATE, EDIT, AND DELETE EVENTS
189
$css_files = array("style.css", "admin.css");
include_once 'assets/common/header.inc.php';
/*
* Load the calendar
*/
$cal = new Calendar($dbo);
?>
<div id="content">
<?php echo $cal->displayEvent($id) ?>
<a href="./">« Back to the calendar</a>
</div><! end #content >
<?php
/*
* Output the footer
*/
include_once 'assets/common/footer.inc.php';
?>
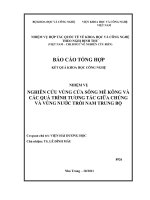
Save this file, then click an event to see the Edit button (see Figure 5-5).
Figure 5-5. The edit button as it appears when viewing a full event description
CHAPTER 5 ■ ADD CONTROLS TO CREATE, EDIT, AND DELETE EVENTS
190
Clicking the Edit button will bring up the form on admin.php with all the event’s data loaded in the
form (see Figure 5-6).
Figure 5-6. The admin form when an event is being edited
Deleting Events
The last step in creating the Calendar class is to allow authorized users to delete events. Event deletion is
different from creating or editing events in that you want to confirm a user’s intentions before deleting
the event. Otherwise an accidental click could result in frustration and inconvenience for the user.
This means that you must implement the Delete button in two stages:
1. The Delete button is clicked, and the user is taken to a confirmation page.
2. The confirmation button is clicked, and the event is removed from the
database.