Android SDK (phần 9) pps
Bạn đang xem bản rút gọn của tài liệu. Xem và tải ngay bản đầy đủ của tài liệu tại đây (2.36 MB, 50 trang )
Playing Audio and Video
❘
367
Playing Video Using the Video View
The simplest way to play back video is to use the
VideoView
control. The Video View includes a Surface
on which the video is displayed and encapsulates and manages a Media Player to manage the video
playback.
The Video View supports the playback of local or streaming video as supported by the Media Player
component.
Video Views conveniently encapsulate the initialization of the Media Player. To assign a video to play,
simply call
setVideoPath
or
setVideoUri
to specify the path to a local file, or the URI of a Content
Provider or remote video stream:
streamingVideoView.setVideoUri(" />localVideoView.setVideoPath("/sdcard/test2.3gp");
Once initialized, you can control playback using the
start
,
stopPlayback
,
pause
,and
seekTo
methods.
The Video View also includes the
setKeepScreenOn
method to apply a screen Wake Lock that will
prevent the screen from being dimmed while playback is in progress.
Listing 11-3 shows the simple skeleton code used to assign a video to a Video View and control play-
back.
LISTING 11-3: Video playback using a Video View
VideoView videoView = (VideoView)findViewById(R.id.surface);
videoView.setKeepScreenOn(true);
videoView.setVideoPath("/sdcard/test2.3gp");
if (videoView.canSeekForward())
videoView.seekTo(videoView.getDuration()/2);
videoView.start();
[
do something
]
videoView.stopPlayback();
Setting up a Surface for Video Playback
The first step to using the Media Player to view video content is to prepare a Surface onto which the
video will be displayed. The Media Player requires a
SurfaceHolder
object for displaying video content,
assigned using the
setDisplay
method.
If you do not assign a Surface Holder for your Media Player the video component
will not be shown.
To include a Surface Holder in your UI layout you use the
SurfaceView
control as shown in the sample
layout XML in Listing 11-4.
368
❘
CHAPTER 11 AUDIO, VIDEO, AND USING THE CAMERA
LISTING 11-4: Sample layout including a Surface View
<?xml version="1.0" encoding="utf-8"?>
<LinearLayout xmlns:android=" />android:orientation="vertical"
android:layout_width="fill_parent"
android:layout_height="fill_parent">
<SurfaceView
android:id="@+id/surface"
android:layout_width="wrap_content"
android:layout_height="wrap_content"
android:layout_gravity="center">
</SurfaceView>
</LinearLayout>
The Surface View is a wrapper around the Surface Holder object, which in turn is a wrapper around
the Surface that is used to support visual updates from background threads.
The Surface View will be examined in more detail in Chapter 15, but Listing 11-5 shows the skeleton
code used to initialize a Surface View within your Activity, and assign it as a display target for your
Media Player.
Note that you must implement the
SurfaceHolder.Callback
interface. Surface Holders are created
asynchronously, so you must wait until the
surfaceCreated
handler has been fired before assigning the
returned Surface Holder object to the Media Player.
LISTING 11-5: Initializing and assigning a Surface View to a Media Player
public class MyActivity extends Activity implements SurfaceHolder.Callback
{
private MediaPlayer mediaPlayer;
@Override
public void onCreate(Bundle savedInstanceState) {
super.onCreate(savedInstanceState);
setContentView(R.layout.main);
mediaPlayer = new MediaPlayer();
SurfaceView surface = (SurfaceView)findViewById(R.id.surface);
SurfaceHolder holder = surface.getHolder();
holder.addCallback(this);
holder.setType(SurfaceHolder.SURFACE_TYPE_PUSH_BUFFERS);
holder.setFixedSize(400, 300);
}
public void surfaceCreated(SurfaceHolder holder) {
try {
mediaPlayer.setDisplay(holder);
} catch (IllegalArgumentException e) {
Log.d("MEDIA_PLAYER", e.getMessage());
Playing Audio and Video
❘
369
} catch (IllegalStateException e) {
Log.d("MEDIA_PLAYER", e.getMessage());
} catch (IOException e) {
Log.d("MEDIA_PLAYER", e.getMessage());
}
}
public void surfaceDestroyed(SurfaceHolder holder) {
mediaPlayer.release();
}
public void surfaceChanged(SurfaceHolder holder,
int format, int width, int height) { }
}
Initializing Video Content for Playback
Once you have created and assigned the Surface Holder to your Media Player, use the
setDataSource
method to specify the path, URL, or Content Provider URI of the video resource to play.
As with audio playback, if you’re passing a URL to an online media file, the file must be capable of
progressive download using the RTSP or HTTP protocols.
Once you’ve selected your media source, call
prepare
to initialize the Media Player in preparation for
playback as shown in Listing 11-6.
LISTING 11-6: Initializing video for playback using the Media Player
public void surfaceCreated(SurfaceHolder holder) {
try {
mediaPlayer.setDisplay(holder);
mediaPlayer.setDataSource("/sdcard/test2.3gp");
mediaPlayer.prepare();
mediaPlayer.start();
} catch (IllegalArgumentException e) {
Log.d("MEDIA_PLAYER", e.getMessage());
} catch (IllegalStateException e) {
Log.d("MEDIA_PLAYER", e.getMessage());
} catch (IOException e) {
Log.d("MEDIA_PLAYER", e.getMessage());
}
}
Unlike audio resources, Android doesn’t yet support the playback of video
resources included in the application package. Similarly, you cannot use the
create
static methods as shortcuts to creating your Media Player objects, nor can you use
a URI to point to a local file using the
file://
schema.
370
❘
CHAPTER 11 AUDIO, VIDEO, AND USING THE CAMERA
Controlling Playback
Once a Media Player is prepared, call
start
to begin playback of the associated media:
mediaPlayer.start();
Use the
stop
and
pause
methods to stop or pause playback.
The Media Player also provides the
getDuration
method to find the length of the media being played,
and
getCurrentPosition
to find the playback position. Use
seekTo
to jump to a specific position in the
media as shown in Listing 11-7.
LISTING 11-7: Controlling playback
mediaPlayer.start();
int pos = mediaPlayer.getCurrentPosition();
int duration = mediaPlayer.getDuration();
mediaPlayer.seekTo(pos + (duration-pos)/10);
[
wait for a duration
]
mediaPlayer.stop();
Managing Media Playback Output
The Media Player provides methods to control the volume of the output, manage the screen lock during
playback, and set the looping status.
It is not currently possible to play audio into a phone conversation; the Media Player always plays
audio using the standard output device — the speaker or connected Bluetooth headset.
Use the
isLooping
and
setLooping
methods to specify if the media being played should loop when it
completes.
if (!mediaPlayer.isLooping())
mediaPlayer.setLooping(true);
To enable a Wake Lock that will keep the screen on during video playback use the
setScreenOnWhile
Playing
method. This is preferred to setting manual Wake Lock as it doesn’t require an additional
permission. Wake Locks are described in more detail in Chapter 15.
mediaPlayer.setScreenOnWhilePlaying(true);
You can control the volume for each channel during playback using the
setVolume
method. It takes
a scalar float value between 0 and 1 for both the left and right channels (where 0 is silent and 1 is
maximum volume).
mediaPlayer.setVolume(1f, 0.5f);
Recording Audio and Video
❘
371
When playing video resources, you can use
getFrame
to take a Bitmap screen grab
of video media at the specified frame.
RECORDING AUDIO AND VIDEO
Android offers two alternatives for recording audio and video within your application.
The simplest technique is to use Intents to launch the video camera app. This option lets you specify the
output location and video recording quality, while letting the native video recording application handle
the user experience and error handling.
In cases where you want to replace the native app, or simply need more fine-grained control over the
video capture UI or recording settings, you can use the Media Recorder class.
Using Intents to Record Video
The easiest way to initiate video recording is using the
ACTION_VIDEO_CAPTURE
Media Store static con-
stant in an Intent passed to
startActivityForResult
.
startActivityForResult(new Intent(MediaStore.ACTION_VIDEO_CAPTURE),
RECORD_VIDEO);
This will launch the native video camera Activity, allowing users to start, stop, review, and retake their
video, and preventing you from having to rewrite the entire video camera application.
The video capture action supports two optional extras, available as static constants from the
MediaStore
class:
➤
EXTRA_OUTPUT
By default, the video recorded by the video capture action will be stored in
the default Media Store. If you want to record it elsewhere, you can specify an alternative
URI using this extra.
➤
EXTRA_VIDEO_QUALITY
The video record action allows you to specify an image quality using
an integer value. There are currently two possible values:
0
for low (MMS) quality videos or
1
for high (full resolution) videos. By default, the high resolution mode will be used.
Listing 11-8 shows how to use the video capture action to record a new video in high quality to either
a specified URI or the default media store.
LISTING 11-8: Recording video using an Intent
private static int RECORD_VIDEO = 1;
private static int HIGH_VIDEO_QUALITY = 1;
private static int MMS_VIDEO_QUALITY = 0;
continues
372
❘
CHAPTER 11 AUDIO, VIDEO, AND USING THE CAMERA
LISTING 11-8 (continued)
private void recordVideo(Uri outputpath) {
Intent intent = new Intent(MediaStore.ACTION_VIDEO_CAPTURE);
if (outputpath != null)
intent.putExtra(MediaStore.EXTRA_OUTPUT, output);
intent.putExtra(MediaStore.EXTRA_VIDEO_QUALITY, HIGH_VIDEO_QUALITY);
startActivityForResult(intent, RECORD_VIDEO);
}
@Override
protected void onActivityResult(int requestCode,
int resultCode, Intent data) {
if (requestCode == RECORD_VIDEO) {
Uri recordedVideo = data.getData();
// TODO Do something with the recorded video
}
}
Using the Media Recorder
Multimedia recording is handled by the aptly named
MediaRecorder
class. You can use it to record
audio and/or video files that can be used in your own applications, or added to the Media Store.
To record audio or video, create a new Media Recorder object.
MediaRecorder mediaRecorder = new MediaRecorder();
Before you can record any media in Android, your application needs the
RECORD_AUDIO
and /
or
RECORD_VIDEO
permissions. Add
uses-permission
tags for each of them, as required, in your
application manifest.
<uses-permission android:name="android.permission.RECORD_AUDIO"/>
<uses-permission android:name="android.permission.RECORD_VIDEO"/>
The Media Recorder lets you specify the audio and video source, the output file format, and the audio
and video encoders to use when recording your file.
Much like the Media Player, the Media Recorder manages recording as a state machine. That means
that the order in which you configure and manage the Media Recorder is important.
In the simplest terms, the transitions through the state machine can be described as follows:
➤ Create a new Media Recorder.
➤ Assign it the input sources to record from.
➤ Define the output format.
➤ Specify the audio and video encoder, frame rate, and output size.
➤ Select an output file.
➤ Prepare for recording.
Recording Audio and Video
❘
373
➤ Record.
➤ End recording.
A more detailed and thorough description of the Media Recorder state machine is provided at the
Android developer site at
/>.html
Once you’ve finished recording your media, call
release
on your Media Recorder object to free the
associated resources.
mediaRecorder.release();
Configuring and Controlling Video Recording
As described in the state model above, before recording you must specify the input sources, output
format, audio and video encoder, and an output file — in that order.
The
setAudioSource
and
setVideoSource
methods let you specify a
MediaRecorder.AudioSource
or
MediaRecorder.VideoSource
static constant that define the audio and video source, respectively.
Once you’ve selected your input sources, select the output format using the
setOutputFormat
method
to specify a
MediaRecorder.OutputFormat
constant.
Use the
set[audio/video]Encoder
methods to specify an audio or video encoder constant from the
MediaRecorder.[Audio/Video]Encoder
class. Take this opportunity to set the frame rate or video
output size if desired.
Finally, assign a file to store the recorded media using the
setOutputFile
method before calling
prepare
.
Listing 11-9 shows how to configure a Media Recorder to record audio and video from the microphone
and camera using the default format and encoder to a file on the SD card.
LISTING 11-9: Configuring the Media Recorder
MediaRecorder mediaRecorder = new MediaRecorder();
// Configure the input sources
mediaRecorder.setAudioSource(MediaRecorder.AudioSource.MIC);
mediaRecorder.setVideoSource(MediaRecorder.VideoSource.CAMERA);
// Set the output format
mediaRecorder.setOutputFormat(MediaRecorder.OutputFormat.DEFAULT);
// Specify the audio and video encoding
mediaRecorder.setAudioEncoder(MediaRecorder.AudioEncoder.DEFAULT);
mediaRecorder.setVideoEncoder(MediaRecorder.VideoEncoder.DEFAULT);
// Specify the output file
mediaRecorder.setOutputFile("/sdcard/myoutputfile.mp4");
// Prepare to record
mediaRecorder.prepare();
374
❘
CHAPTER 11 AUDIO, VIDEO, AND USING THE CAMERA
To begin recording, call the
start
method, as shown in this extension to Listing 11-9.
mediaRecorder.start();
The
setOutputFile
method must be called before
prepare
and after
setOutputFormat
or it will throw an Illegal State Exception.
When you’re finished, call
stop
to end the playback, followed by
release
to free the Media Recorder
resources.
mediaRecorder.stop();
mediaRecorder.release();
Previewing Video Recording
When recording video, it’s generally consideredgood practice to display a preview of the incoming
video feed in real time. Using the
setPreviewDisplay
method, you can assign a
Surface
to display the
video stream in real-time.
This works in much the same way as described earlier in this chapter when playing video using the
Media Player.
Start by creating a new Activity that includes a
SurfaceView
control as part of the UI, and which
implements the
SurfaceHolder.Callback
interface.
Once the Surface Holder has been created, assign it to the Media Recorder using the
setPreviewDisplay
method as shown in Listing 11-10.
The live video preview stream will begin displaying as soon as you make a call to
prepare
.
LISTING 11-10: Previewing video recording
public class MyActivity extends Activity implements SurfaceHolder.Callback
{
private MediaRecorder mediaRecorder;
@Override
public void onCreate(Bundle savedInstanceState) {
super.onCreate(savedInstanceState);
setContentView(R.layout.main);
SurfaceView surface = (SurfaceView)findViewById(R.id.surface);
SurfaceHolder holder = surface.getHolder();
holder.addCallback(this);
holder.setType(SurfaceHolder.SURFACE_TYPE_PUSH_BUFFERS);
holder.setFixedSize(400, 300);
}
Using the Camera and Taking Pictures
❘
375
public void surfaceCreated(SurfaceHolder holder) {
if (mediaRecorder == null) {
try {
mediaRecorder.setAudioSource(MediaRecorder.AudioSource.MIC);
mediaRecorder.setVideoSource(MediaRecorder.VideoSource.CAMERA);
mediaRecorder.setOutputFormat(MediaRecorder.OutputFormat.DEFAULT);
mediaRecorder.setAudioEncoder(MediaRecorder.AudioEncoder.DEFAULT);
mediaRecorder.setVideoEncoder(MediaRecorder.VideoEncoder.DEFAULT);
mediaRecorder.setOutputFile("/sdcard/myoutputfile.mp4");
mediaRecorder.setPreviewDisplay(holder.getSurface());
mediaRecorder.prepare();
} catch (IllegalArgumentException e) {
Log.d("MEDIA_PLAYER", e.getMessage());
} catch (IllegalStateException e) {
Log.d("MEDIA_PLAYER", e.getMessage());
} catch (IOException e) {
Log.d("MEDIA_PLAYER", e.getMessage());
}
}
}
public void surfaceDestroyed(SurfaceHolder holder) {
mediaRecorder.release();
}
public void surfaceChanged(SurfaceHolder holder,
int format, int width, int height) { }
}
USING THE CAMERA AND TAKING PICTURES
The popularity of digital cameras (particularly within phone handsets) has caused their prices to drop
just as their size has shrunk dramatically. It’s now becoming difficult to even find a mobile phone
without a camera, and Android devices are certainly no exception.
The G1 was released in 2008 with a 3.2-megapixel camera. Today several devices feature 5-megapixel
cameras, with one model sporting an 8.1-megapixel sensor.
The following sections will demonstrate the mechanisms you can use to control the camera and take
photos within your applications.
Using Intents to Take Pictures
Theeasiestwaytotakeapictureusingthedevicecameraisusingthe
ACTION_IMAGE_CAPTURE
Media
Store static constant in an Intent passed to
startActivityForResult
.
startActivityForResult(new Intent(MediaStore.ACTION_IMAGE_CAPTURE),
TAKE_PICTURE);
376
❘
CHAPTER 11 AUDIO, VIDEO, AND USING THE CAMERA
This will launch the camera Activity, allowing users to modify the image settings manually, and pre-
venting you from having to rewrite the entire camera application.
The image capture action supports two modes, thumbnail and full image.
➤ Thumbnail By default, the picture taken by the image capture action will return a thumb-
nail Bitmap in the
data
extra within the Intent parameter returned in
onActivityResult
.
As shown in Listing 11-11, call
getParcelableExtra
specifying the extra name
data
on the
Intent parameter to return the thumbnail as a Bitmap.
➤ Full image If you specify an output URI using a
MediaStore.EXTRA_OUTPUT
extra in the
launch Intent, the full-size image taken by the camera will be saved to the specified location.
In this case no thumbnail will be returned in the Activity result callback and the result Intent
data will be null.
Listing 11-11 shows how to use the image capture action to capture either a thumbnail or full image
using an Intent.
LISTING 11-11: Taking a picture using an Intent
private static int TAKE_PICTURE = 1;
private Uri outputFileUri;
private void getThumbailPicture() {
Intent intent = new Intent(MediaStore.ACTION_IMAGE_CAPTURE);
startActivityForResult(intent, TAKE_PICTURE);
}
private void saveFullImage() {
Intent intent = new Intent(MediaStore.ACTION_IMAGE_CAPTURE);
File file = new File(Environment.getExternalStorageDirectory(),
"test.jpg");
outputFileUri = Uri.fromFile(file);
intent.putExtra(MediaStore.EXTRA_OUTPUT, outputFileUri);
startActivityForResult(intent, TAKE_PICTURE);
}
@Override
protected void onActivityResult(int requestCode,
int resultCode, Intent data) {
if (requestCode == TAKE_PICTURE) {
Uri imageUri = null;
// Check if the result includes a thumbnail Bitmap
if (data != null) {
if (data.hasExtra("data")) {
Bitmap thumbnail = data.getParcelableExtra("data");
// TODO Do something with the thumbnail
}
}
else {
Using the Camera and Taking Pictures
❘
377
// TODO Do something with the full image stored
// in outputFileUri
}
}
}
Once you have taken the picture, you can either add it to the Media Store as shown later in this chapter,
or process it for use within your application before removing it.
Controlling the Camera and Taking Pictures
To access the camera hardware directly, you need to add the
CAMERA
permission to your application
manifest.
<uses-permission android:name="android.permission.CAMERA"/>
Use the
Camera
class to adjust camera settings, specify image preferences, and take pictures.
To access the Camera Service, use the static
open
method on the
Camera
class. When your application
has finished with the Camera, remember to relinquish your hold on it by calling
release
, as shown in
the simple pattern shown in the Listing 11-12.
LISTING 11-12: Using the Camera
Camera camera = Camera.open();
[
Do things with the camera
]
camera.release();
The
Camera.open
method will turn on and initialize the Camera. At this point it is
ready for you to modify settings, configure the preview surface, and take pictures,
as shown in the following sections.
Controlling and Monitoring Camera Settings and Image Options
The camera settings are stored using a
Camera.Parameters
object, accessible by calling the
getParameters
method on the Camera object.
In order to modify the camera settings, use the
set*
methods on the Parameters object before calling
the Camera’s
setParameters
method and passing in the modified Parameters object.
LISTING 11-13: Reading and modifying camera settings
Camera.Parameters parameters = camera.getParameters();
[
make changes
]
camera.setParameters(parameters);
378
❘
CHAPTER 11 AUDIO, VIDEO, AND USING THE CAMERA
Android 2.0 (API level 5) introduced a wide range of Camera Parameters, each with a setter and getter
including:
➤
[get/set]SceneMode
Takes or returns a
SCENE_MODE_*
static string constant from the Cam-
era Parameters class. Each scene mode describes a particular scene type (party, beach, sunset,
etc.).
➤
[get/set]FlashMode
Takes or returns a
FLASH_MODE_*
static string constant. Lets you spec-
ify the flash mode as on, off, red-eye reduction, or flashlight mode.
➤
[get/set]WhiteBalance
Takes or returns a
WHITE_BALANCE_*
static string constant to
describe the white balance of the scene being photographed.
➤
[get/set]ColorEffect
Takes or returns a
EFFECT_*
static string constant to modify how
the image is presented. Available color effects include sepia tone or black and white.
➤
[get/set]FocusMode
Takes or returns a
FOCUS_MODE_*
static string constant to specify how
the camera autofocus should attempt to focus the camera.
Most of the parameters described above are useful primarily if you are replacing
the native camera application. That said, they can also be useful for customizing
the way the camera preview is displayed, allowing you to customize the live camera
stream for augmented reality applications.
Camera Parameters can also be used to read or specify size, quality, and format parameters for
the image, thumbnail, and camera preview. The following list explains how to set some of these
values:
➤ JPEG and thumbnail quality Use the
setJpegQuality
and
setJpegThumbnailQuality
meth-
ods, passing in an integer value between 0 and 100, where 100 is the best quality.
➤ Image, preview, and thumbnail size Use
setPictureSize
,
setPreviewSize
,
setJpegThumbnailSize
to specify a height and width for the image, preview, and
thumbnail respectively.
➤ Image and preview pixel format Use
setPictureFormat
and
setPreviewFormat
to set the
image format using a static constant from the
PixelFormat
class.
➤ Preview frame rate Use
setPreviewFrameRate
to specify the preview frame rate in fps
(frames per second).
Each device may potentially support a different subset of these parameter values. The Camera Param-
eters class also includes a range of
getSupported*
methods to find valid options to display to the user,
or confirm that a desired parameter value is supported before assigning the value in code, as shown in
Listing 11-14.
Checking for supported parameter values is particularly important when selecting valid preview or
image sizes as each device’s camera will potentially support a different subset.
Using the Camera and Taking Pictures
❘
379
LISTING 11-14: Confirming supported camera settings
Camera.Parameters parameters = camera.getParameters();
List<String> colorEffects = parameters.getSupportedColorEffects();
if (colorEffects.contains(Camera.Parameters.EFFECT_SEPIA))
parameters.setColorEffect(Camera.Parameters.EFFECT_SEPIA);
camera.setParameters(parameters);
Monitoring Auto Focus
If the host Camera supports auto focus, and it is enabled, you can monitor the success of the auto focus
operation by adding an
AutoFocusCallback
to the Camera object.
Listing 11-15 shows how to create and assign a simple Auto Focus Callback to a Camera object. The
onAutoFocus
event handler receives a Camera parameter when auto focus status has changed, and a
success Boolean parameter indicating if the auto focus has been achieved.
LISTING 11-15: Monitoring auto focus
camera.autoFocus(new AutoFocusCallback() {
public void onAutoFocus(boolean success, Camera camera) {
// TODO Do something on Auto-Focus success
}
});
Using the Camera Preview
Access to the camera’s streaming video means that you can incorporate live video into your applica-
tions.
Some of the most exciting Android applications use this functionality as the basis for implementing
augmented reality (the process of overlaying dynamic contextual data — such as details for landmarks
or points of interest — on top of a live camera feed).
Much like the Media Player and Media Recorder classes, the camera preview is displayed onto a
SurfaceHolder
. To view the live camera stream within your application, you must include a Surface
View within your UI. Implement a
SurfaceHolder.Callback
to listen for the construction of a valid
surface, before passing it in to the
setPreviewDisplay
method of your Camera object.
Acallto
startPreview
will begin the streaming and
stopPreview
will end it, as shown in Listing 11-16.
LISTING 11-16: Previewing real-time camera stream
public class MyActivity extends Activity implements SurfaceHolder.Callback {
private Camera camera;
@Override
public void onCreate(Bundle savedInstanceState) {
continues
380
❘
CHAPTER 11 AUDIO, VIDEO, AND USING THE CAMERA
LISTING 11-16 (continued)
super.onCreate(savedInstanceState);
setContentView(R.layout.main);
SurfaceView surface = (SurfaceView)findViewById(R.id.surface);
SurfaceHolder holder = surface.getHolder();
holder.addCallback(this);
holder.setType(SurfaceHolder.SURFACE_TYPE_PUSH_BUFFERS);
holder.setFixedSize(400, 300);
}
public void surfaceCreated(SurfaceHolder holder) {
if (mediaRecorder == null) {
try {
camera = camera.open();
camera.setPreviewDisplay(holder);
camera.startPreview();
[
Draw on the Surface
]
} catch (IOException e) {
Log.d("CAMERA", e.getMessage());
}
}
}
public void surfaceDestroyed(SurfaceHolder holder) {
camera.stopPreview();
camera.release();
}
}
You’ll learn more about Surfaces in Chapter 15, although the Android SDK includes an excellent
example of using a
SurfaceView
to display the camera preview in real time.
You can also assign a
PreviewCallback
to be fired for each preview frame, allowing you to manipulate
or display each preview frame individually.
Call the
setPreviewCallback
method on the
Camera
object, passing in a new
PreviewCallback
imple-
mentation overriding the
onPreviewFrame
method as shown in Listing 11-17.
LISTING 11-17: Assigning a preview frame callback
camera.setPreviewCallback(new PreviewCallback() {
public void onPreviewFrame(byte[] _data, Camera _camera) {
// TODO Do something with the preview image.
}
});
Each frame will be received by the
onPreviewFrame
event with the image passed in through the byte
array.
Using the Camera and Taking Pictures
❘
381
Taking a Picture
Take a picture by calling
takePicture
on a
Camera
object and passing in a
ShutterCallback
and two
PictureCallback
implementations (one for the RAW and one for JPEG-encoded images).
Each picture callback will receive a byte array representing the image in the appropriate format, while
the shutter callback is triggered immediately after the shutter is closed.
Listing 11-18 shows the skeleton code for taking a picture and saving the JPEG image to the SD card.
LISTING 11-18: Taking a picture
private void takePicture() {
camera.takePicture(shutterCallback, rawCallback, jpegCallback);
}
ShutterCallback shutterCallback = new ShutterCallback() {
public void onShutter() {
// TODO Do something when the shutter closes.
}
};
PictureCallback rawCallback = new PictureCallback() {
public void onPictureTaken(byte[] data, Camera camera) {
// TODO Do something with the image RAW data.
}
};
PictureCallback jpegCallback = new PictureCallback() {
public void onPictureTaken(byte[] data, Camera camera) {
// Save the image JPEG data to the SD card
FileOutputStream outStream = null;
try {
outStream = new FileOutputStream("/sdcard/test.jpg");
outStream.write(data);
outStream.close();
} catch (FileNotFoundException e) {
Log.d("CAMERA", e.getMessage());
} catch (IOException e) {
Log.d("CAMERA", e.getMessage());
}
}
};
Reading and Writing JPEG EXIF Image Details
The
ExifInterface
class provides mechanisms for you to read and modify the EXIF (Exchangeable
Image File Format) data stored within a JPEG file. Create a new
ExifInterface
instance by passing the
full filename in to the constructor.
ExifInterface exif = new ExifInterface(filename);
382
❘
CHAPTER 11 AUDIO, VIDEO, AND USING THE CAMERA
EXIF data is used to store a wide range of metadata on photographs, including date and time, camera
settings (such as make and model), and image settings (such as aperture and shutter speed), as well as
image descriptions and locations.
To read an EXIF attribute, call
getAttribute
on the
ExifInterface
object, passing in the name of
the attribute to read. The
Exifinterface
class includes a number of static
TAG_*
constants that can be
used to access common EXIF metadata. To modify an EXIF attribute, use
setAttribute
, passing in the
name of the attribute to read and the value to set it to.
Listing 11-19 shows how to read the location coordinates and camera model from a file stored on the
SD card, before modifying the camera manufacturer details.
LISTING 11-19: Reading and modifying EXIF data
File file = new File(Environment.getExternalStorageDirectory(),
"test.jpg");
try {
ExifInterface exif = new ExifInterface(file.getCanonicalPath());
// Read the camera model and location attributes
String model = exif.getAttribute(ExifInterface.TAG_MODEL);
float[] latLng = new float[2];
exif.getLatLong(latLng);
// Set the camera make
exif.setAttribute(ExifInterface.TAG_MAKE, "My Phone");
} catch (IOException e) {
Log.d("EXIF", e.getMessage());
}
ADDING NEW MEDIA TO THE MEDIA STORE
By default, media files created by your application will be unavailable to other applications. As a result,
it’s good practice to insert it into the Media Store to make it available to other applications.
Android provides two alternatives for inserting media into the Media Store, either using the Media
Scanner to interpret your file and insert it automatically, or manually inserting a new record in the
appropriate Content Provider.
Using the Media Scanner
If you have recorded new media of any kind, the
MediaScannerConnection
class provides a simple way
for you to add it to the Media Store without needing to construct the full record for the Media Store
Content Provider.
Before you can use the
scanFile
method to initiate a content scan on your file, you must call
connect
and wait for the connection to the Media Scanner to complete.
This call is asynchronous, so you will need to implement a
MediaScannerConnectionClient
to notify
you when the connection has been made. You can use this same class to notify you when the scan is
complete, at which point you can disconnect your Media Scanner Connection.
Adding New Media to the Media Store
❘
383
This sounds more complex than it is. Listing 11-20 shows the skeleton code for creating a new
MediaScannerConnectionClient
that defines a
MediaScannerConnection
whichisusedtoaddanew
file to the Media Store.
LISTING 11-20: Adding files to the Media Store using the Media Scanner
MediaScannerConnectionClient mediaScannerClient = new
MediaScannerConnectionClient() {
private MediaScannerConnection msc = null;
{
msc = new MediaScannerConnection(getApplicationContext(), this);
msc.connect();
}
public void onMediaScannerConnected() {
msc.scanFile("/sdcard/test1.jpg", null);
}
public void onScanCompleted(String path, Uri uri) {
msc.disconnect();
}
};
Inserting Media into the Media Store
Rather than relying on the Media Scanner you can add new media to the Media Store by creating a new
ContentValues
object and inserting it into the appropriate Media Store Content Provider yourself.
The metadata you specify here can include the title, time stamp, and geocoding information for your
new media file, as shown in the code snippet below:
ContentValues content = new ContentValues(3);
content.put(Audio.AudioColumns.TITLE, "TheSoundandtheFury");
content.put(Audio.AudioColumns.DATE_ADDED,
System.currentTimeMillis() / 1000);
content.put(Audio.Media.MIME_TYPE, "audio/amr");
You must also specify the absolute path of the media file being added.
content.put(MediaStore.Audio.Media.DATA, "/sdcard/myoutputfile.mp4");
Get access to the application’s
ContentResolver
, and use it to insert this new row into the Media Store
as shown in the following code snippet.
ContentResolver resolver = getContentResolver();
Uri uri = resolver.insert(MediaStore.Video.Media.EXTERNAL_CONTENT_URI,
content);
Once the media file has been inserted into the Media Store you should announce its availability using a
broadcast Intent as shown below.
sendBroadcast(new Intent(Intent.ACTION_MEDIA_SCANNER_SCAN_FILE, uri));
384
❘
CHAPTER 11 AUDIO, VIDEO, AND USING THE CAMERA
RAW AUDIO MANIPULATION
The
AudioTrack
and
AudioRecord
classes let you record audio directly from the audio input hardware
of the device, and stream PCM audio buffers directly to the audio hardware for playback.
Using the Audio Track streaming mode you can process incoming audio and playback in near real time,
letting you manipulate incoming or outgoing audio and perform signal processing on raw audio on the
device.
While a detailed account of raw audio processing and manipulation is beyond the scope of this book,
the following sections offer an introduction to recording and playing back raw PCM data.
Recording Sound with Audio Record
Use the
AudioRecord
class to record audio directly from the hardware buffers. Create a new Audio
Record object, specifying the source, frequency, channel configuration, audio encoding, and buffer size.
int bufferSize = AudioRecord.getMinBufferSize(frequency,
channelConfiguration,
audioEncoding);
AudioRecord audioRecord = new AudioRecord(MediaRecorder.AudioSource.MIC,
frequency, channelConfiguration,
audioEncoding, bufferSize);
For privacy reasons, Android requires that the
RECORD_AUDIO
manifest permission be included in your
manifest.
<uses-permission android:name="android.permission.RECORD_AUDIO"/>
The frequency, audio encoding, and channel configuration values will affect the size and quality of the
recorded audio. Note that none of this meta-data is associated with the recorded files.
When your Audio Record object is initialized, run the
startRecording
method to begin asynchronous
recording, and use the
read
method to add raw audio data into the recording buffer:
audioRecord.startRecording();
while (isRecording) {
[
populate the buffer
]
int bufferReadResult = audioRecord.read(buffer, 0, bufferSize);
}
Listing 11-21 records raw audio from the microphone to a file stored on the SD card. The next section
will show you how to use an Audio Track to play this audio.
LISTING 11-21: Recording raw audio with Audio Record
int frequency = 11025;
int channelConfiguration = AudioFormat.CHANNEL_CONFIGURATION_MONO;
int audioEncoding = AudioFormat.ENCODING_PCM_16BIT;
File file = new File(Environment.getExternalStorageDirectory(), "raw.pcm");
Raw Audio Manipulation
❘
385
// Create the new file.
try {
file.createNewFile();
} catch (IOException e) {}
try {
OutputStream os = new FileOutputStream(file);
BufferedOutputStream bos = new BufferedOutputStream(os);
DataOutputStream dos = new DataOutputStream(bos);
int bufferSize = AudioRecord.getMinBufferSize(frequency,
channelConfiguration,
audioEncoding);
short[] buffer = new short[bufferSize];
// Create a new AudioRecord object to record the audio.
AudioRecord audioRecord = new AudioRecord(MediaRecorder.AudioSource.MIC,
frequency,
channelConfiguration,
audioEncoding, bufferSize);
audioRecord.startRecording();
while (isRecording) {
int bufferReadResult = audioRecord.read(buffer, 0, bufferSize);
for (int i = 0; i < bufferReadResult; i++)
dos.writeShort(buffer[i]);
}
audioRecord.stop();
dos.close();
} catch (Throwable t) {}
Playing Sound with Audio Track
Use the
AudioTrack
class to play raw audio directly into the hardware buffers. Create a new Audio
Track object, specifying the streaming mode, frequency, channel configuration, and the audio encoding
type and length of the audio to play back.
AudioTrack audioTrack = new AudioTrack(AudioManager.STREAM_MUSIC,
frequency,
channelConfiguration,
audioEncoding,
audioLength,
AudioTrack.MODE_STREAM);
Because this is raw audio, there is no meta-data associated with the recorded files, so it’s important to
correctly set the audio data properties to the same values as those used when recording the file.
When your Audio Track is initialized, run the play method to begin asynchronous playback, and use
the write method to add raw audio data into the playback buffer.
audioTrack.play();
audioTrack.write(audio, 0, audioLength);
386
❘
CHAPTER 11 AUDIO, VIDEO, AND USING THE CAMERA
You can write audio into the Audio Track buffer either before
play
has been called or after. In the
former case, playback will commence as soon as
play
is called, while in the latter playback will begin
as soon as you write data to the Audio Track buffer.
Listing 11-22 plays back the raw audio recorded in Listing 11-21, but does so at double speed by
halving the expected frequency of the audio file.
LISTING 11-22: Playing raw audio with Audio Track
int frequency = 11025/2;
int channelConfiguration = AudioFormat.CHANNEL_CONFIGURATION_MONO;
int audioEncoding = AudioFormat.ENCODING_PCM_16BIT;
File file = new File(Environment.getExternalStorageDirectory(), "raw.pcm");
// Short array to store audio track (16 bit so 2 bytes per short)
int audioLength = (int)(file.length()/2);
short[] audio = new short[audioLength];
try {
InputStream is = new FileInputStream(file);
BufferedInputStream bis = new BufferedInputStream(is);
DataInputStream dis = new DataInputStream(bis);
int i = 0;
while (dis.available() > 0) {
audio[audioLength] = dis.readShort();
i++;
}
// Close the input streams.
dis.close();
// Create and play a new AudioTrack object
AudioTrack audioTrack = new AudioTrack(AudioManager.STREAM_MUSIC,
frequency,
channelConfiguration,
audioEncoding,
audioLength,
AudioTrack.MODE_STREAM);
audioTrack.play();
audioTrack.write(audio, 0, audioLength);
} catch (Throwable t) {}
SPEECH RECOGNITION
Since Android 1.5 (API level 3), Android has supported voice input and speech recognition using the
RecognizerIntent
class.
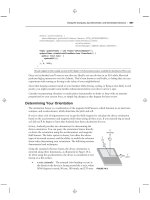
This API lets you accept voice input into your application using the standard voice input dialog shown
in Figure 11-1.
Speech Recognition
❘
387
FIGURE 11-1
Voice recognition is initiated by calling
startNewActivity
ForResult
, and passing in an Intent specifying the
RecognizerIntent.ACTION_RECOGNIZE_SPEECH
action
constant.
The launch Intent must include the
RecognizerIntent
.EXTRA_LANGUAGE_MODEL
extra to specify the lan-
guage model used to parse the input audio. This
can be either
LANGUAGE_MODEL_FREE_FORM
or
LANGUAGE_MODEL_WEB_SEARCH
; both are available as
static constants from the
RecognizerIntent
class.
You can also specify a number of optional extras to control
the language, potential result count, and display prompt
using the following Recognizer Intent constants:
➤
EXTRA_PROMPT
Specify a string that will be displayed
in the voice input dialog (shown in Figure 11-1) to
prompt the user to speak.
➤
EXTRA_MAXRESULTS
Use an integer value to limit
the number of potential recognition results returned.
➤
EXTRA_LANGUAGE
Specify a language constant from
the
Locale
class to specify an input language other
than the device default. You can find the current
default by calling the static
getDefault
method on
the
Locale
class.
The engine that handles the speech recognition may not be capable of
understanding spoken input from all the languages available from the
Locale
class.
Not all devices will include support for speech recognition. In such cases it is
generally possible to download the voice recognition library from the Android
Market.
Listing 11-23 shows how to initiate voice recognition in English, returning one result, and using a
custom prompt.
LISTING 11-23: Initiating a speech recognition request
Intent intent = new Intent(RecognizerIntent.ACTION_RECOGNIZE_SPEECH)
// Specify free form input
intent.putExtra(RecognizerIntent.EXTRA_LANGUAGE_MODEL,
RecognizerIntent.LANGUAGE_MODEL_FREE_FORM);
intent.putExtra(RecognizerIntent.EXTRA_PROMPT,
continues
388
❘
CHAPTER 11 AUDIO, VIDEO, AND USING THE CAMERA
LISTING 11-23 (continued)
"or forever hold your peace");
intent.putExtra(RecognizerIntent.EXTRA_MAX_RESULTS, 1);
intent.putExtra(RecognizerIntent.EXTRA_LANGUAGE, Locale.ENGLISH);
startActivityForResult(intent, VOICE_RECOGNITION);
When the user has completed his or her voice input, the resulting audio will be analyzed and processed
by the speech recognition engine. The results will then be returned through the
onActivityResult
handler as an Array List of strings in the
EXTRA_RESULTS
extra as shown in Listing 11-24.
Each string returned in the Array List represents a potential match for the spoken input.
LISTING 11-24: Finding the results of a speech recognition request
@Override
protected void onActivityResult(int requestCode,
int resultCode,
Intent data) {
if (requestCode == VOICE VOICE_RECOGNITION && resultCode == RESULT_OK) {
ArrayList<String> results;
results = data.getStringArrayListExtra(RecognizerIntent.EXTRA_RESULTS);
// TODO Do something with the recognized voice strings
}
super.onActivityResult(requestCode, resultCode, data);
}
SUMMARY
In this chapter you learned how to play, record, and capture multimedia within your application.
Beginning with the Media Player, you learned how to play back audio and video from local files, appli-
cation resources, and online streaming sites. You were introduced to the Video View and learned how
to create and use Surface Views to play back video content, provide video recording preview, and
display a live camera feed.
You learned how to use Intents to leverage the native applications to record video and take pictures,
as well as use the Media Recorder and Camera classes to implement your own still and moving image
capture solutions.
You were also shown how to read and modify Exif image data, add new media to the Media Store, and
manipulate raw audio.
Finally, you were introduced to the voice and speech recognition libraries, and learned how to use them
to add voice input to your applications.
In the next chapter you’ll explore the low-level communication APIs available on the Android platform.
You’ll learn to use Android’s telephony APIs to monitor mobile connectivity, calls, and SMS activity.
You’ll also learn to use the telephony and SMS APIs to initiate outgoing calls and send and receive SMS
messages from within your application.
12
Telephony and SMS
WHAT’S IN THIS CHAPTER?
➤ Initiating phone calls
➤ Reading the phone, network, data connectivity, and SIM states
➤ Monitoring changes to the phone, network, data connectivity, and
SIM states
➤ Using Intents to send SMS and MMS messages
➤ Using the SMS Manager to send SMS Messages
➤ Handling incoming SMS messages
In this chapter, you’ll learn to use Android’s telephony APIs to monitor mobile voice and data
connections as well as incoming and outgoing calls, and to send and receive SMS (short messag-
ing service) messages.
You’ll take a look at the communication hardware by examining the telephony package for
monitoring phone state and phone calls, as well as initiating calls and monitoring incoming call
details.
Android also offers full access to SMS functionality, letting you send and receive SMS messages
from within your applications. Using the Android APIs, you can create your own SMS client
application to replace the native clients available as part of the software stack. Alternatively,
you can incorporate the messaging functionality within your own applications to create social
applications using SMS as the transport layer.
At the end of this chapter, you’ll use the SMS Manager in a detailed project that involves creat-
ing an emergency SMS responder. In emergency situations, the responder will let users quickly,
or automatically, respond to people asking after their safety.
390
❘
CHAPTER 12 TELEPHONY AND SMS
TELEPHONY
The Android telephony APIs let your applications access the underlying telephone hardware stack,
making it possible to create your own dialer — or integrate call handling and phone state monitoring
into your applications.
Because of security concerns, the current Android SDK does not allow you to
create your own ‘‘in call’’ Activity — the screen that is displayed when an incoming
call is received or an outgoing call has been placed.
The following sections focus on how to monitor and control phone, service, and cell events in your
applications to augment and manage the native phone-handling functionality. If you wish, you can use
the same techniques to implement a replacement dialer application.
Launching the Dialer to Initiate Phone Calls
Best practice is to use Intents to launch a dialer application to initiate new phone calls. Use an Intent
action to start a dialer activity; you should specify the number to dial using the
tel:
schema as the data
component of the Intent.
Use the
Intent.ACTION_DIAL
Activity action to launch a dialer rather than dial the number immediately.
This action starts a dialer Activity, passing in the specified number but allowing the dialer application
to manage the call initialization (the default dialer asks the user to explicitly initiate the call). This
action doesn’t require any permissions and is the standard way applications should initiate calls.
Listing 12-1 shows the basic technique for dialing a number.
LISTING 12-1: Dialing a number
Intent intent = new Intent(Intent.ACTION_DIAL, Uri.parse("tel:1234567"));
startActivity(intent);
By using an Intent to announce your intention to dial a number, your application can remain decoupled
from the dialer implementation used to initiate the call. For example, if you were to replace the existing
dialer with a hybrid that allows IP-based telephony, using Intents to dial a number from your other
applications would let you leverage this new dialer functionality.
Replacing the Native Dialer
Replacing the native dialer application involves two steps:
1. Intercepting Intents that are currently serviced by the native dialer.
2. Initiating, and optionally managing, outgoing calls.
Telephony
❘
391
The native dialer application currently responds to Intent actions corresponding to a user’s pressing the
hardware call button, asking to view data using the
tel:
schema, or making a request to dial a number
using the
tel:
schema.
To intercept these requests include
<intent-filter>
tags on your new Activity that listens for the
following actions:
➤
Intent.ACTION_CALL_BUTTON
This action is broadcast when the device’s hardware call but-
ton is pressed. Create an Intent Filter listening for this action as a default action.
➤
Intent.ACTION_DIAL
The Intent action described in the previous section, this Intent is used
by applications which want to launch the dialer to make a phone call. The Intent Filter used
to capture this action should be both default and browsable (to support dial requests from the
browser), and must specify the
tel:
schema to replace existing dialer functionality (though it
can support additional schemes).
➤
Intent.ACTION_VIEW
The view action is used by applications wanting to view a piece of
data. Ensure that the Intent Filter specifies the
tel:
schema to allow your new Activity to be
used to view telephone numbers.
The following manifest snippet shows an Activity with Intent Filters that will capture each of these
actions.
<activity
android:name=".MyDialerActivity"
android:label="@string/app_name">
<intent-filter>
<action android:name="android.intent.action.CALL_BUTTON" />
<category android:name="android.intent.category.DEFAULT" />
</intent-filter>
<intent-filter>
<action android:name="android.intent.action.VIEW" />
<action android:name="android.intent.action.DIAL" />
<category android:name="android.intent.category.DEFAULT" />
<category android:name="android.intent.category.BROWSABLE" />
<data android:scheme="tel" />
</intent-filter>
</activity>
Once your application has been started, it is up to you to allow users to enter or modify the number to
call and initiate the outgoing call.
The simplest technique is to use the existing telephony stack. In this case you can use the
Intent.ACTION_CALL
action to initiate a call using the standard in-call Activity and letting the system
handle the dialing, connection, and voice handling. Your application must have the
CALL_PHONE
uses-permission to broadcast this action.
Alternatively, you can completely replace the outgoing telephony stack by implementing your own dial-
ing and voice handling framework. This is the perfect alternative if you are implementing a VOIP (voice
over IP) application. Note that the implementation of an alternative telephony platform is beyond the
scope of this book.
Note also that you can intercept these Intents to modify or block outgoing calls as an alternative to
completely replacing the dialer screen.