Adobe Flash chuyên nghiệp - p 5 pptx
Bạn đang xem bản rút gọn của tài liệu. Xem và tải ngay bản đầy đủ của tài liệu tại đây (5.66 MB, 10 trang )
ptg
Adobe fLAsh professionAL Cs5 CLAssroom in A book 31
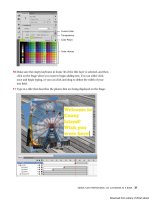
Current color
Color Picker
Color choices
Transparency
10 Make sure the empty keyframe in frame 36 of the title layer is selected, and then
click on the Stage where you want to begin adding text. You can either click
once and begin typing, or you can click and drag to define the width of your
text field.
11 Type in a title that describes the photos that are being displayed on the Stage.
Download from Library of Wow! ebook
ptg
32 LESSON 1 Getting Acquainted
tools Panel Overview
The Tools panel contains selection tools, drawing and painting tools, and naviga-
tion tools. The options area in the Tools panel lets you modify the selected tool.
The expanded menu on the right shows the hidden tools. The black squares on
the expanded menu to the right indicate the default tool that appears on the Tool
panel. The single capital letters in parentheses indicate the keyboard shortcuts to
select those tools. Notice how the tools are grouped together by similar function.
Selection
tools
Drawing and
Type tools
Retouching
tools
Navigation
tools
Colors area
Options area
Selection (V)
Subselection (A)
Lasso (L)
Text (T)
Line (L)
Pencil (Y)
Deco (U)
Eyedropper (I)
Eraser (E)
Hand (H)
Zoom (Z)
Stroke Color
Fill Color
Black and white
Swap colors
Download from Library of Wow! ebook
ptg
Adobe fLAsh professionAL Cs5 CLAssroom in A book 33
12 Exit the Text tool by selecting the Selection tool ( ).
13 Use the Properties inspector or the Transform panel to reposition or rotate
your text on the Stage, if desired. Or, choose the Selection tool and simply drag
your text to a new position on the Stage. e X and Y values in the Properties
inspector update as you drag the text around the Stage.
14 Your animation for this lesson is finished! Compare your file with the final file,
01End.fla.
undoing Steps in Flash
In a perfect world, everything would go according to plan. But sometimes you need
to move back a step or two and start over. You can undo steps in Flash using the
Undo command or the History panel.
To undo a single step in Flash, choose Edit > Undo or press Ctrl/Command+Z. To
redo a step you’ve undone, choose Edit > Redo.
To undo multiple steps in Flash, it’s easiest to use the History panel, which displays
a list of all the last 100 steps you’ve performed. Closing a document clears its his-
tory. To access the History panel, choose Window > Other Panels > History.
For example, if you aren’t satisfied with the newly added text, you can undo your
work and return your Flash document to a previous state.
Download from Library of Wow! ebook
ptg
34 LESSON 1 Getting Acquainted
1 Choose Edit > Undo to undo the last action you made. You can choose the
Undo command multiple times to move backward as many steps as are listed in
the History panel. You can change the maximum number of Undo commands
by selecting Flash > Preferences.
2 Choose Window > Other Panels > History to open the History panel.
3 Drag the History panel slider up to the step just before your mistake. Steps
below that point are dimmed in the History panel and are removed from the
project. To add a step back, move the slider back down.
Previewing Your Movie
As you work on a project, it’s a good idea to preview it frequently to ensure that
you’re achieving the desired effect. To quickly see how an animation or movie will
appear to a viewer, choose Control > Test Movie > in Flash Professional. You can
also press Ctrl+Enter or Command+Return to preview your movie.
1 Choose Control > Test Movie > in Flash Professional.
Note: If you remove
steps in the History
panel and then perform
additional steps, the
removed steps will no
longer be available.
Download from Library of Wow! ebook
ptg
Adobe fLAsh professionAL Cs5 CLAssroom in A book 35
Flash creates a SWF file in the same location as your FLA file and opens and
plays the file in a separate window. A SWF file is the compressed, published file
that you would upload to the Web.
Flash automatically loops your movie in this preview mode. If you don’t want
the movie to loop, choose Control > Loop to deselect the option.
2 Close the preview window.
3 Click on the Stage with the Selection tool. Note at the bottom of the Properties
inspector that the SWF History displays and keeps a log of the file size, date, and
time of the most recent SWF file published. is will help you keep track of your
work progress and revisions.
Publishing Your Movie
When you’re ready to share your movie with others, publish it from Flash. For most
projects, Flash will create an HTML file and a SWF file. e SWF file is your final
Flash movie, and the HTML file tells your Web browser how to display the SWF
file. You’ll need to upload both files to the same folder on your Web server. Always
test your movie after uploading it to be certain that it’s working properly.
1 Choose File > Publish Settings.
2 Click the Formats tab.
Note: You’ll learn
more about publishing
options in Lesson 10.
Download from Library of Wow! ebook
ptg
36 LESSON 1 Getting Acquainted
3 Select Flash (.swf) and HTML (.html).
4 Click the HTML tab.
5 Deselect the Loop option.
Download from Library of Wow! ebook
ptg
Adobe fLAsh professionAL Cs5 CLAssroom in A book 37
6 Click Publish at the bottom of the Publish Settings dialog box.
7 Click OK to close the dialog box.
8 Navigate to the Lesson01/01Start folder to see the files Flash created.
Saving Your Movie
You’ve already saved your Flash movie as an FLA file, but another option is to save
your movie in an uncompressed format known as an XFL format. e XFL format is
actually a folder of files rather than a single document. e XFL file format exposes
the contents of your Flash movie so that other developers or animators can easily
edit your file or manage its assets without having to open the movie in the Flash
application. For example, all the imported photos in your Library panel appear in a
Library folder within the XFL format. You can edit the library photos or swap them
with new photos. Flash will make the substitutions in the movie automatically.
1 Choose File > Save As.
2 Name the file 01_workingcopy.xfl and choose Flash CS5 Uncompressed
Document (*.xfl). Click Save.
Flash creates a folder named 01_workingcopy, which contains all the
information about your Flash movie.
3 Close the Flash document by choosing File > Close.
Download from Library of Wow! ebook
ptg
38 LESSON 1 Getting Acquainted
Modifying an XFL document
In this step, you’ll modify the Library folder of the XFL document to make changes
to your Flash movie.
1 Open the LIBRARY folder inside the 01_workingcopy folder.
e folder contains all the photos you imported into your Flash movie.
2 Select the photo3.jpg file and delete it.
3 Drag the photo4.jpg file from the 01Start folder and move it to the LIBRARY
folder inside the 01_workingcopy folder. Rename photo4.jpg as photo3.jpg.
Swapping out photo3.jpg with a new image in the LIBRARY folder
automatically makes the change in the Flash movie.
4 To open an XFL document, double-click the .xfl file.
e last image in keyframe 24 of your Timeline has been swapped with the
photo4.jpg image with which you made the substitution.
Download from Library of Wow! ebook
ptg
Adobe fLAsh professionAL Cs5 CLAssroom in A book 39
Finding Resources for Using Flash
For complete and up-to-date informa-
tion about using Flash panels, tools,
and other application features, visit the
Adobe Web site. Choose Help > Flash
Help.
You’ll be connected to the Adobe
Community Help Web site where you
can search Flash Help and support
documents, as well as other Web sites
relevant to Flash users. You can nar-
row your search results to view only Adobe help and support documents as well.
If you plan to work in Flash when you’re not connected to the Internet, down-
load the most current PDF version of Flash Help from www.adobe.com/support/
documentation.
For additional resources, such as tips and techniques and the latest product infor-
mation, check out the Adobe Community Help page at community.adobe.com/
help/main.
Note: If Flash
detects that you are
not connected to the
Internet when you
start the application,
choosing Help > Flash
Help opens the Help
HTML pages installed
with Flash. For more
up-to-date information,
view the Help files
online or download
the current PDF for
reference.
Download from Library of Wow! ebook
ptg
40 LESSON 1 Getting Acquainted
Checking for Updates
Adobe periodically provides updates to software. You can easily obtain these
updates through Adobe Application Manager, as long as you have an active
Internet connection.
1 In Flash, choose Help > Updates. e Adobe Application Manager automatically
checks for updates available for your Adobe software.
2 In the Adobe Application Manager dialog box, select the updates you want to
install, and then click Download And Install Updates to install them.
Note: To set your preferences for future updates, choose Help > Updates, and then click
Preferences in the Adobe Application Manager. Select how often you want Adobe Application
Manager to check for updates, for which applications, and whether to download them
automatically. Click OK to accept the new settings.
Download from Library of Wow! ebook


