Adobe Flash chuyên nghiệp - p 32 ppt
Bạn đang xem bản rút gọn của tài liệu. Xem và tải ngay bản đầy đủ của tài liệu tại đây (5.48 MB, 10 trang )
ptg
adobe fLash professionaL Cs5 CLassroom in a book 301
5 e Crop Setting pull-down menu contains options to set how the crop will
appear in the final output file:
• Scale To Fit adjusts the dimensions of the crop and adds black borders to fit
the output file.
• Black Borders adds black bands at either the top (letterbox) or at the sides
(pillarbox) to fit the crop in the dimensions of the output file.
• Change Output Size changes the dimensions of the output file to match the
crop dimensions.
e Scale To Fit and Black Borders options allow you to resize the output file in
the Video tab on the right side of the Export Settings dialog box.
6 Exit the cropping mode without making the crop by clicking the Crop button
again under the Source tab to deselect it. You will not need to crop the
Penguins.mov video for this lesson.
Cue Points
At the bottom left of the
Export Settings dialog
box is an area where you
can set cue points for
your video.
Cue points are special
markers at various
points along the video.
With ActionScript, you
can program Flash to
recognize when those
cue points are encountered, or you can navigate to specific cue points. Cue points
can transform an ordinary, linear video into a true interactive, immersive video
experience. Later in this lesson, you’ll add cue points to your video within Flash
Professional CS5 when your video is directly on the Stage.
Download from Library of Wow! ebook
ptg
302 LESSON 8 Working with Sound and Video
adjusting video length
Your video may have unwanted segments at the beginning or the end. You can
shave off footage from either end to adjust the overall length of your video.
1 Click and drag the playhead (top yellow marker) to scrub through your video
to preview the footage. Place the playhead at the desired beginning point of
your video.
Time markers indicate the number of seconds that have elapsed.
2 Click the Set In Point icon.
e In point moves to the current position of the playhead.
3 Drag the playhead to the desired ending point of your video.
4 Click the Set Out Point icon.
e Out point moves to the current position of the playhead.
Download from Library of Wow! ebook
ptg
adobe fLash professionaL Cs5 CLassroom in a book 303
5 You can also simply drag the In and Out point markers to bracket the desired
video segment.
e highlighted portion of your video between the In and Out point markers
will be the only segment of your original video that will be encoded.
6 Drag the In and Out points back to their original positions, or choose Entire
Clip from the Source Range pull-down menu, because you do not need to adjust
the video length for this lesson.
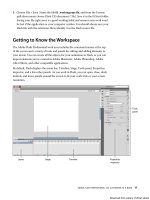
Setting advanced video and audio options
e right side of the Export Settings dialog box contains information about the
original video and summarizes the export settings.
You can choose one of the preset options from the top Preset menu. At the bottom,
you can navigate to advanced video and audio encoding options using the tabs. At
the very bottom, Flash displays the estimated final output size.
You will export the Penguins.mov file again but at a larger size.
Preset options
Summary of
export settings
Advanced video
and audio options
Final output size
Note: You can use
the left or the right
arrow keys on your
keyboard to move
back or ahead frame by
frame for finer control.
Download from Library of Wow! ebook
ptg
304 LESSON 8 Working with Sound and Video
1 Make sure the Export Video and Export Audio boxes are selected.
2 Click the Format tab and choose F4V.
3 Click the Video tab.
4 Select Resize Video and click the Constrain option (the blank grey box). Enter
480 for the Width and click outside the field to accept the change.
e Height automatically changes to keep the proportions of the video.
5 Click OK.
Flash closes the Export Settings dialog box and saves your advanced video and
audio settings.
6 Click Start Queue to begin the encoding process with your custom resize
settings.
Flash creates another F4V file of Penguins.mov. Delete the first one you created
and rename the second one Penguins.f4v.
Saving advanced video and audio options
If you want to process many videos similarly, it makes sense to save your advanced
video and audio options. You can do that in Adobe Media Encoder. Once saved,
you can easily apply your settings to other videos in the queue.
1 Choose Edit > Reset Status to reset the status of your penguin video in the
queue, then choose Edit > Export Settings.
Download from Library of Wow! ebook
ptg
adobe fLash professionaL Cs5 CLassroom in a book 305
2 In the Export Settings dialog box, click the Save Preset button.
3 In the dialog box that opens, provide a descriptive name for the video and audio
options. Click OK.
4 Return to the queue of videos. You can apply your custom settings to additional
videos by simply choosing the preset from the Preset pull-down menu.
Playback of External Video
Now that you have successfully converted your video to the correct Flash-
compatible format, you can use it in your Flash zoo kiosk project. You will have
Flash play each of the animal videos at the different labeled keyframes on the
Timeline.
You will keep your videos external to the Flash project. By keeping videos exter-
nal, your Flash project remains small, the videos can be edited separately, and the
videos can maintain different frame rates from your Flash project.
1 Open your 08_workingcopy.fla project in Flash Professional CS5.
Download from Library of Wow! ebook
ptg
306 LESSON 8 Working with Sound and Video
2 Select the keyframe labeled penguins in the videos layer.
3 Choose File > Import > Import Video.
e Import Video wizard appears. e Import Video wizard guides you step by
step through the process of adding video to Flash.
4 In the Import Video wizard, select On Your Computer and click Browse.
5 In the dialog box, select Penguins.f4v from the Lesson08/08Start folder and
click Open.
e path to the video file appears.
Download from Library of Wow! ebook
ptg
adobe fLash professionaL Cs5 CLassroom in a book 307
6 Select the Load external video with playback component option. Click Next or
Continue.
7 In the next screen of the Import Video wizard, you select the skin, or the
interface controls for the video. From the Skin menu, select the third option
from the top, MinimaFlatCustomColorPlayBackSeekCounterVolMute.swf.
e skins fall in three broad categories. e skins that begin with “Minima” are
the latest designs available in Flash Professional CS5 and include options with
a numeric counter. e skins that begin with “SkinUnder” are controls that
appear below the video. e skins that begin with “SkinOver” are controls that
overlap the bottom edge of the video. A preview of the skin and its controls
appear in the preview window.
8 Select color #333333 with a 75% Alpha. Click Next or Continue.
9 On the next screen of the Import Video wizard, review the information for the
video file, and then click Finish to place the video.
Note: The skin
is a small SWF file
that determines the
functionality and
appearance of the
video’s controls. You
can use one of the skins
provided with Flash, or
you can choose None
from the top of the
menu.
Download from Library of Wow! ebook
ptg
308 LESSON 8 Working with Sound and Video
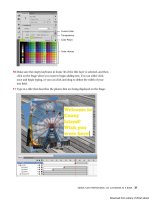
10 Your video with the selected skin appears on the Stage. Place the video on the
left side of the Stage.
An FLVPlayback component also appears in your Library panel. e component
is a special widget that is used on the Stage to play your external video.
Note: When a video
on the Stage is selected,
you can press the
spacebar to begin or
pause playback.
Download from Library of Wow! ebook
ptg
adobe fLash professionaL Cs5 CLassroom in a book 309
11 Click the play button on the skin of your video to preview the video.
e video plays on your Stage. Use the controls to play, stop, scrub, and change
the volume of the movie. e ability to preview an external video on the Stage is
a new feature in Flash Professional CS5.
12 Choose Control > Test Movie > in Flash Professional. After the musical
introduction, click the Magellanic Penguins button.
e video plays the external penguin video with the skin you chose in the
Import Video wizard. Close the preview window.
13 e other animal videos have already been encoded (in FLV format) and
provided in the 08Start folder. Import the Mandrill.flv, Tiger.flv, and Lion.flv
videos in each of their corresponding keyframes. Choose the same skin as the
Penguin.f4v video.
Controlling the video playback
e FLVPlayback component lets you control which video plays, whether the video
plays automatically, and other aspects of playback. e options for playback can
be accessed in the Properties inspector. Individual properties are listed in the left
column, and their corresponding values are listed in the right column. Select one of
the videos on the Stage, and then choose among the following options:
• To change the autoPlay option, deselect the check box. When the check box is
selected, the video plays automatically. When the check box is deselected, the
video is paused on the first frame.
Note: If you don’t
have a skin on your
video, you can still
control playback of
the video on the Stage
by right-clicking/Ctrl-
clicking on the video
and choosing Play,
Pause, or Rewind.
Note: The FLV
or F4V files, the
08_workingcopy.swf
file, and the skin file are
all required for your zoo
kiosk project to work.
The skin file is published
in the same folder as
your FLA file.
Download from Library of Wow! ebook
ptg
310 LESSON 8 Working with Sound and Video
• To hide the controller and only display it when users roll their mouse cursor
over the video, select the check box for the skinAutoHide option.
• To choose a new controller (the skin), click the name of your skin file and select
a new skin in the dialog box that appears.
• To change the transparency of the skin, enter a decimal value from 0 (totally
transparent) to 1 (totally opaque) for the skinBackgroundAlpha.
• To change the color of the skin, click on the color chip and choose a new color
for the skinBackgroundColor.
• To change the video file or the location of the video file that Flash looks for to
play, click the source option.
In the Content Path dialog box that appears, enter a new filename or click the
Folder icon to choose a new file to play. e path is relative to the location of
your Flash file.
Working with Video and Transparency
For the various animal videos, you want to show the entire frame with the animals
in the foreground and the lush environment in the background. But sometimes you
want to use a video file that doesn’t include a background. For this project, the zoo
director was filmed in front of a green screen, which was removed using Adobe
After Effects. When you use the video in Flash, the zoo director appears to be in
front of the Flash background. A similar effect is used for news weatherpersons,
Download from Library of Wow! ebook