Beginning Game Programming (phần 3) ppsx
Bạn đang xem bản rút gọn của tài liệu. Xem và tải ngay bản đầy đủ của tài liệu tại đây (917.57 KB, 50 trang )
If you are eager to get started with 3D graphics, you can skip ahead to Part III of
the book, but I recommend that you stay here and learn the basics first. Before
you start loading 3D objects and rendering animated characters on the screen,
you need to know the basics of DirectX. In particular, the game framework in
Chapter 9 is used in all future chapters, so it’s important to understand how the
game library works. Much of the game framework is readied in this very chapter,
and you will add to it over the next several chapters to make DirectX
programming easier.
Here is what you will learn in this chapter:
n How to initialize the Direct3D object.
n How to create a device for accessing the video display.
n How to create a back buffer for flicker-free graphics.
n How to run a Direct3D program in a window.
n How to run a Direct3D program in fullscreen mode.
Getting Started with Direct3D
To use Direct3D or any other component of DirectX, you must be somew hat
familiar with how to use headers and library files (standard fare in C program-
ming), because DirectX function calls are stored in header files, and the pre-
compiled DirectX functions are stored in libs. For instance, the Direct3D
functions are stored in d3d9.lib, and the way your program ‘‘sees’’ Direct3D is by
including the d3d9.h header file using the
#include <d3d9.h> directive in your
source code files.
I will assume that you have already installed the DirectX 9 Software Development
Kit (SDK) for Visual C++ or the separate version of DX9 for Dev-C++. If you
have not installed one of these yet, you should do that before reading any further.
The DirectX 9 SDK is located on the CD-ROM that accompanies this book in the
\DirectX folder, while the Dev-C++ version is located in \dev-cpp. When given
the DirectX Runtime Support option, you want to install the debug version for
development.
Okay, ready to go?
80 Chapter 5
n
Your First DirectX Graphics Program
The Direct3D Interfaces
In order to write a program that uses Direct3D, you must create one variable for
the Direct3D interface and another for the graphics device. The Direct3D
interface is called
LPDIRECT3D9 and the device object is called LPDIRECT3DDEVICE9.
You can create the variables like this:
LPDIRECT3D9 d3d = NULL;
LPDIRECT3DDEVICE9 d3ddev = NULL;
The LPDIRECT3D 9 object is the big boss of the Direct3D library, the object that
controls everything, while
LPDIRECT3DDEVICE9 represents the video card. You can
probably tell what those objects are by their names. LP means ‘‘long pointer,’’ so
LPDIRECT3D9 is a long pointer to the DIRECT3D9 object. These definitions are
located in the d3d9.h header file, which you must
#include in your source code
file. Here is how
LPDIRECT3D9 is defined:
typedef struct IDirect3D9 *LPDIRECT3D9;
This may be confusing if you aren’t particularly adept with pointers; they can
be confusing until you ‘‘get it.’’ Pointers are certainly the biggest obstacle to
most programmers’ mastery of C. When I don’t understand something, I
prefer to let my subconscious work on it —because my conscious mind just gets
in the way sometimes. Seriously—if you don’t get it, just start using these
pointers and objects and give yourself time. You’ll slowly come to understand.
One mistake programmers often make is to assume that they must know
how something works in order to use it. Not so! Just go ahead and write
Direct3D programs; you don’t need to know anything about 3D modeling or
rendering right away. Practice builds experience, which makes up for a lack of
understanding.
IDirect3D9 is an interface; therefore, LPDIRECT3D9 is a long pointer to the
Direct3D9 interface. The same goes for
LPDIRECT3DDEVICE9, which is a long
pointer to the
IDirect3DDevice9 interface.
Creating the Direct3D Object
Let me now show you how to initialize the main Direct3D object:
d3d = Direct3DCreate9(D3D_SDK_VERSION);
Getting Started with Direct3D 81
This code initializes Direct3D, which means that it is ready to be used. First, you
must create the device upon which Direct3D will display output. This is where
the
d3ddev variable will be used (note that d3d is used to call this function):
d3d->CreateDevice(
D3DADAPTER_DEFAULT, //use default video card
D3DDEVTYPE_HAL, //use the hardware renderer
hWnd, //window handle
D3DCREATE_SOFTWARE_VERTEXPROCESSING, //do not use T&L (for compatibility)
&d3dpp, //presentation parameters
&d3ddev); //pointer to the new device
Hardware T&L
If you are a technophile (that is, someone who loves to tinker with gadgets), or rather, if you are a
hardcore gamer who loves to argue about video card specifications, then the parameter
D3DCREATE_SOFTWARE_VERTEXPROCESSING probably irritated you. If you don’t know anything about
video cards, then no harm done! But I suspect you make it a habit to keep up to date on all the
latest computer technology, right? Well, we all know that ‘‘transform and lighting’’ was the big
buzzword of 2002, and all video cards since then have come with T&L. What this really means is
that much of the 3D setup work is handled by the video card itself, rather than your computer’s
central processing unit (CPU).
When 3Dfx came out with the world’s first 3D accelerator card for the PC, it took the industry by
storm and revolutionized gaming. It would have happened sooner or later anyway, but 3Dfx was
first because the company had been building 3D hardware for arcade game machines for years. I
remember the first time I saw
Quake
running with 3D acceleration; my jaw dropped.
Having the rendering pipeline reside in the 3D card rather than the CPU is a given at this point.
Evolution takes over for a few years and video cards are bumping up the polygon counts and
feature sets. Then nVidia ushered in the next revolution by adding the transform and lighting
phase of the 3D rendering pipeline to the 3D chip itself, offloading that work from the CPU.
What is transform & lighting, anyway? A
transform
is the manipulation of polygons, while lighting
is just like it sounds adding lighting effects to those polygons. While 3D chips first enhanced
games by rendering textured polygons in the hardware (vastly improving quality and speed), T&L
added the final touch by having the 3D chip manipulate and light the scene as well. This frees up
the CPU for other tasks, like artificial intelligence and game physics which, in case you haven’t
noticed, have really taken off in recent years! This is not due to just faster CPUs, but primarily due
to the GPU taking the load off.
The last two parameters of CreateDevice specify the device parameters (d3dpp)
and the device object (
d3ddev). d3dpp must be defined before use, so let’s go over
it now. There are a lot of options that you can specify for the device, which you
can see in Table 5.1.
82 Chapter 5
n
Your First DirectX Graphics Program
First, create a variable of the D3DPRESENT_PARAMETERS struct that is used to set up
the device parameters:
D3DPRESENT_PARAMETERS d3dpp;
and then clear out the struct to zero all values before use:
ZeroMemory(&d3dpp, sizeof(d3dpp));
Let’s take a look at all the possible Direct3D presentation parameters:
There are a lot of options in the
d3dpp struct, and a lot of sub-structs within it as
well. I’ll go over options that you need in order to work through the topics in this
chapter, but I may not cover every option (which would amount to information
overload). Let’s fill in the
d3dpp struct with just a few values needed to get a
windowed Direct3D program running:
d3dpp.Windowed = TRUE;
d3dpp.SwapEffect = D3DSWAPEFFECT_DISCARD;
d3dpp.BackBufferFormat = D3DFMT_UNKNOWN;
Getting Started with Direct3D 83
Table 5.1 Direct3D Presentation Parameters
Variable Type Description
BackBufferWidth UINT Width of the back buffer
BackBufferHeight
UINT Height of the back buffer
BackBufferFormat
D3DFORMAT Format of the back buffer, D3DFORMAT. Pass
D3DFMT_UNKNOWN to use desktop format in
windowed mode
BackBufferCount
UINT Number of back buffers
MultiSampleType
D3DMULTISAMPLE_TYPE Number of multi-sampling levels for full-screen
anti-aliasing. Normally pass
D3DMULTISAM-
PLE_NONE
MultiSampleQuality DWORD Quality level of multi-sampling. Normally pass 0
SwapEffect
D3DSWAPEFFECT Swapping method for back buffer
hDeviceWindow
HWND Parent window for this device
Windowed
BOOL Set to TRUE for windowed mode, FALSE for
fullscreen mode
EnableAutoDepthStencil
BOOL Allow D3D to control the depth buffers (normally
set to
TRUE)
AutoDepthStencilFormat
D3DFORMAT Format of the depth buffers
Flags
DWORD Optional flags (normally set to 0)
FullScreen_RefreshRateInHz UINT Fullscreen refresh rate (must be 0 for windowed)
PresentationInterval UINT Controls the buffer swap rate
After these few values have been filled in, you can then call CreateDevice to create
the primary Direct3D drawing surface.
Taking Direct3D for a Spin
Let’s create a sample project to use in this section on Direct3D to get a feel for
how a complete Direct3D program works. Create a new Win32 Project type of
program and call it d3d_windowed (or whatever name you wish, although this is
the name of the project on the CD-ROM). Add a new file, called winmain.cpp, to
the empty project. Now let’s configure the project for Direct3D.
Note
Remember that this is all basically just C code (rather than C++), even though the filenames all
have an extension of .cpp. Visual C++ may complain if the source files don’t end with .cpp in
some cases.
Adding Direct3D to the Linker
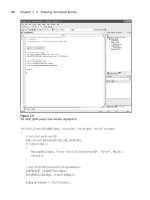
Open the Project menu and select Properties (the last option on the bottom of
the menu). The Properties dialog is shown in Figure 5.1.
84 Chapter 5
n
Your First DirectX Graphics Program
Figure 5.1
The Project Properties dialog for the d3d_windowed project in Microsoft Visual C++
Now, click the Linker item on the list at the left to open up the linker options.
You’ll notice several sub-items under the Linker tree item, such as General,
Input, Debugging, and so on. Select the sub-item called Input under the Linker
tree menu, as shown in Figure 5.2.
Pay special attention to the field called Additional Dependencies. This field shows
all of the library files that are linked to your program when all of the various
source code files are compiled and linked together to form the executable file. If
you have a winmain.cpp file in your project, then it is compiled to winmain.obj
(which is an object file), which contains the binary instructions that will run on
your computer. This is a very low-level binary file that is not readable, so don’t
even try to open it (you can see the various output files inside the Debug
folder, as it is created inside your program’s main folder when you compile the
program).
Now, let’s add the Direct3D library file to the list of libraries. Add ‘‘d3d9.lib’’ to
the Additional Dependen cies field, as shown in Figure 5.3, and then close the
dialog.
Assuming your source code is correct, this is all you need to do to compile a
Direct3D program. You have now configured your first DirectX project in Visual
C++! This is no easy thing to do, so you should feel like you’re making some
serious progress—especially if you are new to the C++ language!
Getting Started with Direct3D 85
Figure 5.2
Opening the Link tab in the Project Properties dialog
Typing in the Source Code
Here is the standard Windows code needed to get the program rolling. I’ll show
you the Direct3D-specific code at the end of this listing.
// Beginning Game Programming, Second Edition
// Chapter 5
// d3d_windowed program
//header files to include
#include <d3d9.h>
#include <time.h>
//application title
#define APPTITLE "Direct3D_Windowed"
//forward declarations
LRESULT WINAPI WinProc(HWND,UINT,WPARAM,LPARAM);
ATOM MyRegisterClass(HINSTANCE);
int Game_Init(HWND);
void Game_Run(HWND);
void Game_End(HWND);
//Direct3D objects
86 Chapter 5
n
Your First DirectX Graphics Program
Figure 5.3
Adding d3d9.lib to the Additional Dependencies field.
LPDIRECT3D9 d3d = NULL;
LPDIRECT3DDEVICE9 d3ddev = NULL;
//window event callback function
LRESULT WINAPI WinProc( HWND hWnd, UINT msg, WPARAM wParam, LPARAM lParam )
{
switch( msg )
{
case WM_DESTROY:
Game_End(hWnd);
PostQuitMessage(0);
return 0;
}
return DefWindowProc( hWnd, msg, wParam, lParam );
}
//helper function to set up the window properties
ATOM MyRegisterClass(HINSTANCE hInstance)
{
//create the window class structure
WNDCLASSEX wc;
wc.cbSize = sizeof(WNDCLASSEX);
//fill the struct with info
wc.style = CS_HREDRAW | CS_VREDRAW;
wc.lpfnWndProc = (WNDPROC)WinProc;
wc.cbClsExtra = 0;
wc.cbWndExtra = 0;
wc.hInstance = hInstance;
wc.hIcon = NULL;
wc.hCursor = LoadCursor(NULL, IDC_ARROW);
wc.hbrBackground = (HBRUSH)GetStockObject(WHITE_BRUSH);
wc.lpszMenuName = NULL;
wc.lpszClassName = APPTITLE;
wc.hIconSm = NULL;
//set up the window with the class info
return RegisterClassEx(&wc);
}
//entry point for a Windows program
int WINAPI WinMain(HINSTANCE hInstance,
HINSTANCE hPrevInstance,
Getting Started with Direct3D 87
LPSTR lpCmdLine,
int nCmdShow)
{
// declare variables
MSG msg;
// register the class
MyRegisterClass(hInstance);
// initialize application
//note––got rid of initinstance
HWND hWnd;
//create a new window
hWnd = CreateWindow(
APPTITLE, //window class
APPTITLE, //title bar
WS_OVERLAPPEDWINDOW, //window style
CW_USEDEFAULT, //x position of window
CW_USEDEFAULT, //y position of window
500, //width of the window
400, //height of the window
NULL, //parent window
NULL, //menu
hInstance, //application instance
NULL); //window parameters
//was there an error creating the window?
if (!hWnd)
return FALSE;
//display the window
ShowWindow(hWnd, nCmdShow);
UpdateWindow(hWnd);
//initialize the game
if (!Game_Init(hWnd))
return 0;
// main message loop
int done = 0;
while (!done)
{
88 Chapter 5
n
Your First DirectX Graphics Program
if (PeekMessage(&msg, NULL, 0, 0, PM_REMOVE))
{
//look for quit message
if (msg.message == WM_QUIT)
{
MessageBox(hWnd, "Received WM_QUIT message", "WinMain", MB_OK);
done = 1;
}
//decode and pass messages on to WndProc
TranslateMessage(&msg);
DispatchMessage(&msg);
}
else
//process game loop (else prevents running after window is closed)
Game_Run(hWnd);
}
return msg.wParam;
}
The first thing you might have noticed about this code is that InitInstance is
missing. Actually, I just moved the code from this helper function directly into
WinMain because the Direct3D code needs access to the window handle (hWnd),
and I would prefer to just keep the
CreateWindow function right inside WinMain.
There are several more changes in this code listing that make it differ from the
GameLoop program that you saw in the last chapter. For one thing, Game_End is
called from within
WinProc (the window event callback function, as you’ll
recall) after the
WM_DESTROY message. This function actually removes the
Direct3D objects and any other things from memory before the program ends.
If you want to see the program hang, just terminate the program without first
releasing Direct3D—it will keep running in memory, even though the program
window is gone! This is what you might call a bad thing.Oh,whybeataround
the bush? This is a very bad thing. So, this call to
Game_End right inside the
callback function ensures that Direct3D is shut down properly before the
program ends.
Now let’s go over the code to initialize Direct3D. I have put the code you have
learned about in this chapter so far inside
Game_Init, which is called by WinMain
just before the main loop starts running. The calls to MessageBox are for testing
purposes, and can be removed once you understand how the program works.
Getting Started with Direct3D 89
int Game_Init(HWND hwnd)
{
//display init message
MessageBox(hwnd, "Program is about to start", "Game_Init", MB_OK);
//initialize Direct3D
d3d = Direct3DCreate9(D3D_SDK_VERSION);
if (d3d == NULL)
{
MessageBox(hwnd, "Error initializing Direct3D", "Error", MB_OK);
return 0;
}
//set Direct3D presentation parameters
D3DPRESENT_PARAMETERS d3dpp;
ZeroMemory(&d3dpp, sizeof(d3dpp));
d3dpp.Windowed = TRUE;
d3dpp.SwapEffect = D3DSWAPEFFECT_DISCARD;
d3dpp.BackBufferFormat = D3DFMT_UNKNOWN;
//create Direct3D device
d3d->CreateDevice(
D3DADAPTER_DEFAULT,
D3DDEVTYPE_HAL,
hwnd,
D3DCREATE_SOFTWARE_VERTEXPROCESSING,
&d3dpp,
&d3ddev);
if (d3ddev == NULL)
{
MessageBox(hwnd, "Error creating Direct3D device", "Error", MB_OK);
return 0;
}
//set random number seed
srand(time(NULL));
//return okay
return 1;
}
Did you see that first line that calls MessageBox to display a message? I inserted
this to demonstrate how things work in the program, how the functions are
90 Chapter 5
n
Your First DirectX Graphics Program
called, and to demonstrate the ordering of events in a Windows program. If you
want to really see how it all works, you may insert similar
MessageBox function
calls elsewhere in the program. You can insert them basically anywhere except for
in the game loop, which you don’t really want to interrupt with a message box, as
that will mess everything up. Okay, let’s take a look at
Game_Run to see what
happens to draw on the Direct3D display:
void Game_Run(HWND hwnd)
{
//make sure the Direct3D device is valid
if (d3ddev == NULL)
return;
//clear the screen with a green color
d3ddev->Clear(0, NULL, D3DCLEAR_TARGET, D3DCOLOR_XRGB(0,255,255), 1.0f, 0);
//start rendering
if (d3ddev->BeginScene())
{
//do something here!
//stop rendering
d3ddev->EndScene();
}
//display the back buffer on the screen
d3ddev->Present(NULL, NULL, NULL, NULL);
}
First, this function makes sure that the d3ddev (Direct3D device) exists; other-
wise, it returns an error. Next, the
Clear fun ction is called to clear the back buffer
with the color green. This is not just a cosmetic function call to
Clear. This
literally blanks out the screen before each frame is rendered (and as you will learn
later on, this function can also clear the z-buffer used to draw polygons). Imagine
that you have a character walking on the screen. At each frame (here within
Game_Run) you will change to the next frame of animation, so that over time the
character really appears to be walking. Well, if you don’t clear the screen first,
then each frame of the animation is drawn over the last frame, resulting in a big
mess on the screen. That is why
Clear is called befor e the rendering begins: to
wipe the slate clean and prepare it for the next frame.
Getting Started with Direct3D 91
Now for the last part of the program:
void Game_End(HWND hwnd)
{
//display close message
MessageBox(hwnd, "Program is about to end", "Game_End", MB_OK);
//release the Direct3D device
if (d3ddev != NULL)
d3ddev->Release();
//release the Direct3D object
if (d3d != NULL)
d3d->Release();
}
The Game_End function is called from within WinMain, as you’ll recall, after a
WM_DESTROY message comes in. This usually happens when you close the program
window (clicking the small X icon at the top right corner—duh, you knew that, right?).
Running the Program
If you run the program (F5 from Visual C++), you should see a blank window
pop up, as shown in Figure 5.4. Hey, it doesn’t do much, but you’ve learned a lot
about initializing Direct3D—that baby is ready for some polygons!
92 Chapter 5
n
Your First DirectX Graphics Program
Figure 5.4
The Direct3D_Windowed program demonstrates how to initialize Direct3D.
Direct3D in Fullscreen Mode
The next step is to learn how to program Direct3D to run in fullscreen mode,
which is how most games run. This requires a change to the
CreateWindow
function and a few changes to the Direct3D presentation parameters. Using the
d3d_windowed program as a basis, you can just make the following changes to
make the program run in fullscreen mode.
Tip
It’s good to have your game run fullscreen for production, but it’s preferable to run the game in
windowed mode while you are working on it because in fullscreen mode Direct3D takes control
over the screen, and you won’t be able to see any error messages that pop up.
Modifying the Code
First, add the following lines up near the top of the code listing:
//screen resolution
#define SCREEN_WIDTH 640
#define SCREEN_HEIGHT 480
These defines will make it easier to change the video resolution later, if you wish.
They also make the code more readable.
Adding Keyboard Support
Because this program will run in fullscreen mode, you need a way to end the
program. Without some way to check for keyboard input, the only way to end
a program in fullscreen mode is to Alt+Tab out to the desktop, open Task
Manager, and terminate the program the hard way. This just will not do, so let
me show you a quick and easy solution that will work until I’ve had a chance to
introduce you to DirectInput in a later chapter. Add this code below the last two
defines that you inserted into the code:
//macros to read the keyboard asynchronously
#define KEY_DOWN(vk_code) ((GetAsyncKeyState(vk_code) & 0x8000) ? 1 : 0)
#define KEY_UP(vk_code)((GetAsyncKeyState(vk_code) & 0x8000) ? 1 : 0)
Modifying CreateWindow
Now, down in WinMain, I have made some changes to the CreateWindow function
call that you should note (the changes appear in bold):
Getting Started with Direct3D 93
//create a new window
hWnd = CreateWindow(
APPTITLE, //window class
APPTITLE, //title bar
WS_EX_TOPMOST | WS_VISIBLE | WS_POPUP, //window style
CW_USEDEFAULT, //x position of window
CW_USEDEFAULT, //y position of window
SCREEN_WIDTH, //width of the window
SCREEN_HEIGHT, //height of the window
NULL, //parent window
NULL, //menu
hInstance, //application instance
NULL); //window parameters
The CreateWindow function includes the screen width and height defines, but I
also made some changes to the
WS_OVERLAPPED window style. It now includes the
WS_EX_TOPMOST value, which causes the window to take precedence over all other
windows. The other two options are
WS_VISIBLE and WS_POPUP, which ensure that
the window has focus and no longer includes a border or title bar.
Changing the Presentation Parameters
The next change involves the D3DPRESENT_PARAMETERS struct, which directly
affects the appearance and capabilities of the Direct3D primary surface. You may
recall that the last program set it up with the following three lines:
d3dpp.Windowed = TRUE;
d3dpp.SwapEffect = D3DSWAPEFFECT_DISCARD;
d3dpp.BackBufferFormat = D3DFMT_UNKNOWN;
There are several other options that I did not set the first time around that are
now significant when you are trying to initialize Direct3D in fullscreen mode.
Here are the new
d3dpp settings with changes in bold (found in Game_Init).
d3dpp.Windowed = FALSE;
d3dpp.SwapEffect = D3DSWAPEFFECT_DISCARD;
d3dpp.BackBufferFormat = D3DFMT_X8R8G8B8;
d3dpp.BackBufferCount = 1;
d3dpp.BackBufferWidth = SCREEN_WIDTH;
d3dpp.BackBufferHeight = SCREEN_HEIGHT;
d3dpp.hDeviceWindow = hwnd;
94 Chapter 5
n
Your First DirectX Graphics Program
Looking for the Escape Key
Okay, just one more change and you’ll be on target with this fullscreen program.
Scroll down in the code listing to the
Game_Run function, which is called by
WinMain to update the screen (this is where all rendering and core gameplay will
occur). Add the following code to the end of the
Game_Run function:
//check for escape key (to exit program)
if (KEY_DOWN(VK_ESCAPE))
PostMessage(hwnd, WM_DESTROY, 0, 0);
Now, when the program runs in fullscreen mode, you will have a way to exit out of
the program. See, I do plan ahead! The program is now ready to run, so give it a spin.
What You Have Learned
In this chapter, you have learned how to initialize and run a Direct3D program in
windowed and fullscreen modes. Here are the key points:
n You learned about the Direct3D interface objects.
n You learned about the CreateDevice function.
n You learned about the Direct3D presentation parameters.
n You learned what settings to use to run Direct3D in windowed mode.
n You learned how to run Direct3D in fullscreen mode.
What You Have Learned 95
Review Questions
Here are some review questions to challenge your impressive intellect and see if
you have any weaknesses:
1. What is Direct3D?
2. What is the Direct3D interface object called?
3. What is the Direct3D device called?
4. What function do you use to start rendering?
5. What function lets you read from the keyboard asynchronously?
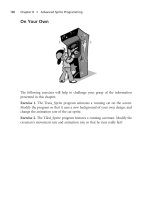
On Your Own
96 Chapter 5
n
Your First DirectX Graphics Program
These exercises will challenge you to learn more about the subjects presented in
this chapter and will help you to push yourself to see what you are capable of
doing on your own.
Exercise 1. Modify the
Direct3D_Windowed program so that it displays a different
color in the background other than green.
Exercise 2. Modify the
Direct3D_Fullscreen program so that it uses a different
resolution other than 640 Â 480.
On Your Own 97
This page intentionally left blank
Bitmaps and
Surfaces
Some of the best games ever made were 2D games that didn’t even require an
advanced 3D accelerated video card. It is important to learn about 2D graphics
because they are the basis for all graphics that are displayed on your monitor—
regardless of how those graphics are rendered, game graphics are all converted to
an array of pixels on the screen. In this chapter, you will learn about surfaces,
which are just regular bitmaps that can be drawn to the screen. So, think back on
some of your all-time favorite games. Were they all 3D games? Very likely not—
there have been more blockbuster 2D games than there have been of the 3D
variety. Rather than compare and contrast the 2D and 3D, it’s better to just learn
both and then use whichever one your game calls for. A game programmer
should know everything in order to create the best games.
99
chapter 6
Here is what you will learn in this chapter:
n How to create a surface in memory.
n How to fill a surface with color.
n How to load a bitmap image file.
n How to draw a surface on the screen.
Surfaces and Bitmaps
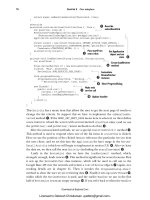
Direct3D uses surfaces for many things. The monitor (shown in Figure 6.1)
displays what the video card sends to it, and the video card pulls the video display
out of a frame buffer that is sent to the monitor one pixel at a time (they might be
in single file, but they move insanely fast!).
The frame buffer is stored in the memory chips on the video card itself (shown in
Figure 6.2), and these chips are usually very fast. There was a time when video
memory (VRAM) was extremely expensive because it was so fast—much faster
than standard system RAM. Now things are somewhat reversed, as the PC’s main
memory usually has the best technology and the video cards are a step or two
behind. The reason for this is because it’s difficult to redo the architecture of a
video card, which is a very precise and complex circuit board.
100 Chapter 6
n
Bitmaps and Surfaces
Figure 6.1
A typical monitor
The PC motherboard, on the other hand, is constantly in a state of flux, as
semiconductor companies strive to outdo each other. Video card companies, no
matter how competitive they may be, can’t gamble on putting six months’ worth
of effort into a memory technology that fails in the market and is replaced by
other types of memory (remember Rambus?). Also, while motherboards are built
for a variety of industries and uses—and, thus, have been subject to much
experimentation—video cards are built for one thing only: displaying graphics.
Therefore, less experimentation goes on with the chips on a video card. After the
PC market has decided on a memory standard, it tends to show up on video
cards. You may recall when the first DDR (double data rate) memory was used
on video cards; it was quite a while after DDR had been initially released.
Where was I? Oh, right! The frame buffer resides in video memory, and repre-
sents the image you see on the monitor (as shown in Figure 6.3). So it makes
sense that the easiest way to create graphics is to just modi fy the frame buffer
directly; the result is that you see the changes on the screen right away. This is
how things work, basically, but I’m leaving out one small detail. You don’ t want
to draw directly on the frame buffer because that causes flicker as your graphics
are drawn, erased, moved, and redrawn while the screen is being refreshed.
Surfaces and Bitmaps 101
Figure 6.2
The monitor displays the linear array of pixels sent to it by the video card
Figure 6.3
The frame buffer in VRAM contains the image that is rendered on the monitor
Instead, what you want to do is draw everything on an offscreen buffer and then
blast that ‘‘double’’ or ‘‘back’’ buffer to the screen very quickly. This is called
double buffering. There are other methods of creating a flicker-free display, such
as page flipping, but I tend to prefer a back buffer because it is more straight-
forward (and a bit easier).
The Primary Surfaces
You might recall from the last chapter that you created a back buffer by setting
the presentation parameters. Then, using the
Clear function, you filled the back
buffer with green and then used the
Present function to refresh the screen. You
were using a double/back buffer without even realizing it! That’s one nice feature
that Direct3D provides—a built-in back buffer. And it makes sense, because
double buffering is as common today in games as bread and butter is in your
kitchen.
The ‘‘frame buffer’’ that I mentioned earlier is also called the front buffer, which
makes sense in that the back buffer is copied to it during each frame. Both the
front and back buffers are created for you when you configure the presentation
parameters and call
CreateDevice. Isn’t that great?
Secondary Offscreen Surfaces
The other type of surface you can use is called a secondary or offscreen surface.
This type of surface is really just an array in memory that looks like a bitmap
(where it has a header and then data representing pixels). You can create as many
offscreen surfaces as you need for your game; it is common to use hundreds of
them while a game is running. The reason is because all of the graphics in a game
are stored in surfaces, and these surfaces are copied to the screen in a process
called bit-block transfer. The common way to refer to this term is ‘‘blitter’’—you
‘‘blit’’ surfaces to the screen.
You might remember the GameLoop program from Chapter 4 that used a
function called
BitBlt (that I purposely neglected to explain at the time). BitBlt
is a Windows GDI function for ‘‘blitting’’ bitmaps to device contexts, such as the
main window of your program. A device context is sort of like a Direct3D
surface, but is more difficult to use (due to the complexity of the Windows GDI).
Direct3D surfaces are simple in comparison, as you’ll see shortly. In fact, I might
use the word refreshing to describe them after writing Windows code for so many
years.
102 Chapter 6
n
Bitmaps and Surfaces
Creating a Surface
You create a Direct3D surface by first declaring a variable to point to the surface
in memory. The surface object is called
LPDIRECT3DSURFACE9, and you create a
variable like so:
LPDIRECT3DSURFACE9 surface = NULL;
Once you have created a surface, you have a lot of freedom as to what you can do
with the surface. You can use the ‘‘blitter’’ to draw bitmaps to the surface (from
other surfaces, of course), or you can fill the surface with a color, among other
things. If you want to clear the surface prior to drawing on it, for instance, you
would use the
ColorFill function, which has this syntax:
HRESULT ColorFill(
IDirect3DSurface9 *
pSurface
,
CONST RECT *
pRect
,
D3DCOLOR
color
);
This usage causes the destination surface to be filled with the color red:
d3ddev->ColorFill(surface, NULL, D3DCOLOR_XRGB(255,0,0));
Drawing the Surface (Blitting)
Probably the most interesting function, of course, is the blitter. You can blit
portions or all of one surface onto another surface (including the back buffer or
the screen). The blitter is called
StretchRect (strange name, huh?). Here is what it
looks like:
HRESULT StretchRect(
IDirect3DSurface9 *
pSourceSurface
,
CONST RECT *
pSourceRect
,
IDirect3DSurface9 *
pDestSurface
,
CONST RECT *
pDestRect
,
D3DTEXTUREFILTERTYPE
Filter
);
Well, didn’t I tell you that bitmaps were easier to deal with in Direct3D than they
are with the Windows GDI? I wasn’t kidding. This sweet little function only has
five parameters, and it is really easy to use. Let me give you an example:
d3ddev->StretchRect(surface, NULL, backbuffer, NULL, D3DTEXF_NONE);
Surfaces and Bitmaps 103
This is the easiest way to call the function, assuming that the two surfaces are the
same size. If the source surface is smaller than the destination, then it is blitted to
the upper-left corner of the destination surface. Of course, this isn’t very inter-
esting; when this function is really handy is when you specify the rectangles for
the source and destination. The source rectangle can be just a small portion or the
entire surface; the same goes for the destination, but you’ll usually blit the source
somewhere ‘‘on’’ the destination. Here’s an example:
rect.left = 100;
rect.top = 90;
rect.right = 200;
rect.bottom = 180;
d3ddev->StretchRect(surface, NULL, backbuffer, &rect, D3DTEXF_NONE);
This code copies the source surface onto the destination, stretching it into the
rectangle at (100, 90, 200, 180), which is 100 Â 90 pixels in siz e. Regardless of
the siz e of the source surface, as long as it isn’t
NULL, it will be ‘‘stuffed’’ into the
dimensions specified by the destination rectangle.
I’ve been using
backbuffer without first explaining where it came from. No, there
is not a global variable called
backbuffer that you can freely use! (Although that
would be kind of cool.) But it’s not a big deal—you can create this variable
yourself. It is actually just a pointer to the real back buffer, and you can get this
pointer by calling a special function called
GetBackBuffer. Boy, was that a tough
call, huh? Well, you can’t argue with the straightforward approach (which is not
Microsoft’s usual approach).
HRESULT GetBackBuffer(
UINT
iSwapChain
,
UINT
BackBuffer
,
D3DBACKBUFFER_TYPE
Type
,
IDirect3DSurface9 **
ppBackBuffer
);
Here is how you might call this function to retrieve a pointer to the back buffer.
First, let’s create the
backbuffer variable (that is, pointer) and then have this
fancy
GetBackBuffer function ‘‘point it’’ to the real back buffer:
LPDIRECT3DSURFACE9 backbuffer = NULL;
d3ddev->GetBackBuffer(0, 0, D3DBACKBUFFER_TYPE_MONO, &backbuffer);
104 Chapter 6
n
Bitmaps and Surfaces