Professional Information Technology-Programming Book part 13 pptx
Bạn đang xem bản rút gọn của tài liệu. Xem và tải ngay bản đầy đủ của tài liệu tại đây (21.05 KB, 4 trang )
3.6. Ranking Images in Bridge
After sorting and adding metadata, the next thing you want to do in your normal
workaday workflow is to give a permanent ranking to all your images. I rerank my
images at this stage, now that all the trash has been eliminated. The reason: you
make better judgments about image quality when there's less to consider.
3.6.1. Using the Light Table for Ranking
The first thing you want to do is go back to Light Table mode so that you can get
the quickest overview and orientation as to what this shoot (folder) contains. Also,
the idea here is that you're ranking so that you know what you really want to spend
time working on and what to keep "just in case."
As soon as you have the files open in Light Tabel mode, drag the sizin
g slider until
you get the smallest size thumbnail that isn't wasting space with a lot of info. At
this stage, your images should already be arranged by category (see the "Organize
and Regroup" section earlier in this chapter).
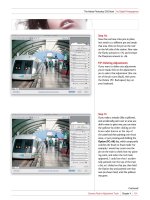
Figure 3-25 shows you the shoot in Light Table mode after you've added the first
star.
Figure 3-25. The shoot in Lightbox mode after you've added the first star.
Go through each group quickly and click to put one star under all those images you
think might be worthy of further use in
any way shape or form. You're not trying to
find the very bestjust those you think you're most likely to use or market sometime
.
Don't include images that are exact duplicates (perhaps you shot them to make sure
you got a steady shot or you bracketed and the shots are useless). They're going
onto backup disk in a moment.
Once you've completed these steps, right-click in the Lightbox and choose New
Folder from the Context menu. Name the new folder with the prefix Maybe,
then add the name of the current pare
nt folder. Now, in Bridge, from the Unfiltered
menu (why did they name it that?) choose Show Unrated Items Only. Now, what
you see in the Lightbox is your new folder and all the images you didn't give a
rating to. Select them all and drag them into the new Maybe folder.
Burn the Maybe folder to a CD or DVD, and label it clearly with an acid-free
marker. Now erase the originals from your hard drive (they're just wasting space
and slowing down your computer until the day, far-far away, when you need
them). Put the CD in an acid-free glassine sleeve in a CD album. Make sure the
album cover is clearly labeled with a marker. Stick on labels fall off, and you're not
doing this for show. Finally, go back to the Unfiltered menu and choose Show All
Items. Now you're ready for the next stage.
Of course, since you already have hundreds of shoot folders that you haven't
organized at all, it would be a good idea to have your assistant follow this routine
for all the pre-existing shoots.
Now we're going to take those one
-s
tar ratings and look for the images that deserve
serious consideration since those are the ones on which you want to stake your
reputation. Table 3-2 shows my list for ranking by stars. I save labels only for
images that have been sold or exhibited, but we'll get around to that later.
Table 3-2. Criteria for awarding stars to images
# stars
Definition
1 Above averagemay have a use or a market someday.
2 Candidates for royalty-free stock sales.
3 Show these in client presentation.
4 Chosen for consideration for sale. Add to Best of Directory for category.
5 Chosen for sale or exhibit.
This is an excellent list for general purposes, but of course you may have special
considerations that suit the nature of your specialty or style. So feel free
to edit and
modify the list. Remember, though, you only have five ratings.
You can download this list from www.kenmilburn.com/lists or
www.oreilly.com/digphotoet. Once you've downloaded the list, open it in your
word processor and print it out so you can keep it next to your keyboard as you
rank your images.
Start by using Bridge for opening the folder you're going to rank. You should do it
in a mode that gives you as large a preview window as will fit your screen, with a
thumbnails column to one side or the other. Personally, I prefer Ken's Workspace.
You can download it from www.kenmilburn.com/workspaces or
www.oreilly.com/digphotoet.
3.6.2. Ranking JPEGs
If you're working with JPEGs, make sure you do all your rotating in Bridge, as this
rotates by adding instructions to Metadata and not by resaving and recompressing
the file. Resaving JPEGs always means a progressively more destructive process
each time the image is recompressed. If you need to open the image to get as large
a version as you like, or because you need to crop or rotate, be sure to save the
result as a .tif file. I say .tif because it's even more universal than .psd, it can be
losslessly compressed (which is nondestructive), and it's easier to distinguish from
versions that have been progressively manipulated in Photoshop or other programs.
3.6.3. Ranking RAW Files
If the shoot you are ranking was shot RAW, ranking your files is going to go much
more quickly. You want to use the same basic procedure as used when collecting
the trash. Use Ken's Workspace (www.kenmilburn.com/workspaces) and open
multiple files. Follow the instructions in the "Using the Light Table for Ranking"
section to throw out the trash when selecting, zooming in on, rotating, and
cropping your files. As you click through the files, you can give your star rating to
each. Just click the dots under the thumbnails until they show the correct number
of stars. Better yet, as each image is selected and previewed, press Cmd/Ctrl-05 to
assign the number of stars to that image.
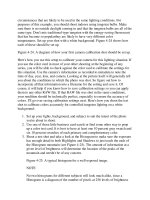
If you want to straighten or level an image, choose the Level tool and drag a line
that describes absolute horizontal or perpendicular in the rotated image. The image
will rotate instantly and cropping handles will appear around it. If you want to do
further cropping, just move the cropping handles until you see the crop you want.
If you change your mind and don't want to rotate or crop, just click outside the
cropping handles. The cropping marquee will disappear and the image will rotate
back to its original position.
3.6.3.1. Choosing initial RAW settings
You're getting a preview of the next chapter here, because Camera Raw really
helps in the ranking process with RAW files. At this point in your workflow,
you've chosen the images that will be kept and that you will be presenting to your
client. Chances are, the default automatic RAW settings that Camera Raw has
assigned to your images already makes them good enough to show, but there may
be some exceptions. Go to Bridge and from the Unfiltered menu choose Show All
Items. Then look carefully at the three-star images that will be used for your client
presentation. The first thing you probably want to correct before presenting your
images for approval is color balance. If there are other settings in the Adjustments
tab you want to correct, do that too. You may also, although it's not very likely at
this stage, need to eliminate some noise or increase sharpness.
Once you've tweaked the default adjustments for the three-star image, you can
easily apply them automatically to all the lower-ranked images. So why not do it
now? It reduces the chances that you'll be embarrassed by the way those images
look. It also speeds up your ability to present those images to secondary sales
outlets, such as online print sales or low- or royalty-free stock photo agencies (see
Chapter 12). You'll save a little time if you apply the settings to all similar images
as soon as you've adjusted the three-star image (remember, that's the one you're
going to present for consideration to a client, gallery, or whatever):
1. Click the Done button to save your settings. If you decide to apply the
settings to the other images later, re-open the corrected three-star image and
then click the Done button again. This places the settings for that image into
the Camera Raw setting for the Previous file.
2. Select all the similar images. That should be easy if you've been following
the workflow, because they're all positioned side-by-side.
3. Right-click on any of the preselected images to get the in-context menu.
Choose Previous Conversion. Bling! All 36 (or however many) of the
images in that same sequence show matching adjustments.