Professional Information Technology-Programming Book part 33 doc
Bạn đang xem bản rút gọn của tài liệu. Xem và tải ngay bản đầy đủ của tài liệu tại đây (30.7 KB, 6 trang )
8.2. Specific Types of Repair Projects
The subsections in this section describe an oft-encountered retouching situation in
which some specific routines can save time and angst.
8.2.1. Restoring Youth to Photographs
No, this section isn't about glamour retouching. It speaks to restoring the youth of
keepsake and collector's images that are beginning to fail the ultimate testthe test of
time. The problems with old and worn images most frequently fall into the
following categories:
Spots
Fading
Discoloration
Stains
Scratches
Cracks
Most of the retouching required for restoration can be done with the Healing, Spot
Healing, and Clone tools. They should always be performed with all image layers
turned off except the image being retouched and a transparent layer meant to show
retouching strokes. Place the transparent layer immediately above the layer of the
image being retouched. If you later create or lift other layers from the main image,
place them above this retouching layer. All retouching that uses the Healing, Spot
Healing, and Clone tools should be done with the Sample All Layers box checked
on the Option bar.
If the entire image has faded, then it's mostly a matter of restoring the original
color and contrast, with Photoshop you can make it look pretty decent, pretty
easily. Open the scanned image, duplicate it, copy the duplicate, paste the copy
into the original file as a layer, and then use the following techniques as they apply
to your image:
Restore the overall color and contrast of the image before you fix any of the
regional problems, such as spots and stains. Otherwise, your spot and stain
correction may show up even more and in a different color. Of course, you
probably won't have the original to compare, but you can do a pretty realistic
job by following the Levels adjustment procedure described in Chapter 6.
Figure 8-10 shows the image before and after color and contrast correction
using that method.
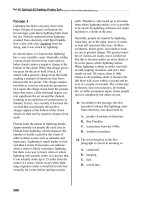
Figure 8-10. The aged and faded original on the left has had color and
contrast restored with the Levels adjustment layer.
Remove stains by using the Replace Color tool. Just be careful to stay within
the area that belongs to the color that you are replacing. If the stains have
dark or faded borders, or if they have darkened or lightened the image, you
will have to do more. Most of the time, however, you can just remove the
stain by using the Replace Color tool.
To lighten some areas that are darker than others due to the stain, select each
one. It is important to be very precise in making the selection. Once you're
confident that is the case, feather the selection as needed and then raise the
selection to a new layer (yes, that's Cmd/Ctrl-J again). Now use the
Brightness/Contrast adjustment to match the brightness and contrast of the
area(s) that were formerly discolored.
If the outside perimeter doesn't quite match the brightness of the underlying
layer, use the Burn and Dodge tools (not a Burn & Dodge layer unless it
turns out to be a much tougher job than you expected). Figure 8-11 shows
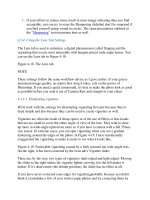
the results of the last three actions.
Figure 8-11. Most of the work of stain removal can be done with the Replace
Color brush, the Brightness/Contrast Adjustment, and a bit of burning and
dodging.
Remove smaller stains by painting in the surrounding area and textures with
the clone tool.
Clean up all of the small spots with the Spot Healing tool. Occasionally, a
spot or smudge will be too close to a contrasting color. So you may find it
easier to clean up with the Clone tool than to fence off the spot with a
selection before healing it. If you get a border artifact, immediately undo and
try one of the other techniques mentioned here.
Most tears and cracks are easy to clean up by anchoring the Clone tool and
dragging it along the path of the tear. Make sure your brush isn't much larger
than the width of the tear or crack. Also, be sure to re-anchor the tool if the
path of the tear changes direction. Figure 8-12 shows the end result of
cleaning up the spots.
Figure 8-12. Tears are cleaned with the Clone and Patch tools. Occasionally,
you'll use the Healing tools to clean up small goofs.
8.2.2. Glamour Tips
Most people want to look as irresistible as possible in photographs, but we all have
our flaws. Unfortunately, the high-resolution digital cameras and lenses that most
pros are buying today will record these flaws with unforgiving accuracy. In
glamour photography, this can be a real issue.
Now look at Figure 8-13. What a change! The following tip makes use of the
Healing and Clone brushes and the Patch tool that we described earlier and also
discusses some filters and settings that can soften the look of a portrait and
diminish skin flaws more or less automatically. You'll also see how to use layers to
lessen the effect of the retouching tools by changing the opacity of the retouched
duplicate layer.
Figure 8-13. A bevy of glamour retouching techniques has been used on the image
on the right.
When you're glamour retouching, be very careful not to overdo it. For instance, if
you set the Spot Healing brush at too large a size, you will end up with some very
pasty-looking, almost posterized, skin tones that can make your subject look more
mannequin than human.
8.2.2.1. Smoothing skin
One of the best ways of smoothing skin is to simply take your time using the Spot
Healing brush and make sure you zap all the blemishes. However, skin sometimes
photographs a lot more textured than it looks in real life and Spot Healing all of it
can take hours.
There are several means of smoothing rough or heavily textured skin. The problem
is that most of them involve blurring the image in one way or another. That can be
a fine technique for a dreamy or glamorous look, but it's not always what we're
after.
There's one technique, however, that involves blurring but doesn't actually blur any
details. You select and send the skin tones to a duplicate layer, blur the skin tone
layer by about 6 pixels (the exact number will depend on the overall pixel size of
the image), erase any of its areas that contain critically sharp elements, such as the
eyes, and then put it into lighten mode. You still have a sharp image, but the
blurring has obliterated all the little dark specs and creases. If there are still
blemishes left over, at least you have fewer of them that need to be zapped with the
Spot Healing brush. Figure 8-14 shows an example of this technique in a before
and after. None of the other techniques in this chapter have been applied to the
righthand image.
Figure 8-14. Look carefully and you'll see that all the small, time-consuming
blemishes are gone. Now there are only four or five areas you might want to heal.
If this weren't a glamour portrait, you probably wouldn't even want to do anything
more.
8.2.2.2. Credible eye emphasis
The eyes are the focus of the image and there are a few things you almost always
want to do to emphasize them (see Figure 8-15). However, take care applying these
changes; you don't want the image to look unrealistic or overly made up.
Obviously, you'd want to do far less of it in a business portrait, for instance, than in
a cosmetic ad. The following are some techniques to emphasize the eyes in an
image.
Figure 8-15. Before and after our list of eye enhancing techniques have been
applied.
Use the Patch tool to remove bags or circles under both eyes
Make sure to select a large area around both eyes and lift it to a new layer so
you can do your patching nondestructively. Be sure you have the Patch tool
in Add mode so you can patch both eyes at the same time on lifted layer.
Then use Edit Fade to keep the effect of the patching at a realistic level.
Whiten the whites (and the teeth while you're at it)
Be very careful not to overdo it. I usually use the Dodge and Burn layer to
do this. An alternative would be to choose the Burn and Dodge layer in the
Layers palette, make a selection around the areas you want to whiten, and
then fill them with a percentage of white. If you've over- or underdone it,
undo and then change the Opacity in the Fill dialog after repeating the Edit
Fill command.
Darken the pupils and outline the iris
This is done just like whitening, but use Black instead of White on the Burn
and Dodge layer.
Lighten the iris
This is one of the few times when I prefer to use the Burn and Dodge Tools
on the original layeror, if you've already lifted the eye, on the lifted layer.
Then the irises will look better when you sharpen them.
Lengthen lashes
I also do this on the layer that was lifted to do the sharpening. I simply use
the Burn tool at about 50 percent Opacity with a very small brush. If you
have a pressure-sensitive tablet, it will help a lot to stroke very lightly so you
get hair-thin lashes. You could paint in Black, but that is often overkill and
the Burn tool just darkens the existing colors, so the result looks much more
natural.
Sharpen eyebrows and lashes selectively.
This is done on a separate layer, which you can also use as a retouching
layer if you need to use the Spot Healing brush. I find it very easy to mask
the area I need to raise to a new layer by clicking the Quick Mask icon in the
Toolbox then choose the Brush tool. Then make sure the Brush Hardness is
only about 80 percent (pull down the Brush menu in the Options bar), and
that the Mode is Normal and the Opacity is 100 percent. Then I paint over
the areas shown in Figure 8-16.